In January, AVTOVAZ announced the start of sales of the updated LADA 4×4. The new SUV received a completely new instrument panel with a new climate system, more comfortable seats, the Era-GLONASS system, a number of styling and technical improvements, as well as an improved noise and vibration insulation package on the body panels. Let's find out how much quieter and more comfortable it has become in the interior of the updated Lada 4×4.
An expert from the magazine “Behind the Wheel” compared the noise level inside the cabin of the new Lada 4×4 2021 and the Lada 4×4 of the previous generation (generation).
How harmful is noise?
Noise surrounds us almost everywhere, most often we simply do not notice it, however, increased levels can be harmful:
- Noise is considered to be any extraneous sounds that reach your ears.
- Increased noise irritates and distracts the driver, causing rapid fatigue
- Fatigue and irritation often lead to accidents
- In addition, the driver’s reaction is reduced, which is associated with great risk on the road.
- Prolonged exposure to increased noise leads to a narrowing of blood vessels throughout the body.
- This can lead to headaches and increased blood pressure, as there is an increased load on the heart.
- Prolonged stress on the heart causes angina and even heart attack
- So noise is not just an annoying interruption to conversation or music, it is harmful to your well-being and health.
What to do outside?
Noise insulation of the Chevy Niva or other modifications will be incomplete if you ignore the treatment of the outer part of the bottom. This is due to the fact that various sounds and noises pass through this element, including vibration of the transmission unit, operation of the muffler, and the ingress of road stones.
Also interesting: Niva VAZ 21213 engine: characteristics, malfunctions and tuning
The specified part of the machine is processed by standard application of layers of material or by applying liquid noise insulation. In any case, you will need an overpass or a garage pit.
https://www.youtube.com/watch?v=ytcopyrightru
Stages of work:
- The surface of the bottom of the car is washed with a directed stream of water under pressure.
- After drying, degreasing is carried out.
- Next, glue the prepared pieces of materials according to the instructions, or spray liquid “Shumka”.
- The second option is preferable because it is easier to apply to hard-to-reach places and has a longer service life.
- In addition, the liquid composition is significantly lighter than the sheet components, although more expensive. At the same time, the price will definitely pay off in the final quality.
After proper treatment of all parts of the car, the audibility of the rustling of tires, the knocking of stones, and the operation of the transmission and engine will disappear. Plastic fender liners, if available, are glued along the internal contour with a noise reflector of the “Spleen” type.
Read news about the new Niva
- Do-it-yourself insulation of Niva
- The modernized Lada Niva Legend (4x4) 2021 was shown on the Internet
- Lada 4×4 Bronto - sales stopped, new details » Lada.Online - all the most interesting and useful about LADA cars
- Description of the instrument panel Lada 4×4 (VAZ 2121, 2131) » Lada.Online - all the most interesting and useful about LADA cars
- Chevrolet Niva gasoline consumption per 100 km
- Buy LADA (VAZ) 2131 (4×4) 2021 in Rostov-on-Don, low price for Lada 2131 (4×4) 2021 on the Avto.ru website
- Fuses Niva 21214 injector «
- The new large Lada 4×4 Niva “Bigster” 2021-2022 based on the Dacia Bigster was shown for the first time. The SUV has changed beyond recognition
Materials for work
Today, in pursuit of savings, many glue batting, linoleum or cheap building materials, without thinking that the absorption of sound and vibrations in such materials is extremely low, and toxicity can be high.
To perform the work, choose the following materials:
- Vibration absorber - created to dampen vibrations, its plastic structure converts vibration energy into heat, the basis of such materials is bitumen. However, this does not mean that construction bitumen is an equivalent replacement (Bimast or Vibroplast)
- Vibration reflector is a material that completely reflects all noise in the opposite direction (Splen); it can be offered as a noise absorber. If you are not planning on acoustics in the cabin and you don’t need a radio either, then this material is suitable for processing inside your cabin, otherwise take a sound absorber
- Sound absorber - the structure of this material dissipates noise, as if absorbing it (Accent, felt)
- Additional materials – Decolin – purely for decorative purposes, Madeline – muffles squeaks from friction of surfaces, Viek – aluminum foil, can be useful when processing doors
Do-it-yourself soundproofing of Niva
To begin with, you will need to prepare suitable material. You should not chase the cheapness of batting or linoleum. Their quality characteristics are low, and their toxicity is off the charts.
It is better to pay attention to the following components:
- A special vibration absorber with a plastic structure that transforms vibrational energy into heat. Such materials are made on the basis of bitumen (not to be confused with a construction analogue).
- Vibration reflector – “mirrors” all noise in the opposite direction. If you do not plan to install high-quality acoustics, this component is optimal.
- A noise absorber is an analogue of a reflector; it is installed instead of it if good acoustics are provided in the cabin. Felt is used as this material.
- Decoline, viek, madeline are components responsible for finishing doors, decorating, and absorbing squeaks from friction.
At this stage of work, a certain sequence is also followed:
- Remove all handles, panels and trim.
- The surface is degreased through technological sockets. For safety, you should wear gloves.
- The anti-vibration material is inserted through the same holes, rolled with a roller or the handle of a screwdriver (in hard-to-reach places).
- After gluing, a control check of the functioning of the window lift cables and handle rods is carried out.
- Seal the technological holes (foil material like “Viek” is good).
- The noise absorber is glued on top in a continuous piece; it is advisable to treat the inside of the skin in the same way.
- The edges of the doors at the point of contact with the casing are glued with “Madeline”, which will eliminate most squeaks.
- At the last stage, the casing is screwed on and the handles are installed.
Also interesting: New Niva: what AvtoVAZ will produce in 2022 :: Autonews
Details about sound insulation
Sound insulation of the hood
The hood is the easiest part of the car to work on and the easiest place for beginners to practice:
- Open the hood, remove the factory insulation from the lid, if any.
- Then wash the surface thoroughly
- After drying, degrease, if you find rust, then you need to clean it, prime the metal and paint, otherwise corrosion will continue
- The first layer is vibrating material: cut out a piece, remove the film, warm it up, then apply it and roll it with a roller
- There is no need to glue the stiffeners, photo below
Vibration insulation treatment of the hood
- Now we degrease the surface again and stick on a sound reflector (for example, Splen), only in one single piece, covering the entire surface of the hood cover and the stiffeners too.
- It is better to use foil material, it is more resistant to high temperatures.
- In addition to sound reflection and, as a result, noise reduction, Spleen will also be a heat insulator, which will be very useful in winter (the engine warms up faster and cools down more slowly).
- In addition to the hood cover (see Soundproofing the hood without problems), the partition between the engine and the passenger compartment, the so-called engine shield, must be subjected to the same treatment.
- The main vibration and most of the engine noise pass through it, so you understand, it is impossible to exclude its processing
Roof
First, remove the ceiling trim with your own hands, to make it easier for you, call an assistant, then:
- Clean and wash the surface
- After this, degrease
- It is better to stick the vibration absorber with an assistant, so that he holds the material while you roll this material.
- It is recommended to take a thinner vibration and noise absorber for the roof - vibration material 2-3 millimeters thick, a noise absorber no thicker than five millimeters
- If you heavily weight the ceiling, the roof of the car may bend into the cabin
Cornfield ceiling with trim removed
- The order of gluing is the same as on the hood: vibration absorber, then sound absorber and return the trim to the ceiling; it’s easier and neater to do this with two people, without creases in the trim.
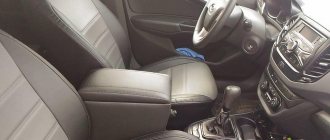
Salon
Niva sound insulation of the interior is probably the most difficult area and it takes a lot of time to process; it is better to allocate a whole day for this work:
- This is where all the tools come in handy - you need to unscrew all the seats, then remove the rugs and floor trim
Important: Collect the fasteners in a box or jar so as not to lose them, and do not seal the fastening holes during processing, otherwise it will be difficult to assemble the interior.
- It is important to eliminate rust: clean, prime and paint, the surface needs to be washed, the bottom is the dirtiest place
- Then degreasing
- The vibration absorber here can be placed 5-6 millimeters, and the noise absorber 10 millimeters
- The vibration absorber is placed on the wheel arches in two layers
- Then comes the assembly of the interior
Niva interior treated with vibration absorber, then noise absorber
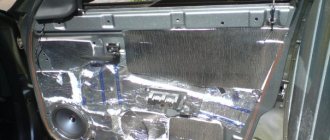
Door processing
The instructions for processing all doors are the same:
- First, unscrew all the handles, panels and remove the trim
- Then degrease the surface through the technological holes; it is recommended to work with cloth gloves so as not to scratch your hands
- Insert the vibrating material in pieces through the same holes, roll it with a roller, if this is not possible, roll it with the handle of a hammer or a large screwdriver
- After gluing, check the proper operation of the window lift cables and handle rods so that they do not jam
Gluing the door panel with vibrating material
- Then these same holes are sealed. You can use a vibration absorber, you can use “Viek” - this foil was mentioned at the beginning of the article
- After processing the door should look like this:
Door after sealing technological holes
- Then the sound absorber is glued on top in a solid piece; it is also recommended to glue the sound absorber to the inside of the skin
- Along the edges of the door, where the trim comes into contact with the metal, you need to stick Madeleine, and around the handles too. Most of the squeaks should go away
- After that, screw the casing back, and don’t forget the handles
Noise insulation of wheel arches
As noted earlier, there is completely no sound insulation on the wheel arches on the interior side. On the outside of the arches there is a “liquid locker” anticorrosive installed, which, incidentally, is good noise protection. But this protection from the manufacturer exists as an additional option and for additional money. I performed noise insulation on the wheel arches on the interior side in two layers. The highlights are shown in the photo below.
Vibration insulation on the rear arched side members, which have technological holes, should be done only after complete installation of vibration and noise insulation of the side walls of the car body (trunk). Otherwise, difficulties will arise with installing materials on the side elements of the body.
The photo below shows the appearance of the arch with installed vibration and noise insulation.
We glue sound insulation to the Niva
You will have to glue it in small pieces. Therefore, first we apply it, measure it, see how much needs to be cut, cut it, lightly heat it with a hairdryer and glue it. After sticking, you can put the hair dryer on, point it towards the ceiling and roll out the sheet with a roller so that there are no bubbles left. After gluing, we do the same with the second layer.
Please note that there is no need to glue the stiffening ribs. After all, noise is the vibration of thin sheet metal. Ribs don't have this problem.
The next stage is the doors. Soundproofing of Niva doors begins with the main sheet and it will have to be glued from the inside through the technological holes. It’s not very convenient, but it’s necessary, otherwise the whole procedure will be in vain. We glue, roll out with a roller and do not forget to warm up the material.
After the inner part is glued, we also glue the outer part. Don't forget about the trunk.
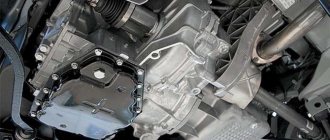
And even about the body panels in the rear of the car:
And of course, soundproofing of the Niva floor. Particular attention should be paid to the place where the gearbox and transfer case are installed. Unfortunately, this is the noisiest node of the Niva. The sound may not go away completely, but the result will be better than before.
The remaining sound insulation can be glued to the fender liners of the car. Many noises, especially when driving over crushed stone or gravel, are transmitted through the wheel arch liners. Thanks to sound insulation, the sound will become duller and will no longer cause such discomfort.