Muffler replacement
In order to easily carry out the replacement, it is necessary to prepare all the tools that will be needed for the work. It is best to carry out work on an inspection pit or overpass.
Step-by-step instruction
Lubricate the clamp bolts with WD-40 for easier unscrewing. Then we wait 5 minutes for the lubricant to penetrate into the threaded connection and get to work.
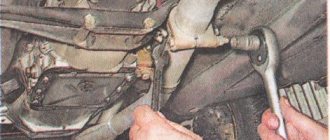
Using a wrench and a socket 13, unscrew the bolts of the clamp connecting the resonator pipe to the muffler pipe.
Once the clamp is removed, it is necessary to disconnect the connection between the resonator and the muffler. To do this, lightly hit the joint with a hammer. There is a connecting ring between the pipes; do not lose it.
Next, the muffler will remain hanging only on rubber hangers; we dismantle it from two hangers and take it out.
Then you should evaluate the condition of the hanging rubber bands. If they are stretched or torn they must be replaced.
Next, install the new muffler in reverse order.
Replacement
- Unscrew the upper and lower fasteners of the clamp holding the resonator and muffler. Moreover, if we unscrew the top one completely, then the bottom one is a little more than half unscrewed.
- We disconnect the resonator and muffler, remove the seal.
- We remove the rubber cushions, slightly lift the muffler up, and dismantle it.
- We install the new muffler in the reverse order.
What does a burned out muffler look like?
The sound coming out of a burnt-out exhaust pipe will be uneven and much louder than usual; a ringing sound appears in the pipe when accelerating or at increased warm-up speeds.
You can determine the location of the muffler burnout while the engine is running. When a large amount of steam comes out of the exhaust pipe, you need to look under the bottom of the car. This is where you can see where the leak is coming from.
Driving with a burnt-out muffler is not recommended, since toxic exhaust gases during the operation of the internal combustion engine will enter the cabin, which can cause significant harm to human health. Therefore, you should not neglect replacing the exhaust system.
Execution of work
The manufacturing process of the structure itself is shown in the video, which is located at the end of the article, so we will not dwell on it in detail. We'll tell you more about installation.
The machine is installed on a ramp or pit. The further procedure will be as follows:
Before fully tightening all the screws, you need to make sure that the dual exhaust system is located at the correct angle to the ground.
Finally, it is worth recalling that since the new pipe runs in close proximity to the fuel supply system, it must be wrapped with a cord made of asbestos - this eliminates the risk of fire.
This video explains how to make a double pipe:
First of all, the dual exhaust on a car is a sign of its power. As a rule, many foreign automobile industries are endowed with this attribute, the power and torque of engines are quite large and require a more complex system for intensive removal of exhaust gases from the cylinders.
But, there is also such a thing as exhaust system tuning, which is when, for some reason, the serial design of the device is subjected to alteration. The reason for such changes today may even be the desire to simply improve the appearance of the car, make it cool and add imaginary power.
Installation of “spider” 4-2-1 on Lada Priora: step-by-step instructions and price
To install a new spider collector, you will need:
- flat screwdriver;
- 13mm head with extension;
- WD-40 lubricant.
It is recommended to perform the work in the following sequence:
- 1. Remove the auxiliary muffler from the manifold by bending the edges of the plate and unscrewing the three mounting nuts on the pipe, after making sure that the Priora exhaust system has cooled down;
- 2. Remove the protective screen and locking plate;
- 3. Gradually disconnect the old factory manifold from the cylinder head. First of all, you need to separate the wire connectors from the oxygen sensors. Then unscrew the bolts securing it to the cylinder block and remove the bracket. Unscrew the eight nuts connecting the manifold and the block head and remove it;
- 4. Free the holes in the cylinder head from carbon deposits, lubricate the open studs with graphite lubricant;
- 5. Place the 4-2-1 spider on the open studs and reassemble the exhaust system in the reverse order;
- 6. Make sure that the spider does not come into contact with wiring and body parts, which can lead to their deformation due to strong heating.
Before installing a spider on a Priora, you should pay attention to the cost of this design. The price range for various modifications of spiders ranges from 2 to 7 thousand rubles, taking into account consumables and labor
The installation process takes no more than one hour.
How to replace the rear muffler on a Priora with your own hands
So, it’s worth noting right away that it’s most convenient to carry out this repair in an inspection hole. If there are no such conditions, then it is necessary to at least raise the rear of the car with a jack.
So, apply a penetrating lubricant to all threaded connections, and then wait a few minutes until everything settles!
Now we unscrew the two nuts of the coupling bolts of the clamp connecting the resonator to the Priora muffler.
How to change the resonator on a Priora
It is most convenient to carry out this car repair in an inspection hole, a lift, or raise it high enough on a jack. After which we immediately apply penetrating lubricant to all threaded connections that will need to be unscrewed.
Particular attention should be paid to the connection to the collector, since this is where you have to suffer. First, carefully try to remove the fastening nuts with a wrench:
If the nuts do not budge, which is what most often happens, you need to move them out of place using a chisel. It will look like this.
Try again using the key. If the nut still does not give in, you need to cut it off with a chisel, acting extremely carefully so as not to damage the stud. The resulting result will be approximately the same as shown in the photo below.
When you have dealt with all the nuts, you can move one edge of the resonator to the side.
Now we move to the opposite side, where it is attached to the muffler. Unscrew the nuts of the tie clamp.
We take it to the side so that it doesn’t get in the way:
If two parts of the exhaust system are stuck to each other, you can separate them by lightly hitting the joint with a hammer, but without force.
As a result, both parts can be separated quite easily.
Now all that remains is to remove the Priora resonator from the rubber suspensions, which are marked with arrows in the photo below:
And finally we remove the resonator to replace it.
Replacement is carried out without any problems and everything is installed in the reverse order. It is advisable to treat all threaded connections, especially the fastening of the resonator in the exhaust manifold, with copper grease. The gasket in the same place must be replaced with a new one.
How to replace a muffler on a Priora
You will need : drive the car into the inspection hole, prepare tools (13mm socket, 13mm wrench, mounting blade).
Removing the Priora muffler:
- Unscrew the nut of the bolt securing the clamp that connects the pipes of the additional and main mufflers, using a 13mm socket. Using the same tool, we hold the bolt on the other side from turning.
- Remove the clamp by loosening the nut of the other clamp mounting bolt.
- Remove the O-ring by pulling the muffler back and moving it to the side.
Manufacturers and prices of analogues - how much the part costs
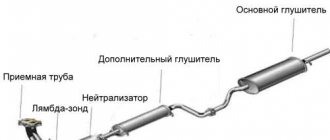
The question of which resonator is best to install on the Priora should be approached based on requests. For example, parts for sports cars are completely tailored to maximize engine power. Such components process a larger volume of gas over a period of time than standard parts. They remove hot gases from the space around the engine faster and it cools faster, and the fuel-air mixture is cleaner, while the proportion of “dirty” air is noticeably reduced. The following analogues are suitable for Lada Priora:
- Mute (for spider) – 3,200;
- Mute (with spider corrugation) – 4,400 rubles;
- Stinger Sport (for spider) – 1,500 – 2,000 rubles;
- Stinger Sport (without flanges) – 2,100 rubles;
- Stinger Sport (FSA class with corrugation) – 3,300 rubles;
- Stinger Sport (with corrugation on a triangular flange) – 2,400 rubles;
- Turbotema with spider corrugation – 2,600 rubles;
- Turbotema for spider – 1,100 rubles;
- STT with corrugation – 5,500 rub.
How to make a double exhaust on a Priora
Hello everyone, I decided to combine all the posts into one. And so, from the moment I bought the car, the exhaust made itself felt as it covered 155,000 km. First of all, the rear muffler burned out. After inspection, it became clear that it could no longer be repaired. CBD GAL015 Muffler VAZ 2172, 21723 hatchback, stainless steel. steel "CBD" RUB 1,254.26 —————————————————————————————————————————— —- After 3 months of driving without problems, the muffler roared again, this time the resonator fell off. It also rotted from the inside beyond the possibility of repair. Resonator assembly CBD RAL007 Resonator VAZ 2170 Lada Priora with corrugation, 21101/103/104/12/11/70 from 2008 onwards. stainless steel steel "CBD" 1895.28 rub. ————————————————————————————————————————————- Well, according to tradition, it remained The last part to replace is the cat manifold. This time there was no sound, just the check p0422 Low catalyst efficiency came on. After throwing it off a couple of times it appeared again. The car began to feel sluggish when accelerating and gasoline consumption increased to 8.9 liters per hundred. I thought for a long time what should Spider4-1 do? Subaru sound? turbo manifold? As a result, seeing that my budget is not a fountain, all this went by the wayside. and was purchased on Avito for a used cat manifold, ideally Euro4. 1500 RUR AvtoVAZ 21124-1008089-00 Manifold gasket 124 issue 1.6V metal (VAZ-VATI) 145.57 RUR AvtoVAZ 21100-1203021-12 Muffler flange GASKET
2110.1118.2170 83.95 rub. AvtoVAZ 11190-1203075-00 Locking plate for resonator nuts 1119, Serdobsky Machine-Building Plant, PO ZAO, Serdo 37.67 rubles Plus three copper nuts m8 60 rubles Additionally, in place of the standard catalyst screen, I put a screen from the vest. 8450006428 Vesta catalytic collector screen RUR 730.55 The screen from Vesta looks more modern than the standard Prior one. To install it, you need to drill 2 holes and cut an M6 thread. Attached from the bottom normally. And bend it a little from the bottom so that it doesn’t rest against the engine shield. In general, after installation everything looks cheerful. I like. And most importantly, the car has become an order of magnitude more energetic, with a more powerful response from the engine to the gas pedal. Along the way, with a dead catalyst, the ECU reduces the dynamics for the sake of the environment. And when he is a living machine, it’s just sad. In general, there is no smell of exhaust now and inspection can be passed without any problems. Consumption became 7.5l And the check is not lit) ———————————————————————————————————————— ——- And that repair of the standard system = 4999.06 rubles —————————————————————————————————————— —————- And I was fired up with the desire to make a double exhaust. The desire was initially after replacing the rear can. I was thinking from the beginning of buying a ready-made kit from the stinger. but the budget, as always, limited me at that time and I thought, with a price tag of 6000 rubles, I could do no worse! And I did: First of all, I And by chance, in traffic, I saw a Priora 95 region and a 2nd exhaust on Moskovsky Avenue))) Lexus Style
Main malfunctions of the Lada Priora muffler
The main reasons for replacing or repairing this part of the exhaust system are often burnout, rupture of the tank with loud bangs inside, loss of integrity, and deformation of structural parts. Loud roar when operating at high speeds, impacts on the body. An important factor in the failure of the Lada Priora muffler is metal corrosion, which occurs when the protective coating is lost as a result of overheating and condensation of water vapor on the walls.
Fluid in the muffler
accumulation of liquid in the cavity of the barrel or, as experienced car enthusiasts joke, “drips from the end”) is a fairly common phenomenon
It is important to find out what kind of liquid collects inside. Often the reason for this is water condensation formed from the difference in the operating temperature of the unit and the external environment
It has a negative effect on models made of iron-zinc steel that are poorly protected against corrosion. Models made of steel with a share of aluminum or stainless steel are less susceptible to this influence. Many people find a way out by drilling a drainage hole in the corner of the tank. If you find antifreeze or antifreeze in the liquid, it’s time to sound the alarm. Malfunction in the tightness of the cooling system of the car engine (loss of integrity, wear of the cylinder head gasket, depressurization of the cylinder block). You should immediately check the operation of the cooling system and eliminate the cause to avoid further negative consequences.
Loud roar at revs
The sound of the exhaust gases changes when the engine speed reaches over 3000. The reason for this behavior is often the burnout of the partitions inside the resonator, the middle part of the exhaust system, or a clogged exhaust catalyst. Loss of joint density, structural integrity as a result of corrosion, burnout of individual elements, cracks at the joints of parts. All this indicates the end of the service life of the spare part. The only reliable solution is to replace the faulty system unit. Eliminating these defects with a hammer and a welding machine is a temporary solution.
Why does the silencer fire?
Loud pops occurring inside the exhaust system suggest a malfunction. There is a malfunction, of course, but it lies in the operation of the car’s engine. The shot occurs as a result of partial combustion of the gas-fuel mixture inside the cylinders and ignition of the residues already inside the exhaust gas removal system.
The “exhaust” only takes on all the consequences of the malfunction; soon it itself may fail. You should check the spark plugs, spark plug wires, and the entire fuel supply system.
Knocks from under the body
Knocking, vibration, extraneous sounds when driving are unpleasant things for the car owner's ear. The culprit is often the impact of parts of the exhaust system on the underbody and gas tank of the car. There are several reasons for this behavior. Rubber fasteners of exhaust system parts are subject to priority inspection. Loss, wear and tear of which weakens the structure; replacing them will not be difficult. There may be a loss of tightness of the clamp connections of the parts (it is necessary to tighten the fasteners, it is possible that the clamp mounting bolts need to be replaced). Installation of an unsuitable model, with a difference in the bending angles of the pipes of the muffler design. This is fraught with constant contact with the body, chassis, gas tank, vehicle (requires immediate intervention). Reducing the vehicle's ground clearance by installing a lowered suspension (knocks on the beam). This can be solved by installing movable fasteners of a suitable configuration.
Design features of “Prior” mufflers
Elements of the exhaust system and mufflers of Lada Priora are made from various metals and their alloys. For this use:
- steel with the necessary additives;
- alloy of steel and aluminum;
- stainless steel.
Products made from an alloy of aluminum and steel are in high demand. Compared to elements made from a conventional steel base, they have certain anti-corrosion properties, and their strength coefficient is higher. If ordinary steel “plugs” are able to withstand dynamic and thermal loads for about one and a half years, then a part made of the above alloy can withstand the effects of exhaust gases, poor road surfaces and difficult weather conditions for about 6 years.
Products made from “stainless steel” are not only the heaviest, but also the most expensive; they are classified as car tuning elements, and accordingly, their price is much higher. They can be ordered at specialized enterprises working with this type of metal.
Malfunctions and replacement of Priora mufflers
Signs of a problem include:
- Increased engine noise when operating while driving. As a rule, this is due to burnout of the muffler walls; it cannot be repaired, and you will probably have to replace the product with a new part.
- When using the car for more than 3 years. By this time, it is necessary to at least diagnose the muffler, if it is still in operation by this time. After the diagnostics have been carried out, decide whether to repair the product or replace this spare part of the car.
- In case of mechanical damage to the product, which is possible when being in an emergency situation, during impacts and sharp shocks, as well as when rubber fastenings to the bottom of the car break. In case of major defects that have changed the geometry of the product, its integrity requires replacement of the Lada Priora muffler, but if the damage is minor, then you can get by with repairing the product.
- Under the bottom of the vehicle, knocking on a metal surface, rattling and increased sounds of vehicle operation are heard. If signs of this kind are identified, it will most likely be necessary to install a new product.
- When the smell of exhaust gases of a car spreads in the cabin, which indicates that the upper part of the muffler pipe is burnt out. Here it is necessary to replace the part.
To replace, the following steps must be taken:
- Do not completely unscrew the lower fastener of the clamp connecting the muffler and the resonator of the Lada Priora, and remove the upper fastener completely and pull out the clamp itself.
- Disconnect the muffler from the resonator.
- Remove the metalgraphite sealing ring.
- Having raised the muffler slightly upward, we remove the product from its mounting points with the suspension cushions of the upper and lower mountings.
- We dismantle the faulty product.
- We install the new product in the reverse order; to make it easier to install the “silencer” bracket into the rear airbag, you need to lubricate it with an aqueous solution of soap.
After installing the new product, start the car and check the tightness of the exhaust system fasteners.
Sources
- https://priora-remont.ru/zamena-glushitelya/
- https://autotema.info/sovety-i-instrukcii/zamena-osnovnogo-i-dopolnitelnogo-glushitelej-na-vaz-2170-priora-svoimi-rukami.htm
- https://avtovx.ru/vyhlopnaya-sistema-vaz/zamena-glushitelya-lada-priora-168/
Do-it-yourself replacement of the Lada Priora muffler
YouTube jokesrestoring dual mass flywheels
An element of the exhaust gas exhaust system, such as the Lada Priora muffler, is a structural part of the exhaust system of the vehicle and the normal operation of the vehicle depends on the operation of this component. After all, this element is responsible for reducing the exhaust noise of a car, maintaining dynamic characteristics and reducing the concentration of carbon monoxide emissions into the atmosphere.
Design features of “Prior” mufflers
Elements of the exhaust system and mufflers of Lada Priora are made from various metals and their alloys. For this use:
- steel with the necessary additives;
- alloy of steel and aluminum;
- stainless steel.
Products made from an alloy of aluminum and steel are in high demand. Compared to elements made from a conventional steel base, they have certain anti-corrosion properties, and their strength coefficient is higher. If ordinary steel “plugs” are able to withstand dynamic and thermal loads for about one and a half years, then a part made of the above alloy can withstand the effects of exhaust gases, poor road surfaces and difficult weather conditions for about 6 years.
Products made from “stainless steel” are not only the heaviest, but also the most expensive; they are classified as car tuning elements, and accordingly, their price is much higher. They can be ordered at specialized enterprises working with this type of metal.
Malfunctions and replacement of Priora mufflers
Signs of a problem include:
- Increased engine noise when operating while driving. As a rule, this is due to burnout of the muffler walls; it cannot be repaired, and you will probably have to replace the product with a new part.
- When using the car for more than 3 years. By this time, it is necessary to at least diagnose the muffler, if it is still in operation by this time. After the diagnostics have been carried out, decide whether to repair the product or replace this spare part of the car.
- In case of mechanical damage to the product, which is possible when being in an emergency situation, during impacts and sharp shocks, as well as when rubber fastenings to the bottom of the car break. In case of major defects that have changed the geometry of the product, its integrity requires replacement of the Lada Priora muffler, but if the damage is minor, then you can get by with repairing the product.
- Under the bottom of the vehicle, knocking on a metal surface, rattling and increased sounds of vehicle operation are heard. If signs of this kind are identified, it will most likely be necessary to install a new product.
- When the smell of exhaust gases of a car spreads in the cabin, which indicates that the upper part of the muffler pipe is burnt out. Here it is necessary to replace the part.
To replace, the following steps must be taken:
- Do not completely unscrew the lower fastener of the clamp connecting the muffler and the resonator of the Lada Priora, and remove the upper fastener completely and pull out the clamp itself.
- Disconnect the muffler from the resonator.
- Remove the metalgraphite sealing ring.
- Having raised the muffler slightly upward, we remove the product from its mounting points with the suspension cushions of the upper and lower mountings.
- We dismantle the faulty product.
- We install the new product in the reverse order; to make it easier to install the “silencer” bracket into the rear airbag, you need to lubricate it with an aqueous solution of soap.
After installing the new product, start the car and check the tightness of the exhaust system fasteners.
Basic resonator malfunctions
The performance of an exhaust system part can be determined by the following criteria:
- rattling noise coming from under the car;
- the motor “does not pull” and produces less power;
- at idle speed the engine may run intermittently;
- the interior will smell unpleasant;
- the connections will become covered with soot;
- high noise level when the motor is running.
If some of the air passes by, extraneous noise will appear, and the exhaust gas system will work “crookedly”. There is a risk of corrosion - in a climate with temperature changes, this outcome is not surprising, and after driving through puddles or parking in the snow, the rate of rust will increase at a rapid rate. The ingress of reagents harms not only the paintwork - due to aggressive chemical compounds, the metal rusts.
How to make a double exhaust on a Priora yourself?
You can also try to do the installation yourself. There are two ways to install a split exhaust. Priora is a fairly budget-class car, which means that all available spare parts and hardware for this procedure will not cost too much.
Option 1. The method is simpler, but not the best. You can weld the outlet pipe to the existing one installed under the rear beam, and bring it out in the opposite direction. You will get two pipes diverging to the sides at different angles.
This is the downside. The system will function beautifully only at idle. At high engine speeds, gases will exit only from one pipe. Agree, this is not exactly the result that I would like to achieve.
Option 2. It is necessary to split the pipes at the junction under the beam at the same angle. This is a more labor-intensive process, but in this case, the exhaust gases will exit both pipes evenly even at high speeds.
As you can see, tuning the Lada Priora and its exhaust system in the operating scheme is quite simple. However, we should not forget that on Priora the exhaust system is located near the fuel system. It is necessary to insulate the pipes with a special material - asbestos.