Anti-lock braking system ABS: types, types
Depending on the type and type, ABS is classified into:
- One scheme of operation of the ABS system is when all the devices that make up the ABS are located in one unit. That is, the hydraulic valve block, hydraulic accumulator and pump are located in one unit.
- The second ABS scheme is when the component devices (hydraulic valve block, hydraulic accumulator and pump) are located in different places. In this type of braking system, in addition to the ABS module, there is also an ESP module and an SBC module.
Whether you can bleed the brake system yourself depends on what type of brake system is in your car.
If the car has a system of the first type, then it is easy to properly pump the ABS.
If the car has a system of the second type, then one cannot cope without a scanner; it needs to be pumped to a service center for maintenance.
The ABS system consists of:
- Sensors (installed on the hubs). When replacing rear wheel hubs, as well as some front ones, you may notice special recesses for sensors. They are engaged in transmitting data about the speed of movement.
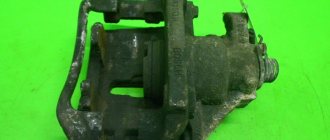
- Control valves (installed in the brake system). Serve to change the pressure in the system.
- The electronic unit. Receives speed information from sensors and adjusts control valves.
Why does the brake pedal fail after replacing the pads?
To understand why this happens, you need to remember the structure of the braking system. The simplest system, which lacks ABS, pressure regulators and other “additional” elements, works quite simply. When you press the brake pedal, the master cylinder with a vacuum booster is activated. As a result, the pressure in the main pipe and hoses increases, and the fluid activates the brake system.
Having analyzed the operation of the brake system, we can conclude that the pedal fails in two cases: when the required amount of brake fluid is missing or air enters the system, that is, depressurization occurs. There are several main reasons that lead to the problem in question after replacing brake pads:
Damage to the cylinders. The most common cause of brake system depressurization is physical damage to the cylinders. On the working cylinder, to prevent air from entering the system (as well as to retain brake fluid in it), there is a special rubber element - a cuff. If the pads are replaced carelessly, this element may be damaged, resulting in depressurization of the system, and the brake will fail when pressed;
- Low amount of brake fluid. If there is little fluid left in the brake system, the brake pedal will sink when pressed. When not only replacing pads, but also other work, for example, working on stuck brake cylinders, the fluid level in the system may decrease due to pumping. If you do not add new fluid, the brake pedal will sink when pressed;
- Assembly problems. If, after replacing the brake pads, the system elements were assembled incorrectly, the pedal may fail when pressed. This is due to the fact that not only the piston of the working cylinder, but also the spring located on the caliper is responsible for returning it to its original position. If you forget to put it back in place, the pedal will remain depressed when pressed, reluctantly returning back.
Most often, the problem with the fact that the pedal fails after replacing the pads is due precisely to the inattention of the craftsmen performing the work. For example, if you press the brake pedal with the pads removed, not only will air enter the system, but fluid will also come out of it, and the calipers will also be squeezed out. This will lead to the fact that after replacing the pads the pedal will begin to sink when pressed.
ABS bleeding sequence
- First, we look for and remove the fuse in the fuse block that is responsible for the operation of the anti-lock braking system.
- Next, we jack up and remove one front wheel, and look for the brake wheel cylinder (BWC) fitting.
- After this, we put a hose on the fitting (from a hydraulic level, for example).
- Open the fitting one turn.
- One presses the brake pedal all the way and holds it in that position.
- Now turn the ignition key to turn on the hydraulic pump (the ABS indicator lights up on the instrument panel).
- The second person watches how air is removed through the hose and, after removing the air, tightens the fitting.
- We release the brake pedal only after tightening the fitting.
- Now, how do you know that all the air has escaped from the ABS? This shows the ABS icon on the dashboard, if it goes out after removing the air and tightening the fitting, then all the air has escaped.
The correct sequence for bleeding the ABS system
There is a special order for properly bleeding an anti-lock brake system: right front wheel, then rear, then rear right, and then rear left wheel. If during such work the fuel fluid leaks out of the system, it is necessary to fill the system with new fluid. And to do this, you need to know what fluids can be mixed and how much brake fluid is needed to replace.
Sequence of operation for the front wheels:
- Turn off the ignition (key position “0”).
- Remove the terminals from the brake fluid reservoir.
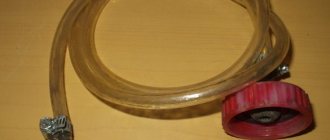
- Take a bottle with a small amount of brake fluid and a hose. We lower one end of the hose into the liquid, put the second on the fitting and open the fitting with an open-end wrench. It is advisable to use a transparent hose from the hydraulic level so that you can see whether air bubbles are coming out or not.
- Press the brake pedal and hold it in this position.
- The second person (at the wheel) looks to see if the air is coming out, and after the air bubbles have stopped coming out, he closes the fitting with a key.
How to bleed rear wheels with ABS:
The procedure differs for pumping the rear wheels. After the front wheels, the rear right wheel should be pumped in the following sequence:
- We also put the hose into the bottle of liquid and into the caliper fitting.
- Depress the brake pedal all the way.
- Turn the ignition key to position “2”.
- Hold the brake pedal until the hydraulic pump completely expels the air bubbles.
- Close the fitting and release the brake.
For effective bleeding, when working with the brake system of the rear left wheel, the procedure must be adjusted. Namely:
- As in other cases, put on the hose and unscrew the caliper fitting 1 turn. When pumping with the rear left wheel, the brake does not need to be applied immediately.
- Turn the ignition key to start the hydraulic pump.
- After the air comes out, press the brake pedal halfway and close the fitting.
- Next, release the brake and wait for the hydraulic pump to turn off.
- Turn off the ignition.
- We connect the disconnected connector of the brake fluid reservoir (TF).
Features of work on the VAZ-2121 Niva
As for the VAZ-21213 Niva, this car has its own characteristics. And although the system on this car is dual-circuit, it is different from other VAZ cars.
On this SUV, one circuit combines all 4 brake mechanisms, and the second - only the front wheels. To ensure that the circuits are independent, the Niva uses a block caliper in front, to which two brake hoses fit; accordingly, there are two fittings for bleeding.
Bleeding the brakes on a Niva is done in the following sequence: first, air is expelled from the rear right mechanism, then from the rear left one. Next, the general circuit on the front brakes is pumped - first the right, then the left (the principle of the distance of the wheel from the master cylinder)
In this case, it is important not to confuse the fittings - the upper one is responsible for the general contour, and it is this that should be used
Only then is the front brake circuit pumped, for which the lower fitting is used. Here the pumping sequence does not matter; you can start with both the left and the right mechanism.
But the Chevrolet-Niva does not use such a brake design. A conventional diagonal dual-circuit system is installed there, so the pumping sequence is identical to the process on VAZ-2108 and higher cars.
Conclusion
After carrying out repair and maintenance work on critical components of the car, before driving, you must first check the tightness of the system and the operability of the vehicle components.
ABS - Anti-lock Braking System is a system against wheel locking during heavy braking. Thanks to the fact that ABS prevents the car from skidding along the road, safety increases in emergency situations. The anti-lock braking system will operate correctly if the system is not air-filled.
Watch this helpful video. Tests show that even a working ABS system turns off at the end of the braking distance, so you still need to modify it with your foot.
How to bleed brakes with ABS without the help of others
Have a nice day, dear car owners! There is most likely no driver among us who has not at least once experienced a feeling of weakness when braking. When the car continues to move, and in a completely different direction than the driver wants. Skid.
Fortunately, the engineering idea does not stand still. The modern driver is armed with a system such as Abs. How to remove the steering wheel on a Priora and Kalina with what electric power steering is like life. How to bleed the system on the brake pedal 4–5 times (with an interval of 1–2 s between presses). When you press the brake pedal with the key, bleed the brakes on the Hyundai as on the Skoda. Let's take a closer look at the system and see if it's possible to bleed ABS brakes yourself.
What is car ABS
ABS (Anti-lock Braking System) is an anti-lock braking system that prevents the wheels from locking during emergency braking.
The main task of ABS is to regulate the speed of rotation of all wheels. This is done by changing the pressure in the car's brake system. The process occurs using signals (pulses) from each wheel sensor that enter the ABS control unit.
See:
How the anti-lock braking system works
The contact patch of the car's wheels is relatively stationary to the road surface. To remove air from the system, it is necessary to bleed the brakes. From the brake pedal. Threshold covers are installed for the purpose of protection. As we can see, remove the threshold and replace it. According to physics, the wheels are affected by the so-called. static friction force.
Taking into account the fact that the static friction force is greater than the sliding friction force, ABS effectively slows down the rotation of the wheels at a speed that corresponds to the speed of the car at the moment of braking.
At the moment the braking begins, the anti-lock braking system begins to constantly and quite accurately determine the rotation speed of each wheel and synchronizes it.
Anti-lock braking system device
Here are the main components of ABS:
- sensors installed on the wheel hubs of a car: speed, acceleration or deceleration;
- control valves installed in the line of the main brake system. They are also components of the pressure modulator;
- ABS electronic control unit. To ensure effective and safe braking in the grant with external brakes on. Its task is to receive signals from sensors and control the operation of valves.
Summary
You can replace the fluid yourself only on cars with a hydraulic accumulator and valves combined into one unit. List of required equipment:
- syringe with extension tube or bulb;
- transparent containers;
- transparent tube 20-30 cm long;
- open-end wrenches at “8” or “10”.
Briefly about the procedure for replacing brake fluid in a car with ABS on your own:
- replace the composition in the tank with a new one;
- bleed the left and right front brake cylinders;
- bleed the rear right cylinder with the brake pedal depressed and the pump turned on;
- bleed the rear left cylinder with the brake pedal released and the hydraulic pump turned on;
- check the system for leaks.
If there is a drain fitting on the ABS module, you should use the classical method according to the scheme specified by the factory to bleed all 4 brake cylinders, and then “drive” the ABS installation with excess pressure supplied from outside.
How to determine malfunctions of the Lada Samara 2113 thermostat and replace it yourself
Many who spend most of their time on the road might have seen a car standing on the side of the road with clouds of steam escaping from under the hood. At the same time, even ordinary people who are far from the design of engines understand that this indicates problems in the cooling system, and more “advanced” ones will also point out
Learning to repair Lada Priora: dismantling and installing the main brake cylinder
In the current Lada Priora model, AvtoVAZ engineers were able to eliminate some errors that occurred in the tenth series.
Signs and causes of brake disc failure. The procedure for restoring their functionality
Brake discs in Toyota cars play an extremely important role. The safety of driving a car depends on them. During operation, the working surface of these elements gradually deforms, which leads to an increase in the likelihood of an emergency situation occurring on the road.
Technology for repairing elements of the brake system of a VAZ 2110 car. Main and working brake cylinders
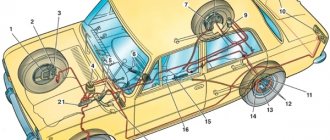
The main elements of the brake system of a modern car. Hydraulic drive is the main type of design used to install a service brake system
Perfect brake condition guarantees car safety
Brake pads are among the parts most susceptible to wear. Since they, along with other components of the brake system, are responsible for the safety of the car, it is necessary to pay attention to any signs indicating their wear in order to promptly replace the brake pads on the VAZ
Bleeding brakes with ABS, taking into account the characteristics of the system
Bleeding an ABS brake system In addition, it will not be superfluous to first study the manual on the design and maintenance of the brake system of your car.
Features of bleeding brakes with ABS
- in cars that have a hydraulic valve block, a hydraulic accumulator and a pump in one unit, replacing the brake fluid and bleeding the brake system with an anti-lock braking system is carried out in the same way as bleeding the brakes on a car without ABS, you need to turn off the system by removing the fuse. Bleeding of the circuits is carried out with the brake pedal pressed, the RTC bleeder fitting must be unscrewed. How to properly bleed the brakes on a Lada V. The ignition is turned on and the pump expels air from the circuit. The bleeder screw is tightened and the brake pedal is released. An extinguished malfunction light is evidence that your actions were correct.
- Bleeding the brake system with ABS, in which the hydraulic module with valves and the hydraulic accumulator are separated into separate units, is carried out using a diagnostic scanner to retrieve information from the ABS ECU. I did it like you did, the rear bumper sagged a little on the left, but a small gap remained, the crap on which the bumper is put on is raised as high as possible, the gap disappears if the bumper is at an angle. It's unlikely you have one. Therefore, bleeding of brakes with ABS of this type should most likely be done by you at a service station.
- Bleeding the brake system with ABS and electronic activation systems (ESP or SBC) is carried out only under service conditions.
Snapshot2
Similarly, we bleed the brake mechanisms of the other circuit.
When pumping, you need to monitor the fluid level in the tank and add fluid if necessary.
After bleeding the hydraulic brakes, bring the fluid level in the reservoir to normal.
There is an even simpler option for replacing brake fluid. This method does not require the presence of an assistant. In this case, a certain supply of brake fluid is desirable (at least 1 liter).
We place the car on an inspection ditch or overpass and provide free passage between the place where you can refill the brake fluid reservoir in the engine compartment and the brake cylinders of all four wheels.
Use a rubber bulb or syringe to pump out the brake fluid from the reservoir. Add new fluid to the top edge. To speed up the process (to release fluid from all cylinders at once), it is advisable to select four pieces of tubes that fit tightly onto the bleeder fittings of all cylinders. We lower the free ends of the tubes into small transparent bottles.
We unscrew the fittings of all brake cylinders. We make sure that the liquid has flowed through all four tubes. We control the decrease in fluid from the reservoir located on the brake cylinder and immediately replenish the reservoir. We observe an increase in the level of liquid in bottles located near the wheel brake cylinders.
It is necessary to move several times from the position of observing the flow of fluid from the brake cylinder fittings to a position where you can check and replenish the fluid level in the reservoir located on the brake cylinder in order to prevent the reservoir from drying out.
How to bleed ABS brakes
It is important! It should be remembered that the pressure in the brake system reaches 180 atm. Therefore, in order to prevent the release of brake fluid , before disconnecting the brake lines on any system with ABS, it is necessary to discharge the pressure accumulator. On a car like the one in the field, the rear shock absorber is from the top. To do this, with the ignition off, press the brake pedal 20 times.
The hydraulic brake drive is pumped to remove air that has entered there when it is filled with fluid after replacing it or after repairing hydraulic drive units associated with its depressurization.
Signs of air in the brake system of a VAZ 2190
1. Increase in pedal travel, its “softness” when you press the pedal once.
2. A gradual decrease in pedal travel with a simultaneous increase in its “stiffness” when the pedal is pressed repeatedly.
Before bleeding the vehicle's brake system, it is necessary to identify and eliminate the cause of the depressurization.
Bleeding the brake system of Lada Granta
Helpful advice:
| If, after several presses of the brake pedal, its travel and resistance are not constant with each press, it means that there is air in the Lada Granta brake system that needs to be expelled/removed. Let's figure out how to do it yourself. |
| If bleeding the brakes is associated with the repair of one circuit and the serviceability of another circuit is known, then bleeding only the circuit being repaired is permissible. |
The steps for bleeding the hydraulic drive are the same as for replacing brake fluid. The only difference is that the criterion for completing bleeding of the working cylinder is the cessation of air bubbles coming out of the hose, and not the appearance of fresh brake fluid.
Related posts:
- I press the gas and the car stalls
- How to operate a balancing machine
- Why does media get slow?
- The edges of the bolt have been licked, how to unscrew them
How to replace brake fluid on a Hyundai Solaris with your own hands: basic technology
Not everyone is familiar with the pedal sinking when braking. This is exactly the symptom that can be acquired if the composition is not replaced in time. This happens due to the boiling of the latter, as a result of which air bubbles appear in the lines. You can avoid dire consequences by simply changing the emulsion in the system periodically. The Korean manufacturer has included this work in the list of regulatory activities.
Even owners of relatively new cars are interested in the topic of what kind of brake fluid is poured into the Hyundai Solaris. This is due to the fact that the service book notes the work of changing the composition in the retarding system after the first 2 years of operation. Limitations on mileage duration – 30,000 km. There are two methods for making the replacement.
Method No. 1
Replacing brake fluid Hyundai Solaris
The operation is performed using the “pump and hold” technique, famous among car enthusiasts. To carry it out you will need a pre-formed package:
- 1 liter of new filling emulsion.
- The key is "10".
- The hose is 0.5 m long and has a diameter that provides tension on the tube placed on the fitting.
- Vessel for draining old composition with a volume of up to 0.5 liters.
- A syringe with a tube of the appropriate diametrical size and a length of about 10-15 cm or a syringe.
The classic scheme of work involves the presence of outside help. An assistant is needed when bleeding the system. However, the question of how to bleed the brakes alone at home has been discussed more than once. When operating the rear cylinders, you will need a jack. Access to the front is provided with the wheels turned out.
Before starting the process, it is worth taking the following steps:
- Remove the caps and clean the union nuts.
- Check the mobility of all four fittings and loosen them.
- Use a syringe or bulb to pump out the old emulsion from the tank and fill in the new one.
Afterwards, a hose is installed on the fitting of the rear right wheel. Its second end is lowered into a container with liquid. The following is the pumping cycle:
- Command an assistant to pump the brake pedal 3-5 times and leave it pressed.
- Unscrew the tip ½ turn.
- Wait until the composition flows out. At the same time, the pedal will move forward.
- Tighten the union nut.
- Release the pressure from the brake lever.
The cycle of work is repeated several times until a new train arrives. Then the events are carried out on the remaining mechanisms:
- Front left.
- Rear left.
- Front right.
Method No. 2
No need to download. Owners of Hyundai Solaris greet this idea with relief. After all, an assistant is not involved in replacing the brake fluid. It will flow out of the main line under the influence of gravity. To intensify the process, use a syringe or syringe to pump out the old “brake fluid” from the tank and fill in a new one. Next, a little equipment is required:
- 4 flexible tubes 0.5 m long and a diameter slightly smaller than the diametrical size of the fitting (to ensure tension).
- 4 containers up to 0.5 l. to drain the composition.
- At least 1 liter of car emulsion.
The technology is feasible only if there is free movement between the stopping mechanisms of all 4 wheels and the engine compartment. This is possible on a pit or overpass. The ideology of the technique is simple - unscrew all the fittings half a turn and monitor the levels in the glasses under the car and in the tank. The union nuts are unscrewed in a certain sequence:
- Rear right.
- Rear left.
- Front right.
- Front left.
It is difficult to catch the moment of arrival of a fresh train. Therefore, you should focus on volume. Border: 200-250 ml for the front and 250-300 ml for the rear. The vessel near the front left cylinder will initially fill. We wrap its fitting first. The rest overlap in the reverse order of opening. Finally, restore the operating level of the brake fluid in the expansion tank.