Not everyone can repair their car themselves. Those days are already gone; many people immediately turn to service even for trivial repairs. These are not car enthusiasts - these are “riders”. This article is dedicated to real car enthusiasts.
When I changed the ball joints on my “Seven” for the first time, there were no detailed instructions with pictures on how to do it quickly and efficiently. I suffered for several days until I replaced everything “in a circle.” To make it easier for others, I wrote a manual with illustrations on how to change the supports on a Zhiguli 2101-07 . Use it and say thank you in the comments.
What do we need for this
- Jack, stop and wheel chocks (wooden blocks are enough).
- Wrenches: 22 and 13. It is advisable to use sockets and a 13 socket with a ratchet.
- A puller, but you can do without it.
- Hammer and long blade.
- A pry bar or pliers (if the lower ball nut will rotate with the pin).
Preparatory operations
Use a metal brush to clean dirt from all threaded connections. This applies to the fastenings of the upper and lower supports to the lever and to the steering knuckle. Dirt trapped under the threads will prevent the nuts from being completely unscrewed; they can turn together with the ball pins and fastening bolts.
Soak them with WD-40 and wait 15 minutes. It is recommended to cover them with a rag soaked in kerosene. It will penetrate under the threads and make it easier to unscrew the nuts. There was no kerosene in our store, we had to use a high pressure fuel oil.
Upper and lower ball joint replacement process
First, it is worth noting that the process of replacing the upper and lower ball joints of the VAZ 2107 is identical. Below in the instructions we will describe replacing the upper support.
- Jack up and remove the wheel.
- We turn the steering wheel to its extreme position to make it more convenient to work.
- Spray three ball mounting bolts and one pin bolt with penetrating lubricant.
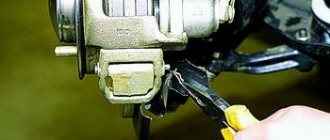
- Unscrew the nut securing the pin to the knuckle using a twenty-two wrench.
- Unscrew the three nuts securing the ball joint to the lever. Thirteen head nuts.
- We install the puller and press the finger out of the fist.
- We lift the upper lever using a pry bar and completely remove the finger from the fist.
- We remove the worn support from the lever. If it doesn't work, you can hit the ball with a hammer.
- Use a wire brush to clean the seating areas for the new ball joint.
- We install the support and align the mounting holes.
- We insert the bolts, put on the washers and tighten the nuts. New bolts are included with quality supports.
- Raise the lever up and insert your finger into your fist.
- We tighten the pin fastening nut and tighten it slightly.
- We tighten with good force the three nuts securing the ball to the lever. If the bolt turns, hold it by the head with a thirteen wrench.
- Tighten the nut securing the pin to the knuckle with a force of 10 kgf m.
Watch the procedure for replacing ball joints on a VAZ 2107 in this video:
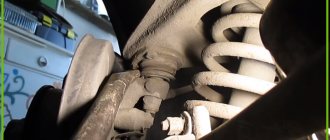
Removing and replacing the lower ball joint
We lift the car with a jack and install a stop so that the car does not fall off it. It must be placed either under the front beam or under the jack. You cannot prop up the suspension arm; it must remain suspended. We install wheel chocks under the wheels for safe replacement.
Using a 22 wrench, we tear off the nut securing the lower ball joint to the steering knuckle. We unscrew it as far as the protrusion on the bipod will allow. She won't get out completely. We run it through the thread several times, unscrewing it and screwing it all the way. This way we will completely clean the threads of rust and debris.
We install the puller between the upper and lower supports. We spread it between our fingers. There is no need to pull it to the “useru”; you can break the threads on its nuts (there may be two or one of them, depending on the design of the puller). It is important to create sufficient tension between the upper and lower ball joints.
Using a hammer, we apply several clear blows to the tide on the fist. You can use a long extension (pipe) and hit it with a hammer. You need to rest it against the tide on your fist.
During punches, it will be visible when the finger pops out of the cone of the fist. This will be accompanied by a characteristic metallic ringing and the landing of the lower arm. The finger nut will fall onto the fist and the finger will appear.
Now there is free space to completely unscrew the fastening nut. Take the 22 key and unscrew it all the way. Inside it there is a plastic bushing, a kind of lock nut; if the support is badly broken, the nut will turn along with the pin. It's OK.
There are 4 ways to unscrew a nut that rotates together with the ball pin:
We install a pry bar between the lever and the hub or the knuckle and the suspension spring. We pull it to the side to jam the finger in the fist, and unscrew the nut.
If there are pliers, use them to squeeze your finger through the rubber boot of the support. It will tear, but you will still install a new ball, you don’t mind it. We hold the pliers with one hand and unscrew the nut with the other.
I didn't know about the existence of the first two options before. So for me the most logical way was to chop the nut off with a chisel and hammer. For this reason, I spent two days replacing the VAZ 2107 ball joints.
The last option is to cut off the finger with a trimming machine . I don’t have a small grinder and the same wheels. This option is not acceptable to me.
Remove the hub completely from the pin and move it to the side. Using 13mm wrenches, we tear off and unscrew the nuts securing the support to the lower arm. We take out the old ball joint from it.
We assemble in reverse order. Before installing the new lower ball joint, it must be serviced. There are several ways to extend the life of the mounts before installing them on your vehicle. In short, remove the boot and put grease under it, generously lubricating the finger ball. The amount of lubricant should be moderate so that the boot does not tear.
We insert the lower ball into the lever. We fasten it with bolts and nuts. It is important that the bolts face up and the nuts are tightened from the bottom. If you mix it up, the protruding end of the bolt can tear the boot while the suspension is operating.
We put the hub on the finger. We lubricate its threads with lithol, or better yet, with waterproof lubricant. Tighten the nut with a 22mm wrench.
Having tightened it all the way, the nut may begin to spin . This is normal, the finger just didn’t completely “sit” into the cone of the steering knuckle. Place a wooden block under the lever and lower the car. Under its weight, the finger will be completely pressed into the steering knuckle, it will jam in it. You can place a jack under the lever and use it to lift the car. This will ensure that the finger is completely pressed in. We tighten the nut all the way, but without fanaticism, so that during subsequent replacement it can be torn off.
Replacement of ball joints of VAZ 2107.
When, during the diagnostics of the suspension, a faulty ball joint was identified, we are faced with the question of how to replace the ball joint on a VAZ 2107? I will answer it for you now. But before repairing, you need to decide on the tool. A long and painful replacement of ball joints on a VAZ 2107 without a puller is possible, because almost no one manages to do this without a puller. Or you can immediately buy a special tool and then I will show you how to use a VAZ 2107 ball joint puller.
We will look at how to dismantle the upper ball joint of a VAZ 2107 without a puller, and I will show how to remove the lower ball joint of a VAZ 2107 in a version with a device designed for this.
Replacing the upper ball joint of a VAZ 2107.
Replacement of VAZ 2107 ball joints occurs with the wheel removed. To remove the upper ball joint, for example, on the left side without a puller, we must perform the following actions: turn the steering wheel as far as possible to the left, loosen the ball nut, put something under the hub, so that when lowering the car from the jack, the hub fits tightly on this object, take a hammer and point it at the tide on the fist (just below the ball nut) and with a sledgehammer or an ax we hit the hammer sharply, but not too hard. After a few tries the ball will come out. To make the process go faster, you can pour hot water on the hub in the ball area.
As soon as the pin comes out of the hub, unscrew the 3 bolts and dismantle the part.
But this case does not help in all cases. It happens that the ball simply rusts to the hub and there is no way to remove it except a puller.
Replacing the lower ball joint of a VAZ 2107.
Using a puller, the balls can be pressed out of the hub in less than 5 minutes. To do this, unscrew both ball pin nuts a couple of turns. Next, we insert the puller between the upper and lower ball pins and begin to unscrew the puller bolt as shown in the photo below.
Next, all we have to do is unscrew the bolts securing the balls to the arms and install new balls.
Assembly is carried out in reverse order.
During assembly, it happens that when you tighten the nut onto the ball pin, it begins to rotate. To avoid this situation, wipe the ball pin and its seat in the hub with a dry rag. And after inserting the ball into the hub, lightly but firmly hit the ball with a hammer a couple of times. After these procedures, the finger will not turn when screwing the nut.
Removing and installing the upper ball joint
Unscrew the nut securing the ball joint to the knuckle. Nothing will interfere, unscrew it completely. We install the puller and open it. Using a hammer and a pointer, knock out the finger from the fist.
Remove the hub from the pin and move it to the side. Unscrew the mounting bolts from the lever.
Before replacing the upper ball joint of the VAZ 2107, it also needs to be serviced. Remove the boot and put additional lubricant underneath it.
Installation is carried out in reverse order.
We tighten the bolts securing the lever. The bolt heads should point down toward the boot. If you put it with the caps up, you can tear it.
Just as with the lower hinge, when the nut is tightened, the upper support pin can rotate. There is a way out.
Place a block under the lower arm. We install the key between the upper arm and the bump stop and lower the car.
Similarly, we change the ball joints on the VAZ 2107 on the other side. All bolted connections must be lubricated before tightening to prevent them from rusting. During subsequent replacements, unscrewing them will not be difficult.
For clarity, watch the video of replacing a ball joint on a VAZ 2107:
Knock in the suspension of a VAZ 2107.
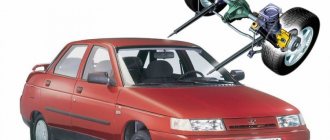
If when driving over bumps you are haunted by an unpleasant sound in the front of the car, then there is no need to bring the matter to a critical moment. To find the cause of the knocking, you need to understand the structure of the suspension, both as a whole and its individual parts. In this article I will talk about one of the causes of knocking and how to replace ball joints on a VAZ 2107.
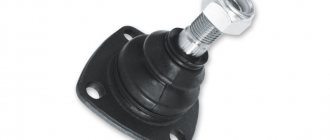
Ball joint device for VAZ 2107.
The ball joint consists of a pin inserted into the body. Between them there is a plastic liner, which wears out over time. A rubber cover placed on the body and fits tightly to the finger protects against dust getting inside the insert. The ball joint housing has a hole for lubrication and checking the condition of the part. But not all manufacturers do this.
Diagnostics of ball joints of VAZ 2107.
If there is a knocking sound on bumps in the front part of the car and a beating in the steering wheel, as well as increased sensitivity of the car to the ruts, you should check the condition of the suspension and one of the points will be checking the ball joint of the VAZ 2107. How to check the ball joint on the VAZ 2107? Very easy! There are several ways to check ball joints.
If you have an inspection hole or overpass, then we go there and begin inspecting the car. First of all, you should pay attention to the condition of the ball joint boots. From them you can determine the first signs of a malfunction of the ball joint of the VAZ 2107. If they are torn, then most likely this was the reason for the abrasive getting into the body and increased wear of the part. If the boot is intact, and you have a ball with a technological hole in the body, as in the diagram above, then cut a piece of thin straight wire, mark 11.8 mm on it and insert it into this hole. If the tag is immersed in the ball, then it’s time to change it.
If you do not have access to the overpass, simply turn the steering wheel and hang the wheels on the jack one by one. Next, we hold one hand at the junction of the body with the finger, and with the other we shake the wheel. To check the upper ball joint, you should rock the wheel while holding its upper part, and to check the lower ball joint, you should apply force to the very bottom part of the wheel. You can also simply rock the upper and lower parts of the wheel toward and away from you, but this may not give accurate results, since in this case the silent blocks of the levers may still make a sound.
Which manufacturers’ components are best to choose for the “Seven”
The ball joint consists of several elements. Each performs a specific function. The main component is a finger, which has a rounded shape at the base and a thread at the opposite end. It is attached to the suspension arm.
The quality characteristics of the spare part affect the service life of the unit. Its components undergo special processing to achieve the necessary properties of the metal:
- Manufactured from wear-resistant steel;
- The spherical part of the finger undergoes a cementation procedure, the body is hardened, followed by cooling in oil.
The remaining components are manufactured by cold die forging. They undergo heat treatment and hardening.
Such production technology is expensive. Few ball joint companies can afford its use to produce high-quality automotive components.
For VAZ 2107, such manufacturers are considered:
- ;
- Production association “Nachalo”;
- Italian.
Often you come across fakes that are made with high quality. Even a specialist cannot always distinguish them from the original. It is worth choosing extremely carefully the ball joints for the seventh model of Zhiguli. We pay attention to the price, which helps to recognize counterfeit goods. It is clear that branded spare parts are more expensive than fake ones. Skimping on quality means exposing yourself and others to danger.
Technically, replacing a VAZ 2107 ball joint is simple. Some stages will require sufficient physical preparation. Therefore, first you should correctly assess your capabilities. Study the entire process thoroughly. Buy the necessary equipment and only then get to work.