- Advantages of acoustic podiums
- How to make podiums for speakers with your own hands VAZ 2114
- Stages of work execution
- Design of podiums for VAZ 2114
- Useful video
- Conclusion
The word “Podium” came to us from England and means elevation, convexity. An acoustic podium in a car is a special convex structure for mounting a speaker of any size. Owners of the domestic automobile industry prefer podiums to be able to install musical equipment of any segment and enjoy high-quality sound on the road.
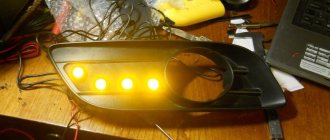
VAZ 2114 podiums
Advantages of acoustic podiums
VAZ 2114 acoustic podium
Podiums allow you to qualitatively improve acoustics, raising the sound to a new level. In this case, you can not be limited to the standard landing dimensions of 13 cm, as provided by the manufacturer of the VAZ 2114.
Among the many advantages of podiums, I would like to highlight the following:
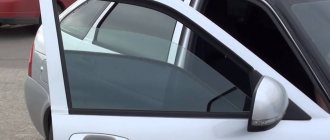
- Podiums allow you to install speakers in car doors. Thus, rear passengers no longer feel discomfort from strong sound, as was the case before. The sound will be evenly distributed throughout the cabin.
Podiums in the doors of VAZ 2114
- Podiums make it possible to create the correct direction of sound. As you know, sounds have a clearly defined direction. In other words, the higher the frequency of a sound, the more directional it becomes. This can explain the fact that the midrange and high-frequency speakers must be correctly directed.
- Podiums are always easy to install. Attaching them is quite simple and it is not necessary to cut through the metal of the door. Often acoustic podiums are firmly fixed to the skin.
Installing podiums is easy and simple
Note. You can evaluate the effect of “podium” sound immediately after fixing this element. Previously disturbing overtones will disappear, the transparency of the sound will improve, low bass will be added and the sound will seem to “get rid of” the speakers.
- Another advantage of the podium is the spaciousness of the “pocket” where a larger speaker can be inserted.
- Leather-wrapped podiums make it easy to remove dirt and dust.
- The podiums have petals on the base. This is also considered an advantage, since it will allow the element to be firmly fixed to the door.
- The podium will fit perfectly into the interior of the VAZ 2114, making the interior richer and more beautiful.
Conclusion
In this article you learned how to make podiums for a VAZ 2114 with your own hands. As you can see, this is not a difficult job at all. But as a result, you will get an original car interior and will be able to listen to loud music without experiencing discomfort.
Podiums VAZ 2114
No one doubts that the acoustic podiums on the VAZ 2114 can qualitatively improve the sound. The acoustic podium of the VAZ 2114 will allow you to install almost any type of acoustics in the car, regardless of its segment. And most importantly, the sound will be clear and high quality.
Making podiums for acoustics
VAZ 2114 acoustic podium and its production
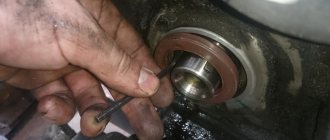
Let's look at how to make podiums for doors. As a rule, the standard places on the doors of a VAZ 2114 car are designed to install speakers measuring 13 cm. What should we do if we want to install larger speakers? The most suitable material from which to make good podiums is plywood. And to start the process, you need to cut out circles of a certain size from plywood for the speakers you intend to install.
Advice. When cutting, we recommend using an electric jigsaw. It will save both time and nerves. In extreme cases, you can use a drill.
To adjust the podium to the desired shape, the following materials are used:
- Polyurethane foam.
- Epoxy resin.
- Compoplast.
And now everything is in order.
Frame making
Note. To make the frame, it is recommended to use plywood, the thickness of which does not exceed 5-6 mm.
Let's get started:
- We cut out the rings with a jigsaw so that the purchased speaker sits tightly in it.
- Using spacers from bars or self-tapping screws, we create a suitable frame where the speaker will be placed.
DIY podium
Advice . If we want to get a slope of the podium, then we use spacers of different heights, as in the photo below. Be sure to use self-tapping screws to prevent the plywood from cracking.
Spacers with different heights
Note. You can make not one, but two frames for one door. Here everything will depend on creativity and individual preferences.
Creating a Form
Acoustic podium VAZ 2114 and creating the form
Once the frame is ready, it's time to start creating the mold. The simplest solution is polyurethane foam. Creating a mold from polyurethane foam:
- We take the frame and foam it.
- We wait a certain time until the foam hardens. It may take more than one hour.
- After the foam has cooled sufficiently, we begin work that makes you feel like a sculpture. In other words, we cut out everything unnecessary.
Advice. The sharper the knife we use to cut out the extra pieces of foam, the better. Therefore, you need to prepare such a tool in advance. It is advisable that the knife has a wide blade.
- Apply a layer of putty to the foam and wait until it dries.
- Take sandpaper and sand the entire part.
- The acoustic podium is ready.
Creating a mold from compoplast:
Acoustic podiums on the VAZ 2114
The mold can also be created from compoplast. This is a two-component composite plasticine designed for almost any purpose. It has many useful functions: good adhesion, no shrinkage and toxicity, etc. So:
- Mix two equal parts of white and gray matter.
- Apply the resulting mixture to the frame.
Note. Working with compoplast is similar to a modeling lesson, when different things are made from plasticine, for example, the same podiums. Only plasticine is more similar to cold welding, hardening after a certain time.
- We wait until everything dries and the form can be considered ready.
The final stage of work
So:
- We stretch old and unnecessary nylon tights onto the workpiece so that there is no sagging.
- We dilute the baksu separately and cover the resulting form with it.
Note. According to the advice of experienced people, the buck should be placed every 12 hours. The last coating should be the third and after that you need to wait a day for the glue to dry completely.
- We cover the product with anti-gravel, using one can for two podiums.
- The inner rings and foam walls can be coated with black spray paint.
Podiums for acoustics VAZ 2114
Note. The paint and aerosol will dry quickly.
- We fix the acoustic shelves to the door trim with self-tapping screws, doing this from the inside along the plywood.
- Next we hang up the original trim.
- We put the pockets in place.
- Install the speakers and enjoy high-quality sound.
Podiums for acoustics in VAZ 2114
Making acoustic podiums with your own hands makes sense if you need to get a unique shape. In normal cases, you can use ready-made options.
When working, be sure to use step-by-step instructions, useful photos and video materials. Thus, the price of purchasing and installing an acoustic podium is significantly reduced, because you only have to buy consumables: glue, screws, etc.
Construction principle
Making places for speakers or tweeters begins with taking measurements. You need to define:
- column diameter to accurately measure the seat;
- the thickness of the case, which should not interfere with the operation of the window lift mechanism;
- the amount of departure into the cabin. The podiums should not rest against the seat or plastic door sill when the door is completely closed.
Tools and materials
From the mandatory set of tools and materials you will need:
- material for making the housing to which the speaker will be attached. For example, you can use MDF panels. To support, adjust the reach and angle of inclination, supports are used, which can also be cut from MDF boards. It will be great if you find a piece of pipe. For example, a cylinder made of compressed paper, which is often found in many industries. A slight difference in size can always be corrected using available means. In this case, making podiums is largely a creative process.
- polyester resin and hardener for it;
- fiberglass, glass mat;
- thick fabric, construction stapler;
- screws or other fasteners, if you have chosen your own manufacturing option.
- brush;
- ruler, pencil, compass, marker;
- manual or jigsaw. A rounded rasp may be required for adjustment;
- putty. To adjust the shape of the podiums, you can use technical plasticine;
- sandpaper. The choice of gradations of abrasiveness will depend on the amount of work you will do yourself. For example, P80 and P120 will be sufficient for processing fiberglass before puttying; preparation for primer requires P240, P320. Before painting, the primer must be rubbed with P500 and then P800.
DIY podiums for VAZ 2114 useful tips
I have long wanted to buy podiums for 16″ speakers for the front doors, but I couldn’t find a suitable option. And it was decided to do it myself. And so, let's go.
Making a frame
We fasten with 2 screws and another one from below
This is the most important thing. In order for the foam to take on the shape of the door trim, you need to wrap the door card in a garbage bag so as not to stain the newspaper on top. We press the podium against the door card from above and foam it.
(VERY IMPORTANT! “MAKE SURE TO PLACE THE NEWSPAPER BETWEEN THE CELLOPHANE AND THE PODIUM!”) Newspaper breathes, but cellophane does not. As a result, the foam does not harden exactly to the shape of the door card. That’s how it was for me, after which I picked out the snot (uncured foam with glue) and foamed it with new foam, then adjusted it with sandpaper. And we foam.)
Rough processing and fitting. Trimming.
Afterwards we sand it to perfect condition and glue the fiberglass. Glue it with epoxy glue. It dries for a day, then another layer.
Glue leather vinyl 88 glue
Result
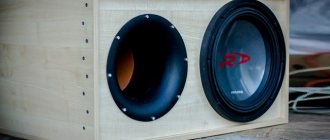
Car audio
Manufacturing and installation of podiums in front doors
It all started with an exacerbation of a fairly well-known disease, whose name is “Autosound”. As a result of the next attack, podiums for 6-inch frontal acoustics in the front doors of my “penny” were designed and manufactured.
The design began with determining the size and shape of the cardboard blanks for the template. All measurements were carried out “by eye”, by applying a sheet of cardboard to the door and drawing the shape of the workpiece on it. The result was the following:
I’ll say right away that the midbass angle was selected “by eye”, without prior listening. The main thing is that the midbass should not be located opposite each other on the same axis, this will avoid mutual cancellation of sound vibrations.
DIY podiums for VAZ 2114 in pictures
Today I will talk about how to make acoustic podiums in a car. Let's take the VAZ 2114 as an example. Manufacturing for other cars has no fundamental differences, the meaning is the same.
To make podiums in the VAZ 2114 we will need:
- plywood 8-10 mm;
- leatherette, or any material you like best;
- fiberglass putty;
- polyurethane foam;
- jigsaw, set of spatulas and sandpaper;
- Titan glue, epoxy glue;
- speakers for which we make podiums.
First of all, we cut out the rings for the speakers and the base:
Let's try the speaker on the podium.
We wrap the door trim and the podium with cellafane.
We wrap the door trim and the podium with cellophane.
We cover everything with polyurethane foam and wait until it hardens.
Using a sharp knife, we cut off all excess, giving the shape to the podium, and carefully sand it. If voids appear, foam them again.
We glue the wasps with fiberglass with epoxy glue and sand them.
We putty the uneven surfaces and sand them again, this time it’s smooth.
Applying glue and heating with a hairdryer, we cover the structure with leatherette. Very carefully, the process is really complicated.
This is what the finished podium looks like. The material can be used by anyone who likes it.
Skeleton decoration
- The fixed rings must be covered with thick fabric. Secure the fabric around the perimeter with a stapler. You can put a small object inside the cut out ring. It is important to stretch the fabric well, which will give the entire structure greater strength later. You can treat the places where the fabric and rings come into contact with Super Glue, which will also have a positive effect on strength;
- saturate the fabric with polyester resin. Please note that the resin only reacts with the hardener after a few minutes. Be sure to follow the proportions. Leave the cards for several hours for the resin to dry;
- After drying, mix a new portion of resin. After pre-wetting the surface of the podium, apply glass mat around the perimeter. The places where the podiums meet the door frame must be sanded. Fiberglass mat, like fiberglass, must be smoothed with a brush. Make sure that there are no air bubbles left on the surface;
- For strength, place one layer of dense glass mat on each side. Wait for each layer to dry completely;
- clean off the lumps of dried resin with sandpaper;
- lay another layer of fiberglass with a density of 150 grams/sq. m. And then another layer with a density of 600 grams/sq. m.
After drying, trim off excess pieces of fiberglass. The final shape of the product is given by putty. It is advisable to use a special putty for plastic. Further processing is no different from the usual preparation of a part for painting. You can find all the necessary theoretical material in the “Painting” section.
We do it ourselves
If you try, the homemade podium will not be much different from the factory one. But the price will be much less. Plus an additional reason for pride.
To complete the work you will need a set consisting of:
- plywood (take a thickness of about 6-8 mm);
- PVA;
- epoxy;
- cardboard;
- degreaser;
- nylon tights;
- polyurethane foam;
- paints;
- putties;
- leather or fabric (will be tight);
- scissors;
- pencil;
- hacksaw or jigsaw;
- sandpaper;
- spatula;
- stationery knife.
I will say right away that in this case we are considering the option of making a homemade speaker podium, which will later be installed with your own hands in the front or rear doors of the car. Often a speaker with a diameter of 13 cm is used here. But no one bothers to make a design for the rear shelf.
But size is not key. The entire preparation procedure looks like this:
- think over the shape of the podium;
- take measurements of the speaker and its special protective mesh;
- the diameter of the ring here will be exactly equal to the diameter of the corresponding landing socket or place on the future podium;
- the external diameter of the existing ring we need, in turn, corresponds to the diameter of the tread (protective) mesh;
- a sketch is drawn on cardboard;
- the template is cut out;
- applied to plywood;
- outlined and cut out;
- a perfectly even hole is cut for the podium.
Do everything as accurately as possible so that no problems arise later.
If you are done with this, proceed to the next step.
Manufacturing process
You have already made the preparation. But it’s too early to relax. There is still a lot of work ahead.
- A layer of polyurethane foam is applied to the surface of the workpiece;
- The foam hardens, and the required shape is given with a blade or sharp knife;
- Next, apply 1-2 layers of putty;
- When it dries, make the product smooth using sandpaper;
- The product is painted in a suitable color;
- It is better to apply the paint in 3 layers;
- An alternative to painting is upholstery with fabric or leather;
- The banner is secured with glue.
The installation process finishes it all off. The most optimal method of fastening is installation using self-tapping screws on the inside of the existing door trim. This will preserve the sound quality, ensure reliable fixation, and at the same time definitely will not spoil the appearance of the interior and the podium structure in particular.
Do not forget to additionally use soundproofing materials. They are used to make noise on doors. This is not necessary, but it is useful and effective.
I think you have figured out how to make podiums in the doors. They can also be installed in rear shelves and racks.
Thanks everyone for your attention! Don't forget to subscribe, leave comments, ask questions and invite your friends to join us!
Subscribe to updates and receive articles by email!
We guarantee: no spam, only new articles once a week!
The word “Podium” came to us from England and means elevation, convexity. An acoustic podium in a car is a special convex structure for mounting a speaker of any size. Owners of the domestic automobile industry prefer podiums to be able to install musical equipment of any segment and enjoy high-quality sound on the road.
Shaping
When the creation of the frame is completed, you can begin to shape the parts being manufactured. Here are the three most common options.
Option 1
So:
- Shaping using polyurethane foam. This option is considered the simplest;
- You should foam the inside of the previously made frame, waiting until it completely hardens. With a sharp knife you can give the podium any shape. There are no restrictions here, the main thing is not to spoil the base of the created structure;
- Now you need to apply a layer of putty on the foam to make the podium more durable;
- The final touch remains - sanding.
That's it, the polyurethane foam podium is completely ready!
Foam podium for car audio
Second method: epoxy resin podiums
Made from epoxy resin
To do this you need:
- Shapes and rings should be cut out of plywood using a jigsaw;
- The edges must be processed with a milling cutter;
- Cut out pockets using a sharp tool. A stationery knife may be suitable, since the plywood should not be very thick - about 8 mm;
- Attach the rings to the mold using self-tapping screws. It is advisable to fasten them at the junction to make it more reliable. Afterwards, attach the pockets, also using self-tapping screws;
- Nylon tights should be pulled over the resulting workpiece. You need to tighten them as tightly as possible so that there is no sagging;
- Dilute the glue and grease the mold with it.
- Leave the mold for a day until completely dry;
- You can foam the inside of the structure with polyurethane foam. But in this case there should be little foam. Leave for another day so that the foam also dries;
- When the foam dries, it will need to be cut out with a stationery knife;
- Do-it-yourself podiums can also be covered with anti-gravel. One cylinder will be enough for two parts;
- Attach the podiums to the sheathing with self-tapping screws. It is advisable to fasten them on the reverse side so that this does not spoil their appearance.
The third option is made of complast
From compoplast
This is a convenient material that resembles ordinary plasticine in structure, but after a while it completely hardens. It can be used for absolutely any purpose. Manufacturing consists of several stages:
- You need to mix the white and gray substances (usually they are sold as a set), and then apply the resulting mass onto the frame with gentle movements;
- Having given the required shape, you should leave the frame for a while until the composite plastic dries. As a rule, this does not take long;
- Prime the podium to make it even more resistant to corrosion. Now you just have to wait a little longer until the primer is completely dry.
What it is
In fact, every car is standardly equipped with an audio system. Some of them are extremely simple, others are advanced and powerful.
As a fan of high-quality and fairly loud music, standard speakers often cannot satisfy my needs. Therefore, the decision is made to purchase more solid speakers. And here another problem appears. The large dimensions of the equipment can be a nuisance if they are not installed correctly on the rear parcel shelf or in the doors of your vehicle. That is, you need to place everything so that the speakers do not disturb the driver and passengers, but at the same time create the highest quality and much cleaner sound than before. And podiums come to the rescue. They improve the sound and take even standard acoustics to a new high level.
The podium is the base or basis for the speakers, due to which the speaker is fixed in the required position. That is, in fact, this is a mount that can be used standardly and practically in doors, in the cabin on the rear parcel shelf or directly in pillars.
By installing a podium, the sound becomes deeper and richer, high and, accordingly, low sound frequencies are clearly distinguished.
The podiums have several quite useful features and functions:
- appearance improves the visual perception of the speaker system in a car;
- the quality of the speakers improves;
- increased acoustic comfort in the cabin;
- podiums serve as mounts for speakers of non-standard shape;
- structures support large-sized devices;
- become a decoration of the entire interior;
- change a person's perception of music for the better.
Whether you need a podium or not, decide for yourself. Here you should take into account that buying a ready-made structure in St. Petersburg or any other city, including Almaty, is not a problem. But for some reason, many people strive to do everything efficiently and with their own hands. Numerous homemade products on Drive2 are direct confirmation of this.
Varieties
The podiums are not divided into rear or front, respectively. They are classified by location, and distinguished internal and external, respectively.
External ones include fastenings that are installed directly in the cabin. A striking example is placement on the rear standard parcel shelf of a car. But more often, motorists give preference to internal structures that are inserted into the doors. They hold up well and improve sound.
Both options can be easily installed or purchased for machines such as:
- VAZ 2110;
- Ford Focus;
- Chevrolet Niva;
- Chevrolet Lacetti;
- Daewoo Lanos;
- Lada Priora;
- Nissan Qashqai;
- VAZ 21099;
- Lada Kalina;
- Mitsubishi Lancer, etc.
Cars usually already have standard, factory-installed speakers or at least mounting holes for them. The dimensions and shapes themselves depend directly on the specific brand of vehicle. Domestic cars usually have speakers with a standard diameter of 13 cm, while foreign cars have speakers with 10 cm, 16 cm, 16.5, 20 and even 25 cm. 6x9 podiums are also extremely popular.
For doors, speakers are used that have oval or no less common round shapes. Depending on what kind of car you have, you need to consider the shape when choosing a speaker. Although in reality any form can be used. After all, the main task of the podium is to ensure reliable and strong fixation. This is what gives the sound volume and improves clarity.
Tools and materials
First of all, you will need to stock up on materials and tools with which you can make a shelf. This list includes:
- Sheet of plywood - 2 pieces with a thickness of at least 5 millimeters;
- Cardboard sheet;
- Set of self-tapping screws;
- 2-3 furniture curtains;
- Electric jigsaw;
- Sandpaper;
- Marker;
- Shelf covering material;
- Roulette, ruler, etc.;
- Glue.
The design involves the creation of two main elements. They are combined into a single system - a podium for the speakers and a folding part with which you get access to the luggage compartment.
Manufacturing
The base will consist of two sheets of plywood. Their sizes and shapes are almost the same. But only the bottom sheet will have slightly smaller cutouts for the folding element. In the end, the task is to build a stepped ledge on the base. It will become a support for the folding element.
- Don't rush to remove the standard shelf. First, make a stencil using a piece of cardboard. The dimensions will be about 1.5 meters wide and at least 1 meter long.
- Some people find ready-made drawings on the Internet, but they may not always clearly correspond to your specific luggage compartment dimensions. This is due to the fact that even at the assembly stage of VAZ series cars, certain deviations are allowed.
Manufacturing process
Place a sheet of cardboard on the factory shelf and make the necessary cuts
Pay special attention to the corners near the rear pillars. According to the markings, mark the areas through which the seat belts will extend. Creating a stencil will allow you to clearly determine the dimensions, dimensions and shapes of the future shelf. Based on the results obtained on the stencil, cut out the elements from plywood. Immediately check to ensure that the cut out elements comply with the dimensions of the vehicle’s interior. This way you can find mismatches, trim and fit the workpieces. Now you can dismantle the standard shelf, but leave the sides in place. On blanks from a sheet of plywood, make a cutout of the folding part, and cut holes for your speakers
Here everything depends on what kind of speakers you plan to install on your VAZ 2114. Using an electric jigsaw, a folding element of the podium is cut out on one of the blanks. To do this, you need to make a C-shaped base. The cut plywood element will become your folding element.
Holes for speakers
- On the second piece, make the same cutout, only slightly smaller. So, when installing the first sheet of plywood on the second, a protrusion will be created at the cut site.
- In the upper part, a connection is made with the cut out elements left on the folding element. This is done using furniture curtains.
- Lay the top piece of plywood, where the folding part is already screwed, onto the bottom one. The two structural components are connected with self-tapping screws.
- The resulting podium is covered with fabric or any selected material. Carpet, carpet and other similar materials are excellent.
- The do-it-yourself podium is mounted on standard sidewalls. Check how firmly your shelf fits.
- Now you need to fix the podium on the sides using self-tapping screws.
- Don’t forget to first check how tightly the sidewall fasteners are tightened so that they don’t start creating unnecessary noise immediately after the work has been completed.
Even on standard sidewalls, a homemade thick shelf provides excellent sound quality for music, and also eliminates the noise that is familiar to VAZ 2114 owners, which comes from a standard podium.
Enjoying the result
A high-quality audio system is one of the main elements that owners want to see in their own car. This is especially true for the younger generation of drivers, some of whom are investing huge amounts of money in acoustics. Is it possible to trust the most powerful audio system on standard podiums? Of course no.
Sources
What to do?
There are three ways to solve this problem. The choice in favor of one option or another directly depends on your requirements, wishes and sometimes financial capabilities.
| Solution option | Explanation |
| Completely dismantle the sides and shelf | Nothing will make noise in this situation, but you will deprive yourself of space to install an audio system. You can forget about high-quality sound inside the car |
| Purchase a ready-made podium for durable material with holes for speakers | A good option that requires certain financial costs. All you have to do is install it in place. Disadvantage - it is not always possible to find a shelf that is ideal for all parameters |
| Make a podium with your own hands | This option provides minimal financial costs and the opportunity to create a shelf that will meet your smallest requirements. The downside is that you have to do the work yourself, which not everyone can handle. |
Having a stronger and thicker shelf not only eliminates noise, but also improves the sound quality of the audio system. The thick shelf acts as a highly efficient enclosure.
Today we will look at how you can create an acoustic podium with your own hands, which will be placed on factory sidewalls. You can also try to make an option with your own sidewalls, but it is much more complicated and extremely difficult for a beginner to cope with. Let's not make things difficult for you. The option with standard sidewalls is very good.