The main brake cylinder of the VAZ-2109 is necessary to ensure the normal operation of the cylinders and calipers, which clamp the pads and stop the car. The design of the entire system is quite simple - there are no frills like a traction control system, and you won’t even find sensors signaling excessive pad wear.
The condition of the elements must be monitored by the driver. To help him, there is only a level sensor on the expansion tank. When the brake fluid level drops below a critical level, a warning light on the dashboard will light up.
General system diagram
The brake drive system here is of a hydraulic type, functioning using two circuits, they work independently of each other. The use of a dual-circuit system is justified by safety. If one of the calipers leaks or a hose breaks, you can still stop the car. Even directly on the main brake cylinder of the VAZ-2109 there may be a leak. But the car can still be stopped.
True, if the braking system operates on only one circuit, you will feel discomfort. The car will pull to one side when braking. Braking efficiency is also reduced. For these reasons, continuing to drive a vehicle that has a faulty brake system is strictly prohibited. Using the VAZ-2109 master brake cylinder, pressure is created inside the system. When the driver presses the brake pedal, it moves the rod and piston inside the cylinder. This increases the pressure inside the hoses and tubes.
Actuators are installed on each of the wheels. These are the working cylinders that are located on the rear wheels. As well as calipers on the front wheel mechanisms. With the help of these elements, the rear pads are unclenched and the front pads are compressed. In this case, under the influence of friction between the discs, drums and pads, the car is braked.
Basic faults
Despite the simplicity of the design and the small number of moving elements, the GTZ often ceases to perform its functions normally due to malfunctions.
It is not difficult to detect a breakdown of the GTZ. The first signals of a malfunction will be given by the brake pedal. Any change in its behavior when pressed (lightness, increase in force, etc.) indicates a breakdown. But it will signal the emergence of problems throughout the system. Checking the system on the highway allows you to more accurately identify the malfunction (the car accelerates, and then emergency braking is performed). And then the traces determine how the system works. Afterwards, all that remains is to visually inspect all the components of the drive for leaks.
The main malfunctions of the master brake cylinder are:
The master cylinder loses its seal, usually due to severe wear or damage to the sealing collars. In this case, liquid can flow between the chambers and also come out of the housing. This allows air to enter the system. As a result, the pressure decreases significantly and the effectiveness of the braking system deteriorates.
Video:Replacing the master brake cylinder VAZ 2108 2109 2110
Air leaks in the system may occur due to blockage of the ventilation hole in the tank lid. Because of this, when the liquid moves, a vacuum is formed in the tank, which is compensated by air penetrating through the cuff. As a result, airing of the system causes a decrease in the efficiency of the system.
Piston jamming can occur for two reasons - debris entering the cylinder through the tank or the formation of rust on the internal surfaces of the housing. This causes one of the circuits to stop working.
Restoring the performance of the gas turbine engine is possible only in case of wear or damage to the seals or clogging. Special repair kits are sold for repairs.
Often, washing the cylinder and replacing rubber elements allows you to completely restore functionality. But there are also cases when such measures do not help and the problem can only be solved by replacing the assembly.
When purchasing a car, every person realizes how complex a mechanism he will have to operate. All mechanisms and elements have their own design purpose. In particular, the brake master cylinder (MBC) is responsible for converting pressure on the brake pedal into hydraulic pressure, which starts the braking process of the car. This functionality is provided by the supply of hydraulic fluid, which has a high boiling point. Every motorist needs to know the design of the GTZ in order to correctly understand the causes of failures.
Maximum brake reliability and an increased level of safety in modern cars is achieved by installing 2-section master cylinders. Since the intra-cylinder circuits are practically independent of each other, it is partially ensured that the brake remains operational in the event of depressurization of one of them. The single-chamber system has actually gone into oblivion due to the impossibility of distributing mechanical force to all chains so that the car does not lose controllability.
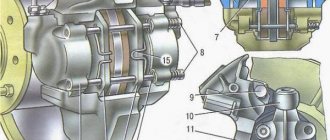
Front brake
A metal disc is rigidly fixed directly to the hub. The brake disc is secured using:
- Small conical studs that serve as guides for the wheels.
- The bolts that secure the wheel to the hub.
The rotation speed of the disk and wheel will always be the same. Therefore, in order to brake a car, it is necessary to stop all its wheels. To do this, you need to clamp the disc using pads and brake calipers.
The calipers have two parts - external and internal. On the inside there is a cylinder, a steel piston is installed in it. Under the influence of the pressure created by the main brake cylinder of the VAZ-2109, this piston moves and acts on the block located from the inside. At the same time, the outer part of the caliper moves towards. When the pressure in the system decreases, the pads return to their original position under the action of springs.
Rear brakes
The brake design, which is located on the rear wheels, has approximately the same design. Only instead of a disk a drum is used. It is made of aluminum alloy, inside of which there is a steel cage. The pads are made of metal, the outer part of which is in contact with the drum, and special linings are glued on. They are made from various friction materials. The pads are driven by brake cylinders.
This element allows, under the influence of pressure created by the main brake cylinder of the VAZ-2109, to release the pads. The service life of the rear drums and pads is much higher than that of similar elements of the front brakes. The reason lies in the fact that the rear wheels account for no more than 30% of the load during braking. The service life of the rear elements of the braking system is approximately two to three times higher than that of the front ones.
Master brake cylinder
The design of this element is quite simple. The main cylinder is made of special aluminum alloys. A one-piece body to which the expansion tank and tubes are attached, through which the liquid is supplied to the actuators.
The design of the VAZ-2109 master brake cylinder is somewhat similar to an internal combustion engine. There is a cavity inside, it is perfectly flat, and two pistons move in it under the action of the pedal. These pistons have rubber seals on the outside. They are necessary to improve tightness. The repair kit for the VAZ-2109 master brake cylinder necessarily contains these cuffs.
An expansion tank is installed on top of the cylinder; it is made of plastic. There is a plug on it, inside of which a float level sensor is built. It does not show intermediate values, but allows you to simply turn on the lamp power circuit when the liquid level in the system decreases.
How to service the master cylinder
The design of the brake system on nines is approximately the same as on classic models. The only difference is that the parts of the VAZ-2109 brake system are much stronger and more powerful, since the car is capable of developing higher speeds, therefore, it needs to be stopped faster.
There is no need to service the master cylinder if it is functioning properly. But try to change the brake fluid, top up if necessary and make sure that there is no leakage in the system. If a leak appears from the master cylinder, it must be repaired or completely replaced.
Symptoms of failure
Below we highlight the main signs of malfunction of this mechanism:
- Increased pedal travel.
- Uneven braking.
- Pedal too soft.
- Increased braking distance.
The problem may also be accompanied by a leak of brake fluid from the reservoir.
It is located at the top of the master cylinder. The level must be at least average.
Replacement or repair?
The price of the VAZ-2109 master brake cylinder is about 1000 rubles. The repair kit will cost half as much. But the feasibility of its installation is highly controversial. When repairing, you will need to do the following:
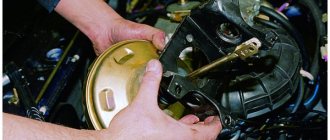
- Drain the liquid from the expansion tank.
- Remove the expansion tank.
- Unscrew the pipes that are located on the brake cylinder.
- Remove the two nuts that secure the master cylinder body to the vacuum booster.
- Loosen the locking bolt that holds the first piston in place.
- Pull the piston out of the cylinder. This must be done carefully so that the spring does not jump out. Try not to lose all the elements.
- Loosen the locking bolt holding the second piston and remove the element from the cylinder.
Installing a new cylinder
The layout of the VAZ-2109 master brake cylinder is the same as on classic series cars:
After this, you need to install new cuffs and pistons and fix the device in place. But it is much better to change the main brake cylinder of the VAZ-2109. How to do it yourself:
- Secure the cylinder body with two nuts on the vacuum booster.
- Install the brake pipes.
- Secure the expansion tank to the cylinder.
After this, it is necessary to fill the system with fluid and bleed the brakes. If this is not done, there will be air pockets inside the system that will not allow maximum braking efficiency to be achieved.
Contents of the repair kit
The composition of the brake master cylinder repair kit differs depending on several factors:
- car model for which the set is intended;
- manufacturer;
- composition of the kit (complete or incomplete).
Thus, the kits differ from each other not only in the presence of certain consumables, but also in their quantity. Complete sets include the items listed below, while incomplete sets include only the cuffs. So, in most cases, the repair kit includes the following consumables:
GTZ repair kit for VAZ-2109
- chamber separating cuff;
- main cylinder piston cuff;
- outer cuff of the cylinder;
- sealing collar for GTZ;
- protective cap for GTZ;
- seal for the piston head;
- cap for the fitting of the bleeding hoses from the clutch release cylinder;
- pistons (primary and secondary);
- return springs for pistons;
- sealing rings for pistons;
- piston seat;
- piston spring holder and holder screw.
The brake master cylinder repair kit should be used if malfunctions occur in its operation. More about them later.
Price of brake cylinder VAZ-2110
The cost of a new element is not that high. The price of a VAZ-2110 brake cylinder is 1030 rubles. The kit may also include a new tank. If the damage is minor and consists only of depressurization of elements, it is not necessary to replace the master brake cylinder of the VAZ-2110. The price of the repair kit is only 50 rubles. This price includes:
- Rear brake adjuster head seal.
- Cap for the bleeder hose fitting.
- GTZ cuff.
Thus, thanks to the repair kit, you can bring life back to the old mechanism without buying a new VAZ-2110 brake cylinder.
Its price is many times higher than a set of rubber seals and cuffs. But it is not always possible to limit ourselves to only these components.
Signs of a faulty master cylinder
There are a number of objective signs indicating that the GTZ is faulty. These include:
- The appearance of brake fluid on the housing of the vacuum brake booster at its junction with the main brake cylinder. The reason for this is that the low-pressure collar cuff in the GTZ has failed, as a result of which its replacement is required.
- Feeling of “softness” in the pedal . In this case, the most likely reason is that air has entered the system due to depressurization of the brake hydraulic system. Another option is wear of the piston cuff of the main brake cylinder or wear of the “mirror” of the GTZ.
- Brake pedal jamming . The cause of this problem is that the compensation hole in the brake master cylinder body is clogged or blocked.
- Brake pedal sticking during braking . This symptom may be caused by jamming of the pistons in the master cylinder if dirt gets into the system. This, in turn, may be a consequence of the brake fluid “drawing” moisture, since it is hygroscopic. Along with dust, small solid particles can also enter the system. That is why car manufacturers recommend periodically changing the fluid in the brake system.
- The brake pedal does not return to its original position after being pressed. There may be several reasons for the problem. For example, failure of one or two return springs of the GTZ pistons or a malfunction in the brake pedal drive.
GTZ malfunctions
The VAZ 2101 brake system has many parts that can fail due to wear, poor quality or untimely maintenance. The following characteristic symptoms of problems can be identified:
- slow stopping of the vehicle after pressing the brake pedal. One of the reasons is that the lip seals of the pistons have become unusable, which led to a loss of tightness;
- high pedal effort. This problem appears when the cuffs increase in size, for example, when installing a low-quality repair kit;
- The brake pedal has a short stroke. The working environment, i.e. the brake fluid, has nowhere to go due to the fact that the compensation hole is clogged. In addition, the canal may be blocked by swollen cuffs;
- The car only brakes when the pedal is pressed to the floor. This indicates a complete failure of the lip seals when the liquid goes into the tank and not into the system;
- Brake pads do not move away from the discs and drums, causing them to become hot while driving. The reason lies in the jamming of one of the pistons or the formation of a blockage in the bypass hole.
These symptoms may also occur if there are problems with other parts of the braking system. For example, the pedal may fail if there is no fluid in one of the wheel cylinders or if air gets into the system
Therefore, for a final diagnosis, it is necessary to pay attention to additional features of the car’s behavior. For example, there are certain signs that clearly indicate problems with other components of the brake system, and not with the GTZ:
- pulling the car to the side when braking;
- jamming of the brake mechanisms on one of the wheels;
- the appearance of sounds uncharacteristic of normal brake operation (creaking, squeaking, grinding);
- heating of brake pads or discs on one wheel.
Checking the brake master cylinder
The most common cause of GTZ problems is wear of the seals. When replacing cuffs, you need to take into account that repairs only make sense if the piston and cylinder walls do not have wear. Otherwise, replacing the rubber seals will not bring any results and soon you will still have to install a new part. Before you start checking the main hydraulic brake drive, you should make sure that there are no problems with other elements of the system:
- Inspect the wheels from the inner surface to identify any leaks of brake fluid from the brake fluid brake system.
- Check the integrity of the tank and hoses connecting it to the gas turbine engine, as well as the presence of fluid and its level.
A clear sign that there is a problem with the master cylinder is the appearance of liquid on the unit body. A working mechanism should always be dry without a hint of leakage. If the hydraulic drive has lost its seal, it must be dismantled for further disassembly and repair. You can determine that the gas turbine engine bypasses fluid, i.e., it does not enter the system, but returns to the expansion tank when you press the pedal:
- Open the tank lid.
- An assistant is seated in the driver's seat. The engine does not start.
- Your partner presses the brake pedal, and you listen to the sounds coming from the reservoir.
- If gurgling is heard from the container, and the pedal is pressed lightly, it means that the liquid is entering the tank instead of the system. The malfunction lies in the wear of the seals, which are unable to create the necessary pressure in the cylinder circuits.
Brake master cylinder device
Knowing the structure of the brake cylinder, you can easily cope with its repair by using the necessary elements from the repair kit. Most modern cars use a GTZ, consisting of two sections, each of which is responsible for the operation of a pair of wheels. In the case of a front-wheel drive vehicle, one circuit works with the front left and rear right wheels, and the other circuit works with the front right and rear left wheels. If we are talking about rear-wheel drive cars, then one circuit is responsible for the front brakes, the second for the rear. The use of two circuits makes the braking system much more reliable.
The brake master cylinder consists of the following parts:
- Frame. It contains all the working mechanisms of the cylinder.
- Expansion tank. Its task is to supply the hydraulic system with working fluid.
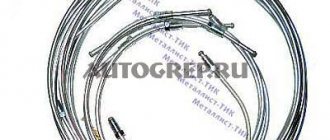
- Working tubes designed to pass fluid through a circuit.
- Pistons. Thanks to it, the necessary pressure is ensured in the system.
- Return springs. They work as a counterweight to the pistons, lifting them and holding them in their initial position provided there is no resistance.
- Cuffs and rings for sealing. Their task is to ensure the required level of tightness both in the cylinder and in the hydraulic brake system as a whole.
- Differential pressure sensors. They transmit information to the ECU, which, in turn, informs the driver about any malfunctions in the hydraulic braking system (pressure drop, low fluid level, etc.).
Without knowledge of the principle of operation, you will hardly be able to check that it works correctly. So we further suggest understanding how the GTZ works and checking its serviceability.
Principle of operation
Now let's look at how it all works: due to the action of springs, the pistons are set in their original position. In this case, the compensation channels are open, the chambers are completely filled with liquid (the system is connected to the atmosphere).
When the driver presses the brake pedal, the rod connected to it moves. This rod, overcoming the force of the spring, pushes the first piston. As it moves, it closes the compensation channel, which leads to sealing of the circuit (it is disconnected from the atmosphere) and opens the bypass (liquid from the tank enters the cavity behind the piston). At the same time, the pressure in the chamber begins to increase. One part of the liquid from it goes into the pipelines, acting on the brake mechanisms, while the other pushes the second piston. While moving, it does the same thing as the first one - it closes one channel and opens another, and also pushes liquid into the pipelines.
When the pedal is released, the springs return the pistons to their original position. At the same time, the liquid present behind the pistons returns back to the tank through the bypass channel (all this eliminates the occurrence of vacuum). Having returned to the initial position, the pistons open the compensation channels, connecting the system to the atmosphere (the pressure in it is equalized).
Now let's look at how the GTZ works if one of the circuits has lost its tightness. First, let's analyze the situation when the circuit for which the first piston was responsible is damaged. Since it is depressurized and there is no liquid in front of the piston, when you press the pedal, the pressure in the chamber will not increase. The piston, encountering no resistance, will move all the way and will mechanically begin to influence the second piston. And he, in turn, moving, will fulfill his function - ensure the injection of fluid into the mechanisms of his circuit.
In the event of depressurization of the circuit for which the second piston is responsible, everything works somewhat differently. When you press the pedal, the first piston will begin to work as expected and the pressure in the chamber in front of it will begin to increase. But since it will not be in the second chamber, there will be no resistance and the second piston, under the influence of pressure, will shift and rest against the wall of the housing. This will ensure that liquid is squeezed out of the first chamber into the circuit pipelines.
Algorithm of operation of the main brake cylinder
The main task of the GTZ is to convert the pressure available on the vehicle's brake pedal into hydraulic pressure of the brake system using the working cylinders. That is, it is the main distribution link, thanks to which the working fluid is supplied to the actuators.
When you press the brake pedal, pressure is created in the line, causing the vacuum booster rod to push the first piston of the cylinder, which closes the compensation hole. As a result, the pressure in the first and then in the second circuit increases. And the voids that arise during the movement of the pistons are filled with working fluid. In this case, the movement of the pistons themselves will continue as long as the return spring allows it.
When the maximum pressure in the circuits is reached, the brake mechanism is activated. After the driver removes his foot from the brake pedal, the springs return the pistons to their original position, and the pressure in the system normalizes (becomes atmospheric). There is an expansion tank in the system where the brake fluid returns, thus preventing the creation of vacuum in the system. If one of the cylinder circuits fails, the other will continue to operate, providing braking, although with less efficiency.
Symptoms of GTZ failure
The main symptom or sign of brake cylinder failure is uneven supply of fluid to the wheels, which causes the brakes to malfunction.
Wear of the seals affects the pressure. If the rubber seals are not tight, the pressure in the system is already less (see the video below for more details).
If there are particles of abrasive substances (sand, pebbles) in the liquid, then scuffing will appear on the piston and cylinder and the rubber sealing cuffs will quickly wear out.
As you can see, low-quality brake fluid, that is, not clean, containing impurities, will clog the holes and make scratches and scuffs on the contacting rubbing surfaces.
If symptoms or signs of a malfunction in the brake system are detected, it is necessary to find, repair or replace it urgently, since this is a safety and transport control system.
If the brake pedal is pressed effortlessly, or fails altogether, then the reason is a fluid leak or a compression hole. If the compression port becomes clogged or closed, no pressure will be generated. Also, the piston may become stuck. If the piston is stuck, the brake pedal will be pressed slightly. A sign of a stuck piston may be that the brakes engage even if the pedal is not pressed.
Checking the brake master cylinder
The design of the brake master cylinder involves the use of rubber sealing parts, which periodically fail and become the main problem during testing. Therefore, if the brake system has problems described above, it is necessary to check its operation. And you need to start with the GTZ. The check is performed in the following sequence:
- It is necessary to check for drips on the body, as well as for cracks on it.
- Next, you need to check the tightness and condition of the cylinder sealing elements. For any amount of repair work carried out, it is necessary to replace all rubber seals that are included in the repair kit for the main brake cylinder.
Tools
Regardless of whether you are using a master brake cylinder repair kit or replacing the entire brake cylinder with a new one, to perform the repair operation you need to prepare:
- Set of heads and socket wrenches.
- Screwdrivers and pliers (the latter will be needed when replacing the cuffs).
- Special purpose wrench for “10” brakes.
When replacing the main brake cylinder on a VAZ-2110, we will need new fluid. For the “ten”, “RosDot” of the fourth class is suitable. It is advisable to purchase at least one eggplant.
Repair and replacement of the brake master cylinder repair kit
After you have found out the cause of the breakdown, you need to buy a repair kit for the brake master cylinder. They are divided into two main types - complete and incomplete. Some cars require an additional special key (for example, for a VAZ 2110). The complete set includes: plastic cones for installing new cuffs on the piston body, washers, springs, boots, all the necessary cuffs. If the kit is incomplete, then, as a rule, it only includes GTZ cuffs.
How to change the brake master cylinder repair kit? The algorithm for performing the work is as follows:
GTZ repair kit for VAZ 2108-2109
- Remove the negative terminal from the battery and the terminal from the brake fluid reservoir. This is done so that the electronic control unit does not display an error message in the future.
- Next, you need to drain the working fluid from the system. This is done using a medical syringe and tubes. Some liquid will still remain in the system, so prepare a rag in advance to remove drips. All disconnected pipelines must be “plugged”.
- After this, you need to start removing the GTZ itself. This process will literally differ slightly for each car model, so it is impossible to give definite recommendations within the framework of one article, but one thing can be said with confidence that it is screwed to the vacuum seal with only two studs.
Further repairs to the brake master cylinder must be carried out on a workbench. As practice shows, major repairs of the gas turbine engine in a garage are impossible or do not bring the desired results. Therefore, we will limit ourselves to considering the case of replacing rubber seals from the brake cylinder repair kit.
- To dismantle it is necessary to unscrew the locking and fastening bolts of the mechanism. Then disassemble the body. This must be done carefully. so that the springs inside do not fly apart.
- Remove all old rubber seals and cuffs from the body, and then clean their seats from possible dirt, dust and oil.
- When reassembling, all new rubber seals must be lubricated with the used brake fluid (preferably new). It is better to replace the copper rings under the locking bolts with new ones. It is better to coat the fastening and locking bolts with copper grease (spray or paste) so that in the future, if necessary, they do not stick and they can be easily unscrewed.
Replacing the master brake cylinder repair kit
Using a repair kit for the VAZ GTZ
Assembling and installing the cylinder in place is performed in the reverse order. Don't forget to connect the terminal to the battery. It is imperative to fill the system with new working fluid (new rubber sealing parts are lubricated with it), after which the brake system is pumped to remove air from it.
Causes of malfunctions in the master brake cylinder of the VAZ 2110
- The appearance of brake fluid leaks from under the master cylinder on the vacuum booster housing is a sign that the low-pressure double-collar cuff in the master cylinder of the brakes is worn out and the turbocharger will need to be replaced.
- A soft brake pedal indicates either the presence of air in the brake system, or wear of the master cylinder piston seals or wear of the master cylinder “mirror”.
- A jamming brake pedal is a sign that the compensation hole is blocked or clogged in the brake master cylinder body.
- A sticking brake pedal can also be caused by jamming of the pistons in the master cylinder due to dirt.
- Non-return of the brake pedal may be due to a break in one or two return springs of the master cylinder pistons, or a malfunction in the brake pedal drive.
When disassembling the GTZ, you should be careful so that the insides do not fly apart under the action of the spring and all parts can be folded in the order of removal. The length of the spring under load should be 39.01–45.9 N (3.8–4.8 kgf) - 41 mm, with another option the following indicators should be 82.01–99.48 N (8.35–10 .15 kgf) – 21 mm. When free, the spring should have a length of 59.8 mm. If the springs do not have such indicators, then they must be replaced. After disassembling the GTZ, all parts must be washed and dried.
Do not wash all rubber products with gasoline or wipe them with oil. All this can ruin them and they will lose their shape.
After washing the cylinder body, you need to carefully inspect its internal mirror for the appearance of cavities or an ellipse. In the place where the ellipse appeared, there will be no shine from the mirror. If the master cylinder mirror is not damaged, then new sealing rings are installed on the cylinder piston, a new double-collar cuff is installed and everything is assembled in the reverse order. It is also necessary to replace the copper rings under the retaining bolts .
If, as a result of the inspection, the above types of wear are revealed, the cylinder must be replaced, since repairing the gas turbine engine will not give the desired result and will only be a waste of time and money.
To work on replacing the master cylinder of the VAZ 2110 brakes, you will need the following tools:
- pliers;
- flat and Phillips screwdrivers;
- open-end wrenches at 13, 15, 17;
- socket wrench 17;
- socket wrench 13;
- wrench special wrench for brakes 10;
- brake fluid (DOT4);
- new master brake cylinder (21083505010);
- paper towel or rags.
Manufacturers of repair kits
Popular manufacturers of brake master cylinder repair kits used in our country are the following companies:
- JSC "Volzhskrezinotekhnika" The company produces repair kits for domestic cars - “Zhiguli”, “Moskvich” and other popular brands (for Moskvich 2140 it consists of 3 pairs of cuffs, each of which has its own cat. no. 412-3505045, 042 and 036).
- FENOX Global Group (Belarus). The company produces a wide range of repair kits for domestic and foreign cars. In particular, for VAZ-2101, 2106, 2107 and VAZ-2121, the catalog number of the GTZ repair kit is KPT1963C3, the price of the repair kit is 1.3. $1.7. And for Moskvich 2140-3505032.
- PJSC “Balakovorezinotekhnika”. Manufacturer of rubber products, producing more than 6,000 items and ensuring uninterrupted operation of VAZ, KamAZ, GAZ automobile conveyors (catalog number for the GTZ repair kit for VAZ 2108-09 cars is 21080350503300, repair kit from the manufacturer, price - about $1).
- Basalt company. Russian manufacturer producing GTZ repair kits for domestic cars.
- SEIKEN. A manufacturer from Japan that produces repair kits mainly for Japanese cars (for example, HONDA, kit catalog number - SK62811, price of a brake master cylinder repair kit - $16.18).
- Aisin Seiki Co Ltd (or simply Aisin). Another Japanese company producing components for car assembly plants. It produces a lot of products for Toyota.
- SEGURIDAD INDUSTRIAL, SA (SEINSA), Spain. Manufactures products, including GTZ repair kits under the AUTOFREN trademark. Used in many European cars. (for example, the catalog number of the set is D1298, the price is $2.3).
- DELPHI company, USA. Its repair kits are used on both American and European cars (for example, Mercedes).
- ATE, Germany. Produces repair kits for European cars (for example, catalog number 03037030232, the price of a GTZ repair kit is $20.25).
I would like to remind you that.
Using the GTZ repair kit, you can eliminate only minor malfunctions in its operation - brake fluid leakage, smooth operation of the pedal, adjustment of the brake system. If the cylinder is physically damaged, then in most cases it must be completely replaced, and unfortunately, replacing the cuffs is not enough.
Upon completion of the work on replacing the master cylinder repair kit, do not forget to bleed the brake system to ensure that it is tight and free of air. And before heading out on the road, test the effectiveness of the braking system near the garage, while observing safety rules.
The vacuum brake booster (VUT) makes it easier to operate the brake pedal. This assembly is divided into two chambers - one has a permanent connection with the intake manifold, and the second is connected to the atmosphere when the brake pedal is pressed.
The unit is located under the hood behind the brake master cylinder. Through the rod it is connected to the brake pedal.
Checking status
The corresponding signs may indicate the need to change the vacuum booster or the brake master cylinder.
The primary sign of VUT failure is an increase in the force that must be applied to the pedal to brake.
To be sure of the problem, perform the following check:
- Turn off the engine;
- Press the brake pedal 5-6 times in a row;
- Press the pedal to the floor;
- Start the engine;
- If the VUT is working properly, the pedal will immediately go up.
note
If after these operations the pedal becomes soft, most likely air has formed in the system.
She needs to be pumped. To do this, we alternately expel the air from the wheels in a “crosswise” pattern, starting from the rear right one.
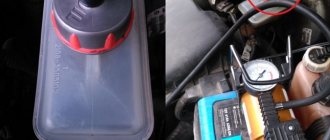
Liquid should be added to the reservoir periodically. The essence of pumping is to push the aired liquid out through the lines. For the operation you will also need an assistant who, at your command, will press the brake pedal. This must be repeated until clean, bubble-free liquid comes out of the hole. The procedure is done on each wheel. For better fluid control, a transparent silicone hose is connected to the drain hole. The liquid itself is poured into the bottle.
Choice
We will give some recommendations regarding the choice of a new vacuum amplifier.
Selection criterion
Required parameters
The cost of a good vacuum cleaner is now about 2.5 thousand rubles. These are not the most expensive, but not the cheapest Chinese options. Optimal for VAZ 2109
This packaging, used by a genuine manufacturer, is made of corrugated cardboard
The label should be clearly legible - the production batch number, the production date of the part and the name of the manufacturer itself
The vacuum unit corresponding to the technical parameters of the VAZ 2109 has article number 2108-3510010TM
You should not buy from market traders. There are many good, trusted spare parts stores in any city. Don’t be shy to ask for certificates, documents for parts
Choosing wisely
Now there are a lot of fakes on the market. Such parts cost the same as the originals, but last much less.
Replacement of VUT
First, remember that repairing the vacuum booster is impossible. This unit is removed and replaced with a new one. In theory and in practice, some do. But at your own responsibility.
Now about the replacement itself.
- Disconnect the brake pedal from the booster rod. The units are connected to each other by a pin. Dismantling is carried out in the area of the pedal assembly and here you will need a simple flat-head screwdriver.
- Let's go and open the hood.
- Disconnect the power supply to the brake fluid level sensor.
- Remove the bracket that holds the hydraulic lines to the frame. A 10mm socket is useful, which is used to unscrew the nut.
- Disconnect the brake master cylinder. To do this, unscrew the 2 nuts holding it to the vacuum unit. Assess the condition of the GTZ. If necessary, replace it too.
- It is not necessary to disconnect the hydraulic lines from the brake cylinder (master). The pipes are quite long, so they can easily be moved to the side so that they do not interfere with the work process.
- Disconnect the pipe that connects the vacuum chamber to the intake manifold.
- Remove the spacer from the front struts.
- Unscrew the 4 nuts that hold the vacuum housing to the car body studs.
- Remove the unit from the studs and pull it out through the engine compartment.
- On the drive fork side, there is a seal with a bracket on the return of the amplifier. He secures the assembly to the frame with 4 studs. They need to be removed. To do this, use a 17mm head to remove 2 nuts, after which the iron structure is removed. Just pull it towards you. Be sure to pull the boot off the stem.
- Install the mounting bracket and a new rubber seal onto the new vacuum booster. Now you can begin full reverse assembly.
Replacing the device
Reassembly
If you decide to dismantle and reassemble yourself, be sure to follow several recommendations when installing a new VUT:
- The vacuum rod and the brake pedal are connected to each other immediately after the device is seated on the mounting studs. That is, before they started tightening the nuts.;
- Experienced VAZ 2109 owners recommend applying sealant between the vacuum brake booster and the brake cylinder. This is due to imperfect design;
- The vacuum rod, which acts on the main brake cylinder, may move during transportation of the part. Also, displacement often occurs during the installation process. Therefore, be sure to check this fact and install it correctly if necessary. To do this, press the rod all the way.
If the stem is not installed correctly during assembly, the brakes simply will not operate properly. The consequences are hardly worth talking about.
Master brake cylinder
It is not uncommon to discover problems with the master cylinder when checking the condition of the brake assembly.
GTZ
When changing the vacuum seal, it would be logical to study the current state of the gas turbine engine and, if necessary, replace it.
Many are trying to repair the GTZ. But in practice, this only brings a temporary effect, plus you have to constantly worry whether the node will fail at the most inopportune moment. The best solution is replacement.
The replacement procedure itself is as follows.
- Disconnect the negative terminal from the battery.
- Disconnect the wire block from the fuel oil level sensor. It is located in the tank and is built directly into the lid.
- Use a special wrench for brake pipes to loosen their tension. There is no need to unscrew it completely.
- Unscrew the pair of nuts that secure the GTZ to the vacuum chamber. Only now can the brake pipes be completely unscrewed.
- Remove the cylinder from the studs.
- If necessary, remove the brake fluid reservoir itself at the same time. To do this, you need to carefully rock the tank and remove the leg from the bushing.
- Assess the condition of the removed cylinder. Also be sure to check for any defects on the tank. If there are any, be sure to replace the brake fluid reservoir with a new one.
- Armed with a new GTZ, put it in place and tighten the nuts. Fasteners can be fully tightened immediately.
- Install the reservoir and fill it with brake fluid to the maximum mark.
- Now a very important step is to extract air from the cylinder. To do this, you need to close the holes in the front brake pipes with your fingers. At the same time, your assistant should gently, but not sharply, press the brake pedal. This will create pressure in the system. Continue this manipulation until you feel liquid coming out of the holes.
- As soon as the liquid flows, put on the tubes, install and fix them in place. In this case, the brake pedal cannot be released.
- By analogy, the rear tubes are connected. When they are installed in place, there must be pressure in the system, that is, the brake pedal is pressed to the floor.
After completing the replacement of the turbocharger, do not forget to bleed the brake system according to the rules.
Disassembling the unit with the TJ tank
It is quite possible to change the vacuum seal and cylinder with your own hands. The work will take a few hours, but will save a lot of money on visiting a car service center.
Installing an element
Now we mount the tank with bushings on the new cylinder. If it was not included in the kit, you can take the old one. But it must be free of cracks and other deformations. Then we take out the rubber sealing bushings from the old GTZ. There are two of them. If they are worn out and have cracks, we take new ones from the master brake cylinder repair kit. We put the mechanism back to the “vacuum chamber” and tighten the fastening nuts. Next, place an empty container underneath and fill the tank with new liquid. It is advisable not to mix different classes - buy Series 4 Dot.
Next, you will need an assistant who, at your command, will press the brake pedal in the cabin. At this time, you need to close all four pipe holes in the master cylinder with your fingers. Pressing should be done to the floor and very slowly. We repeat the procedure until liquid flows out of the holes. Next, you can safely connect the tubes that go to the front wheels. After this, ask the assistant to press the pedal again. We make sure that all the air comes out of the holes for the rear wheels.
After this, remove the fingers and screw in the remaining tubes. At this point, the replacement of the "tens" GTZ is almost complete. All that remains is to add liquid to the tank to the required level, connect the sensor and put the soundproof cover in place.