Additional lighting is a fairly popular tuning option. Moreover, you can do this yourself, using a standard set of tools and available consumables.
Illumination is mainly done purely for aesthetic reasons. But there is also some practicality here. The only question is how exactly the system will be implemented.
To implement the idea with your own hands, you will need basic skills in working with electricity. If you follow the instructions and recommendations, very soon your car will sparkle with new colors. And in the literal sense of the word.
Backlight options
Motorists perceive the concept of footwell lighting in a car somewhat differently.
Basically we are talking about the following options:
- Turn on the car lights when the door is opened. That is, the system is mounted at the bottom of the door, and the light is directed to the ground. The practicality of such a solution is minimal. Although some automakers install such lighting from the factory, displaying the logo of the car brand.
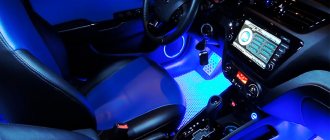
- Lighting in the feet. There is no need to open or close the door anymore. The light is directed towards the pedal assembly area. Looks impressive. This way you can see what is happening under your feet. This helps a beginner to better navigate the pedals in the dark.
Objectively, it is the second option that is more practical and preferable than illumination when opening a car door. But no one is stopping you from making sure that when you open the doors in the car, the asphalt lighting turns on, displaying the car company logo or some other image there. But the lighting of the legs is not only visually impressive, but also practical in certain situations.
The lighting system is implemented in different ways. You can choose a different color, even provide a color music effect. But when moving, it will certainly be distracting. Therefore, it is more correct to make the necessary lighting so that it helps during trips and makes it easier to change the position of your feet on the pedals.
What is required for work
To make your own footlights in your car, you will need to first prepare a certain set of tools and some consumables.
To implement the simplest, but at the same time original project, it is enough to assemble a set consisting of:
- light source;
- wires about 5 meters long;
- heat shrink tube;
- glue;
- pliers;
- soldering iron;
- screwdrivers;
- sharp knife, etc.
That is, you need a standard set of tools.
You can complicate your task somewhat, but make the glow more universal. For this purpose, a brightness control controller, a control panel, and a switch are additionally used. This will allow you to adjust the settings, turn on the backlight as needed and at the brightness that suits you.
As for the light source, the footlights installed in the car interior can be made of 2 types of tapes:
- Neon ribbons. They look very impressive, beautiful and expensive. The light is objectively more pleasant. But for most motorists this is not a fundamental difference. Neon strips are much more expensive. To install them you will need to use an ignition unit. And this involves interfering with the vehicle’s electrical system.
- LED strips. The most practical and versatile option. There are no installation difficulties. The ribbons themselves are affordable and come in a wide range of colors.
Installation procedure
Before installing diode footlights in a car with your own hands, you need to choose a place for convenient and correct placement of the lighting strip.
The following areas can potentially be used for this:
- perimeter at the bottom of the front seat;
- under the car dashboard;
- under the glove compartment (glove compartment), etc.
Here you should build on your own imagination and the design features of a particular car.
According to the rules and for reasons of comfort, the lighting should be directed strictly to the floor.
Some car enthusiasts do not take this point into account and install the tape on the side, on the floor covering itself. But in this case, the lighting can interfere, dazzle the eyes, etc. Remember, this is lighting specifically for the feet, and therefore it should be located in the cabin so as to illuminate this particular area, and not direct streams of light into the eyes.
Installing LED footwell lights in your car yourself is not at all difficult. Here you need to perform the following procedures:
- clearly define the places where the tape will be located;
- cut the LED strip into the required lengths;
- a wire is soldered to the edges of the tape;
- Next, the tape is tested by connecting to a power source;
- if the light comes on, you can continue working;
- the soldering area is insulated using heat-shrinkable tubing for this purpose;
- In order for the tube to fit well into place, it should be heated with a soldering iron or just a lighter;
- Having finished with the insulation, the prepared tape is mounted at selected points in the cabin;
- double-sided tape, glue or silicone ties are suitable for fixation;
- By analogy, the tape is installed in all parts of the cabin where it needs to be done.
The LED strip can only be cut in certain places where appropriate marks are provided.
Objectively, the most questions arise regarding how to make the connection correctly.
How to install LED strip on a car? Nice tuning
Fans of self-tuning when decorating the interior are definitely interested in how to install an LED strip on a car. And some pay attention to external variations: installed below, in the evening in the parking lot, it effectively illuminates the car and makes it noticeable from afar, helping the owner to better navigate in the dark. However, such lighting is purely decorative, and unsafe, as it attracts the attention of car thieves. But the LEDs in the trunk, under the hood and in the cabin are very functional. When you open the lid, you get a very good overview - despite the fact that most models, domestic and foreign, have very poor lighting in the trunk, and especially in the engine compartment, which makes life very difficult at night. In the salon, several goals are achieved at once. Firstly, the light provides encouragement in the dark and prevents the driver from falling asleep. Secondly, the fallen item can be found without difficulty and without preliminary searching for a flashlight. And thirdly, the backlight clearly lets the driver know whether he forgot to turn on the lights with low beam during the day, when this is required by the rules. How to install an LED strip on a car, what types are best to use, how to do it with the least amount of labor? We will talk about this in our article. Choosing LEDs You need to be careful when purchasing a strip: it determines how long your lighting will last and how convenient it will be to use. First of all, decide where you are going to place it, and pay attention to the degree of moisture resistance of the LEDs you are purchasing.
- IP20 marking means almost complete lack of protection from water. This tape is only suitable for internal use, and in those places where moisture, by definition, cannot enter. In a car this is the ceiling, maybe the dashboard (if the windshield doesn’t leak);
- The IP65 label indicates medium resistant LEDs. They are coated with a layer of epoxy, which increases the mechanical strength of the lamps and protects them from water. Suitable for installation almost anywhere on the machine;
- The most protected - and most expensive - are diodes marked IP68. They are hidden under silicone and can be used in the most difficult conditions.
If you are installing the tape inside the body (in the passenger compartment, engine compartment, trunk), choose the second type. For illumination under the bottom, it is better to choose the third one - the LEDs will have to work in a very aggressive environment. Installing the strip First of all, you need to decide where you will lay the LED strip. Traditionally, it stretches along the dashboard, along the walls under the feet of the front passengers and the ceiling in the cabin, along the sides or trunk lid. But the location can vary: you can install diodes along the thresholds or frame the doors with them. In any case, you need to measure the intended locations, taking into account that the tape should not bend sharply.
- The mass is removed from the battery;
- The reel with LEDs is cut into the required pieces along the permitted lines. Regular scissors are quite suitable for this;
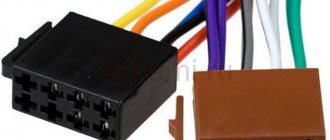
- In the places where you are going to connect the sections to the on-board electrical network, the interior trim is removed. It is better to think about the location of the tie-in in such a way that there is as little dismantling work as possible. For example, under the front door sills: then only 2 entry points will be enough. On the driver's side, the lighting of the console and the space under his feet will be connected, on the passenger side - a niche under the glove compartment;
- The wires from the tape are soldered to the standard wiring with a low-power (25-40 W) soldering iron. If your diodes are monochrome (one color), use negative black and positive red wires. When installing multi-color tape, green and blue are added to them;
- The solder area is insulated, preferably with a heat-shrinkable tube;
- Before hiding the insert under the casing, the battery is connected and the operation of the LEDs is checked. If they don’t light up, it means you mixed up the connection order and will have to resolder;
- After successful inspection, the casing is put in place, and the tape is laid in the planned places.
Regarding fixing the LEDs, here are a couple of additional recommendations.
The tape has an adhesive layer, from which the protection is removed before fastening. However, those who have already done similar tuning found fixation using only this layer to be not very reliable. People advise supplementing it with small plastic clamps, electrical mounting brackets, or primitive firmware using fishing line. Some people also do not approve of soldering, since installing an LED strip on a car using screw terminals or connectors (like MOLEX) turned out to be more convenient and faster. Although other craftsmen believe that a soldering iron gives a stronger connection. Whom you agree with is up to you. AutoFlit.ru
Connection
There are several suitable options for how to make the lighting in your car yourself to ensure an original glow in your legs.
Each motorist will decide for himself how it will be more convenient and easier for him to connect the LED footlights in the car. But there are 3 main options:
- to the lighting of the interior itself;
- through the cigarette lighter;
- from dimensions.
The choice depends on the format in which the driver wants to see the backlight. After all, each scheme provides its own version of when and how the glow will be activated.
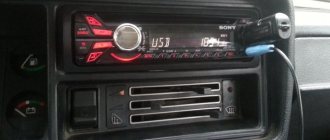
Illumination from side lights
The footlights in the car will always be on, even in the dark, if you connect it to external lighting. If you want to be able to turn it off at any time, then you should install a switch in advance. To connect, “power” the positive wire from any light bulb on the instrument panel, and throw the negative wire onto the car body.
Footlight lighting for Volkswagen Polo and other car brands is an original option to decorate your car without significant financial costs. Attaching the backlight is simple, because for this you will need very little: consumables, LED or neon strip, tools and a little imagination.
Every motorist wants to improve the operating conditions of his vehicle. In this article we will talk about how to illuminate car thresholds and doors when opening them with your own hands. In fact, this function is not the most important when using a car, however, it adds aesthetics to the car and practicality for the driver and passengers at night.
Many drivers believe that taking on such work without experience is an impossible task, and yet it is possible to install interior lighting in a vehicle without the help of specialists, although this is a very labor-intensive process.