Door lock device
To understand how to change the door lock on a VAZ, it is important to understand the structure of the mechanism itself. The larva is a metal core that is activated when the key is turned in the well. Protection is provided by locking the internal teeth. If incorrect operation of the locking system is noticed, the entire lock or its cylindrical part is replaced. When the key enters the device, the internal pins begin to move. When problems arise when opening/closing the mechanism, it means that the teeth do not fit into the grooves.
If the pins diverge in different directions when opening, then when closing, a disconnective displacement occurs. This encoding is activated when the key is turned. The reasons for the breakdown may be as follows:
- creak;
- difficulties when inserting and removing the opening object;
- jamming;
- internal or external damage to the cylinder;
- The key does not go all the way into the hole.
When the lock is used for a long time, parts wear out. In order not to completely change the closing device, you can remove the cylinders and install a new one.
Changing the contact group
From a cost point of view, replacing one contact group is the least expensive:
- All our actions are repeated in principle, as in the case described above with removing the lock, you will have to remove the casing, and so on
- To avoid the common nuisance associated with mixing up contacts, it is recommended to number them (or otherwise mark them) before disconnecting them.
- This measure will save your nerves and time
- Some models of locks have a locking ring in their contact group, and here we need an awl to remove it
- It’s important not to forget to put it back in place later.
- Then everything is assembled back and screwed to the steering column
It will be useful: Replacing lamps in the dashboard of a VAZ 2109
That's all, all that remains is to finish watching the video and calmly change any part of the lock.
Tools
To repair or replace a car lock, you need to prepare:
- flat-head and Phillips-head screwdrivers;
- pliers;
- socket wrench 8;
- silicone grease;
- larva
If desired, you can immediately replace the standard part with a European pen, which is purchased in advance.
Repair work is carried out in a well-lit room and at a comfortable temperature.
We repair “Nine” locks ourselves
Let's say the key in the VAZ-2109 lock does not turn or, conversely, turns and does not unlock the door. Repairing car locks involves one of the following actions: replacing the cylinder (cylinder), replacing or repairing the internal lock. In official manuals, by the way, it is recommended not to repair the internal lock mechanism, but to replace it. Be that as it may, you first need to get to it, for which you remove the door trim. Each of the actions required for dismantling is further illustrated in the photo. The entire sequence must be considered in order.
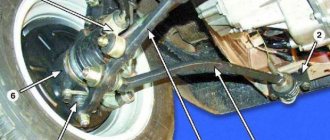
Repair or dismantling of interior door locks
When replacing the rear door lock of a VAZ 2109, it is important to follow the algorithm of actions:
- To remove the handle, use a screwdriver to unscrew two bolts: top and bottom.
- The cover, plug and casing are removed. The facing material is secured with special latches. It is important to dismantle them carefully so that the plastic elements do not break.
- The panel is removed and the external fasteners are removed using a size 8 wrench.
- Access to traction is gained. It can be unscrewed freely using a screwdriver.
- The handle is removed along with the rods, the tip is dismantled.
- The core of the cylinder device opens.
- To change the cylinder, it is important to remove the return spring.
- After installing the new core, we return the spring to its place. A pin is installed on the tip of the rotary rod.
- The lubrication of the elements and the functionality of the mechanism are checked.
- The assembly is performed using the reverse algorithm.
Sometimes it is necessary to replace the wires that are connected to the lock. If a small break is detected, the electrical wiring is partially changed.
Why is the replacement carried out?
There are several reasons why the owner of a VAZ-2109 is faced with the need to replace the door lock cylinder.
So, in particular, you won’t be able to do without this if the last key from the set was lost or broken. There are no options left here. Fortunately, such troubles occur relatively rarely.
Most often, the larva itself breaks. A faulty element does not allow you to open the lock, and, consequently, using the door turns into a whole quest.
Sometimes prudent car owners also change the cores of all locking devices after purchasing a used car, which is actually very correct.
Be that as it may, during the replacement process you will have to disassemble both the door and the lock mechanism itself. Don’t put off repairs because you don’t know what might happen in the future.
Features of door adjustment
Incorrect operation of the lock may be caused by problems with the door card. After long-term use, it sags, and sometimes it is simply installed incorrectly. Basic actions:
- The lock latch, which is located on the stand, is adjustable. To do this you will need an impact screwdriver. The screws are first loosened, adjustments are made, then the fasteners are tightened.
- Adjusting the response part if there is no softness when closing or a squeak is heard. The door moves outward using external adjustment bolts.
- The bracket is dismantled using a hammer. After several blows the door moves. After this, the operation of the mechanism is checked. If the problem does not go away, the procedure is repeated.
Purpose and device
The main purpose of the lock was initially to protect the car from theft, however:
- Today, as can be seen from practice, in order to start and steal a car, car thieves do not necessarily need to have a key or a duplicate of it
- To put it more clearly, the protection from the castle used to justify itself, but today it is “so-so”
- Advanced car thieves, equipped with modern technologies and devices, are able to hack the electronic protection of the most modern anti-theft systems in just a few seconds.
- And on the VAZ 2109, the lock cylinder or the VAZ 2109 lock itself, or its domestic analogue can generally be called entertainment for beginners
- In fact, the ignition switch is an ordinary switch that, when you turn the key, opens or closes a certain group of contacts
- The appearance of a malfunction in the ignition switch increases the likelihood of vehicle theft several times, in addition, it creates great trouble for you and, according to the law of meanness, at a completely inappropriate moment for this
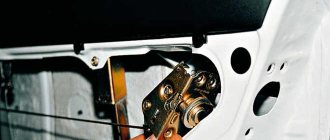
- The design of any ignition switch is similar; it consists of a lock and its contact group
- And the contact group consists of two separate plates, fixed and movable
- The movable plate moves when the key is turned in the lock and the contacts are closed in the required sequence
- Already now, switches that have the same design and order of contact closure are successfully used on all domestic cars
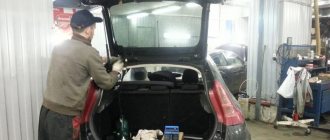
Replacing and adjusting the trunk lock
The luggage compartment is equipped with an identical lock as the driver's door. For dismantling you will need a standard set of equipment. Step-by-step instruction:
- The handle unscrews. The trim, trim, and panel are removed.
- The two dome lamp terminal connectors, the windshield wiper motor and the actuator are disconnected.
- The lock is removed using pliers. The rods are turned off and the spring is removed.
- A new mechanism is inserted. The spring returns to its place.
- The rod is screwed on. Electronics are connected.
The price of a complete set of locks for the driver's door and trunk starts from 500 rubles.
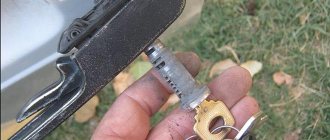
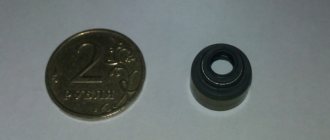
How to replace the larva
It is not at all difficult to make a replacement yourself, even if you have absolutely no plumbing skills and experience. You will spend about 1 hour, while saving up to 700 rubles, which otherwise would have to be given to car service workers.
Among other things, the work will allow you to better understand how the lock and door opening mechanism works, and what is inside it. With such knowledge, in the future you will be able to easily not only change the cylinder, but also repair the handles, adjust the window lifter rod, etc.
The instructions below refer to the driver's door of a VAZ, but work on others is carried out in the same order. The only difference is that the rear ones do not have larvae as such - there is just a button here.
To make replacement easier, be sure to lift the glass.
The car manufacturer recommends starting the replacement by removing the inner door trim. Try to do everything carefully so as not to damage the material - the cladding will have to be returned to its place.
Recommendations for changing the cylinder in a VAZ 2109 lock
If you disassemble the core, you can avoid replacing the cylinder or the entire mechanism. When the door opens with a creak, then most likely the internal pins are not deformed. Then lubrication work is carried out and the serviceability of the device is checked. Tips from the experts:
- Partial repairs will bring life back to the castle for a short period of time. If serious problems arise, it is better to immediately replace the larva.
- It is recommended to use silicone during lubrication.
- When dismantling, you will need a set of screwdrivers: flat, Phillips, impact.
Experts advise purchasing clips in advance that hold the casing and spring, since during dismantling these parts most often become unusable.
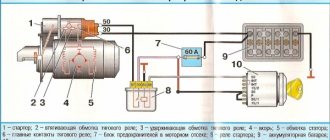
How to replace the ignition switch, check the contact group and replace it on a VAZ 2108-VAZ 21099?
Replacing the ignition switch:
Removal: 1) Starting with “The battery is a rechargeable battery,” unscrew the nut that holds the “-” terminal on the battery and then remove the terminal. (How to remove the negative terminal from the battery, see the article about “Replacing the battery on a VAZ”, in the “first” paragraph)
2) Then remove the steering column cover and both steering column switches. (How to remove the casing and both switches, see the article: “Replacing under-steering switches”)
- Further, for clarity, the operation will be shown with the steering wheel removed, but you can still remove the ignition switch without removing the steering wheel.
3) Next, insert if the lock allows it, then insert the ignition key into it and put it in position “0”.
Note! The key must be installed in this position only to disable the anti-theft device!
4) Now remove the four bolts that secure the ignition switch. If you have these bolts with a cut off head, then knock them down with a hammer and chisel. (Be sure to read the “Important!” paragraph)
It will be useful: Site map
Note! If that doesn’t work, then try drilling out all four bolts, but just do it carefully without damaging anything!
5) Once the bolts are loosened, use pliers to remove them from the hole.
6) Next, remove the bracket on the left side, and the ignition switch on the right.
7) Now disconnect the wire block from the electrical connector.
 And finally, crawl under the dashboard, and there, disconnect the connector going from the ignition switch to the relay.
Installation: Installation of a new lock is carried out in the reverse order of removal.
Checking the contacts of the wire block:
1) First, remove the lock from the car using the text above.
2) Next, using an “Ohmmeter” or a “Multi-meter” with the “Ohmmeter” function enabled on it, connect its leads to the electrical connector and then look at the readings of the device.
Note! The device should clearly display “0”; otherwise, replace the contact group!
Replacing the contact group:
1) First, on the removed ignition switch, use a screwdriver to unscrew the screw that secures the ignition switch cover.
2) Then use a screwdriver to press out the two plastic latches securing the lock cover.
3) Then remove the cover.
4) And finally, remove the contact group from the ignition switch.
Note! Installation of the contact group is carried out in the reverse order!
Important! Not on all cars of the Samara family the ignition switch is attached to the steering column with four bolts; on some cars it is attached only with two bolts and on top it is secured with a hook indicated by a red arrow!
Additional video material: Below we have prepared a video related to replacing the ignition switch on cars of the Samara family.