To understand the features of the repair, you must first study the design of the starter and understand how it works for the benefit of your car.
Let's start with the design. It includes four main nodes.
Knot
Peculiarities
It transmits direct current through four brushes
Freewheel with gear
A clutch or bendix drives the flywheel of your car's engine.
Serves to extend the bendix with gear when turning on the electrical appliance
Ensure easy rotation of the clutch, rotor, and gear. One bushing is located inside the starter, and the second is in the clutch housing.
Device diagram
Having familiarized yourself with the starter diagram, you can discuss the principle of its operation.
Design and operating principle
To understand the features of the repair, you must first study the design of the starter and understand how it works for the benefit of your car.
Let's start with the design. It includes four main nodes.
Knot
Peculiarities
It transmits direct current through four brushes
Freewheel with gear
A clutch or bendix drives the flywheel of your car's engine.
Serves to extend the bendix with gear when turning on the electrical appliance
Ensure easy rotation of the clutch, rotor, and gear. One bushing is located inside the starter, and the second is in the clutch housing.
Having familiarized yourself with the starter diagram, you can discuss the principle of its operation.
The operating principle is to convert an electrical signal into the rotational movement of a drive gear. Current is transmitted through the brushes to the poles of the electric motor. At the same time, the clutch extends and the gear is connected to the flywheel ring. To start the engine you need a quick but easy rotation of the starter. When the engine starts, the clutch returns to its original position.
Where can I buy
You can purchase spare parts in a specialized store, or by ordering in an online store. For example, HERE we sell high-quality parts at a competitive price.
Video instruction
Before you get started, it is recommended that you watch this video, which clearly demonstrates how to change the bushings yourself.
Help
If you are unable to replace this part yourself, contact a specialist for help. A similar procedure is performed in any car service, for example, HERE .
Replacing the starter bushing on an Oka car
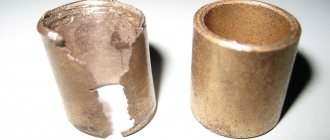
Despite the fact that the design of the starter on the Oka is implemented on a principle similar to the VAZ-2109 (the front bushing is also located in the clutch housing), the execution of the engine starting mechanism turned out to be extremely unsuccessful, as were most other components of this car. The main reason for this is the desire of designers to reduce the cost of the production process as much as possible. It is for this reason that bushings are manufactured using technology taken from powder metallurgy, and a combination of graphite chips and bronze is used as the starting material. Because of this, these parts have a very small margin of safety, which negatively affects their service life.
For those car enthusiasts who are interested in how to replace the starter bushing on the Oka, you need to know about one more drawback of the engine of this car. We are talking about a seat in the clutch housing itself, which breaks down unevenly during long-term operation. Therefore, if you buy a standard size product (external diameter 13.03 mm) to replace it, then most likely it will fit into place too loosely and even begin to dangle. This should not be allowed, as the part will very soon become unusable. Knowing this feature, experts recommend using a repair size bushing (external diameter 14 mm), but it often turns out that its diameter does not correspond to the size and even shape of the seat.
In the case where the development of the socket is relatively the same around the entire circumference, the problem is solved by simply adjusting the outer diameter of the sleeve using sandpaper. If, during replacement, you find that the seat is unevenly divided (for example, in the form of an ellipse), in this case it will have to be leveled. At the same time, experts do not recommend trying to unscrew the front bushing socket yourself using hand tools, since in this case it will not be possible to maintain alignment with the starter shaft, which is fraught with problems in its operation. If you find yourself in such a situation, it is better to contact specialists who, using special equipment, will turn the hole in the right direction. By the way, many car service centers manufacture repair-size starter bushings from bronze.
You can make a part of the required diameter at specialized service stations
After reading this manual, you were able to see for yourself that replacing starter bushings on a “nine”, as on any other car, is not the easiest task. Difficulties can begin already at the stage of removing the starter due to the inconvenience of work and end with pressing in the bushings. Therefore, when performing this type of repair, be patient, take your time, and follow the instructions strictly.
Symptoms of failure of VAZ 2109 starter bushings
The main sign that lets you know that the starter bushings are faulty when you turn on the ignition is a piercing noise coming from the engine compartment, then developing into a squeal and abruptly dying out. It is possible that the bushings may fail if the armature rotates jerkily or very slowly . If these manifestations occur, it is necessary to begin diagnostic and repair procedures as soon as possible, otherwise the problem may worsen.
If, during diagnostics, signs of wear, metal shavings, scuffs, or cracks are found, then the damaged parts must be replaced. Most often, the bushing in the clutch housing (front) breaks, less often - the rear cover bushing.
Tips for replacing bushings VAZ 2109/2108
Replacing the VAZ 2109 starter bushings, despite its apparent simplicity, is a rather complex procedure that requires special tools and knowledge of the starter structure, but it can be done with the help of these instructions and car repair skills.
When manufacturing a car, the bushing is pressed into the crankcase, which creates additional difficulties when removing the part from the socket. To do this, you need to use a special puller or choose the right tap. Next, you need to screw the tap into the bushing, reaching the bottom of the hole, it will push the bushing out.
Another way to remove the bushing from the crankcase is to use a screwdriver sharpened for an awl, or simply crumble the part with a chisel and pull out the debris. In both the first and second cases, care must be taken not to rotate the seat .
Replacing the starter bushing on an Oka car
Despite the fact that the design of the starter on the Oka is implemented on a principle similar to the VAZ-2109 (the front bushing is also located in the clutch housing), the execution of the engine starting mechanism turned out to be extremely unsuccessful, as were most other components of this car. The main reason for this is the desire of designers to reduce the cost of the production process as much as possible. It is for this reason that bushings are manufactured using technology taken from powder metallurgy, and a combination of graphite chips and bronze is used as the starting material. Because of this, these parts have a very small margin of safety, which negatively affects their service life.
For those car enthusiasts who are interested in how to replace the starter bushing on the Oka, you need to know about one more drawback of the engine of this car. We are talking about a seat in the clutch housing itself, which breaks down unevenly during long-term operation. Therefore, if you buy a standard size product (external diameter 13.03 mm) to replace it, then most likely it will fit into place too loosely and even begin to dangle. This should not be allowed, as the part will very soon become unusable. Knowing this feature, experts recommend using a repair size bushing (external diameter 14 mm), but it often turns out that its diameter does not correspond to the size and even shape of the seat.
In the case where the development of the socket is relatively the same around the entire circumference, the problem is solved by simply adjusting the outer diameter of the sleeve using sandpaper. If, during replacement, you find that the seat is unevenly divided (for example, in the form of an ellipse), in this case it will have to be leveled. At the same time, experts do not recommend trying to unscrew the front bushing socket yourself using hand tools, since in this case it will not be possible to maintain alignment with the starter shaft, which is fraught with problems in its operation. If you find yourself in such a situation, it is better to contact specialists who, using special equipment, will turn the hole in the right direction. By the way, many car service centers manufacture repair-size starter bushings from bronze.
You can make a part of the required diameter at specialized service stations
After reading this manual, you were able to see for yourself that replacing starter bushings on a “nine”, as on any other car, is not the easiest task. Difficulties can begin already at the stage of removing the starter due to the inconvenience of work and end with pressing in the bushings. Therefore, when performing this type of repair, be patient, take your time, and follow the instructions strictly.
Article: 2108-1601220/3708405, additional articles: 2108-1601220
Order code: 004018
- Buy with this product
- show more
- Buy analogues
- Passenger cars / VAZ / VAZ-21083 drawings
- » href=»/catalog/vaz-3/legkovye_avtomobili-30/vaz_2108-18/korobka_peredach-127/#part28961″>Starter shaft support bushingGearbox / Gearbox
- » href=»/catalog/vaz-3/legkovye_avtomobili-30/vaz_2108-18/korobka_peredach-130/#part29040″>Starter shaft support bushingGearbox / Gearbox
- » href=»/catalog/vaz-3/legkovye_avtomobili-30/vaz_2108-18/korobka_peredach-128/#part28990″>Starter shaft support bushingGearbox / Gearbox
- Passenger cars / VAZ / VAZ-210992 drawings
- » href=»/catalog/vaz-3/legkovye_avtomobili-30/vaz_21099-79/korobka_peredach-127/#part36946″>Starter shaft support bushingGearbox / Gearbox
- » href=»/catalog/vaz-3/legkovye_avtomobili-30/vaz_21099-79/korobka_peredach-126/#part36916″>Starter shaft support bushingGearbox / Gearbox
- Passenger cars / VAZ / VAZ-21111 drawing
- » href=»/catalog/vaz-3/legkovye_avtomobili-30/vaz_2111-11/korobka_peredach-148/#part45565″>Starter shaft support bushingGearbox / Gearbox
- Passenger cars / VAZ / VAZ-21151 drawing
- » href=»/catalog/vaz-3/legkovye_avtomobili-30/vaz_2115-65/korobka_peredach-111/#part53622″>Starter shaft support bushingGearbox / Gearbox
- Passenger cars / VAZ / VAZ-21141 drawing
- » href=»/catalog/vaz-3/legkovye_avtomobili-30/vaz_2114-647/korobka_peredach-63/#part1669890″>Starter shaft support bushingGearbox / Gearbox
- Passenger cars / VAZ / Lada Kalina 1117, 1118, 11191 drawing
- » href=»/catalog/vaz-3/legkovye_avtomobili-30/lada_kalina_1117__1118__1119-1048/karter_scepleniya-103/#part2612679″>Starter shaft support bushingClutch / Clutch housing
- Passenger cars / VAZ / VAZ-21092 drawings
- » href=»/catalog/vaz-3/legkovye_avtomobili-30/vaz_2109-9/korobka_peredach-127/#part33007″>Starter shaft support bushingGearbox / Gearbox
- » href=»/catalog/vaz-3/legkovye_avtomobili-30/vaz_2109-9/korobka_peredach-126/#part32977″>Starter shaft support bushingGearbox / Gearbox
- Passenger cars / VAZ / VAZ-21101 drawing
- » href=»/catalog/vaz-3/legkovye_avtomobili-30/vaz_2110-10/korobka_peredach-148/#part41257″>Starter shaft support bushingGearbox / Gearbox
- Passenger cars / VAZ / VAZ-21121 drawing
- » href=»/catalog/vaz-3/legkovye_avtomobili-30/vaz_2112-12/korobka_peredach-148/#part49873″>Starter shaft support bushingGearbox / Gearbox
- Passenger cars / VAZ / VAZ-2110, 2111, 21121 drawing
- » href=»/catalog/vaz-3/legkovye_avtomobili-30/vaz_2110__2111__2112-415/korobka_peredach-171/#part1303910″>Starter shaft support bushingGearbox / Gearbox
- Passenger cars / VAZ / VAZ-21131 drawing
- » href=»/catalog/vaz-3/legkovye_avtomobili-30/vaz_2113-648/korobka_peredach-63/#part1669890″>Starter shaft support bushingGearbox / Gearbox
There are no reviews for this product yet.
The series of articles “Crystal VAZs, or typical breakdowns of domestic cars” talks about typical problems and malfunctions of cars produced by the Volzhsky Automobile Plant. Today we will talk about the front-wheel drive Samara family, as well as its modern analogues.
How to Replace the Starter Bushing on a VAZ 2109
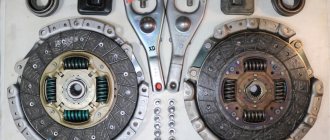
How to replace bushings on a VAZ-2109
replacement of VAZ-2109 Starting Bushes becomes necessary with strong axial mileage. This problem may be detected at startup. Engine speed and power are reduced.
To check the condition of the bushings, you will have to completely disassemble the starter, otherwise it is unlikely to find them suitable. The job is simple because it can be easily done independently in your own garage, without the need for outside help and without the introduction of a special tool. If your car hasn't been serviced for a long time, new bushings and brushes will come in handy.
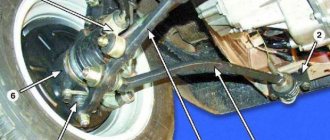
Removing the starter
Before removing the starter , you need to prepare two keys at 10 and 13, they are useful for removing the terminal from the battery. To avoid short circuit, remove the negative terminal first. If your vehicle is equipped with an injector, you will need to remove the air filter above the starter.
The VAZ-2109 starter can be removed in two ways: from above or from below. If option 2 is selected, the crankcase must be temporarily removed so that it does not interfere. Next you need to disconnect the electromagnetic relay from 2 wires. First, disconnect the strong (thick) wire through which voltage is supplied to the starter, then the narrow one necessary to power the relay winding.
You can simply pull the narrow wire with your hand. To disconnect the power source, unscrew the nut from the electromagnetic relay contact with key 13. When disconnecting the wires, remove them from the side.
How to replace VAZ-2109 starter bushings
Before you change the bushings on the starter, you will have to dismantle it, but first remove the terminal from the battery. Then you need to disconnect two wires from the solenoid relay. If to disconnect the thin one (which powers the relay winding) you just need to pull it, then removing the thick conductor requires using a “13” wrench to unscrew the fixing nut. Next, using the same wrench set to “13”, unscrew the three nuts that secure the starter to the clutch block.
Disconnect the wires at the back of the relay
After removal, the device must be disassembled, which will allow us to determine whether the cause of the malfunction really lies in worn bushings. To do this, first disconnect the solenoid relay by unscrewing the two bolts using a screwdriver. Now you need to remove the rotor from the bendix plates. Using the key set to “10”, remove the rear cover of the starter, after which access to the rotor axis will open. The retaining ring on it must be removed using a flat-head screwdriver. At the last stage of disassembly, all that remains is to unscrew the nuts on the two studs so that all three parts that make up the starter housing are disconnected. This completes the disassembly process. You will learn further about how to replace the starter bushings without resorting to the help of a specialist.
Replacing the rear starter bushing
If, as a result of an external inspection, it was revealed that one or both bushings are worn out, they must be removed from their seats and functional analogues installed. Even in cases where only one part turns out to be unsuitable for further use, both the front and rear parts are usually replaced. First, let's look at how to correctly replace the bushing located in the rear cover of the VAZ-2109 starter.
The dismantling technology is not much different from how the rear starter bushing is replaced on all classic VAZ models. In other words, you just need to remove the back cover and knock out the old part and its remains. After this, the new bushing is pressed in, and the work is completed. True, very often the installed sample fits into the mounting socket too tightly. In this case, its outer diameter should be slightly reduced - you cannot push it in with great force, since the lid may burst. Therefore, simply sand the part with sandpaper. It is not recommended to use lubricants during installation, otherwise the bushing may rotate and break the seat.
Replacing the front starter bushing
The front starter bushing bears a larger portion of the load when starting the engine, and therefore wears out much faster. If the starter on your car has failed for the same reason and you are interested in how to replace the VAZ-2109 starter bushing located in its front part, just take into account the information below.
Replacement technology
First of all, you need to disconnect at least one of the wires from the battery, as well as all the wires from the starter. Then you need to unscrew the bottom bolt that secures the starter and screw it in on the reverse side to secure the engine to its front mount. Otherwise, the motor may move forward. After this, you need to unscrew the remaining two bolts that secure the starter and remove it from the car. As mentioned earlier, the bushing is built into the clutch housing. To remove it, you need an M12 tap, as well as a drill chuck. The tap will have to be inserted into the chuck, then clamped, after which it must be carefully screwed into the sleeve, thereby cutting the thread. Great care is required due to the fact that the steel of the tap is very fragile and even a slight misalignment with the applied force can lead to its breakage. In this case, the shank will remain in your hands, and the cutting part will remain inside the sleeve. It would seem that the situation is hopeless. However, it is not. The length of the sleeve is approximately 14 millimeters, which means that there is approximately 10 or 20 mm of the cutting part of the tap on the hands. You need to take a regular nut with exactly the same M12 thread and screw it onto the broken tap. In a situation where the tap is broken off so that it is impossible to screw a nut onto it, you can take a bolt with a corresponding thread about 10 centimeters long and grind grooves on it similar to the grooves of the tap. Or you can do it more radically, but at the same time simpler. Go to the store for a new tap. The tap is equipped with three grooves into which you need to insert nails of the appropriate size. This must be done in such a way that their ends protrude beyond the end of the tap by about 10 mm. Try to insert the resulting structure into the sleeve with the broken end of the tap. It may not work out right away, but with the right amount of persistence the operation can be easily accomplished. After this, you can try to unscrew the piece and try to unscrew the bushing again. As a rule, after a few turns the bushing will begin to rotate and can be carefully unscrewed. If the bushing is very stuck, you will have to cut the thread in it approximately 6 or 8 turns. After this, remove the tap, and in its place screw in a bolt of a suitable size and use it to remove the sleeve. When a new one is inserted in its place, it is slightly pressed in.
Removing the starter
Before removing the starter, you need to prepare two keys, 10 and 13, they will be needed in order to remove the terminal from the battery. To avoid short circuit, first remove the negative terminal. If your car has an injector, you will have to remove the air filter located above the starter.
The VAZ-2109 starter can be dismantled in two ways: through the top or through the bottom. If the second option is chosen, then you need to temporarily remove the crankcase protection so that it does not interfere. Next, you need to disconnect the solenoid relay from the two wires. First, we disconnect the power (thick) wire through which voltage is supplied to the starter, then the thin wire needed to power the relay winding.
The thin wire can simply be pulled out by hand. To turn off the power, you need to use a 13 key to unscrew the nut from the contact of the solenoid relay. After disconnecting the wires, move them aside.
Next, you need to unscrew the three nuts securing the starter to the clutch block. To do this, use the key number 13.
After unscrewing the nuts, you need to pull the body to the right and move it away from the studs. Now you can pull the starter out through the top or bottom and start repairing it.
Place the dismantled starter on a workbench and remove all dirt from it. Disconnect the solenoid relay, which is secured by two screwdriver-head bolts. Next, remove the anchor from the metal bendix plates. Take a 10mm wrench and unscrew the rear starter cover. After removing the cover, you will have a view of the starter axis, from which you need to remove the locking ring. It can be removed using a flathead screwdriver.
The starter housing on the “nine” consists of three parts, which is held in place by three studs that tighten it. In the process of unscrewing the nuts on the studs, all parts of the unit are disconnected, so disassembling the starter will not be accompanied by difficulties. There are two types of starters: with and without a planetary gearbox, the collectors of which are slightly different.
Recommend: Top 10 Brake Pads
If a planetary gearbox is installed in the VAZ-2109 starter, its brushes will be located parallel to the body, in the second option - perpendicular to the starter axis. The old bushing is securely pressed into the starter housing, so you will have to try hard to remove it. To get rid of the old bushing, take a hammer, a piece of pipe of suitable diameter, or
mandrel. Place it against the bushing and use sharp, short blows of a hammer to knock it out of its seat. The main thing is not to overdo it in the process, since the starter cover can burst at any moment, and there will be nothing to replace it with.
To avoid having to look for a similar starter from which you can remove the cover, be extremely careful. Before pressing in a new bushing, it is advisable to go over the installation site with fine-grained sandpaper. To press in a new bushing, it is best to use the old one, since it is made of soft metal and will soften the impact force during installation, this will prevent cracks from appearing on the cover body. While the starter is disassembled, inspect the brushes; they may need to be replaced. Reassembling the starter is done in reverse order.
To check the starter's operation, connect it to the battery. Smooth, quiet operation will confirm that the process of replacing the bushings and assembling the starter was completed correctly. Then you can install it in its place.
Consequences of using worn bushings
Bushing wear is a very serious malfunction, the consequences of which affect the operation of the entire mechanism. Operating a car with a starter with worn bushings leads to tragic consequences, which include:
· High heating of the armature and stator windings, as a result of which the starter refuses to work.
· Melting of the insulating bakelite due to high temperature causes an interturn short circuit in the winding wires or a short circuit.
· The increased load caused by worn bushings, which is present when the shaft rotates, causes wear of the brushes and the commutator plates in contact with them, which leads to premature wear of the brushes.
Starter mechanism malfunctions
If any difficulties arise with starting the car, this unit is the first to be suspected, but now, knowing the design of the VAZ 2109 starter, you will quickly figure out where to look. Various sounds similar to metal grinding should also alert you; it is quite possible that your VAZ 2109 will need to disassemble the starter. The reason may lie in the flywheel, and its crown will need to be replaced. In this case, the car will most likely start, just not right away.
But if the car does not start and there are no alarming sounds, then you may have to replace the clutch. Disassemble the starter and dismantle it, try turning it in both directions. If it rotates freely, then calmly throw away the failed part. You can understand that it is necessary to remove and replace worn starter brushes installed on a VAZ 2109 by a characteristic click, after which the expected engine start will not take place.
The starter on a VAZ 2109 does not work, what should I do?
The design of starters on the VAZ 2109 has fairly good reliability indicators. But with use and over time, they still fail.
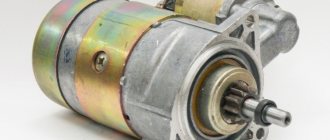
Appearance of the device
Design and operating principle
To understand the features of the repair, you must first study the design of the starter and understand how it works for the benefit of your car.
Let's start with the design. It includes four main nodes.
Knot
Peculiarities
It transmits direct current through four brushes
Freewheel with gear
A clutch or bendix drives the flywheel of your car's engine.
Serves to extend the bendix with gear when turning on the electrical appliance
Ensure easy rotation of the clutch, rotor, and gear. One bushing is located inside the starter, and the second is in the clutch housing.
Having familiarized yourself with the starter diagram, you can discuss the principle of its operation.
Typical faults
It is better to start diagnosing the starter even before you remove it.
After dismantling, some signs of failure, by which the source of the problems can be determined, can no longer be determined.
Signs of a faulty element include:
Checking the dismantled unit
Before blaming the starter for everything, take the time to look under the hood and check the condition of the terminal contacts and connectors. Also pay attention to whether everything is ok with the battery. Only after this can you start working on the starter.
Diagnostics
To carry out diagnostics, arm yourself with a conventional tester with voltmeter mode.
Removal
Well, the check showed that the starter needs to be repaired. Therefore, the first thing we do is dismantle it.
Before starting work, be sure to clean the device from accumulated dirt so that it does not get inside the structure and reduce all repair efforts to nothing.
Repair
Next, you have to check the condition one by one and take appropriate measures to eliminate problems with the following components of the starter:
Now let's talk about everything one by one.
Assembly
After all faults have been eliminated, you can begin assembling the VAZ 2109 starter. Before assembling the device, all parts should be cleaned of dust and dirt. Sometimes by cleaning parts you can restore the functionality of the device.
Assembling the starter does not take much time. The assembled mechanism is installed in its regular place. Next, a connector with wires is connected to it. After final assembly, you should check the device for functionality.
If it was not possible to repair the device, then the VAZ 2109 starter will need to be replaced. Knowing how to remove the starter, replacing it with a new unit is not difficult. Thus, you can repair your car yourself, saving on service station maintenance.
Sorry, there are no surveys available at this time.