Published:
04.03.2017
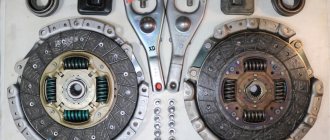
Wear of starter bushings is a fairly common problem in cars that have been in use for a long time and require maintenance. Despite the fact that at the production stage a significant resource is put into these parts, over time they are still subject to critical wear and tear and become unable to perform their function. That is, metal-ceramic and bronze bushings, in fact, are consumables, the service life of which depends on the quality of manufacture and intensity of use. Therefore, sooner or later the car owner has to contact a car service for a replacement or resolve the issue independently. But to do this, you need to know how to change the bushings on the starter without damaging the parts themselves and their seats.
How to determine that the problem when the engine starting mechanism malfunctions lies precisely in the bushings that are unsuitable for further use? First of all, if they are worn out or completely destroyed, excessive axial runout of the rotor appears. This, in turn, causes loss of contact and lack of mass on the rotor winding. As a result, the starter may simply stop working, and if the engine manages to start after a while, then extraneous noises can be clearly heard during the process.
The bushings wear out, so they will need to be replaced for normal operation of the starter.
What removal tools might be useful?
This work is best done in a garage; there must be a pit. The ideal option would be to remove the box on an overpass. But if there is no hole in the garage, you can use a jack instead. Also, you need to stock up on stands to secure the machine, since this must happen at some height. This is why the process is very difficult to complete alone. It is worth asking a friend for help, or if there is no such person, you can hire him in a special company.
To change the bushings, you need the following tools:
- The most important tool that may come in handy is a basic set of keys. They can be of different sizes, this will greatly simplify the work.
- Equally important is the mounting. Without it, it is impossible to perform high-quality work that will last a very long time.
- Also, in order to change the bushings, you will need a rag.
- And the last, mandatory tool on this list is a large container, which will be designed to drain all the oil.
These tools, which are contained in this list, must be carefully prepared in advance. In your work, you can use not only wrenches, but also ring wrenches. Because there is a rotating head, the process of removing the transmission can be very quick and easy. The main thing to remember is to fix the machine; it is necessary in order to have access to the casing, which is located below.
Assembly
After all faults have been eliminated, you can begin assembling the VAZ 2109 starter. Before assembling the device, all parts should be cleaned of dust and dirt. Sometimes by cleaning parts you can restore the functionality of the device.
Assembling the starter does not take much time. The assembled mechanism is installed in its regular place. Next, a connector with wires is connected to it. After final assembly, you should check the device for functionality.
If it was not possible to repair the device, then the VAZ 2109 starter will need to be replaced. Knowing how to remove the starter, replacing it with a new unit is not difficult. Thus, you can repair your car yourself, saving on service station maintenance.
Sorry, there are no surveys available at this time.
How to change bushings on a VAZ 2109 starter?
The car box itself can weigh more than 30 kilograms, it’s worth knowing this in advance in order to install a winch for a small fixation of all the parts present. Also, do not forget that there should be a lot of light in the room, because there are small details, and due to the presence of dirt, it may seem that they have disappeared.
Replacing the starter bushing on an Oka car
Despite the fact that the design of the starter on the Oka is implemented on a principle similar to the VAZ-2109 (the front bushing is also located in the clutch housing), the execution of the engine starting mechanism turned out to be extremely unsuccessful, as were most other components of this car. The main reason for this is the desire of designers to reduce the cost of the production process as much as possible. It is for this reason that bushings are manufactured using technology taken from powder metallurgy, and a combination of graphite chips and bronze is used as the starting material. Because of this, these parts have a very small margin of safety, which negatively affects their service life.
For those car enthusiasts who are interested in how to replace the starter bushing on the Oka, you need to know about one more drawback of the engine of this car. We are talking about a seat in the clutch housing itself, which breaks down unevenly during long-term operation. Therefore, if you buy a standard size product (external diameter 13.03 mm) to replace it, then most likely it will fit into place too loosely and even begin to dangle. This should not be allowed, as the part will very soon become unusable. Knowing this feature, experts recommend using a repair size bushing (external diameter 14 mm), but it often turns out that its diameter does not correspond to the size and even shape of the seat.
What is the algorithm of actions?
- It is necessary to very carefully and carefully disconnect the entire negative terminal, which should be located on the battery itself.
- Then, you will need to drain the pre-prepared oil into a completely different, deep container.
- Next, you need to remove the mudguard, as well as all kinds of crankcase protection.
- Then, you need to dismantle all the nuts, and then the wheels. After completing this process, you will need to slightly raise the engine itself, and then slightly fix it in this position. This can be done using stands, which can be made from various materials.
- After completing the previous processes, you can move on to the main ones - remove the entire cable.
- Next, you can remove the starter. It’s also better to dismantle it entirely, then secure it to the wires that are located next to it.
- After this, you need to remove all kinds of ground wires. Also, do not forget about the bolts that need to be unscrewed.
- And the last, final stage will be removing the food stretcher from the machine, which is located on the left side of it.
Replacing starter bushings for VAZ 2109
The operation of the starter is, first of all, the correct and coordinated functioning of all components, as well as the mechanisms as a whole, which in turn affect the operation of the machine. Bendix, armature, and bearings are the most “crystal” parts that most often fail. The part of the armature that moves consists entirely of a pair of bushings, a shaft that rotates between two bushings that are soaked in oil. One bushing is installed in the rear cover of the starter. Another bushing is installed in the clutch housing. What symptoms can be used to determine that the starter bushings have failed? The most basic symptom is a loud noise that comes from the side of the engine compartment, after which it increases in intensity and decreases. There is also a possibility that the bushing may fail and signal with sudden jerks. If you have such problems, then you need to urgently diagnose the procedure. Otherwise, everything may get worse. If during diagnostics you see mechanical damage, chips, cracks, etc., then you will urgently need to replace the parts. The bushing often breaks in the clutch housing; the rear cover bushing is the least likely to break. *Tips from experts on replacing bushings: Replacing bushings is not the simplest procedure; here you need to have special tools on hand. Other starters have previously been installed on parts of the vehicle, but we can say that by analogy they are quite the same. The bushing is pressed into the starter, again it is difficult to get it out. In order to do this, you will need a special puller. After all, you need a tap to screw the bushing in as far as possible; it will just be able to remove the bushing from there. You can also pull out the bushing using a screwdriver, which is sharpened for an awl, or simply use a chisel to crumble the part. In two cases, you need to be extremely careful to ensure that the seat remains intact. When you change the bushing, we will need to disassemble the starter; the element is located at the rear of the starter. Of course, there are many opinions, one of them is that before you decide to install a new bushing in the starter, you need to modify it. In order for the anchor to rotate smoothly, you will need a 12 mm screwdriver. Then you can install the bushing in its place. What do we need for work? - Screwdriver and chisel. — Tap with puller. - Protroyer. — Open-end keys for “ten” and “thirteen.” - Hammer. — A set that includes bushings.
Using a ten key, we need to carefully loosen the tightening of the nut bolts.
We need to remove the negative terminal from the battery.
Using a ten key, unscrew the three bolts that secure the starter.
Using a key set to “thirteen” we need to unscrew the nut that secures the terminal going to the battery. You need to remove the connector from the starter relay output.
We dismantle the starter.
We need to screw the tap into the bushing.
Remove the front bushing
You need to get a new bushing.
Let's use a bolt and press it into the punishment cell.
Using a screwdriver, pry up the locking ring and remove it completely.
Remove the restrictive ring.
Using a ten-point wrench, unscrew the tie rod nuts.
Remove the pins carefully.
Remove the starter cover
Next, you will need a punch that fits the diameter and knock out the sleeve carefully.
Let's use a new bushing.
Take a hammer and hammer the bushing into place.
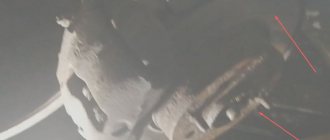
The photo shows the bushing that we hammered.
Reassemble the starter and all other parts in reverse order.
The starter on a VAZ 2109 does not work, what should I do?
The design of starters on the VAZ 2109 has fairly good reliability indicators. But with use and over time, they still fail.
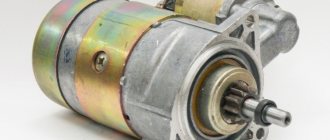
Appearance of the device
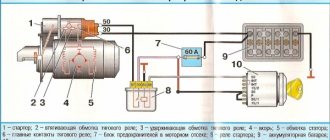
Design and operating principle
To understand the features of the repair, you must first study the design of the starter and understand how it works for the benefit of your car.
Let's start with the design. It includes four main nodes.
Knot
Peculiarities
It transmits direct current through four brushes
Freewheel with gear
A clutch or bendix drives the flywheel of your car's engine.
Serves to extend the bendix with gear when turning on the electrical appliance
Ensure easy rotation of the clutch, rotor, and gear. One bushing is located inside the starter, and the second is in the clutch housing.
Device diagram
Having familiarized yourself with the starter diagram, you can discuss the principle of its operation.
Typical faults
It is better to start diagnosing the starter even before you remove it.
Design and operating principle
To understand the features of the repair, you must first study the design of the starter and understand how it works for the benefit of your car.
Let's start with the design. It includes four main nodes.
| Knot | Peculiarities |
| Electric motor | It transmits direct current through four brushes |
| Freewheel with gear | A clutch or bendix drives the flywheel of your car's engine. |
| Traction relay | Serves to extend the bendix with gear when turning on the electrical appliance |
| Bushings | Ensure easy rotation of the clutch, rotor, and gear. One bushing is located inside the starter, and the second is in the clutch housing. |
Device diagram
Having familiarized yourself with the starter diagram, you can discuss the principle of its operation.
The operating principle is to convert an electrical signal into the rotational movement of a drive gear. Current is transmitted through the brushes to the poles of the electric motor. At the same time, the clutch extends and the gear is connected to the flywheel ring. To start the engine you need a quick but easy rotation of the starter. When the engine starts, the clutch returns to its original position.
We recommend: 5 common signs of a faulty fuel pump (fuel pump)