How to tighten the handbrake of a VAZ 2107. Adjusting the handbrake
Locking the wheels when parking a car is the task of the parking or hand brake. It is more often used on bumpy road sections.
A well-adjusted handbrake should lock the car in one place when tightened by 4-6 teeth with a surface slope of 25%. If this does not happen, the parking brake needs to be adjusted or repaired.
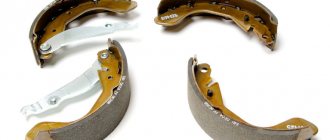
The breakdown of the handbrake is a common occurrence, since it is enough to just start the car without removing it from the handbrake. In this case, the pads will wear off and will no longer reach the brake drum.
Reasons for failure of the VAZ 2107 handbrake
Most likely, the cause of the breakdown lies in a stretched or unadjusted handbrake cable. A tightening should be performed if the car does not lock even after 5-7 clicks. This procedure on a VAZ 2107 can be done no more than 4 times, after which the brake pads will need to be replaced.
Another source of handbrake malfunction may be cable looping due to moisture, rust, or dirt that gets on the cable while moving. This can be eliminated by cleaning the cable and lubricating it. If after some time the breakdown occurs again, the handbrake cable 2107 needs to be replaced .
Completion of work using the second method
When carrying out repairs, try not to allow the hose to become twisted. This may cause damage and fluid leakage. First you need to tighten the edge on which the thread is external. Then the edge with the internal thread is tightened. How to make a hydraulic handbrake yourself? The final stage looks like this:
- Fix the position of the new system, check the tightness of all threaded connections.
- Fill the expansion tank with brake fluid.
- Bleed the system according to the scheme from the far cylinder to the near one. Add fluid to the reservoir in a timely manner. Otherwise, pumping will need to be done again.
- Check the functionality of the brake system. Are the calipers pressed out normally?
Afterwards, assemble all the disassembled components and replace the wheels. Before your first ride, make sure the brakes work properly. If there are problems, fix them immediately. When driving for the first time, do not accelerate to high speed so that you can at least stop the car with the engine. All of the above methods are suitable for installing a hydraulic handbrake with your own hands on a VAZ of any model, as well as on cars from other manufacturers (including foreign ones).
Also check out
- Self-replacement of the VAZ 2110 CV joint
- Instructions for replacing the VAZ 2115 wheel bearing at home
- How to replace the rear wheel bearing and brake drum of a VAZ 2114
In addition, to correct the breakdown, it is necessary to remove the jamming defect of the handbrake lever, and perhaps also the ratchet mechanism of the ratchet.
Therefore, before repairing the handbrake, you should make sure that it is adjusted correctly and that the cause of the problem is not in the cable. At the same time, the technical condition of the rear brakes, cable, and handbrake drive must be good.
Required tools:
- 2 keys for “13”;
- pliers;
- jack.
Why do you need a hydraulic handbrake?
The argument about stretching the cable of a mechanical handbrake is a strong argument, but not the only one or even the main one. This tuning is preferred by lovers of sports driving, since the hydraulic parking brake allows you to brake the rear wheels, and with unequal effectiveness. Under normal conditions, such actions are possible only with remarkable driving skills, and even then not on all cars. Note that with such a radical modification of the car’s brake system, the regulator must be installed between the main brake cylinder and the hydraulic handbrake - only in this case will you be able to redistribute the braking force, which is accentuated on the rear axle shaft, over a fairly large range, while the power of the front brakes will also increase. But remember that, according to the rules for operating vehicles, unauthorized intervention to change the standard design of the brake system is unacceptable if this is not approved by the car manufacturer.
How to tighten the handbrake of a VAZ 2107 yourself
- Place the car on a viewing hole or lift.
- Jack up the rear of the car, hang the rear wheels (they should rotate freely).
- Tighten the handbrake to the locking position (5-7 clicks).
- Remove dirt from the adjusting bolt and handbrake nuts.
- Using keys “13”, tighten (or loosen) the nut that adjusts the tension of the handbrake. It is worth pulling until the free rotation of the wheels stops (at this time you can make sure that there is no play or friction).
How to tighten the handbrake of a VAZ 2107. Adjusting the handbrake
- After tightening the adjusting nut and locking the wheels, you need to tighten the adjusting nut completely. This will reduce the free play of the handbrake.
- Make sure the wheels brake, then tighten the locknut.
How to tighten the handbrake of a VAZ 2107. Adjusting the handbrake
- Lubricate the threaded holes (optionally, “Litolom” lubricant).
- Make sure that the protective sheath of the hand rope is not damaged.
This the tightening of the VAZ 2107 handbrake . All that remains is to lower the car from the jack and check the handbrake in action.
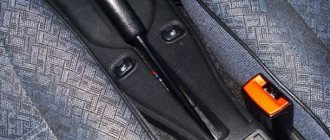
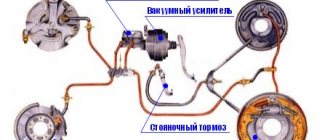
Cable drive design
The handbrake device of this type, installed on the vast majority of passenger cars, is simple and provides for autonomous activation, independent of the main system. How standard service brakes function:
- The driver pressing the pedal in the cabin sets the piston of the main hydraulic cylinder in motion.
- Under the influence of the piston, pressure is created in tubes with incompressible fluid laid to all wheels.
- Transmitted to the working cylinder of the wheel, fluid pressure pushes the pistons of the drum or disc brake. In the first case, the pads are moved apart and the force of friction stops the rotation of the drum. In the second, they tightly compress the spinning disk.
For parking braking, the handbrake uses standard elements - pads, but moves them apart with its own mechanical drive, consisting of the following parts:
- the above-mentioned lever in the cabin, equipped with a locking mechanism in different positions and a push-button unlocking device;
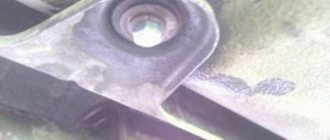
- the main cable connected to the lever and ending with a mounting bracket or an arcuate guide;
- secondary cables connected to the main one and connected to the brake levers of the rear wheels;
- cable adjustment mechanisms (spacers, nuts and springs), suspension brackets to the underbody;
- spacers between the pads.
The rod system is usually hidden under the bottom in the recess of the central tunnel. Cable drives are equipped with protective covers that prevent corrosion. How does a mechanical handbrake work:
- The driver lifts a handle in the cabin, which automatically locks into the selected position.
- The traction moves the main cable forward, and it carries the secondary drives along with it through a mounting bracket.
- A lever inside the drum mechanism rotates and pushes the upper ends of the shoes apart. The automatic regulation function is taken over by the spacer bar.
- When the driver removes the car from the handbrake, the springs inside the drums tilt the lever back and the pads move. At the same time, the spring pulls the cable drive back to its original position.
The parking brake described above locks the drum wheels mounted on the rear axle. On cars equipped with brake discs, the same principle works: a cable pulls a lever, which causes the pads to compress. The only difference is the location and shape of the lever - on disc brakes it is placed outside, behind the hub.
↑ Inspection and repair
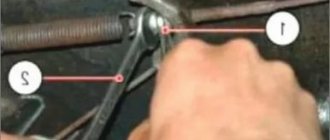
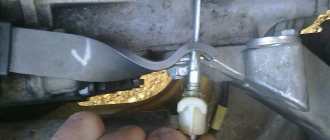
- After loosening the locknut 26 and the adjusting nut 27, remove the tension spring 11, then completely unscrew the locknut and nut.
- Disconnect the cable brackets 15 from the body floor and the rear cable end from the brake shield; remove the brackets and rear cable.
- Remove roller 8 with sleeve 7.
- Remove the lever protective cover, and then the lever assembly and front cable.
- After removing the cotter pin and thrust washer, disconnect the front cable from the handbrake lever.
- Install the parking brake in the reverse order of removal, followed by its adjustment.
Installation
Handbrake VAZ 2110
According to the advice of experts, there are two options for assembling the handbrake hydraulics.
Method one
- An additional clutch master cylinder from a VAZ-2101 is installed under the hood.
- The tank is removed.
- An adapter is made for the fitting, that is, an internal thread is cut and a threaded washer is placed under the fitting.
- The assembly is carried out from the main brake to the clutch cylinder, regulator, hydraulic handbrake and to the rear circuit.
For connection, use brake pipes from the Gazelle, select according to size. To fasten the tubes, use the places where the handbrake cable is fastened, installing additional fastenings on the bottom of the body.
Method two
Under the hood, replacements are being made on the brake master cylinder:
- Unscrew the tube from the rear left wheel and install the plug.
- Then disconnect the tube of the front right wheel and screw it into place of the rear right wheel.
Note: the work is carried out carefully, it is recommended to drain the liquid in advance. When it comes into contact with metal, it corrodes it. When using rags, it is recommended to put them on a rack or special plastic containers.
- Inside the car, install the handbrake lever between the front seats.
- Instead of a pendulum, a bolt is placed in the regulator and screwed to the bottom of the body.
Note: it is best to remove the front seats of the car and remove them from the interior. So that they do not interfere with work and do not get dirty.
- Lay the brake pipe from the engine compartment along the bottom of the passenger compartment.
- Lay the tubes from the regulator along the bottom of the body inside the passenger compartment.
- Carefully select the tubes and install them up to the rear brake calipers.
- Install a classic brake hose onto the rear beam bracket.
Features of the braking system
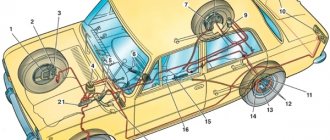
One of the features of the VAZ-2107 brake circuit is the presence of a dual-circuit system. The essence of a dual-circuit system is that the working drive is divided into two parts, each of which supplies fluid to only two mechanisms, while the circuits do not interact with each other.
The presence of two circuits ensures the operability of the brakes of at least two wheels in the event of depressurization of one of the circuits. That is, even if the pipelines of one circuit are punctured, the second will remain fully operational, which will ensure the functioning of the brakes.
In the VAZ-2107, the circuits are divided in such a way that the drive of the front axle mechanisms is separated from the drive of the rear mechanisms. This allows you not only to maintain the functionality of the system when one of the circuits fails, but also to pump each circuit separately. That is, if one of the circuits is airy, then it needs to be pumped, but it is not necessary to service the second one.
This is only general information about how the VAZ-2107 brake system works, and does not include all the details on its maintenance and repair. In general, the brakes of this car work quite well, although some elements of it cause complaints from car owners.
Basic faults
The most common malfunction of the VAZ 2107 brake system is the ineffectiveness of the braking itself. The driver himself can notice this malfunction by eye:
- when braking, the braking distance increases;
- The braking process itself takes longer than before.
This malfunction can be caused by a number of breakdowns:
- there are air pockets in the system;
- leakage of brake fluid;
- severe wear of the pads;
- cylinder failure.
In addition to ineffective braking, other malfunctions may also occur:
- strong grinding noise (noise) when squeezing the brake pedal;
- the car swerves to the sides when slowing down;
- softened brake pedal lowered;
- vibrations and jerking when pressing the pedal.