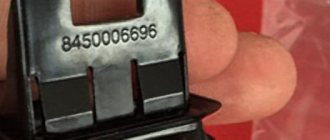
Modern cars are much more comfortable than the models of the past; computer technologies serve to make drivers more comfortable. The clutch sensor on the Lada Vesta is needed to synchronize the rotation of the crankshaft and the gearbox input shaft. In this case, there are two types of devices, one is intended for a manual gearbox, and the second for a robotic gearbox.
Why an additional system is required: special gears are responsible for synchronizing the speed of the power plant with the rotation of the gearbox input shaft. If the synchronizer of any gear wears out, you will not be able to change gear. The presence of a sensor helps eliminate synchronizers from the circuit, since the electronic signal is transmitted directly to the control unit, and the power unit raises or lowers the speed to the required level. The system also helps to cope with the jerking of the car when changing gears.
The sensor installed on the Lada Vesta has two position options:
- "Enabled"
- "Turned off".
The control unit adjusts the engine speed to the position automatically. With automatic transmission, the system works in exactly the same way, and the data is transmitted to the electronic unit. The robotic box allows you to take into account the speed of movement and some other factors.
Sensor location and dismantling process
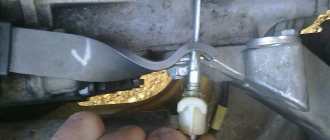
On the Lada Vesta, the sensor is located near the steering shaft, next to the pedal. If jerking or jerking occurs when changing gear, the car owner should check and adjust it.
To dismantle an element, you need:
- press the latch and carefully disconnect the block with wires;
- Rotate the component counterclockwise ninety degrees and remove it.
When installing the part in place, you need to make sure that the brake pedal is in the upper position; the actions are performed in the reverse order.
After installation, the pedal is carefully lowered, after which the block with wires is connected.
Replacing the clutch on a Lada Vesta with gearbox 21807 / JR3 / JR5 (MT)
- inspection hole;
- assistant;
- wheel chocks;
- jack;
- supports – 2;
- keys: wheel, 18 mm (2 pcs.);
- socket heads: 8, 10, 13, 16, 17, 18, 30 mm, Torx E10;
- bits: Torx T20;
- centering mandrel;
- mounting blade;
- hexagon – 5mm;
- tetrahedron – 8mm;
- empty container for transmission oil – 5 l;
- screwdriver: slotted, Phillips;
- hammer;
- barb or metal rod.
The procedure is as follows:
- Drive into the inspection hole, engage the parking brake, and place chocks under the rear wheels.
- Pump out the brake fluid from the brake system hydraulic reservoir to a level below the fitting to which the clutch hoses are connected.
- Loosen the wheel bolts and hub nuts on the front wheels, raise the front of the car on a jack, install the supports and remove the jack.
- Remove the wheels.
- Remove the gearbox: Unscrew the 13 bolts securing the engine splash guard (protection) and the lower clutch housing cover..
- Remove the battery and its shelf.
- Remove the air filter housing.
- Disconnect the gear selection cables by pressing the lock on the gearbox housing and disconnect the cable end. Press the fasteners securing the cable sheath to the box body. Remove the cable from the repair area.
- Disconnect the hose supplying the brake fluid to the clutch slave cylinder and drain it.
- Disconnect the wiring connectors: oxygen sensor, reversing light switch.
- Drain the oil by unscrewing the plug with a 17" socket (21807) or a square socket (JR3 / JR5).
- Remove the left fender liner by removing the screws using a T20 Torx bit and removing the clips using a slotted screwdriver.
- Place a jack under the gearbox and lift it, unloading the left power unit support.
- Unscrew the pinch bolt from the steering gear driveshaft and disconnect it from the steering column.
- Remove the starter by unscrewing the nut from the power contact with a “13” socket and 3 mounting bolts with an E10 socket.
- Disconnect the stabilizer struts from the shock absorber struts by unscrewing the nut from the ball joint pin with a 16mm socket, holding the pin from turning with a hexagon.
- Remove the rear engine mount by unscrewing with a socket and an 18mm wrench the 3 bolts securing the mount to the front subframe and gearbox housing.
- Disconnect the ball joints from the steering knuckles by unscrewing the nuts with a 18mm socket.
- Remove the front subframe longitudinal members,
- Remove the subframe by unscrewing the 4 bolts securing it to the body using a 18mm head.
- Remove the front wheel drives: unscrew the hub nuts, pull the outer CV joint shank out of the hub. With the mounting blade resting on the inner CV joint, push the drive out of the gearbox.
- Remove the bolts securing the gearbox to the cylinder block.
- Remove the left power unit support by unscrewing with a 16" head the 4 bolts securing it to the body, and unscrewing with a 18" head the 2 bolts securing the support to the gearbox.
- Remove the unit from the vehicle.
Unscrew the 6 bolts securing the clutch to the flywheel with an “8” head, holding the latter from turning with the help of a mounting spade. Remove the clutch. It is recommended to replace the slave cylinder. Check the condition of the gearbox input shaft splines and the absence of oil leakage from the oil seal. Insert the centering mandrel into the hole in the crankshaft and put the driven disc on it so that the protruding part faces the clutch housing. Install the clutch and other parts in reverse order. Bleed the clutch hydraulic drive.
Checking the Clutch Sensor
To check what position the sensor is in, you will need an ohmmeter. Next you need to follow this algorithm:
- the rod lock is moved to the extreme right position using a flat screwdriver;
- ohmmeter probes are connected to terminals 3 and 4;
- if the rod is in the free position, the resistance value should tend to infinity, that is, the circuit is in an open state;
- the circuit closes; if you press on the rod, the ohmmeter will show a resistance of about zero.
If the readings are incorrect, the sensor has failed and requires replacement.
Where is the clutch switch located?
The location of the clutch detector on the “mechanics” is perfectly illustrated by a universal schematic image:
The mounting location of the sensor is where the clutch pedal is attached. The device is located in such a way that one end of the lever, the pusher, touches the limit switch, and accordingly, when pressed/released, the contacts are closed/opened (sensor on/off).
Replacing and adjusting the sensor
If you need to replace a faulty part on a car with a manual transmission, just install a new one. If the gearbox is robotic, then in addition to replacing the element itself, adjustments will need to be made.
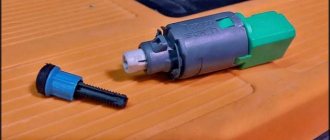
The dismantled sensor must be measured - the rod should protrude at a distance of 17 to 18 millimeters. There is a special marking on the rod itself. It also helps with navigation. Usually it is required that the rod extends three or four notches.
The rod can be adjusted by gently pulling the end. If during the process the rod completely separates from the sensor or it is necessary to pull the end three or more times to achieve the desired values, then the element is faulty and a new part must be purchased.
What does adjustment help with?
If the element is in working order and the adjustment is carried out correctly, positive changes will be noted:
- the movement of the machine will become smooth;
- the car will not jerk when changing gears;
- There will be no shaking when releasing the gas.
The adjustment process does not take much time and is easily carried out on your own without the involvement of specialists from car services.
If after installation the rod is not held at the specified distance, you can try to fix it using a small piece of plastic tube or a spring of a suitable diameter.
If after adjustment the car behaves as before, it is recommended to contact a service center and carry out diagnostics.
Total
If it clicks when you release or squeeze the clutch of a Lada Vesta in the cabin, the reason may be in the limit switch, pedal support or hydraulic cylinder design. Knocks in the engine compartment are more serious - the dealer is less likely to refuse to find out their cause, since this may indicate a malfunction of important parts - springs, release bearings, working cylinder.
As a temporary solution to a serious knock, drivers use the accelerator. You need to get used to this: when the clutch is released, the driver applies more gas and the knocking disappears. Typically, such actions indicate defects in the release support guide.
Lada Vesta became the new flagship of AvtoVAZ in 2015. External design, interior and equipment began to differ radically from all previous models. For the first time in many years, the new product was able to compete with the most popular foreign cars from Europe and Asia. Moreover, Vesta is not inferior to them in quality, and in some cases can give them a head start.
Jerks when starting off
If you notice that the movement is accompanied by twitching, this is a serious reason to seek help from specialists. The Lada Vesta can shake for various reasons (for example, ignition failures), but if it is the clutch mechanism that gives the effect, we are talking about scrap parts. Obsolescence will never be accompanied by jerks, but destruction, the breaking off of pieces of metal, manifests itself this way. The presence of freely moving debris can cause great damage to other Vesta nodes. It is recommended to carry out repairs immediately.
Messages 13
1 Topic from Andre-y 2016-09-04 12:43:27
- Andrey
- New member
- Inactive
- Messages: 3
- Thank you: 0
Topic: Vesta clutch adjustment
Hello to everyone who will come.
I’ve driven the West for 1000 km and I can’t get used to the clutch, just when I’m moving off, well, the clutch grabs at the very end, so you still have to release it very slowly and for a long time in order to start normally and not stall the engine, and keep the speed at least 1500-1700. Is it so hard for everyone to start moving and is it possible to adjust the clutch? Before this I had a Priora, even if I let go of the clutch more frequently, I still pulled away confidently, but in the West the engine stalled.
2 Reply from Fan 2016-09-04 19:07:49
- Fan
- Moderator
- Inactive
- From: Smolensk region
- Messages: 1,017
- Thank you: 204
Re: Vesta clutch adjustment
I got into the Vesta in the cabin and immediately took off and drove off. You probably don’t have enough experience; you need to feel when the engine is choke. And don’t forget that Vesta, unlike Priora, has a hydraulic clutch, not a cable.
3 Reply from Andre-y 2016-09-04 19:42:03
- Andrey
- New member
- Inactive
- Messages: 3
- Thank you: 0
Re: Vesta clutch adjustment
I got into the Vesta in the cabin and immediately took off and drove off. You probably don’t have enough experience; you need to feel when the engine is choke. And don’t forget that Vesta, unlike Priora, has a hydraulic clutch, not a cable.
I went for a test drive, and somehow I didn’t feel any grip, so I sat down and drove off. And when I bought the Westa, I started driving, and that’s where it all began. Maybe during the test drive the clutch was adjusted a little better and grabbed in the middle, but on mine it was at the very end.
What is an electric drive mechanism?
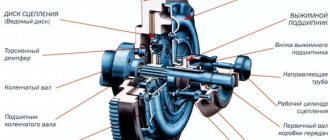
As for the electrical wire, it directly affects the clutch system fork itself. If the fork rotates, a certain force begins to act through the release bearing on the petals of the pressure spring.
There is no gap in the shutdown drive - this ensures that the spring leaves are constantly pressed against the clutch, and the bearing operates without any interruption.
There is no need to change the lubricant in the bearing - it is provided for the entire service life of this part. If the lubricant has run out, the bearing will make noise. In this case, it should be replaced - the same must be done when replacing clutch discs, no matter what condition the bearing is in.
If a problem with a hydraulic drive can be corrected by bleeding air, then adjusting the clutch on an automatic transmission is a much more complex procedure and is called adaptation. Such an operation can only be carried out at an authorized dealer by specialized technicians - the setup is performed using a computer.
Now AvtoVAZ is introducing into its products a clutch system of an improved design of the world standard, which is distinguished by more durable lining material and durable damper springs. New technologies will make the car start even softer and gear shifting smoother.