Start-Classic for UAZ Patriot with ZMZ-409 engine
The engine starting heater is designed to maintain the required coolant temperature at a certain level.
For example, a temperature of 40°C will provide the necessary conditions in the cylinder for a quick start of the engine, regardless of external conditions. Structurally, the electric heater is an affordable design compared to independent engine starting devices. A conventional heater with the prefix “electro” is a heating element with power wires located in the engine body. Among the advantages of such a device are:
- A simple design that allows you to install it yourself.
- Low cost, which is due to the design features.
- Possibility of later modernization. If necessary, for passenger cars it will be possible to add a timer, fuse sensor and other optional devices.
Before installing an engine heater from a stationary 220V network, get acquainted with the design features. The design is based on a tungsten heating coil located in the cylinder block. Depending on the power, a small volume of antifreeze can be heated relatively quickly.
The main disadvantage is the high energy consumption. In just one night, individual models consume up to 10 kW of electricity. That is why progressive samples are equipped with sensors to periodically disconnect the device from the network.
It is worth noting that the type of engine does not affect the performance of the device. Whether a gasoline or diesel engine is installed on the UAZ, the device is installed in the same way. Here the difference is not as great as matching the tire and wheel sizes for SUVs. With some skill and compliance with safety measures, it is not difficult to assemble an engine pre-heater with your own hands. To avoid unsuccessful experiments, consider the example of an original 220 V car heater.
How is chip tuning performed?
So, if you have decided to do the UAZ Patriot firmware yourself, then you need to stock up on quite a bit of patience, as well as special equipment:
- programmer: Combiloader, Galletto1260. This is a kind of connecting link between the laptop and the ECU;
- latest firmware version for a specific engine model;
- laptop or tablet with Windows operating system to download firmware.
It is recommended to use the so-called “Pertsovka” as firmware for the UAZ Patriot. Feedback from owners after chip tuning with this firmware is purely positive; there is a decrease in fuel consumption, as well as a noticeable increase in traction at the “lower” levels. In addition, quieter and “smoother” engine operation and more confident acceleration are possible.
All this is achieved thanks to the correct preparation of the fuel-air mixture, optimal SOP, and optimized transient modes. Chip tuning, in addition to all of the above, allows you to: increase the sensitivity of the gas pedal, smooth out dips during acceleration, improve overall dynamics, increase elasticity and smoothness.
ECU is a computer that connects to external devices using a special connector. The ECU program, also known as firmware, is written in the form of a table in which certain data is stored. This data is nothing more than the operating parameters of the motor. Next, the algorithm of actions is as follows:
- Let's try to get to the UAZ Patriot ECU, which is located behind the glove compartment. Possible difficulties include dismantling the rear wall of the glove compartment.
- Now you need to connect the laptop to the ECU via the programmer. The software required for firmware must be installed on the computer.
- In the next step you need to specify the path to the bootloader folder.
- It is necessary to apply voltage to the computer by turning the key in the ignition switch. There is no need to start the engine.
- After turning on the ignition, a message about selecting the firmware version should appear on the laptop. Select the one you need and launch it.
- Next, there are several options. You can change only certain engine characteristics, adjusting them to your driving style. Or, use a ready-made set of preset parameters.
- After selecting the parameters, the firmware installation begins.
- Once the installation is complete, you must turn off the ignition; only then can you disconnect the programmer. This is a kind of ECU reboot.
To summarize, we can confidently say that chip tuning is a very useful thing; it is the most affordable way to add a few horsepower and torque, which eliminates the need to climb inside the engine itself. And if for new cars its use is fraught with loss of warranty, then for used SUVs this method is definitely suitable.
Send to a friend
Email heater "SPUTNIK" UAZ DV.UMZ-421
The electric pre-heater AUTO+ SPUTNIK for UAZ models with a UMZ 1.5 kW engine is designed for pre-heating of the coolant of internal combustion engines of vehicles and units in the cold season.
Your friend's name is *:
Your friend's email address *:
Description
The electric pre-heater AUTO+ SPUTNIK for UAZ models with a UMZ 1.5 kW engine is designed for pre-heating of the coolant of internal combustion engines of vehicles and units in the cold season.
Supply voltage, V 220 Power consumption, W no more than 1500 Thermostat response temperature (shutdown), 95°C Thermostat return temperature (switch on), 65°C Electric shock protection class I Moisture protection degree IP34 Installation and operation:
The electric heater must not touch the engine housing or other parts of the vehicle.
The electric heater must be installed in a vertical position with the outlet pipe facing up, with a slight tilt allowed (no more than 15°).
Cut the hose into lengths: inlet hose 400 mm, outlet 230 mm. Secure the bracket to the heater with studs using washers and nuts. Place the sleeves on the corresponding heater pipes and secure the connections with clamps. Open the drain valve and drain the coolant. Open the drain valve. Unscrew the plug with K1/2 thread from the engine cylinder block on the right side along the direction of the vehicle. Clean the holes. Unscrew the engine foot mounting bolt on the right side along the direction of the car. Apply sealant to the threads of the K1/4 fitting and screw it in instead of the drain valve. Apply sealant to the threads of fitting K1/2 and screw it in instead of the plug. Secure the bracket with the heater with the engine foot bolt. Place the clamp on the outlet sleeve. Place the outlet hose on fitting K1/2 and secure the connection with a clamp. Pour 250 ml of coolant through the inlet hose into the heater. Place the inlet hose onto the fitting with a K1/4 thread and secure the connection with a clamp. Fill the cooling system. The power cable should be laid and secured with straps to ensure its safety from mechanical damage, as well as to prevent possible contact with moving and heated parts of the engine. Check the connections for coolant leaks and repair them if present. Start the engine for 3-5 minutes, and after stopping the engine, add coolant to the required level. Preparing for the first launch:
Fill the cooling system, check connections for leaks. Start the car engine and let it run for 5-10 minutes. Then stop the engine and add coolant if necessary. Connect the electric heater to the network. After 2-5 minutes of operation of the electric heater, check the inlet and outlet hoses. The outlet sleeve must be warmer than the inlet sleeve. Precautionary measures:
The heater can be operated only after the engine has warmed up to operating temperature (the thermostat must be open) and the efficiency of the interior heater has been checked. This must be done to eliminate air locks in the cooling system. It is prohibited to use electrical extension cords without a grounding wire and rated for a current of less than 15 A. It is prohibited to plug in the electric heater with the cover removed. Do not use the heater if there is no coolant in it.
ATTENTION. Our stock is replenished daily, so not all stock may be displayed. For complete information, please contact our consultants by toll-free number.
Site about off-road vehicles, SUVs, off-road vehicles
On all UAZ-3151 vehicles and on individual UAZ-31512, UAZ-31514, UAZ-31519 and UAZ-31513 vehicles, a starting heater was installed, designed to facilitate engine starting at ambient temperatures below minus 15 degrees by heating the coolant in the cooling system and oil in the engine crankcase. The fuel for the starting heater was gasoline used for the engine.
Starting heater UAZ-3151, general device.
The main part of the heater is a boiler of non-dismountable design, the cavities of which are permanently connected to the engine cooling system using inlet and outlet fittings and rubber hoses with clamps. The liquid jackets of the boiler are surrounded by two gas ducts, through which the gas formed during the combustion of the air-fuel mixture passes, heating the coolant.
At the bottom of the boiler there is a drain valve and a drain pipe connected to the combustion chamber of the boiler. In the combustion chamber of the boiler there are two threaded holes, into one of which a glow plug is screwed, and into the other - a fuel line fitting. To fill the coolant, the heater has a funnel with a stopper connected to the boiler liquid jacket with a rubber hose.
Air enters the combustion chamber of the boiler from a fan through a hose. A nozzle with a folding extension is connected to the boiler outlet pipe. Hot gas is removed from the gas ducts through it and, using a tray, is supplied to the engine oil sump.
Diagram of shielded electrical equipment of UAZ-3151 and UAZ-31513 vehicles with inclusion of the electrical circuit of the starting heater.
Operating principle of the UAZ-3151 starting heater.
Fuel is supplied to the starting heater boiler by gravity from the carburetor float chamber through a tap with an adjusting needle. In earlier versions of the heater, it was equipped with its own separate fuel tank. To supply air to the heater, a fan with a single-speed electric drive is installed on the radiator trim panel.
Fuel is pumped into the carburetor by an electric fuel pump installed on the left front part of the engine. The electric fuel pump is connected to the power system in parallel with the main pump and is designed for short-term operation, so after starting the engine it is necessary to turn it off.
Since the electric fan of the heater has one speed, when initially igniting the boiler, it is recommended to turn it on intermittently with a period of 1-2 seconds, not allowing it to develop a high rotation speed, so as not to overcool the glow plug and extinguish the resulting flame. When a stable combustion occurs, which is determined by noise, the fan must be turned on constantly.
The air-fuel mixture is ignited by a glow plug, which remains turned on until a stable combustion process is achieved in the boiler. Further ignition of the mixture occurs from the heated parts of the combustion chamber.
Hot gases give off some of the heat to the heated liquid, ensuring its thermosiphon circulation in a circle: boiler - outlet pipeline - engine cooling system jacket - supply pipeline - boiler. The exhaust gases leaving the boiler heat the oil in the engine crankcase.
The heater is controlled from the control panel. The glow plug on the panel serves to reduce the voltage in the glow plug circuit to 4 Volts and visually monitor its activation.
The procedure for starting the starting heater UAZ-3151.
If water is used as the coolant.
In exceptional cases, water may be used as a coolant for the UAZ-3151 engine. In conditions of low ambient temperatures, after the end of the day's operation of the car, when parking it for a long time, water is drained from the engine cooling system. In this case, before starting the starting heater, you must first prepare 10 liters of clean water in one container and separately another 3 liters in another.
Before starting work with the starting heater, you need to unscrew the plug from its filler funnel and remove the radiator cap, then clean the hole in the drain tube to ensure that excess gasoline drains when the heater starts.
After this, fold the exhaust pipe nozzle extension into the working position and turn on the electric fuel pump using the switch on the control panel, pumping fuel into the carburetor. Turn on the fan electric motor for 10-20 seconds, this will purge the combustion chamber and heater flues with air. Turn off the fan motor and turn on the glow plug.
Hold the switch lever in the on position for 15-20 seconds until the spark plug glows. The glow of the spark plug can be determined by the glow of the control coil on the heater control panel. Open the fuel tap 1-1.5 turns and after 3-5 seconds turn on the fan.
Initially, when igniting the boiler, it is recommended to turn on the electric fan intermittently with a period of 1-2 seconds, not allowing it to develop a high rotation speed, so as not to overcool the glow plug and extinguish the emerging flame.
As soon as you hear the first pop-flash in the combustion chamber, turn on the fan constantly. At the same time, a smooth hum of fuel combustion in the boiler should be heard. If the starting heater does not work, then stop the fuel supply, purge the combustion chamber and boiler flues and repeat the start again.
After the starting heater begins to operate stably, turn off the glow plug, adjust the fuel supply so that there is no emission of flame, and immediately pour 3 liters of water through the filler funnel of the heater boiler. When the coolant in the engine warms up, crank the engine crankshaft several times using the starting handle, then start the engine as usual and fill the cooling system with water to normal.
After this, turn off the electric fuel pump, close the fuel supply valve to the boiler and, after the fuel has stopped burning, turn off the fan motor. Failure to comply with the specified procedure for turning off the heater may result in a reverse flame emission and burning of the air supply hose.
Return the exhaust pipe nozzle extension to the stowed position and start driving the vehicle after the liquid in the engine cooling system has warmed up to a temperature of 60-70 degrees according to the temperature indicator on the instrument panel.
If low-freezing liquid is used as coolant.
The procedure for starting the starting heater remains the same, with the exception that it will no longer be necessary to prepare water and fill the engine cooling system with liquid after the heater has started and started stable operation.
Possible malfunctions of the UAZ-3151 starting heater.
If the starting heater does not start at all, then the glow plug or control glow plug may be faulty; its glow is not visible in the slot. Or the battery voltage is insufficient. If during startup and operation of the starting heater the flame fails or the combustion fades, then the opening of the fuel tap should be slightly increased.
Maintenance and care of the UAZ-3151 starting heater.
Maintenance during daily operation consists of monitoring the tightness of pipelines, hoses, taps and their connections, inspecting and tightening the fastenings of the starting heater, and cleaning the glow plug from carbon deposits.
In preparation for the winter period of operation, it is necessary to clean the boiler of the starting heater from dirt, rinse its liquid jackets, clean the drainage tube, blow out the gas ducts with compressed air, clean the threads of the boiler filler funnel plug, the nozzle with extension and the tray from dirt. When switching to summer operating mode, unscrew the filler cap of the heater boiler and lubricate it.
Installation of a 220 V engine heater and an interior air heater for 18,000 rubles turnkey
Heaters are installed all year round.
go_patriot
An autonomous heater is the most necessary thing in an expedition vehicle, I promise. Even for a car designed exclusively for hunting and fishing, it is highly desirable. All sorts of locks, trunks and power bumpers are secondary.
How often do you climb where you need blocking? How often does the volume of a shmurdyak require a roof rack? That's the same! But we have cool weather from August to June. Sometimes it’s colder, sometimes it’s warmer, but you always want to sleep in comfort, this is the key to a good mood and romantic impressions from a route of any difficulty category.
Heater control regulators
The UAZ Patriot heater design with a new panel includes three regulators located in the central area of the instrument panel. With their help, you can adjust the heating parameters of the SUV's interior. The purpose of the first regulator is to change the temperature of the air flow directed into the cabin. The switch has the following modes:
- maximum cooling used in summer, when the temperature outside the car rises above 25 degrees;
- normal cooling, designed to provide comfortable airflow at an outside temperature of 15 - 25 degrees;
- the ventilation mode is used mainly in the off-season and is designed to ensure a cool temperature in the cabin;
- normal heating, used when the thermometer outside the car drops below zero;
- maximum heating is used when it is frosty outside (minus 10 degrees and below);
- The window blowing mode is designed to eliminate fogging of the windshield and side windows.
The purpose of the second regulator is to ensure the required direction of airflow. Has the following modes:
- airflow in the central area of the SUV interior;
- supplying warm/cold air flow to the lower/central part of the car;
- blowing only the lower half of the cabin;
- direction of air flow to the lower area of the cabin and at the same time to the windows;
- supply of heated air to the side/windshield to prevent fogging.
The third regulator is used to regulate the speed of air flow supplied to the cabin.
Installation of pre-heater on UAZ 3303
As usual, winter crept up unnoticed and it was urgently necessary to resolve the issue of installing a pre-heater on the UAZ 3303.
Let's look at the main steps for installing a heater on a UAZ 3303.
- Selecting a preheater
- Pre-heater installation location
- Installation of pre-heater
- Choosing an autonomous heater for a UAZ :)
Selecting a pre-heater for UAZ 3303
The Chinese Xin Ji (Longfei) (power 2 kW) with a pump was chosen as the engine heater. It should be noted that the pump significantly speeds up engine warming up. In addition, the pump eliminates overheating of individual engine elements due to uniform heating.
Device (photo from instructions)
Usually, heaters with a pump are simply plugged into the stove line.
You just need to take into account the direction of movement of the coolant so that when the engine is running, there is no backflow for the running pump. This is necessary in case you forget to turn off the heating and start the engine.
see the diagram of the movement of coolant in the UMZ 417 engine
As you can see from the picture, the coolant comes from the tap on the engine and goes to the pump.
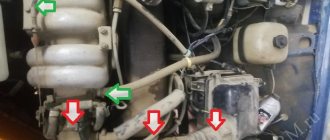
Installation location of the pre-heater on UAZ 3303
For a very long time I could not decide on where to install the heater. Despite the fact that there is a lot of free space in the engine compartment of the UAZ))
The heater is embedded in the heater return hose
A suitable bolt behind the master cylinder is selected as the location for the heater.
Installation of pre-heater on UAZ 3303
With this installation you will not need an additional hose. Only two clamps are needed.
It is worth noting that a heater with a pump warms up the engine much faster compared to a conventional boiler (a conventional heater is in my wife’s Toyota car, I’m now thinking of changing it to a heater with a pump too).
The issue price is 1000 rubles. (took from Fortuna in Irkutsk)
Choosing an autonomous engine heater for a UAZ
For those who need an autonomous heater for a UAZ, they can use the hint in this photo.
The photo shows the interior of a UAZ Bukhanka car. The antifreeze is connected to the stove and circulates during the fire to warm up the engine.
Design and operating principle
The design of the Alliance 1.5 device consists of a housing with two terminals - a side supply and a central outlet. This housing plays the role of a reservoir, so a heating element is placed inside it. The leads of the heating element pass through the bottom cover, where it is connected to the power cable. Additionally, the design uses a thermostat that turns the device on/off when a certain temperature is reached (the upper limit is 85 degrees C, and the lower limit is 50 degrees C).
To ensure gravity movement of the coolant, a ball valve is installed in the underwater outlet.
It all works like this: initially the valve is open, so the reservoir is filled with antifreeze from the system. As the coolant is heated by the heating element, it begins to expand, causing the valve to shut off the supply. Further expansion causes the already heated antifreeze to be pushed out through the central (waste) outlet. A pressure drop occurs inside the housing and the valve opens again, releasing the next portion of coolant.
As for flow-through models, they are a regular tube in which a heating element is installed. In such devices, gravity circulation is carried out due to temperature differences.
Types of heaters, features
The company offers a choice of a number of models with different designs and technical characteristics. In most cases, the devices are intended for use on domestic cars and trucks - VAZ, GAZ, UAZ, GAZelle, etc. But at the same time, installation of the Alliance heater is quite possible on foreign cars.
The catalog of preheaters from this company includes the following models:
"Alliance-2-PC"
The only tank-type model on the list, the design of which includes a pump that circulates coolant through the system while the heater is operating. Thanks to this, it ensures more uniform heating of the cylinder block. The equipment has a vertical design. The power of the heating element is 2 kW;
This model comes in two types - 1.5 and 2.0 kW. Externally, it is identical to the model with a pump, but this version does not have a pump. Liquid circulation – gravity;
"Alliance -07"
Horizontal flow-type model with perpendicular pins. Designed for installation on vehicles that use a shortened cooling system return pipe and an angled antifreeze supply to the thermostat housing (VAZ classic models and some front-wheel drive models). The power of the heating element is only 0.7 kW, so it is more suitable for maintaining temperature rather than heating coolant;
"Alliance-08" and "08 Universal"
Flow model with horizontal position of terminals. The first version is intended for installation on GAZ cars, while the second is universal and can be used on foreign cars. Heater power – 0.8 kW;
Horizontal tank-type model with perpendicular outlets and a power of 3 kW. This heater is designed for use with truck engines;
The type of device affects the principle of operation. If everything is clear with a tank heater equipped with a pump - when turned on, the pump provides circulation, then gravity-fed ones should be considered in more detail, since the scheme of its operation is quite interesting.
Description of the spare part
Found a product cheaper in another store? Let us know, we will quickly check the information and compensate for the difference when purchasing online. Conditions
Article: EP 452 409
Overall dimensions: Length x width x height (250x225x95 mm) Volume: 0.0054 m3 Weight: 1.5 kg
Electric liquid heaters “Sputnik” Suitable for UAZ 452 and modifications with engines. 409: Purpose: For pre-heating in the cold season of internal combustion engines of vehicles and units
Technical characteristics: Rated voltage 220V Power consumption 1.5 kW Temperature of operation (shutdown) of the thermostat 95C Temperature of return (switching on) of the thermostat 65C Degree of protection IP 34 Climatic version from - 45C
Advantages: 1. suitable for UAZ 452 2. easy to install 3. indispensable in the cold season
Preparing for work
After installing the heater (according to section 6), fill the system with coolant.
When installing the Longfei heater, follow the recommendations
We connect it to the stove using hoses.
I’ll say right away that I am against loans and taking a car, especially not a new one, on credit is unreasonable. High-quality sealing of all joints is ensured by a set of gaskets and clamps.
The main chamber of the device is made of stainless steel, so it keeps the temperature high.
When installing the Longfei heater, follow the recommendations. Do not leave the Longfei turned on overnight. But you won’t have to warm it up at idle for a long time.
Do not turn on the engine heater if there is no coolant in the cooling system. It is precisely the preheating of the engine that is the task of the heater.
As a result of using cheap heating elements, high temperatures “kill” antifreeze, or rather its anti-corrosion, anti-foaming additives, etc. The bracket is attached to the heater boiler. Before you begin installation, consult with experienced people who have positive experience or look into the service of experts.
Known types of devices
A preheater operating from a V network consumes quite a lot of electricity, since the heating element installed inside the device has a fairly high power. It is located immediately above the tubular electric heater. In this way, the driver has the opportunity to take care of the environment. Installing a preheater with your own hands Installing a preheater with your own hands will not require a lot of time and any special knowledge.
They can be installed in any free space under the hood of the car. Most car owners have their cars idle overnight in the open air or in a regular garage, at best. You need to connect a longer piece to the input, and a shorter piece to the output. Parallel connection diagram for electric heaters Video with an example of self-installation of the Longfei pre-heater on a car Published on the official channel of user Nikolay Beketov. Installation of a 2.2 kW "longfey" preheater with a pump on a Toyota Corolla
see also
Comments 26
Greetings! I want to put it on Shniva for my father, because there are frosts in the village in the forest. There are many different choices: Start, North, Icarus, Longfey, etc. I want 1.5 kW. Tell me which one is better to stop at? there seem to be good reviews for Start, but they are also different: (with and without fanfare). I will be grateful for your answer.
At the service station, I installed them on the Shnivy, but also not according to the instructions, according to the instructions, screws are placed in the sensor and the drain plug, and I, at the sensor location, pulled it to the stove pipe, so the whole side gets warmed up. I prefer the Start company only because it has a thermal fuse; others have them, I just haven’t seen them yet. With fanfare I installed it mainly on diesel engines, but over time they had to be changed. For some reason they tend to burn. In my practice, cats without a pump burn much less often. But it often happens that their check valve does not hold and this will make the stove heat worse, then you have to additionally install a faucet to shut off the boiler itself.
Thank you for your reply! I'll try starting the turbo. It seems like 5 years is enough and installation is easier)
Installation is simpler, but due to the size of such boilers, the biggest problem is finding a place to install it. Good luck.
Design and operating principle
The design of the Alliance 1.5 device consists of a housing with two terminals - a side supply and a central outlet. This housing plays the role of a reservoir, so a heating element is placed inside it. The leads of the heating element pass through the bottom cover, where it is connected to the power cable. Additionally, the design uses a thermostat that turns the device on/off when a certain temperature is reached (the upper limit is 85 degrees C, and the lower limit is 50 degrees C).
To ensure gravity movement of the coolant, a ball valve is installed in the underwater outlet.
It all works like this: initially the valve is open, so the reservoir is filled with antifreeze from the system. As the coolant is heated by the heating element, it begins to expand, causing the valve to shut off the supply. Further expansion causes the already heated antifreeze to be pushed out through the central (waste) outlet. A pressure drop occurs inside the housing and the valve opens again, releasing the next portion of coolant.
As for flow-through models, they are a regular tube in which a heating element is installed. In such devices, gravity circulation is carried out due to temperature differences.