Comments: no Published: 03/20/2016
Rating:
Tags:VAZ 2108/2109/21099LED backlight
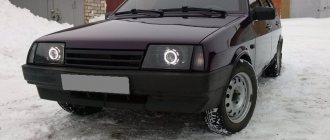
Almost every car owner wants to make his car unique. And it doesn’t matter whether we are talking about a Maybach or a VAZ 2109, 21099. With the help of tuning a VAZ 2109, you can make almost any car exclusive. Next, we’ll look at the elements of headlight tuning specifically for VAZ 2109 and 21099, and how you can do it yourself.
It should be noted that tuning both front and rear headlights is not as complicated a process as it might seem at first glance. The main thing you need is your imagination and the necessary materials.
Tuning rear lights VAZ 2109
Alternative optics
Besides the fact that alternative optics on a VAZ 2109 or 21099 are beautiful, such headlights are much more reliable than standard lighting fixtures.
Why do the headlights fog up from the inside and thereby spoil the appearance of the car? The fact is that glass allows moisture to pass through, as a result of which the contacts oxidize, and the lamp may simply burn out. Even if this does not happen, the glass will fog up, resulting in poor visibility on the road. Replacing the glass won't do anything. The result, if there is one, will only last for a short time.
Based on this, we can say that tuning the rear lights on a VAZ 2114 or 2109 and 21099, or the front lights, is more of a necessity than just an external change.
Alternative optics for VAZ 2109
Causes and actions in case of breakdown
Among the reasons for the breakdown of the rear parts of the lighting system on a VAZ 21099, 2108 or 2109, the most common are:
- Bulb burnout. It happens due to wear or power surges and is almost the most popular reason for replacing rear headlights.
- Oxidation of contacts. Occurs due to poor quality of terminal contact, electrolyte leakage, or cracks in the battery case.
- Fuse failure. This cause of failure is due to voltage surges.
- The reverse sensor is broken or its wiring is broken.
- Burnt out contacts on the headlight film.
- Lack of ground on the board.
The most common and easiest fault to solve is a lamp burnout. The product must be replaced with a new one by turning off the light sources, opening the trunk and disconnecting the column of wires.
To do this, you will most likely have to remove the trunk trim of the VAZ 2108 or 21099, which is located behind the lamp. After this, squeezing the latches (they are located on the sides), you need to take out the panel and unscrew the lamp, after pressing on it. To install a new rear lamp, reverse the process.
Replacing lamps in the rear lights of a VAZ 2109
To clean the contacts from the white coating that accompanies oxidation, you need to clean them. To do this, remove the headlight unit. The ground must be returned to its place, and the nearby wiring must be tested for correct operation. Broken fuses on VAZ 2109 and 21099 are not difficult to find - their diagram is usually presented on the block cover.
If you are faced with the problem of constant lighting of the reversing lights, this may be caused by problems with the wiring or the cessation of operation of a special sensor located on the box.
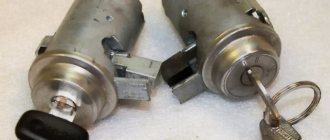
When the car headlight switch stops working, you can get to it through the engine compartment or from underneath the car.
You can diagnose the failure of this component of the lighting system as follows:
- start the VAZ 21099 and shift it into reverse gear;
- close the contacts. The rear lights should light up at this time;
- Use a multimeter to check if the contacts are closed when you turn on the rear headlight switch, having first removed the switch;
- make sure that the contacts are soldered securely, assemble the switch and check its operation again. If a normal short circuit is observed, replace it.
Types of lamps
For rear and front lights, two types of lamps can be used:
- LED;
- xenon
As practice shows, LED lamps are most often chosen for rear lights. This is due to the fact that such lighting devices are much cheaper, but at the same time durable and economical.
In addition, we can highlight the following advantages of LED lights specifically for VAZ 2109, 21099:
- service life - at least 10 years;
- ergonomics;
- energy saving;
- response is 3 times faster than xenon.
Against the backdrop of all this, such headlights provide the optimal amount of light for the car. If you don’t want to change the rear or front headlights, you can tune the ones you already have. It should be noted that, unlike the front lights, the rear lights on the VAZ 2109 or 21099 can even be painted from the inside. It’s quite easy to make this a reality with your own hands.
Rear LED headlights
What kind of lamps are there?
Now a few words about the lamps used in the rear light of the VAZ 2109. The A12-5 (T5W) bulb with a power of 5 W is responsible for the side lights.
T5W bulb, responsible for the side light of the VAZ 2109
All steel lamps - direction indicator, fog light, reverse indicator and brake light - are of type A12-21-3 (P21W). Their power is 21 W.
Lamp P21W
Instructions for replacing light bulbs
It's time to learn how to change lamps yourself so as not to waste extra money and your time on trips to a car service center. Open the trunk lid and find the rear part of the lights. Disconnect the power supply.
Removing the power supply from the rear light of a VAZ 2109
Press the side latch that secures the light fixture. The latch is located on the side of the light device, which is closer to the central axis of the car.
The back of the lamp is secured using side latches
We take out the back part of the flashlight along with the circuit board and bulbs.
Removing the rear part of the right lamp VAZ 2109
Place the module with the lamps facing up.
Removed module with lamps
We find the burnt-out light bulb, guided by the photo in the section “Pinout of connectors and design of lamps”, turn it counterclockwise, and remove it. Fix the new lamp by turning it clockwise. We install the module in place, connect the power supply.
Cover covering the rear part of the lamp VAZ 2109 (left) and VAZ 21099
Necessary materials
First of all, it should be noted that regular spray paint will not work. This is due to the fact that the space inside heats up, and the paint simply slides off. To tune the rear headlights on a VAZ 21099 or 2109, you only need to use special paint.
A special substance for tuning headlights must withstand high temperatures. The cost of one such bottle does not exceed 500 rubles.
Car headlight tinting paint
Preparatory stage before painting
In order for the paint on the headlights to last for a long time, a preparatory stage should be carried out. The algorithm of actions is as follows:
- headlights are dismantled and disassembled;
- the additional turn signal reflector is removed;
- Using fine sandpaper or a special substance, chrome is removed from the surface of the lantern;
- primer is applied.
Please note that the primer must dry for at least one hour. The substance should be applied to the headlight of a VAZ 2109 or 21099 in 2-3 layers. Otherwise, the paint will simply peel off during use.
Preparing headlights for painting
Painting process
The paint must be applied in at least 4-5 layers. It takes at least one hour to dry completely. After this, you can assemble the entire rear light.
At the final stage, you need to be especially careful when applying the sealant. The old one is completely removed. After this, the surface of the rear light is degreased and a new sealant of the appropriate color is applied.
If this protective substance is applied incorrectly, the taillight of the VAZ 2109 (21099) will fog up, which will lead to more serious consequences. In general, doing this yourself is very simple.
Modification of the rear lights of the VAZ 2108
Often, owners of a VAZ 2108 have a problem with poor contacts on the rear lights. In order to fix the problem, you have to remove the back board and re-install all the bases, often breaking the fragile antennae. Thus, we spoil our nerves, waste time and expend a lot of energy.
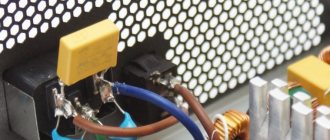
Some craftsmen insert foil, which also does not hold for a long time and falls out, and you have to repeat the whole process all over again. In fact, this problem can be solved without having to redo anything, but this requires electrical skills. Before you start work, you need to stock up on the necessary tools: pliers, cambric, wire cutters, stranded wire with a cross-section of 2 mm, tester, insulating tape, male-female terminals, soldering station, harnesses. First of all, you need to dismantle the rear light board of the VAZ 2108 and pull out all the bases from there. A plug is connected to the board; you need to cut off all the wires from it in order of priority, then remove the plug from the structure. We round them into the shape of a ring and put them into the cambric, but not all together, but separately, otherwise you can get confused during installation. Further work will be carried out using a soldering iron, so we prepare all the conditions for this. We have new bases, we need to tin their contacts. If this is not done, the soldering will fall off over time.
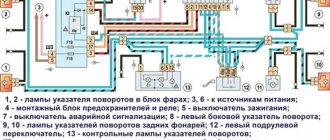
The base has a pair of contacts, one of which is common. it turns out that all identical contacts will be connected to each other. As for the second contact, a separate wire will come from it. We measure in advance the length of the wires that we will use. The wire should hang from the board by about 5 cm. We solder the wires of all bases, having previously tinned the contact of the base and the wire itself. We wrap the wire around the contact in small tight rings and solder it. As soon as each base has its own wire, we connect them to the sockets on the board and solder the remaining contacts of the bases in a similar way, the wire of the last base goes to the input of the board. We also bring out all the remaining single wires there. On the board itself, the wires can be laid along tracks and fastened with bundles; for this, small holes are made in the tracks. but these are details that concern the aesthetic appearance. Next, we clean the ends of the bases and connect the male terminal there, and so on to each individual wire. Now let's look at the headlights of the VAZ 2108. We take a harness that has 10 wires and figure out according to the diagram which wire fits which device, a diagram will be useful for this. If there is no diagram, you can use a tester, thereby calling the wires. Thus, we find the necessary wires and connect them. All that remains is to put the cambrics on the terminals. The wire is partially frayed; we wrap this fragment with insulating tape. We carry out the assembly in the reverse order, then check it for functionality and then the work is completed.
- Author: admin
Rate this article: Share with friends!
Contacts of rear light bulbs VAZ 2107
Do-it-yourself polishing of rear headlights (lanterns) on a VAZ-2109
Film tinting
If painting does not suit you, you can use tuning using film.
Here it is necessary to note the main rule: the better the quality of the film, the better the result. Therefore, in this case, savings are inappropriate.
Film can be applied to lanterns both outside and inside. But if you plan to cover the front of the headlight, you should understand that the film deteriorates much faster.
Film tinting of headlights
The process of pasting headlights
The algorithm is as follows:
- the headlights are carefully dismantled and disassembled;
- The reflector is removed using an abrasive material or a special liquid.
It is recommended to cover the glass with masking tape to avoid scratching it during work. To make it easier to level the film around the edges, you can use a spatula that is not too sharp. It's a little more difficult to apply film to the taillights. The gluing process itself is the same. Only the preparatory stage is somewhat different:
- the battery is turned off;
- the wires that lead to the lighting fixture are disconnected;
- The flashlight itself is disassembled.
Only after this can the procedure described above be carried out.
Pasting car headlights
In general, tuning a VAZ 2109 (21099) with your own hands is a simple process that almost anyone can do. But it also has several negative sides:
- significant deterioration of lighting;
- tinting is prohibited by law and is punishable by administrative penalties;
- possible problems during technical inspection.
Therefore, when doing such tuning with your own hands, you should understand and take into account these nuances. With the correct selection of materials and compliance with technical requirements, tuning, which was done by yourself, will not only add beauty to your car, but will also provide it with greater practicality.
Author: Baranov Vitaly Petrovich
Education: secondary specialized. Specialty: car mechanic. Professional diagnostics, repair, maintenance of passenger cars of foreign production 2000-2015. Extensive experience working with Japanese and German cars.
Repair and tuning of rear lights on the legendary Nines - VAZ 2109
Causes of failure of the rear parts of the lighting system and driver actions
You can find out what the breakdown may be and how to solve the problem below. We will talk about modified nines.
Possible malfunctions of brake lights and their elimination
- Due to a voltage drop, a short circuit may occur and the paws will burn out.
- If it's time to strip the wires because the contacts have oxidized and the terminals do not conduct current well enough.
- Often, in the event of a voltage drop, it may be necessary to remove and replace fuses.
- If the reverse sensor contacts are broken or damaged.
Removing the brake light switch sensor
In case of the problems listed above, the easiest way, of course, is to install a new lamp. This happens without any difficulty: you just need to turn off the lights, open the trunk and remove the wiring block. After this, holding the fixing elements that are installed on the sides, remove the panel and unscrew the lamp. In its place, install a new light device and assemble the assembly in the reverse order. If we talk about stops, both lamps and one of them may not work, that is, only in one headlamp.
If such a problem occurs, it is necessary to immediately diagnose:
- Check the fuse and, if necessary, replace it with a new one. Fixing a breakdown is not enough, because, as in the case of human diseases, a burnout may be a fault in the system that needs to be corrected. If this is not done, you can change the device until the end of the life of the VAZ 21099. One of the reasons may be a short circuit.
- If the wiring in the signal lamp sockets has oxidized, the lamp needs to be twisted a little in the socket to scrape off the damaged layer. To make the work done more effective, you can clean the contacts with sandpaper.
- If the lamps in the stops burn out, you need to replace it with a new one and check whether the system will work. And if the contacts are bad, they need to be cleaned both on the board and on the wire block.
- If the tracks in the headlight circuit board are burnt out, then you can remove the board and visually diagnose its integrity. If there are burnt tracks, they can be modified by replacing the wiring.
- The sensor is faulty or the electrical circuit is broken. First, you need to remove the red and white wires from the sensor and connect them with a piece of wire. If the brake lights come on, then the sensor needs to be replaced; if not, you need to check the electrical circuit. It needs to be checked for broken contacts.