Algorithm for replacing the front springs of a VAZ 2107
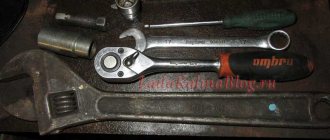
Prepare the simplest tool for the job; every car owner who at least sometimes repairs his iron horse should have it.
You will need:
- A set of keys (you should have it in your trunk);
- jack;
- a brush with metal bristles;
- wheel wrench;
- hammer;
- wire hook;
- mount;
- insulating tape.
The sequence for replacing the front springs is as follows:
1. Remove the shock absorber from the desired side and remove the wheel.
2. Next, you need to slightly unscrew the nuts securing the lower arm.
Place a lifting device under the lower arm and lighten the suspension (this is necessary to simplify the task of removing the stabilizer).
3. Unscrew the pair of nuts that hold the fixing bracket on the stabilizer pad.
4. Now remove the retaining bracket from its place, and then the cushion (stabilizer bushing).
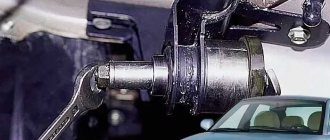
5. Slightly loosen the ball nut that secures the steering knuckle and the lower hinge pin. Be careful. The nut must be unscrewed until it coincides with the end of the pin. Once this happens, lower the jack that is located under the lower control arm slightly.
6. Take a hammer and make several strong (and most importantly, sharp) blows to the outer part of the fist. Thanks to this action, you will achieve the release of the pin from the rotary cam.
7
Pay attention to the lower arm. At the moment when the pin is knocked out it will be on only one nut, you need to slightly raise the jack under the lower part of the lever
But there is no need to heavily load the suspension.
8. Unscrew the pin nut and lower the lower part of the lever as low as possible. Then, using a mounting tool, move the stabilizer (more precisely, its rod) over the stud. Now remove the jack and let the lever lower.
9. Take and make a hook out of wire and secure the upper lever with it. Please note that in this case there is no need to disconnect the steering knuckle. Try to mount the lever so that it is as high as possible - this will simplify access to the spring.
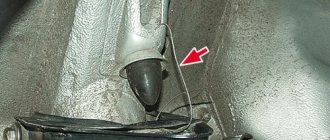
10. Pry the spring from below and pull it out from the bottom. There is a rubber spacer on the upper part of the support located on the body; remove it. If it is badly cracked, replace it. Now you have an idea of how to remove the front springs on a VAZ 2107.
Rear axle gearbox shank oil seal: how to replace video AvtoNovator
How to install a window regulator on a VAZ 2107 on your own
The rear axle gearbox shank oil seal is a seal located on the inside of the axle bearing. Like any oil seal, its main function is to create a seal, or rather, it prevents the leakage of transmission oil, which is located in the rear axle.
The main function of the gearbox oil seal
If depressurization occurs, then all the grease in the bearings is incredibly quickly washed out, and, as a result, they are destroyed. The main sign that the gearbox seal needs to be changed urgently is an oil leak. It is quite easy to detect this; a simple visual inspection is enough: if drops of oil are found on the surface of the gearbox housing, then you cannot hesitate. However, it should be taken into account that a thin oily film does not at all indicate the presence of a leak and is in no way a reason for carrying out repair work.
Please note that it is not always possible to limit yourself to just replacing the oil seal, since quite often it is also necessary to repair the gearbox, and this is best left to professionals. Despite the fact that replacing the rear axle gearbox seal is a rather responsible procedure that requires patience and attention, this does not mean that it cannot be done at home, you just need to strictly follow all the instructions.
Getting close to the rear axle gearbox shank oil seal
First of all, you should start by selecting the necessary tool; for this you will need a torque wrench, a two-jaw puller and, of course, a new oil seal and lubricant. Next you need to proceed in the following order. Place your “iron horse” on an overpass or inspection hole. You need to drain the oil that is located in the rear axle into a special container, now you can climb inside the car.
The first step is to disconnect the propeller shaft from the gear flange, turn on the parking brake and use a socket wrench to unscrew the nut securing the gearbox shank. In order to avoid turning the shank, it is not necessary to use a handbrake; you can also insert two bolts into the holes of the flange, and hold it with a mounting spatula or other suitable tool.
You will need a two-jaw puller to use it to press the shank flange off the gear. Sometimes this can be done without a tool, just with your bare hands, but, more often than not, you can’t do it without a puller.
Replacing the rear axle gearbox seal - the final stage
Everything is ready to dismantle the flange along with the dirt deflector and washer. Using a screwdriver or other suitable tool, pry up the old oil seal and remove it. The next step, of course, is to install a new seal. However, before you do this, it is worth checking the condition of the flange surface, as you can often find signs of wear and corrosion, which can be removed quite easily by grinding.
Now you need to apply grease to the working edge and seating surface of the new oil seal. Using a hammer and a special bushing, we press it into place. Only the blows should be soft and applied evenly over the entire surface in order to avoid unwanted distortions. All the removed parts of the shank are mounted in their original place, and it is advisable to replace the fastening nut with a new one.
Now the rear part of the car is hung out, and the axle shafts are disengaged from the gears. Use a dynamic wrench to tighten the shank nut, while its flange must be held by the bolts. Next, by rotating the flange by hand, we check the resistance; it should be uniform and light, no jamming or clicking is allowed. Finally, you need to check that there is no play.
When it's time to replace
VAZ 2107: replacing crosspieces on your own
There are several signs by which you can determine that it is time to replace the springs. These signs are:
- Detection of damage and defects in the product design. This malfunction can be determined by visual inspection, but first you need to put the VAZ 2107 car on an overpass.
- Their significant subsidence. If the vehicle's ground clearance decreases significantly, this indicates sagging of the devices in question. Springs quickly sag in such cases when the car is used to transport heavy loads every day. Also, those cars that are used as taxis also require frequent replacement of the devices in question.
If you find a problem with the springs on a VAZ 2107, then you should replace them without delay. This will extend the life of other suspension elements and save money. It is recommended to replace devices in pairs, since replacing only one element will cause the body to skew, which will negatively affect driving. In some cases, spacers help when the springs have sagged but are not deformed. Experts believe that you should not get carried away with spacers, since the physical properties of a car with spacers are many times worse. As a result of such modifications, the suspension does not function correctly, which affects many factors: from control to comfort. Therefore, if necessary, it is better to replace the springs, both rear and front. We will learn how this is done on a VAZ 2107 from this material.
Replacing the front springs of a VAZ 2107
Replacing the front suspension elements on the “seven” is carried out according to the following scheme:
- First, you need to install the car on an inspection hole or overpass, and then begin to remove the wheels, having first jacked them up.
- The front shock absorber needs to be removed.
- The nuts that secure the lower arm to the axle are loosened.
- Using a second jack, you need to place it under this lever, thus adding the suspension load. This is done to make it easier to disconnect the stabilizer.
- At this moment, you can use special spring ties (if available) to secure the springs in a compressed state. This will make further removal actions much easier.
The front springs of the VAZ 2107 need to be changed in pairs, just like the rear ones.
What you need to consider when installing rear disc brakes on a VAZ 2107
- Disc brakes are more efficient than drum brakes. Therefore, after installing disc brakes on the rear wheels, it is necessary to adjust the pressure regulator of the rear brake circuit, otherwise the rear brakes may operate earlier than the front ones, which may cause the rear axle to skid.
- To install disc brakes, you will have to carry out welding, milling and turning work, which will require special equipment. If it is not there, some of the work will have to be ordered externally.
- A car with a modified brake system (with disc brakes instead of drum brakes provided by the manufacturer) will not pass inspection.
- The requirements for the condition of the rear wheel hub bearings increase when installing disc brakes. The small amount of play allowed on drum brakes can cause damage.
- Tampering with the brake system is a dangerous step. If you are not confident in your capabilities, it is better to refuse to install disc brakes yourself or entrust the job to professionals.
Sequencing
How to change the oil in a manual transmission on a VAZ 2107 with your own hands?
To work, we will need the tools listed in the list above. In addition to them, we will need a rust cleaning liquid. It's better if it's WD40.
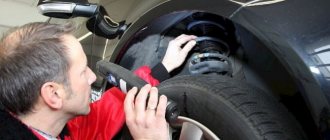
- The car is jacked up and the rear wheels are removed. Provides access to the brake drums and rear axle shafts. The axle shafts are thoroughly wiped off from dirt using a rag, and if necessary, treated with WD40. The best way to clean rear axle shafts is with WD40.
- The brake fluid from the system is drained into a previously prepared container. The pads are removed from the brake drum, then it is removed along with the axle shafts so that only the brake pipes remain. The first step is to remove the rear brake pads from the drum.
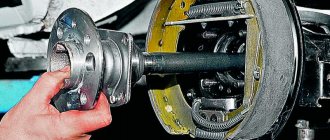
- The mounting rings and wheel bearings located under the rings are removed from the axle shafts. Green wheel bearings are visible under the retaining rings and need to be removed.
- Now the axle shafts are ground on a lathe so that their diameter matches the diameter of the selected brake disc (at this stage of the work, the car owner will need the help of a qualified turner). After this, holes are drilled in the axle shafts for the brake disc mounting bolts. Boring the rear axle shafts of a VAZ 2107 - work for a qualified turner
- The axle shafts improved in this way are installed back on the rear axle of the VAZ 2107. A brake disc is installed on top of them and screwed with a pair of mounting bolts as shown in the photographs above. After securing the discs, disc calipers with pads are installed on them, the rear wheels are installed in their regular places and the car is lowered from the jacks.
Video: setting rear disc brakes to “classic”
So, even a novice car enthusiast can change the front brake discs on a VAZ 2107. All that is required is the ability to use wrenches and a minimal understanding of how a disc brake system works. As for replacing rear drum brakes with disc brakes, it will not be possible to do this without the help of a qualified turner.
Sources
- https://bumper.guru/klassicheskie-modeli-vaz/tormoza/kak-snyat-tormoznoy-baraban-na-vaz-2107.html
- https://provaz07.ru/tormoza/snyatie-tormoznogo-barabana-vaz-2107.html
- https://semerkavaz.ru/tormoznaya-sistema/kak-pomenyat-tormoznojj-baraban-na-vaz-2107/
- https://avto-idea.ru/remont/zamena-zadnih-tormoznyh-kolodok-vaz-2107-svoimi-rukami/
- https://semerkavaz.ru/tormoznaya-sistema/zamena-kolodok-na-vaz-2107/
- https://semerkavaz.ru/tormoznaya-sistema/zamena-zadnikh-tormozov-na-diskovye-vaz-2107/
- https://bumper.guru/klassicheskie-modeli-vaz/tormoza/zadnie-diskovyie-tormoza-na-vaz-2107.html
How to replace rear springs on a VAZ 2107
Replacement of rear springs on cars of classic models, such as the VAZ 2107, is carried out in two cases: if one of them significantly subsides or in case of mechanical damage. You should definitely remember that both need to be changed at the same time, otherwise the car will lose stability on the road due to tilting to one side. Unlike the front ones, replacing the rear springs does not require special tools and can be done in 1-2 hours without much labor. In particular, to replace the front springs you need a set of special pullers.
Rear springs for the VAZ 2107 are available in two sizes:
- Type A – length exceeds 273 centimeters – red color;
- Type B – length less than or equal to 273 cm – green color.
To work you need to stock up on tools:
- Two keys for 19;
- Two keys for 10.
In addition, you need to purchase two springs and two spare sets of rubber stands. If it is necessary to change the springs, then the stands may be suitable for further use. However, it is better to change them too while the car is disassembled, so that you do not have to do the same work again later.
To remove the springs on a VAZ 2107, you need to unscrew all the parts that interfere with the free movement of the bridge in the vertical plane. First, using 10mm wrenches, you need to unscrew the brake fluid pressure regulator rod.
After this, in order to avoid damage to the brake pipes, you need to unscrew the bolt securing the brake pipe tee using a 10mm wrench.
Next, use two 19mm wrenches to unscrew the lower shock absorber mount on the side where replacement is planned.
After this, we jack up the rear of the car on the side where you planned to work, the bridge lowers and the part is released. We take out the part to be replaced along with the upper and lower rubber pads, and install a new one in its place.
You should pay attention to the presence of protrusions on the linings on both sides. On one side the end of the coil rests on the protrusion, on the other we rest:
- into the protrusion on the car body for the upper lining;
- into the protrusion on the bridge platform for the lower lining.
After installing the part in its normal place, remove the car from the jack and screw on the shock absorber. The replacement of one element is completed, you can move to the other side. Having replaced both springs, we assemble the brake system parts in the reverse order. At this point, the work of replacing the rear springs can be considered completed. For VAZ 2107 vehicles with a long service life, before unscrewing the nuts, it is recommended to treat them with a special penetrating lubricant such as WD-40 to make work easier.
Removing the spring
On both sides of the car, spring removal is carried out in the same way. When replacing the front springs of a VAZ, you need to have a minimum set of tools on hand. A screed is a must—you can’t do without it. Further actions:
Place the ties opposite each other and compress the spring as evenly as possible. Using a 10mm wrench, unscrew the nuts that secure the stabilizer pad. Completely dismantle the cushion and stabilizer bracket. Loosen the lower ball joint to the control arm. Lower the second jack located under the lever. Once the lever is lowered, the spring can be removed.
There is no point in pressing the ball joint out of the steering knuckle - this is a very difficult task and requires a puller. It will be much easier to unscrew the three bolts that secure the cage to the lever. The spring should be compressed as much as possible. Be sure to remove the spacer from the top cup. If it is damaged or deformed, it should be replaced.
PURPOSE OF SUSPENSION VAZ 2107
The suspension of the VAZ Seven, like any other car, is necessary for safe and comfortable movement. Its design may seem complicated at first glance, but in reality it is not. The front and rear suspensions are a set of elements whose purpose is to provide an elastic connection between the wheels and the chassis of the car. The main function of the suspension is to reduce shock, vibration and jolts that occur when driving over uneven surfaces, which is inherent in roads with poor quality surfaces. It is worth looking at faults, repairs and modernization of the rear suspension in more detail.1
FRONT SUSPENSION
The VAZ 2107 has a double-wishbone independent suspension with an upper and lower wishbone at the front. The first of them is fixed through the mudguard strut, the second - to the front beam connected to the power elements of the body. The upper and lower arms are secured to each other by means of a steering knuckle and ball joints. To rotate the levers, the suspension design includes silent blocks made of rubber and a metal bushing. The softness and smoothness of the suspension is determined by elements such as springs and shock absorbers, and the stability of the car on the road is determined by the anti-roll bar.
The front suspension of the VAZ 2107 bears greater loads than the rear, so its design is made independent
REAR SUSPENSION
The rear of the car takes up less load than the front, so the suspension has a simpler design - dependent. The wheels of the rear axle of the “seven” have a rigid connection with each other. Such a system today, although outdated, still has positive aspects - high reliability and ease of maintenance.
Suspension
The suspension was inherited from its predecessor 2102 - reinforced classic. Namely, the front is independent, on levers with springs, and the rear is dependent, also with springs.
Since they were discontinued late, many cars remain in excellent condition today. Although, it is worth recognizing that the quality of the latest cars is much worse than the cars of that era. VAZ 2104 was exported under the name Lada Riva. There were also right-hand drive versions. Export cars were equipped with a speedometer graduated in miles. The Quartet has become perhaps the most popular domestic station wagon. It is actively used by Russian Post, having the appropriate coloring and a white-moon beacon on the roof.
When to change springs
Two main signs that the VAZ 2107 springs need to be replaced::
- Damage appeared on the springs. This can be determined by visual inspection.
- The springs sagged a lot. This is noticeable in the reduction in ground clearance of the “Seven”, especially under load, and in the frequent breakdowns of the suspension when driving on a bad road.
In both cases it is necessary to make a replacement. Sometimes VAZ owners try to restore the stiffness of sagging springs using spacers. This decision is not entirely correct. The dynamic properties of a working spring and a spring with a spacer are different, which is why the suspension does not work quite correctly. In addition, cracks may soon appear on the reinforced sagging spring.
Replacement of rear and front springs of VAZ 2106
The need for such an event as replacing the rear springs of the VAZ 2106 is caused by their wear or destruction. Wear is expressed in the subsidence of the car during operation; destruction occurs with constant overload or driving on country roads. Some car enthusiasts remove springs in order to change worn rubber spacers, which can also cause the car body to settle.
Replacing the VAZ 06 springs can be done on an open, flat area, having good anti-recoil means, since the car will have to be raised and lowered several times. The process itself is simple; almost every VAZ 2106 owner can do it. To do this you will need:
- jack and wheel wrench;
- wheel chocks or comfortable stones;
- a set of spanners or open-end wrenches;
- 2 spring ties;
- low wooden block or cinder block;
- powerful flat screwdriver;
- hammer;
- fabric gloves.
During such repairs, cloth gloves are worn to avoid injuring your hands during the work on the protruding parts of the suspension and car body. Spring ties can be found from one of your car enthusiast friends; many VAZ 2106 drivers have this device in their arsenal. As a last resort, it can be purchased at an automotive supply store. Replacing springs also involves replacing rubber spacers, which serve as a gasket between the upper coil of the product and the glass in the car body.
What to look for when choosing parts
There are several factors to consider when choosing springs.
This is interesting: Handbrake: self-adjustment of cables
Rigidity
Rigidity affects not only the comfort when driving in a car, but also when there is a load on other elements of its chassis system. It is more comfortable to ride on soft springs, especially on poorly paved roads. However, it is not advisable to install them on a car that often carries significant loads. Conversely, it is better to install stiff springs on cars designed to transport heavy objects. This is especially true for rear shock absorbers.
In the context of rigidity, another situation is relevant. Often, when purchasing new springs (especially for VAZ classics), a pair of identical springs included in one set may have different stiffnesses. Naturally, this leads to the car tilting to the right or left. It is almost impossible to check them when purchasing, so there are two ways to solve the problem.
The first is to install the spacers mentioned above. With their help, you can level the vehicle's ground clearance and achieve uniform suspension stiffness. The second way is to buy higher quality springs, usually from trusted manufacturers, usually foreign.
Stiffness is a physical quantity that in springs depends on the following parameters:
- Rod diameter. The larger it is, the greater the rigidity. However, here you need to take into account the shape of the spring and the diameter of the rod from which each coil is made. There are springs with variable overall diameters and rod diameters. More on them later.
- Outer diameter of the spring. All other things being equal, the larger the diameter, the lower the rigidity.
- Number of turns. The more there are, the lower the rigidity. This is due to the fact that the spring will bend along its vertical axis. However, additional parameters need to be taken into account here. In particular, a spring with a small number of turns will have a short stroke, which in many cases is unacceptable.
Length
The longer the springs are, the greater the vehicle's ground clearance will be. For each specific car model, the corresponding value is directly indicated in its technical documentation. In some cases, the length of the front and rear springs will be different. Ideally, the manufacturer's recommendations should be followed. Deviation from them is possible only for tuning or in the case of using the car for cargo transportation.
Turning parameters
The general name in this case refers to the diameter and number of turns. The overall spring stiffness depends on these two parameters. By the way, some spring models have an uneven shape with coils of different diameters. In particular, with narrow turns at the edges and wide ones in the middle.
However, such turns also have different diameters of the metal rod. Thus, the large-diameter coils located in the middle of the spring are made of a large-diameter rod. And the outer small turns are made from a rod of small diameter. Large rods work on large irregularities, and small ones, respectively, on small ones. However, due to the fact that small bars are made of thinner metal, they break more often.
Such springs are mostly original, that is, those that were installed from the factory. They are more comfortable to drive, but their service life is lower, especially when the car is constantly driven on bad roads. Non-original springs are usually made from a rod of the same diameter. This reduces the comfort of driving the car, but increases the overall life of the spring. In addition, such a spring will cost less, since it is technologically easier to manufacture. What to choose in this or that case is up to everyone to decide for themselves.
Helpful information
A short rod unscrewed from the stocking will facilitate dismantling and installation. For ease of assembly, a new rubber spacer and a metal lining are fixed to the spring with electrical tape or tape. Reinforced springs with VAZ 02 - 04 will increase the load capacity, but the car will become rougher to drive. It is easier to replace the torque rods with new ones without wasting time pressing the bushings in a vice. When experimenting with the height of the springs, you should remember the length of the shock absorber stroke. They may have to be lengthened or different ones used. During disassembly, the brake hose receives extra stress, which can lead to damage.
Read this, it might come in handy: Why does the engine overheat?
Follow safety precautions and replacing rear springs will not be a hassle.
Springs and shock absorbers for the front and rear suspension of VAZ 2106, 2107, 2101, 2105
Well, spring has come, I decided to do the suspension. First of all, I spent a couple of days surfing the Internet. You need a sports suspension so that the car behaves steadily on the highway at least up to 160 km/h and has the least amount of roll when cornering. At the same time, I want a more or less comfortable ride in the city, over bumps, etc., I also go to the country. There is no need for a big understatement. The money factor is also important...
SHOCK ABSORBERS FOR CLASSICS VAZ 2106, 01, 05, 07, 03 – PLAZA SPORT, SINGLE-PIPE, GAS-OIL.
{loadposition user20}
In the picture above there is an ammo of the old and new batch (yellow and orange).
Monotube shock absorbers are better and more reliable than twin-tube shock absorbers. And of course gas-oil ones! First of all, I spent a couple of days surfing the Internet. The main fluctuations were between KYB and PLAZA. PLAZA won. In the Internet community there is a prejudiced attitude towards these shock absorbers, namely, that when buying them you are playing the lottery. Some drive perfectly for more than 100 thousand, some break down in the first thousand. Having reasoned logically, summarized the information and read the official explanations from PLAZA representatives, I came to the conclusion that the culprit is:
- Fakes. Questionable shock absorbers were purchased at markets, small shops, etc. Often the seller himself is confident in the originality of the shock absorber. To combat counterfeits, PLAZA changed the labeling and color of ammo. Now plaza sports are yellow (formerly orange), and plaza standard are orange (formerly yellow). I just got Plaza Sport front ones from different batches (one orange, one yellow). So take a look at the box before you buy it. And yet, in each box with a shock absorber there is a piece of paper with the serial number of the shock absorber with a stamp.
- Incorrect pumping. Many “tuners” don’t even know that shock absorbers need to be pumped before installation! Such shock absorbers have a high probability of failure in the first thousand. Bleeding shock absorbers before installing them on a car. I’ll briefly describe it: Turn the ammo head down, squeeze it all the way, 3-4 seconds. Hold, turn back, 3-4 seconds. hold, release (let open) and so on 6-7 times. To check whether it is pumped, we press sharply in the working position - if there are no dips, the stroke is uniform, then everything is fine. If there is, we pump it further. After bleeding, the shock absorber should remain in working position. Do not turn!
place only vertically
old shock absorber
The shock absorber on a VAZ classic is easy to install. Unscrew a couple of nuts on each - and you're done. This is in theory. In practice, everything is more complicated. The front shock absorber mounting bracket (new!) was broken during a previous repair at a car service (more precisely, a pin), and then carefully welded to the lower arm, instead of drilling and screwing. I deliberately left the first part of the description of the pendant, where I rejoiced at the good craftsmen. I forgot that I live in Russia and everything here is done through the ass. The main thing is that they didn’t tell me anything! There were also no new silent blocks. They simply weren’t installed, leaving the old ones!!! I'm just being crazy! It’s too late to figure it out, and it’s useless. I had to buy and install new silent blocks, steering rods and lower control arm.
rear
front, welding visible on left
SPRINGS FOR CLASSICS VAZ 2106, 01, 05, 07, 03 - SIRIUS, PROGRESSIVE or regular, you can FOBOS, but I was afraid to drive with FEAR springs, and they say they break often, maybe fakes?...
Sirius springs
I installed the front springs with variable pitch (progressive), the rear ones - regular ones. Replacing springs is much more difficult than replacing shock absorbers. The rear springs can be changed using a single jack.
You'll have to tinker with the front ones. You also need a shock absorber spring compressor. It's hard to find at 1am, so stock up in advance.
Now about the exhaust of all this tuning. The car is simply beyond words, elastic and moderately tough. Vibrations are at a normal level, there are no breakdowns in the suspension (I haven’t noticed it yet). Holds the track like a glove. By the way, the car turned out to be lowered (Sirius springs), let's see what happens next. In a coupe with a tuned engine, it handles no worse (or maybe better) than a budget foreign car! I want to ride and drive.
The cost of the upgrade is about 6,000 rubles. Definitely worth the money spent.
Replacing the front suspension shock absorber on a VAZ 2106
Replacing the rear suspension spring on a VAZ 2106 car
Replacing the front suspension spring on a VAZ 2106 car
Replacing shock absorbers and when spring replacement is required.
If the shock absorber is faulty, it should be replaced. The best option when replacing is to also change the springs, but this is not necessary and is quite expensive, especially since it is not always possible to visually determine some of their characteristics, for example, metal fatigue.
Springs may lose their properties as a result of:
- its wear and tear;
- mechanical damage;
- frequent heavy overload of the vehicle;
- driving at speed on rough roads with obstacles;
- fatigue and metal corrosion.
When a spring loses its properties, it sag. As a result, the vehicle handles worse on the road, its braking performance decreases, and the shock absorbers wear out faster.
Shock absorbers: functions and structure
Let us immediately note that shock absorbers in different models may have fundamental differences. But in general their design is as follows:
- cylinder;
- piston;
- return spring;
- stock;
- fixing bushings and inserts for shock absorber springs;
- gasket between cylinder and piston.
As we have already said, the task of the shock absorber in the SMA is to dampen the vibrations of the tank. The effect that weakens vibrations is achieved due to the movement of the piston, which is located inside the cylinder.
The gasket is impregnated with lubricant that does not dry out. When the tank vibrates, the piston enters the cylinder, dampening the vibration. And the damper spring brings the piston to its original position.
In addition to the lubricant that impregnates the insert, vibration is dampened by specially designed holes in the piston. Through them, air passes from one part of the piston to another and back.
Replacing shock absorbers
These parts differ from each other in the type of fixation. Some are mounted strictly vertically, others - slightly at an angle. On one side, the shock absorber is attached to the tank, on the other, like the damper, it is attached to the body.
Sometimes these parts are attached with a rod. In this case, in order to replace the faulty part, you need to disassemble the entire washing machine and remove the tank. Here the complexity of the work depends on your SMA model.
As we have already said, shock absorbers cannot be repaired, so if you have disassembled the part and come to the conclusion that the shock absorber spring has burst, you can, of course, change it. But whether you will find it on sale is another question. Moreover, you may need an insert for the shock absorber spring and other parts.
If you decide to replace the shock absorbers, use the information from the video: