The brake system fault indicator is on
Most often, the reason is trivial - like a low level of brake fluid in the reservoir or excessive wear of the brake pads equipped with the corresponding sensors. Another simple reason could be... the parking brake is on (it happens that the limit switch is simply faulty). However, brake fluid leaks can also be the cause of a decrease in the level - they must be urgently identified and eliminated.
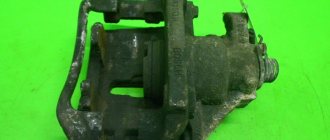
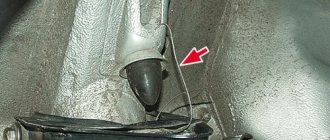
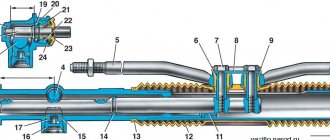
Removing the master cylinder
Before dismantling, you will need to drain the fluid from the expansion tank and remove the pipes. Then you will need to do the following:
- Using a special “10” wrench, loosen all pipes.
- Unscrew the tubes completely using a regular key to “10”. It is advisable to place a rag underneath so that the brake fluid does not get on the body parts.
- After disconnecting the GTZ from the system, it is necessary to unscrew the nuts using a wrench set to “13” that fasten it to the vacuum booster housing.
This completes the dismantling. The brake cylinder must be replaced in exactly the reverse order. But if it is possible to make repairs, disassemble the cylinder.
Parking brake ineffective
Have you tightened the lever, but the car still tries to roll downhill? In the simplest cases, the parking brake just needs to be adjusted normally. In addition, oiliness of the brake pads can affect it. It happens that the cables are jammed in the sheaths. Possible causes include oily discs or drums. Completely worn out pads may be to blame. And if the parking brake does not release the car, then most likely the pads are frozen or rusted to the brake drums.
Brakes squeak: 5 main reasons
Natural vibrations
When the pads press against the brake rotor to stop it, they vibrate. Due to the acoustics created by the wheel arches, this sound is amplified and becomes so loud that it can be heard.
It is that very light squeak that a fully functional brake system can emit constantly.
To prevent this from happening, some pad manufacturers supplement them with special linings that dampen resonance. Another method is one or two slots with a width of 2 to 4 mm on the working surface of the part: this way the area that comes into contact with the disk is reduced and the resonance is reduced. This reason for a squeak is not a reason to worry and make an appointment with a car mechanic.
New pads
At the factory, they are coated with a special protective layer containing impurities, which can cause whistling and squeaking until it is completely erased. To reduce its wear time, you need several emergency braking, that is, you need to reach a speed of no less than 100 km/h and stop sharply. At the same time, be sure to follow safety precautions. If it becomes clear that the cause of the squeak is precisely friction on the discs of the new pads, the intervention of service center specialists is not required.
Emotions from squeaking brakes
Incompatibility of pad and disc materials
This situation can arise for two reasons:
- Despite the fact that the same materials are used to produce pads, each manufacturer selects their ratio independently. The situation is similar with disks. And then the material of the friction layer of the former during braking may conflict with the cast iron of the latter.
- A condition under which even long-installed pads can begin to creak: their physical properties have changed after heating and sudden cooling. This happens if a car that has been on the road for a long time gets its wheel into a deep puddle, or if the car has been standing in line for a long time to be washed in the heat. The result is an unpleasant sound that can only be eradicated by replacing the pads. This malfunction does not require urgent intervention, but the cause of the squeak can only be eliminated in a car service center.
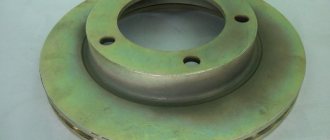
Disk overheating
Constant physical activity combined with high temperature in some cases affects the geometry of the disc even without sudden cooling. And when it loses its original adjusted shape, it inevitably comes into contact with other elements of the system during braking. To get rid of the whistling or even grinding noise in such a situation, you need to replace the brake disc. And here you cannot do without an urgent visit to the service center.
Brake overheating
This type of malfunction is usually identified by the appearance of a burning smell. This is usually accompanied by an increased pedal travel, which begins to feel weak, as well as an increased braking distance. The cause of overheating can be either excessively active driving with constant braking, or simple forgetfulness, that is, the parking brake is too tight.
Additionally, possible culprits include seized cylinders and calipers.
Conclusion
The brake system of the VAZ 2107 is an important component of the vehicle control system. The life and health of the driver, passengers and other road users depends on its serviceability. The likelihood of getting into an accident if your brakes fail is very high. The only thing more dangerous in its consequences is a breakdown of the steering. Therefore, it is necessary to constantly monitor the condition of the brake system and each of its components. It is especially important to regularly check the condition of the brake hoses. Despite the presence of two independent brake circuits, a burst brake hose leads to a drop in pressure and complete failure of the brake system. To fully use a working brake circuit, you need to press the brake pedal several times, and this may simply not be enough time.
Monitoring the condition and timely repair of the brake system is a vital necessity.
Noise when braking
High-frequency noise, squealing, and whistling can occur both during braking and, sometimes, during normal movement. The reason is the off-design mode of friction of the friction material on the working surface of the brake disc. Extreme wear on the brake pads and severe corrosion of the brake disc (often on the inside, “invisible” side) may be to blame. It happens that the brake pad lining has peeled off from the base. The list of possible causes continues with contamination of the pads, warping of the disc due to local overheating, improper fastening of the pads in the caliper, left pads or discs, etc.
Replacing front brake hoses
Replacing the front brake hoses on a VAZ 2107 is not a difficult procedure, and before performing it, you need to pump out the fluid from the expansion tank. To pump it out, it is better to use a rubber bulb or syringe. Before you start doing the work, you will need to grab a tool and get started.
- First, let's start removing the front wheel from the desired side. We remove the front wheel in order to free access to the hose.
- When access to the eyeliner opens, you must first clean the joints with a wire brush, and then treat them with WD-40 or similar lubricant.
- 5-10 minutes after treating the connections with lubricant, you can begin to unscrew the fittings. To do this, use a special 10 mm key with a slot.
- The key has a special stopper in the form of a bolt, which is screwed in after it is put on the metal tube.
- We proceed to loosen the bracket nut, for which you need to hold the fitting with a key “17”.
- As soon as the connecting coupling on the metal tube is loosened, you can remove the special key and continue unscrewing by hand.
- After disconnecting the hose, a rubber boot must be placed on the end of the tube to prevent dust or water from entering the system.
- To release the second end of the fitting from the bracket, you will need to remove the bracket with pliers.
- Using a flathead screwdriver, unscrew the screw that holds the trim bracket to the caliper. After this, you can dismantle the part.
New hose in place - Using a “14” wrench, you need to unscrew the bolt securing the second fitting.
- The copper washers must be replaced, and then proceed to install the new hose on the caliper. It is important to take into account one nuance - the tip of the fitting should be directed downward, not upward.
Read, it may be useful: Adjusting the steering mechanism of the VAZ-2107
After screwing the second fitting, you can begin to perform similar actions, but on the other front wheel. This completes the installation of the front hoses, but do not rush to install the wheels in place, as you will need to perform the procedure of removing air from the system (bleeding the brakes).
Install and screw the locking bracket
When the brake pedal is released, one of the wheels slows down
The following reasons are suspected: jamming of the wheel cylinder piston, swelling of the brake cups, deformation of the brake pipe, jamming of the pads due to contamination of the guide, peeling of the brake pad lining of the drum brake. It happens that the tension spring of the drum brake shoes is weakened or broken, the parking brake is overtightened, or the cable is stuck in the sheath.
- Do you know which faults you can drive with and which ones you cannot? Take the test and check your driving skill level.
- To increase the life of your car, use additives from SUPROTEC. Original SUPROTEC products can be purchased at.
Possible brake malfunctions, their causes and methods of elimination of the VAZ 2107 Zhiguli
- Repair manuals
- Repair manual for VAZ 2107 (Zhiguli) 1982+.
- Possible brake malfunctions, their causes and methods of elimination
| Cause of malfunction | Elimination method |
| Insufficient braking performance | |
| 1. Leakage of brake fluid from the wheel cylinders of the front or rear brakes | 1. Replace unusable parts of the wheel cylinders, wash and dry the pads and drums, bleed hydraulic drive system |
| 2. Air in the brake system | 2. Bleed the system |
| 3. Damaged rubber seals in the master brake cylinder | 3. Replace seals and bleed the system |
| 4. Damaged rubber hoses of the hydraulic drive system | 4. Replace hoses |
| Spontaneous braking when the engine is running | |
| 1. Air leak in the vacuum booster between the valve body and the protective cap: a) destruction, distortion of the seal cover or poor fixation due to damage to the locking parts, seal wear b) insufficient lubrication of the seal covers | 1. Do the following: a) replace the vacuum booster b) remove the protective cap and put grease into the seal |
| Incomplete release of all wheels | |
| 1. There is no free play of the pedal brakes due to incorrect position brake light switch | 1. Adjust the switch position |
| 2. The protrusion of the adjusting bolt of the vacuum booster relative to the mounting plane of the main cylinder | 2. Adjust the protrusion (1.25-0.2 mm) adjusting bolt |
| 3. Vacuum valve body jamming amplifier due to swelling of the diaphragm or pinching of the seal amplifier cover or protective cap | 3. Replace the vacuum booster |
| 4. Clogged compensation hole in the master cylinder | 4. Clean the hole and bleed hydraulic drive system |
| 5. Swelling of rubber seals master cylinder due to the ingress of gasoline, minerals into the liquid oils, etc. | 5. Flush the entire system thoroughly brake fluid, replace damaged rubber parts, bleed the hydraulic drive system |
| 6. Master cylinder piston stuck brakes | 6. Check and, if necessary, replace the main cylinder, bleed system |
| Braking one of the wheels when the brake pedal is released | |
| 1. The tension spring of the rear brake pads is weakened or broken. | 1. Replace the spring |
| 2. Sticking of the piston in the wheel cylinder due to corrosion | 2. Disassemble the cylinder, clean and wash parts, replace damaged ones |
| 3. Swelling of O-rings wheel cylinder due to contact with liquid fuels and lubricants | 3. Replace the rings, flush the hydraulic drive system with brake fluid |
| 4. No gap between the pads and the drum | 4. Adjust the parking brake |
| 5. Violation of the position of the caliper relative to the brake disc when loosening the bolts fastening to the bracket | 5. Tighten the fastening bolts, if necessary, replace damaged ones details |
| 6. Increased runout of the brake disc (more than 0.15 mm) | 6. Sand the disc if the thickness at least 9 mm, replace the disk |
| The car skidding or pulling to the side when braking | |
| 1. Brake fluid leak in one from wheel cylinders | 1. Replace the seals and bleed the system |
| 2. Wheel cylinder piston stuck brakes | 2. Check and clear jams piston in the cylinder, if necessary, replace damaged parts |
| 3. Clogging any steel tubes due to dent | 3. Replace the tube or clean it and bleed the system |
| 4. Different tire pressures | 4. Adjust the pressure |
| 5. Incorrect wheel alignment angles | 5. Adjust the angles |
| 6. Contamination or oiling of discs, drums and linings | 6. Clean the brake parts |
| 7. Incorrect installation of the regulator pressure | 7. Adjust the position of the pressure regulator |
| 8. Pressure regulator is faulty | 8. Repair or replace pressure regulator |
| Increased pressure on the brake pedal | |
| 1. Vacuum booster air filter is clogged | 1. Replace the air filter |
| 2. Seizing of the valve body of the vacuum booster due to swelling of the diaphragm or pinching of the seal of the booster cover or protective cap | 2. Replace the vacuum booster |
| 3. The hose connecting the vacuum booster and the engine intake pipe is damaged or its fastening to the fittings is loose | 3. Replace the hose or tighten its fastening clamps |
| 4. Swelling of cylinder seals due to gasoline, mineral oils, etc. getting into the liquid. | 4. Flush the entire system thoroughly, replace damaged rubber details; bleed the system |
| Brake squealing or squealing | |
| 1. Loosening the tension spring of the rear brake pads | 1. Check the tension spring and if necessary, replace with a new one |
| 2. Ovality of rear brake drums | 2. Bore the drums |
| 3. Oiling the friction linings | 3. Clean the metal lining brush using warm water and detergent. Eliminate the cause liquid or grease gets on brake pads |
| 4. Wear of the linings or inclusion of foreign bodies in them | 4. Replace the pads |
| 5. Excessive brake disc runout or uneven wear | 5. Sand the disc if it is too thick less than 9 mm - replace the disk |
↓ Comments ↓
1. Vehicle operation and maintenance
1.0 Operation and maintenance of the vehicle 1.1. Vehicle operation 1.2 Vehicle maintenance
2. General information
2.0 General data 2.1 Technical characteristics of vehicles 2.2 Controls and monitoring devices 2.3. Ventilation control and interior heating
3. Engine
3.0 Engine 3.1 Removal and installation of the engine 3.2 Disassembling the engine 3.3 Possible engine malfunctions, their causes and methods of elimination 3.4 Engine assembly 3.5 Bench tests of the engine 3.6 Checking the engine on a car 3.7. Cylinder block 3.8. Pistons and connecting rods 3.9. Crankshaft and flywheel 3.10. Cylinder head and valve mechanism 3.11. Camshaft and its drive 3.12. Cooling system 3.13. Lubrication system 3.14. Supply system
4. Transmission
4.0 Transmission 4.1. Clutch 4.2. Gearbox 4.3. Cardan transmission 4.4. Rear axle
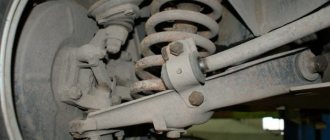
5. Chassis
5.0 Chassis 5.1. Front suspension 5.2. Rear suspension 5.3. Shock absorbers
6. Steering
6.0 Steering 6.1. Inspection, check and adjustment of steering 6.2. Steering mechanism 6.3. Steering rods and ball joints 6.4. Swing arm bracket
7. Brakes
7.0 Brakes 7.1. Checking and adjusting the brakes 7.2 Possible malfunctions of the brakes, their causes and methods of elimination 7.3 Bracket for the clutch and brake pedals 7.4. Vacuum booster 7.5. Brake master cylinder 7.6. Front brakes 7.7. Rear brakes 7.8. Rear brake pressure regulator 7.9. Parking brake
8. Electrical equipment
8.0 Electrical equipment 8.1 Electrical equipment diagram 8.2. Battery 8.3. Generator 8.4. Starter 8.5. Ignition system 8.6. Lighting and light signaling 8.7. Sound signals 8.8. Windshield cleaner 8.9 Headlight cleaner 8.10. Heater electric motor 8.12. Control devices
9. Body
9.0 Body 9.1. Doors 9.2 Possible body malfunctions, their causes and methods of elimination 9.3. Hood, trunk lid, bumpers 9.4. Body glazing 9.5. Windshield and headlight glass washers 9.6. Instrument panel 9.7. Seats 9.8. Heater and ventilation of the body interior 9.9. Body frame repair 9.10. Paint and varnish coatings 9.11. Anti-corrosion protection of the body
10. Modification and equipment of VAZ-2107 cars
10.0 Modification and equipment of VAZ-2107 vehicles 10.1. Car VAZ-21072 10.2 Car VAZ-21074 10.3. Car VAZ-21073-40
11. Applications
11.0 Appendices 11.1 Appendix 1. Tightening torques for threaded connections* 11.2 Appendix 2. Tools for repair and maintenance* 11.3 Appendix 3. Used fuels and lubricants and operating fluids 11.4 Appendix 4. Basic data for adjustment and control 11.5 Scheme