- What's included in the rear suspension?
- Disassembling and replacing the rear suspension: instructions
- Front suspension device
- Disassembling and replacing the front suspension: instructions
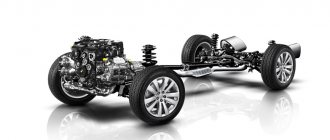
A complete set of VAZ 2114 chassis elements
The chassis of the car includes two suspensions - front and rear. During operation of the machine, most of the load falls on the chassis. The quality and comfort of the ride, as well as the safety of the driver and passengers, depend on the condition of the front and rear suspensions. The main function of each suspension is to eliminate vibrations and soften the ride. Also, the tasks of the chassis include reducing roll when turning, ensuring a smooth ride, and providing high information content for the driver in the city and on the highway.
On the roads of the CIS countries, the chassis is subject to excessive load, since the condition of the road surface leaves much to be desired. As a result, motorists often turn to car service centers. Things are better with the VAZ 2114, since it has more modern systems compared to previous Lada models. Many motorists choose to solve the problem on their own. But in order to understand what has gone wrong, you need to know the suspension structure.
What's included in the rear suspension?
The image below shows all the main elements of the rear suspension that can fail.
Rear suspension diagram of VAZ 2114
- The first part is a rubber-metal hinge, which is the main attachment to the car body.
- A bracket used to secure the rear suspension arm to the body.
- Shock absorber housing.
- A buffer that takes the load from the compression stroke.
- Casing cover.
- Main support washer.
- Shock-absorbing cushion.
- Spacer sleeve.
- Strut (shock absorber).
- Insulation gasket.
- Solid spring.
- Connecting element for levers.
- Beam lever.
- Bracket for fastening the rack structure.
- Flange.
- Lever bushing.
The beam structure includes a connector and two trailing arms; these elements are indicated in the diagram as numbers “12” and “13”. The parts are fastened together by welding. In the rear part, flanges (number “15”) and brackets for attaching struts (shock absorbers) are attached to the levers. The axles of the rear pair of wheels along with the brake elements are screwed to the flanges. Bushings (16) are installed on the rear suspension arms at the front. They are fastened using rubber-metal hinges - number “1”. One end of the spring rests on the support through a rubber gasket, and the other on the shock-absorbing cup.
conclusions
Selecting and installing a spacer for VAZ-2114 shock absorbers to increase ground clearance is quite simple. Even a novice motorist can cope with this task.
It turns out that my husband installed spacers for me secretly :) I thought there were factory ones at the back. Now I'm convinced that this is a revision. It’s clear why my butt is raised so much...
This seems like a joke. If someone is serious about using the 2114 for cargo purposes, it would be better to sell it right away. In a year or two he will simply ruin the car.
VAZ 2114 is a popular car in our country that requires proper maintenance. Its frequency depends on driving style, year of manufacture of the car, road conditions and other factors. When the rear of the car begins to sag, you need to replace the VAZ suspension springs. A large selection of such parts is presented on this website. All products here are of high quality, they are sold at an affordable price.
Disassembling and replacing the rear suspension: instructions
The main parts of the rear suspension are highlighted in color
A complete disassembly of the rear suspension is required if the motorist decides to lubricate all the parts or change them. Most often you need to get to a specific element and replace it. The parsing proceeds as follows:
- The VAZ 2114 is installed under an inspection hole, or, as an option, on a lift. In the luggage compartment, the rear and side trims and the seat belt retractor are disconnected. Also in the luggage compartment there are fastenings for the racks to the car body. They need to be loosened; there is no need to unscrew them completely.
- Next, the fastenings of the rear wheel pair are loosened. To do this, you need to remove the hubcaps and then completely dismantle the wheels. Reliable jacks should hold the car at this time; they are usually installed on each side.
- Now it is necessary to dismantle the brake system cables. You need to get them assembled. To do this, the cable fastenings to the suspension arms and the body of the VAZ 2114 are disconnected. Afterwards, the brake drums are dismantled. The cable ends should be removed from the manual drive levers. You also need to disconnect the flanges from the brake flaps.
- Before dismantling the hoses and pipes of the brake system, care must be taken to prevent leakage. Next, you need to dismantle the elastic drive lever, which is used to operate the brake pressure regulator. To remove the lever, you need to disconnect it from the bracket by removing the lock washer, then remove the shackle from the wheel axle.
- The next step is to disconnect the struts (shock absorbers). To do this, remove the rubber cushions, nuts attaching to the body part and the washer. After this, you need to install additional stops for the front wheelset. The rear part should be raised. After this, you can remove the compression stroke buffers, springs and shock absorber covers.
- If you disconnect the body mounting brackets, the entire beam can be detached. The rear suspension along with the struts will lie in front of the motorist. If necessary, you can disassemble the shock absorbers, which is no longer difficult.
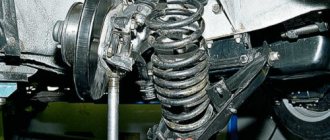
Components of the rear pillar of the VAZ 2114
IMPORTANT. The shock-absorbing spring must be removed using special ties. If they are not used, serious injury may occur as the iron spring is under high pressure.
Detailed suspension repair diagram
So, let's look at a brief diagram of how to disassemble the suspension of a VAZ-2114 car:
- The car must be placed on a lift. Of course, you can use the inspection hole, but this is quite inconvenient and not entirely safe, since dismantling will be carried out on both sides at the same time.
- The first step is to dismantle the caps (if any), disks and loosen the wheel bearing fastenings.
- Next, disconnect the ball joint and also remove the steering rod.
- Unscrew the fastening and remove the stabilizer.
- The next step is to dismantle the lever.
- We remove the caliper.
- We remove the outer CV joint from the hub.
- Now you can remove the brake drum from the steering knuckle mountings.
- We dismantle the steering knuckle.
- Remove the shock absorber strut assembly.
- We disassemble the removed parts.
- Assembly is carried out in reverse order.
Thus, the entire suspension assembly can be replaced. If we take time, then complete disassembly of the VAZ-2114 suspension will take approximately 8-12 hours, if no difficulties arise. Some “kulibins” make it easier to speed up the process, and if the suspension to be removed will no longer be installed. It is worth noting that this method is dangerous and contrary to safety regulations, especially if the motorist has never performed this process. Let's briefly look at how the accelerated process occurs:
- Unscrew the stabilizer.
- We dismantle the upper mount of the shock absorber struts.
- Unscrew the steering rod and brake hoses.
- Carefully unscrew the lever mount.
- The suspension feeds downwards in the assembly.
Tuning
Tuning suspension for VAZ-2114
Many motorists, in order to improve the stability and maneuverability of the car, install a sports version of the suspension, both rear and front.
It fits perfectly into the seats and is attached to the body without requiring any modifications. The sports suspension has greater stability and maneuverability, and can also withstand a load on the suspension that is 2 times greater than the standard one. The cost of this option is about 30-40 thousand rubles.
Tuning suspension installed on a car
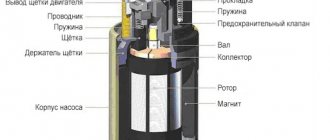
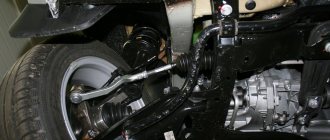
Front suspension device
The main element of the front chassis of the VAZ 2114 is the shock absorber strut, which is designated as number “9”. It is attached to the steering knuckle with two bolts. Compared to the rear system, the front suspension has a more complex design, which can be understood by the number of parts. Number “11” indicates a bolt that passes through the holes of the rack bracket; it has an eccentric washer and an eccentric collar. When the steering gear turns, the top bolt turns. The result is that the car turns. Most often, shock absorber struts fail, since they do the main job.
Diagram and explanations for it
Replacing springs as a tuning step
When replacing shock absorbers, it is also recommended to pay attention to the springs. This suspension element also prevents swaying and increases vehicle stability. Springs are made from special steel. Domestic versions last less, have low rigidity, and do not cope well with uneven roads. This causes the vehicle to sway.
There are quite a few springs that can be purchased and installed on a VAZ 2114 car. Among all the possible options, the sporty version is the most popular. It has greater rigidity. You should also pay attention to the ability to raise or lower the car by selecting a spring of a certain length.
When choosing a spring, you should pay attention to the fact that it must match the previously selected shock absorber. Otherwise, the shock absorber will fail quite quickly.
vote
Article rating
Disassembling and replacing the front suspension: instructions
- The VAZ 2114 is installed on a viewing hole or raised on a lift. The car must be set to the parking brake. It is necessary to remove the wheel caps, loosen the mounting bolts and unscrew the hub nut. Having secured the front of the car, you can remove the front wheels.
- Next, you need to remove the ball joint pin, which is located in the swing arm of the front strut. The next step is to remove the front stabilizer link (number “24”) from the front suspension arm (number “22”). Next, the stretch marks from the body (30) are removed. Next, you need to completely disconnect the ball joint that is attached to the steering knuckle.
- Now you can remove the front suspension arm. To do this, you need to disconnect it from the body bracket (28). Afterwards the lever is removed along with the bracket and the extension (29, 30). It is also necessary to remove the bolts that secure the pads to the steering knuckle.
- In front of the driver there will be a caliper assembly. To avoid problems with it, you do not need to completely remove it; you need to hang the caliper on a hook in such a way that there is no load on the main hose. The next step is to press the spline shank out of the front wheel hub.
- From the side of the engine compartment, you need to remove the protective fist (“41”). To do this, unscrew the telescopic strut nuts and then remove the solid front suspension strut. It should be together with the wheel hub and steering knuckle. The other front suspension strut is removed in the same way. Next, the racks are removed from the rod.
Removing springs using zip ties
When removing the bolts that secure the ball joint to the steering knuckle, you must use a socket wrench. Otherwise, the protective cover of the hinge may be seriously damaged, resulting in additional costs.
In the case of the front suspension, its assembly proceeds in the reverse order, with the exception of a few features. When installing the mounting bracket to the VAZ 2114 body, you need to make sure that the threads of the bushings are not damaged. To do this, you must perform operations carefully. Also, longitudinal displacement of the cushions on the bar must not be allowed. This can happen during installation of the anti-roll bar.
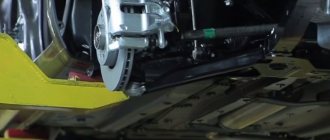
Principle of operation
This is how the front wheel suspension on the VAZ-2114 is designed.
The system itself works on the following principle - the strut and spring act simultaneously and act as a supporting and shock-absorbing element for the car. Through the use of braces and levers in the system, support is provided for the entire assembly in its lower part. The system is also kept from moving in the longitudinal axis of the car body. The drive wheels can be turned using steering rods - when turning the steering wheel, they pull on special ears located directly on the racks. The entire assembly rotates completely.
Its upper part rotates due to the support bearing, and the lower part rotates due to ball joints. Thanks to the presence of a stabilizer in the system, the front suspension of the VAZ-2114 is connected together and can work synchronously.
Symptoms of ball failure
First of all, the problem begins with a torn boot. Because of this, dirt, water and sand get inside. Thus, they wash out the lubricant from the ball mechanism. As a result, the element begins to work “dry”, and corrosion processes begin. In practice, this results in loud knocks and squeaks from the suspension. Next, the wheels will begin to spontaneously change their trajectory. There will also be uneven wear on the tire tread. As you turn the steering wheel, the knocking noise intensifies. If you notice the problem in time, you can eliminate emergency consequences.
How does the ball joint change?
To do this, you need to remove the front wheel mounting bolts and hang part of the car on a jack. Next, the nut securing the ball element is unscrewed. The support pin is pressed out of the lever. Similar to the previous case, this is done using a puller. If there is none, do not unscrew the nut completely.
Also interesting: Suspension lift in the field yourself
After this, the lever is moved to the side (with a pry bar), and the support is successfully pulled out. A working finger should not move with more than 0.8 millimeters of play in the support. Otherwise, it needs to be replaced, since there is a large output here. Before installing the dirt boot, it is recommended to coat the surface of the support with sealant.
Read news about the new Niva
- The modernized Lada Niva Legend (4x4) 2021 was shown on the Internet
- Lada 4×4 Bronto - sales stopped, new details » Lada.Online - all the most interesting and useful about LADA cars
- Description of the instrument panel Lada 4×4 (VAZ 2121, 2131) » Lada.Online - all the most interesting and useful about LADA cars
- Chevrolet Niva gasoline consumption per 100 km
- Buy LADA (VAZ) 2131 (4×4) 2021 in Rostov-on-Don, low price for Lada 2131 (4×4) 2021 on the Avto.ru website
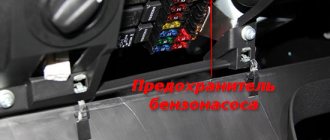
- Fuses Niva 21214 injector «
- The new large Lada 4×4 Niva “Bigster” 2021-2022 based on the Dacia Bigster was shown for the first time. The SUV has changed beyond recognition
- New Niva Chevrolet Lux 2021 - review of GLC equipment
Stabilizer
This element of the front suspension of the VAZ-2114 is designed to reduce the roll of the car when cornering. The part does not have a complex structure and consists of a flexible beam, as well as a pair of silicone silent blocks. The element has a small stroke, which ensures vehicle stability on the road. Attached to the front side members with the central part. The side parts are connected to the suspension arm on the “knuckles”. The stabilizer has a long service life - more than 100 thousand kilometers. Usually it is the silent blocks that fail. But to replace them you need to remove the stabilizer completely. Below we will tell you how to do this.