Removing the Priora heater fan
You will need to : remove the throttle assembly and move it to the side, remove the frill and sound insulation of the engine shield.
Prepare a Phillips and flathead screwdriver. Procedure :
- Bend the end of the brake pedal bracket upward.
- Unfasten and cut the clamp securing the heater fan wire block.
- Disconnect the block with wires from the heater fan by pressing the lock.
- Disconnect the block with wires from the additional resistor. Then unscrew the self-tapping screw and nuts securing the heater so that you can move it forward (see “Removing the heater heater”).
- Disconnect the fan ventilation hose from the nozzle.
- Unscrew the 3 self-tapping screws securing the heater fan using a Phillips screwdriver.
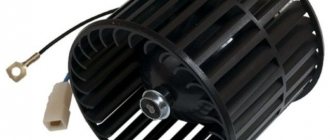
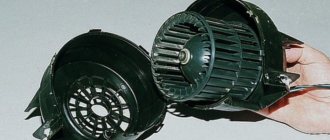
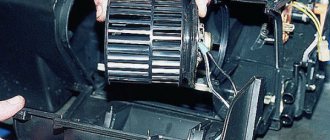
- Remove the Priora heater fan together with the impeller from the heater housing by prying it off the flange with a flat-head screwdriver.
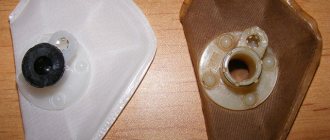
The fan flange is attached to the heater through rubber pads. To replace them, remove the plastic bushings and then remove the cushions from the holes in the fan flange.
Installing a Priora interior fan
The catalog number of the electric heater fan of the Priora is 2111-8118020. When installing the fan, turn it so that its branch pipe is opposite the motor ventilation hose. The rest of the assembly is done in reverse order.
By the way, if after replacing the heater fan there is poor air flow into the cabin, then try replacing the cabin filter.
Replacing the stove fan on a Priora
Welcome! Heater fan - thanks to it, air is sent from the environment into the car interior, but it comes from the environment cold, and after it flies into the instrument panel, it passes through the heater radiator (heating radiator, it is correctly called) which can either be very heated , or be too cold (This depends on how the coolant has warmed up, if it has reached its cherished operating temperature of 95 degrees, aiming, then the radiator also heats up very well and all the air passing through it becomes just as warm), that is, simple In other words, a fan is needed for only one purpose: to suck in air from the environment and release it in a certain flow into the car’s interior, where it, after passing through the radiator of the stove, heats up well and comes out warm into the interior.
Note! To replace the stove fan, it will not take very much but also not very little time (Here it still depends on which way you go), strength and tools, the main ones being: All kinds of wrenches, from wrenches to wrenches with socket heads, in addition to this set of various types of screwdrivers you will need and, of course, a new stove fan itself!
Summary:
Where is the heater fan located? It is located under the right side of the windshield if you look in the direction of travel of the car; next to it there is also a cabin filter which is located periodically every 15,000 thousand kilometers, or better even once every 10,000 thousand kilometers, it is recommended to change it to a new one, because when the filter becomes clogged, firstly (If it is a carbon filter) at a certain time, desorption occurs (This is a process in which all the dirt that has accumulated on the filter comes out of it, and when leaving it, it flies straight into the car interior, and the filter collects far from being pleasant things, dust firstly and toxic exhaust gases secondly, we think this will be enough for you to start changing this filter on your car more often and not delay replacing it), but this is not what this article is about We are talking about the location of the heater fan, for clarity, by the way, in the photo below it is indicated with a red arrow, and the blue one shows the same cabin filter that is periodically recommended to be changed on the car.
When should you change your furnace fan? If the fan completely fails, the stove stops working altogether (That is, when you turn the knob of the stove regulator, it will not turn on), if the fan partially fails (And partial failure may include breakage of the blades, the fan motor itself is acting up, etc. .d.) the stove will still work, but during its operation extraneous noises will be heard, such as rustling, humming, whistling, in addition to this, the stove may also work worse and weaker, these will be the most basic symptoms that will appear with partial or complete the stove fan fails.
FakeHeader
Comments 7
Only registered users can participate in discussions.
I understand that the topic is old, but for me it is relevant. My motor howls and squeals... I will definitely change it. Just wondering, did it really blow better after the replacement or is it an illusion? (Of course, I will also replace the filter)
I felt the difference. The whistle disappeared - the engine is new! And the “fresh” engine turns more vigorously and cheerfully!
The main thing is not to be afraid and do it if you have the desire and time. The same people as us work at the service. My motto: “No one can break it better than me.” With these words I begin any repair
I made it easier by removing the dirt catcher and making it more convenient to change it. Moreover, there are different motors and I had to buy them by removing the old one. At the same time, for the first time I took a newer model which began to hum within a month. I came and exchanged it for the same one as it was, now I’ve been driving quietly for almost half a year, and the time it took to replace it was half an hour)
and the price difference is big, how much does it cost?
Like Priorovsky 2000r and the old model like mine is 1500r
How to replace the heater fan on a VAZ 2170-VAZ 2172?
Note! When replacing the fan, if the cabin filter has not been replaced for a long time, then it can be removed and replaced with a new one, it doesn’t cost a lot of money in car dealerships, but just so you don’t have to get into the car (Still, to change the heater fan, you need to go to that place choose where the filter is installed), you can immediately change it if it is too dirty and thereby drive in the near future with clean air in the car!
Removal: 1) There are two ways by which you can remove the stove fan, we will tell you both, but before we start describing them, let’s talk about them briefly, and which one you will use during the work is up to you to decide, the first method is in removing the throttle assembly, in removing the front panel upholstery and in removing the cooling expansion tank, the second method does not imply this; when choosing the second method, you will only need to unscrew the screws and nuts securing the fan and then remove it from the car.
Note! It would seem that the second method is much more convenient and faster, in fact it is, it is done much faster but is very inconvenient, because in this case you will have to get to hard-to-reach nuts, as well as hard-to-reach screws, etc. etc., while when carrying out the second method, you will no longer need to crawl to hard-to-reach places, all the nuts and screws will be before your eyes, but you will still spend more time, because you will remove other parts that are in the first way and you won’t need to touch it!
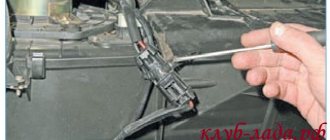
2) After you have decided and made your choice, go to work; at the beginning of the operation, in any case, you will need to remove the windshield lining (How to remove the lining, read the article: “Replacing the cabin filter on a Lada Priore”), then the block Disconnect the wires and the connector from each other (They are indicated by a red arrow) and remove the wire block from the additional resistor (It is connected to it, this block is indicated in both photographs by a blue arrow), these are all general operations and will need to be carried out in any case.
3) Read this point only if you are carrying out the second method, but if you don’t want to remove anything unnecessary and if you are not going to do the work using the second method, then in this case go straight to point 4, so about the second method, if it First, you will need to remove the throttle assembly (How to do this, read the article: “Replacing the throttle assembly on a car”), but only when you remove it, do not disconnect any hoses, but simply unscrew the nuts that secure the assembly to the receiver and then remove it, and as soon as the assembly is removed, proceed to removing the dashboard upholstery, to do this, use a screwdriver to loosen the screw that secures the steam removal hose to the cooling expansion tank (This is the tank into which coolant needs to be poured, you will immediately find it), loosening the screw, disconnect the hose from the tank and lead it through the hole in the upholstery (see photo 1), then lift the expansion tank and without disconnecting any other hoses from it, carefully move it, otherwise it will interfere with removing the upholstery, then again, use a screwdriver to unscrew it but this once the lower screw, which secures the upholstery (see. photo 2) and the left part of the upholstery (look as the car is moving) remove from the car, then find three clamps that are attached to the clamps and secure the vacuum brake booster hose so that it does not dangle, and so, overcoming the force of the clamps, remove them from the brackets ( see photo 3), immediately after which, using a socket wrench or wrench, unscrew the nut that secures the steering rack screen in the upper part (see photo 4), as soon as the nut is unscrewed, pull this metal screen and remove it from the top the studs and finally the right (last part) of the upholstery (see photo 5) from the car and bend up the end of the brake pedal bracket (see photo 6).
Important points
When replacing a heating fan on a VAZ 2107, you should remember several important nuances, neglect of which can ruin all the work. Here they are:
- When bending the plastic latches on the central panel and on the cigarette lighter panel, there is no need to apply much effort, since these latches are made of the same fragile plastic as the heating fan. They break very easily, especially if repairs are made in the cold;
- You need to be very careful when removing the motor after opening the latches. Behind it are wires with terminal blocks. If you pull such a wire carelessly, its terminal block may crack, since it is very thin. It is not possible to find this spare part for sale. Therefore, cracked pieces of plastic will have to be glued together using universal glue. All this can be avoided if you act carefully and slowly.
So, it is quite possible to change the stove fan on the “seven” with your own hands. Even a novice driver who has some understanding of the operation of automobile heating systems can do this. All you need to do is be patient and follow the instructions above exactly.
Repair, diagnostics and replacement of the heater damper on Lada Priora
A comfortable temperature in the interior of the Lada Priora at low temperatures is maintained using a stove. If it breaks down, noise appears in the heater operation, and the ability to adjust the temperature, direction and intensity of the air flow is lost. In most cases, the sources of problems are the motor or damper of the Lada Priora stove, which fail.
Where in St. Petersburg to repair a car with maximum benefit
Our auto centers will quickly and efficiently repair a Citroen or any other car. The company has been operating on the market for more than 20 years, providing high-quality services for servicing and repairing cars of all brands and any year of manufacture at affordable prices. Our service stations have the latest equipment and are equipped with special tools, and our employees are highly qualified.
You can get more detailed information on our website or find out directly from managers. We will be glad to see you at our service center!
Heater device on Priora
The liquid-type heating system on the Lada Priora is structurally connected to the engine cooling system and includes:
- radiator or heat exchanger of the heating system;
- a fan supplying air to the cabin;
- damper that regulates air temperature;
- heater damper reducer;
- damper for flow distribution on deflectors;
- deflectors.
A failed heater damper on a Priora does not close completely, so the warm flow mixes with cold air without warming up to the required temperature and the cabin is always cool and uncomfortable. To fix the problem, you need to remove, replace or repair the heater damper gear motor.
Malfunctions
For normal operation, the heating system needs: tightness, integrity of parts and normal antifreeze. The first step is to check the relay and fuse - after all, this unit contains electrical appliances inside. If the unit's electrical network is not in contact with the ECU, there is no point in turning the controls on the heater control unit.
The heater fuse on Priora has the number F9. In order to get to it, you need to remove the plastic plug above the driver's left knee (under the headlight switch) by unscrewing three bolts around its perimeter.
Once the fuse has been inspected and no deficiencies have been identified, further diagnostics can begin.
Perhaps the most annoying thing in any car is the situation when, even at the hottest summer temperatures, the heater does not turn off. This happens because the damper does not block the air flow. The heater damper on the Priora is controlled by a gear motor, which stops after its operating life has expired - it will have to be replaced.
While driving a VAZ-2170, you should carefully look and listen to what you see and feel. If heat should come from the cracks, but it doesn’t, then something is wrong with the seal or the damper gear motor. For example, if the glass becomes greasy, as if it was smeared with your hands, it means that the heater radiator is leaking. However, these are not the only signs of a heater failure.
Priora: the stove blows cold air, does not heat - reasons
When cold air comes from the heating system and turns into the air conditioner, the following possible malfunctions are considered:
- The heater hoses do not supply coolant, or the radiator itself is not efficient enough and does not take heat from them.
- The air filter is dirty. If there is no new part nearby, try removing the filter and then starting the heating system without it.
- The damper gear motor is stuck.
- The control unit (switches) is broken.
- The temperature sensor in the cabin has broken (it is located under the roof).
The shutter does not move, and the modes: face, legs, glass do not work
Reasons for this problem include:
- Faulty air distribution gearmotor.
- Inoperative control controller (CU).
The stove blows hot air when turned off.
The most likely reason for this behavior of the heater is a failed damper gear motor.
It’s noisy – what to watch
When you hear an unknown noise, you need to check the heater motor bearing. The noise is caused not so much by the bearing, but by small debris that has gotten under the motor blade.
The stove does not blow and does not even turn on
There are only two reasons why air does not escape from the heating system of a Lada Priora car. When the interior heating does not work, you need to check fuse F9 and the switches on the center console - perhaps they are simply broken.
Replacing the gearmotor
If the damper does not work, hot or cold air blows from the heater, and the ability to adjust it is lost. In such a situation, the cabin heater gearmotor must be replaced.
Replacing the damper on a Priora begins with raising the hood and removing the wipers. To do this, remove the plastic caps and unscrew the nuts with a 14 wrench, after which they are easily removed. Next, the left and right frills are dismantled by removing the rubber pad, protective plastic caps and unscrewing six screws. Then the plastic soundproofing of the engine compartment is removed, the cooling system hose passing through it is carefully disconnected from the expansion tank, then the tank itself is removed. To avoid draining the coolant, the holes in it must be plugged.
To inspect the heater gear motor, remove the expansion tank mounting bracket by unscrewing two bolts under the wing and removing the protection above the left front wheel. After this, the wiper motor and trapezoid are dismantled.
Now the unit is being dismantled; first you need to carefully disconnect the heater damper sensor and the power supply contacts. After this, install and check the new spare part, reassemble everything in the reverse order, and the replacement of the stove gear motor is completed.
Video: Replacing the gearmotor of the Lada Priora stove (Lada Priora)
Gearmotor repair
In most cases, the extraneous sounds produced by the heater damper drive on a Priora are associated with cracking of the plastic gear. When its teeth are cut off, the mechanism stops working normally. Replacing it is quite difficult, but possible. After dismantling the gearbox, release the compressed plastic cover and bend it, then carefully remove it.
After carefully inspecting the mechanism, determine which gears are faulty and install new ones. Determine the condition of the commutator, bearings and brushes of the mechanism. Lubricate the bearings with silicone grease, which does not harm other structural elements. If after assembly the system functions normally, replacing the heater gear motor will not be necessary.
Search
Replacing a radiator heater on a Lada Priora (with or without air conditioning)
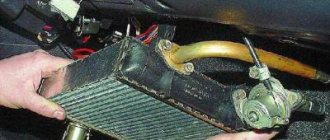
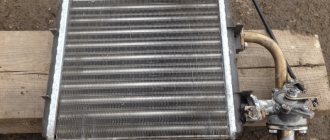
One of the reasons for poor heater performance is the furnace radiator . While the vehicle is in use, it begins to leak and can no longer provide the required amount of heat to the cabin. Depending on the year of manufacture and the complete set of Lada Priora, the process of removing the oven (radiator) can be very different.
How to remove a stove radiator on Priorat without air conditioning
Since the start of production, AvtoVAZ has installed a heater from the Top 10 on the Priora (catalog number: 21110-8101012). The disadvantage of this design was that the heater radiator was removed in the direction of the vacuum brake booster, which allows. As a result, the heater assembly must be removed.
The procedure looks like this:
- Remove the windshield wiper blades.
- Remove the protection (windshield).
- Remove the sound insulation from the engine shield.
- Disconnect the stack of connectors with wires.
- Unscrew the heater mount.
- Divide the heater into two parts (left and right).
- Remove the right side of the heater (in the direction of travel).
- Move the left side out of the way to gain access to the furnace radiator.
- Drain the antifreeze.
- replace the furnace radiator .
Replacing the motor plate
replacement
heater fan by weight
in
DIY.
Removing and installing the Prior motor plate.
heater motor
217230 1 part.
The whole procedure took several hours. This is shown in more detail in the video:
There is another way to replace it. To gain access to the furnace radiator, it is necessary to remove the vacuum brake booster along with the brake pedal instead of the heater housing. This allows access to the left side of the heater (in the direction of travel) and to the radiator itself.
Replacing the heater radiator with Prior for air conditioning
After some time, the manufacturer began to equip its cars with air conditioners (for example, HALLA or Panasonic (Ref: 21703-8101012). The design of the new Priora heater has become much more convenient in terms of maintenance. Now you do not need to remove the can, wiper blades, heater or vacuum brake booster for replacing the hob.
All you need to do is remove the engine shield noise shield, remove the air filter hose, the engine seal and the heater radiator . All! We drain the antifreeze and remove the radiator towards ourselves, towards the engine.
Video instructions are attached:
So, replacing the stove radiator. Priorities depend not only on the type of insulation, but also on the chosen method of replacing it. And how did you shoot the heater radiator in your car? Which method suits you best? Let us remind you that solutions to other problems with plates can be found in this article.
Product delivery options
Note! Below are the shipping methods available specifically for this product. Payment options may vary depending on the shipping method. Detailed information can be found on the “Delivery and Payment” page.
Parcel by Russian Post
Available payment methods:
- Cash on delivery (payment upon receipt)
- Using cards Sberbank, VTB, Post Bank, Tinkoff
- Yandex money
- QIWI
- ROBOKASSA
Shipping throughout Russia. Delivery time is from 5 to 12 days.
Parcel by Russian Post 1st class
Available payment methods:
- Cash on delivery (payment upon receipt)
- Using cards Sberbank, VTB, Post Bank, Tinkoff
- Yandex money
- QIWI
- ROBOKASSA
Shipping throughout Russia. Delivery time is from 2 to 5 days. More expensive than regular delivery by Russian Post, approximately 50%. Parcel weight up to 2.5 kg