Today we will tell you how to adjust and replace the rocker on a Chevrolet Niva.
The gearbox linkage is a part of a multi-lever unit that acts as a connecting link between the gearbox lever and the rod. Note that in the Chevrolet Niva, such an element as the rocker is located at the bottom of the car body near the driveshaft. This component is susceptible to the appearance of moisture and contamination, and this, after some time, deteriorates the quality of lubrication of rotating parts. Consequently, the components wear out, causing various problems.
In relation to other components of the transmission, the rocker, also known as the gearbox control drive rod, is considered a relatively simple device in structure. However, for correct operation, the condition of the scenes should be given due attention. That is, it is important to do repairs or adjust traction on the Chevrolet Niva in due time. Any car owner wants no force majeure to occur during the movement, and therefore the condition of the scenes must be monitored.
On most vehicles, the rocker looks like a fairly durable device that is quite capable of being used for about a hundred kilometers without replacement. At the same time, drivers are not insured against damage to this unit. How can you identify the need to repair the rocker on your Chevrolet Niva? This can be determined for the following reasons:
- The gearbox lever clearance has increased significantly;
- there are problems with gear shifting (the lever may float);
- Reverse gear does not engage;
- adjusting the backstage became impossible.
If the gears work poorly or the wrong one works at all, it makes sense to adjust the mechanism. Naturally, such a fact is relevant only when the position of the drive is visually assessed as working. When the connecting parts of the device’s hinges operate with significant play, then it is advisable to replace the component on the Chevrolet Niva.
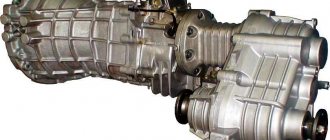
When studying a Chevrolet SUV, which we know as a relative of the VAZ, many do not understand what a rocker is and where to look for it. By the way, in Chevrolet there are 2 such devices. One rocker is designed to change gears, while the other switches transfer case modes.
Note that the rocker, equipped on a Chevrolet Niva SUV, has a powerful operating resource. However, this reserve directly depends on the style of driving the machine.
Consequently, sometimes car owners notice malfunctions in the operation of the gearbox, manifested in the following:
- when engaging 1st gear there is a spontaneous shift to reverse;
- when switching on, 5th speed disappears;
- activating reverse gear instead of selecting forward 5 gears.
How to remove and replace?
To replace the Chevrolet Niva rocker you will need:
- Set of heads ½.
- Spanners, open-end or ratchet wrenches for “10”, “13”, “17”, “19”
- Screwdriver Set
The rocker on a Niva Chevrolet SUV is removed in the following order:
- Be sure to disconnect the negative terminal of the battery under the hood.
- Set the gearshift lever to the middle position.
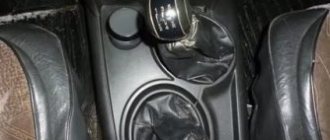
- In the cabin, the lining of the instrument panel console is dismantled. We unscrew all the fastening bolts of the plastic panels, remove the ashtray, the glove box with cup holders, and then lift up the entire lining of the floor tunnel.
- We remove the gearshift lever and transfer case linings using a screwdriver.
- Unscrew the front driveshaft from the drive shaft. We tie the removed part to a convenient place on the body.
- Unscrew and dismantle the intermediate shaft. To do this you will need keys for “13”, “19”.
- To make the work more convenient, use a “13” wrench to remove the two nuts securing the cross member of the rear gearbox suspension to the underbody. It will go down a little, thereby increasing the space for dismantling the required unit.
- We unscrew the nut securing the gear shift drive from the rear drive support using a socket “17” with an extension. Also, together with the nut, it is necessary to remove the expansion sleeve and 2 support washers.
- Using a ring ratchet wrench set to “13”, loosen the tension clamp of the drive rod.
- Using a “13” socket with an extension, unscrew the three fastening nuts securing the gear shift control drive bracket to the rear cover of the box.
- We take out the rocker assembly along with the lever and bracket.
- We remove the speed selection mechanism using a “10” wrench and unscrew the 3 nuts securing the housing.
- We remove the entire mechanism assembly.
Installation of the drive after repair or replacement is carried out in the reverse order.
Advice! You should not independently modify (overcook, shift, lengthen or shorten) the factory design.
Also interesting: How to measure tire pressure - test of 16 pressure gauges - Behind the Wheel magazine
As a replacement for the unit, it is better to purchase a standard rocker, which is equipped at the factory with basic vehicle models. After installation, it is recommended to additionally treat all moving joints with modern grease Mobilgrease XHP™ 220 or conventional Litol-24.
see also
Comments 21
As I understand it, after studying the Internet and trying to adjust the rocker myself, the whole point of the adjustment comes down to: Firstly, in the neutral position, the lever does not rest against the locking stop (let alone hide) against the reverse locking pad. In this case, only 1st and 2nd gears will be engaged (and even then it is not necessary). Secondly, the neutral position of the lever should be such that when engaging 1st gear, the lever does not rest against the left front side of the housing annular flange (red arrow). When you turn on the 2nd, it goes to the left rear (green arrow), and when you turn on the 5th, it goes to the right front (blue arrow). That's all. If the lever does not rest against anything, the gearbox drive will work. The following conclusion follows from this. If you hear a crunching sound when you engage the gears, or the gears jump out, then nothing can be corrected by adjustment, since the fault is in the gearbox itself (most likely the synchronizers).
The instructions for the pulley figuratively say: 1 loosen the linkage clamp, 2 move the linkage in the longitudinal direction, achieve clear engagement of all gears, and 3 tighten the linkage clamp. As we see, there are no clear millimeters. Everything is based on the principle of “scientific research”. On other sites you can find anything: set the lever slightly to the left of the reverse stop, engage first gear and turn some mysterious lock to the left. In another place, on the contrary, engage reverse and turn this lock to the right. In one place there is actually a diagram of the mechanism, which shows the gaps between the reverse stop and the gear shift lever. At first glance, everything is logical. But judging by the reviews, mechanics have to repeatedly jump under the car and into the cab to find a gap that ensures clear gear shifting.
qdesn1k It’s just that when switching from 2-3 gears, it doesn’t stick right in, there’s a crunching sound, I wait until the revolutions drop (1-2) to 2 thousand, or if you give the lever a little movement, it gets up. and with the first one it happens when you are rolling and trying to insert it, it will also crunch and stand as if on a zil until you stop completely, then it will just get up... I understand that 4 years have passed, but I would like to know how the author got out of the situation. The fact is that my shniva has the same symptoms. I adjusted a lot, but to no avail
In my shnivy repair book there was a picture with dimensions and gaps. Set it to no.
You can post the diagram to the community)
Yes, and remove the boot from the interior and unscrew the nut from below (holds the rocker) the nut is 17 and on the rubber cushion it will be easier to crawl up to the rocker clamp and adjust, but without the boot it will be easier since you can see the position of the rocker and gears, but you need to remove the center console and from the passenger compartment you will adjust
Buy auto parts boot for the handbrake lever Niva Chevrolet for foreign cars - Autopiter
Prices and delivery times depend on the city chosen.
Moscow Cart
The search for “boot for the handbrake lever on a Chevrolet Niva” found 44 positions Lever st/o. VAZ 2123 Chevrolet Niva Avtopribor
Gearbox lever boot for VAZ-2123 “Chevrolet Niva” (external) (manufacturer: Balakovo Rezino Tekhnika)
Gearbox lever boot 2123 (internal) (03441)
Boot RCS V-2123 "Niva Chevrolet"
Handbrake lever boot for UAZ-452 “Loaf”
Gearbox boot for VAZ-2123 Chevrolet Niva (manufacturer: Balakovo Rezino Tekhnika)
Gear selector boot for VAZ-2123 Chevrolet Niva
switch (limit switch) 2123-3710230 of the handbrake lever Niva-Chevrolet (79.3710)
Suspension arm 2123 Chevrolet Niva upper left AvtoVAZ
Pendulum arm 21213, 2123 Chevrolet Niva assembly AvtoVAZ
Boot RCS VAZ 2123 Niva Chevrolet 2123-1602518
Transfer case connection boot for VAZ-2123 Chevrolet Niva (CV joint)
2123-1703200Р Gearbox lever boot 2123 (on the thrust joint) “BRT”
Suspension arm 2123 Chevrolet Niva upper right AvtoVAZ
Suspension arm 2123 Chevrolet Niva lower left AvtoVAZ
Handbrake lever VAZ 2101-07, Niva-2121-13 (in collection) 2103-3508012 VIS
Transfer case lever boot 2121/1111/2110/2170
gear lever boot 2123-1703101 Niva-Chevrolet ***
2123-1703225Р Gearbox lever boot /2123/
Transfer case lever boot for VAZ-2123 Chevrolet Niva (upper)
2123-1703101Р Gearbox lever boot 2123 external “BRT”
Pendulum arm 21213, 2123 Chevrolet Niva assembled on INTER-AUTO bearings
Suspension arm 2123 Chevrolet Niva lower right AvtoVAZ
Lower lever for VAZ-2123 Chevrolet Niva (Chevrolet Niva) AvtoVAZ right
Lower lever for VAZ-2123 Chevrolet Niva (Chevrolet Niva) AvtoVAZ left
Rear axle
The rear axle of the Chevrolet Niva is assembled according to the classic design. It is based on the design of a hypoid main gear with a differential. The drive is distributed between two axle shafts, which transmit torque directly to the wheel hubs.
Malfunctions
The most common causes of malfunction:
- the backlash and vibration of the gearshift lever has increased;
- 5th speed goes out or reverse gear is engaged;
- It is difficult to engage reverse;
- fuzzy long-term switching of speeds.
And it’s also interesting: AvtoVAZ will produce three generations of Niva simultaneously - read in the News section in Avto.ru Magazine
Reference! Vibration of the gearshift lever is the most common problem that occurs in many vehicles when the internal combustion engine is running in the range of 2500 - 3500 rpm.
In what case is replacement performed?
The gearbox is simpler than the engine, but sometimes it needs replacement. Often wear and damage force the car owner to buy expensive spare parts. Ultimately, the sum equals a used box in good condition. In this case it is better to change. Thus, a used box will be the best option.
In addition, replacement may be required after severe impacts and destruction of both the gearbox housing and internal mechanisms, which “dragged” along the parts of the fastenings to the housing. The price of a new Niva box is not high. Thus, repairs will cost the car owner less than many analogues.
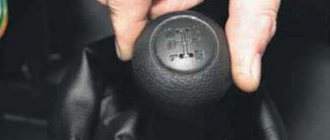
Do-it-yourself gear shift assembly adjustment
To correctly adjust the gear selection mechanism you will need a 13 key
Sequencing:
- We start the engine, engage 1st gear. As soon as the car starts to move, we stop and turn off the engine. In this case, we leave the first gearbox speed in the ON position. We put the car on the handbrake and anti-rollbacks.
- We loosen the coupling bolt of the clamp securing the connecting rod of the gearbox under the body. For ease of work, you can use a lift, overpass, pit or jacks.
- We move the plastic traction lock located in the passenger compartment all the way to the extreme left position.
- Then we fix the loosened bolt of the mounting clamp back.
You can also try one more method to eliminate rattling and play in the gearbox handle: using a “13” wrench, you need to tighten the lever fastening nut until the axial play is eliminated.
Important! The permissible clearances of the drive unit must correspond to the following values in millimeters: D = 1.5±0.5; E = 1±0.5.
The lever nut must be tightened to a torque of 24.5 Nm (2.5 kgfm).
If, after the adjustment has been made, the same difficulties with gear shifting and vibration remain, this means that this unit is worn beyond the permissible norm and needs to be replaced.
Repairing faults and adjusting the VAZ-2123 steering gear
Bleeding and adjusting the Chevrolet Niva clutch: step-by-step instructions
How to repair a Chevrolet Niva transfer case with your own hands: detailed disassembly instructions
Structure
Lada Granta hatchback Logbook Unsuccessful replacement of CV joint boot
Important! If you decide to replace the CV joint yourself completely or change its individual parts, you need to understand its design, and only after that dismantle and subsequent replacement
Replacing a CV joint is an expensive procedure, which in a service center will significantly affect the thickness of the car owner’s wallet. The part is made of heavy-duty materials that are resistant to mechanical stress and aggressive environments. Accordingly, these materials, like the part itself, are quite expensive. It is designed for long-term operation, but not always road conditions and the driving style of the drivers themselves allow all parts of the chassis to be used for many years without the slightest breakdown.
And the cost of replacing a CV joint will be approximately half the cost of the mechanism. That is why many try to replace it themselves in order to save some money on repairs. But not everyone is born an auto mechanic, so the average person must first find out what parts the mechanism consists of. Here is their list:
- separator;
- balloons;
- fist;
- frame;
- outer and inner anthers.
The anthers perform two functions at once: they protect the hinge from dust and dirt. After all, in essence, a CV joint is an external part that is located on the bottom of the car. This means that all small particles when driving fall on the hinges in the same way as on the rest of the chassis.
On each wheel drive there are two mechanisms, which have almost the same structure, only slightly different in shape and size. As a rule, left and right CV joints are interchangeable on most car models. If you are in doubt, it is better to go to a car service center and ask if it is possible to buy left-handed hinges for right-hand drive on such and such a VAZ model for installation on right-hand drive, or vice versa.
Sometimes the entire mechanism requires repair, but more often it is the outer one that is worn out, while the inner one, as a rule, is almost eternal. But sometimes it may require replacement.
The design of the mechanism is not that complicated. The separator rotates the balls, which are located in the grooves of the fist and the outer housing. All this is covered by anthers that protect the parts from dirt and dust, as well as from leakage of lubricant. When replacing, the most difficult thing is to dismantle the mechanism itself so that you can install a new one entirely or change its individual parts.
Repair of the gearshift mechanism of the transmission (slide) Niva Chevrolet - niva chevrolet (VAZ 2123, Chevy)
See also Disassembly and assembly of the gear selection mechanism drive)
| You will need: a 10mm wrench, a screwdriver, a hammer, and a bit. |
2. Remove the clamp from the mechanism rod.
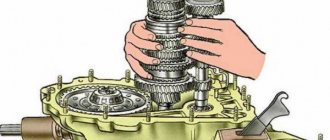
| 1. Remove the gear selection mechanism (see “Disassembling the gearbox”). | |
4. Knock out the rod joint axis.
| 3. Remove the cover of the mechanism rod. | |
| 5. Remove the joint from the gear selector lever. |
8. Remove the protective cover of the mechanism housing and the spring.
| 7. Remove the rod eye bushings. Replace them if necessary. | |
10. ... sealing rings. Replace rings if necessary.
| 9. Remove the locking and... | |
12. Unscrew the three nuts securing the gear selector flange.
| 11. Remove the spherical washer. | |
14. Remove the guide plate washer.
| 13. Remove the flange, seal and two lever gaskets. | |
| 16. ...lever from the guide plate. |
| 17. Assemble the gear selection mechanism in the reverse order of removal. |
Video
Standard Design Vulnerability
As a rule, in order to improve the off-road characteristics of their car, car drivers install wheels with a size of 31'' and replace the engine and main pair. In this case, the load on the transfer case increases, and more specifically, on the pinion axis and differential gears.
The standard differential of the transfer case of VAZ 2121, 2123 and other Niva modifications has two gears mounted on the satellite axis. The axis, in turn, is fixed in the housing using locking rings installed on the outside:
If this scheme works in a stock car, then in a Niva car prepared for off-road, under conditions of extreme loads, one pair of satellites becomes insufficient to “digest” the increased torque, which leads to their sudden breakdown.
Node device
On older models, this unit is located under the bottom of the car, thereby being exposed to increased contamination and moisture.
The design of the gear shift mechanism does not have complex connections, the work is carried out without much load, but owners often encounter wear and tear on this unit.
Read news about the new Niva
- Gearbox VAZ-21213 Lada Niva, VAZ-21214 Lada 4x4, diagram
- Lada 4x4 Niva 2021 prices, models, configurations, photos, new body, video
- what to choose UAZ or Niva
- Choosing oil for a Chevrolet Niva engine
- Engine tuning: Niva 4x4 - increasing power using common methods
- Chevrolet Niva fuse box with description (up to 2009 release)
- SEAL OF TRANSFER CASE AND FRONT AXLE SHANK NIVA 2121 21212302052 AvtoVAZ. Wholesale and retail.
- Hot-dip galvanizing on Niva is used only on a few parts, and the hood and roof are not galvanized at all
Checking clutch performance
Let's start by looking at the concept of cohesion. So, this is a mechanism whose operating principle is based on the force of sliding friction (friction clutch). It is used to transmit torque.
The Chevrolet Niva has a clutch closed with a central diaphragm spring, which is installed using a hydraulic drive. A reinforced clutch is also installed on this car, which has a large diameter and a powerful damper. In addition, this element has a large disk thickness. Over time, on a Chevrolet Niva this mechanism fails, requiring either adjustment or replacement. You can check the functionality in the following ways:
- Engage neutral gear and start the engine. Next, you need to wait a little until the engine warms up and depress the clutch pedal, engaging reverse gear. If the transmission is easily engaged, this means that the system is working properly. It’s another matter if you hear creaks - this indicates the need for repairs.
- An easier way to check is to switch gears in order and check for any extraneous sounds from below. If they are, then you need to immediately go to the service center.
- You can notice a malfunction of the mechanism when it starts to slip while accelerating. This also means that it’s time to show the car to the experts.
There is no need to worry too much about a faulty clutch, because you can bleed the hydraulic drive. If you have at least the slightest knowledge of mechanics and the desire to independently adjust the operation of the mechanism, then you do not need to go to a service station at all. Bleeding the hydraulic drive is done as follows:
- first, the hose is put on the cylinder valve, and the other side is immersed in the brake fluid;
- Next, you need to press the clutch pedal and hold it a little. This manipulation should be repeated exactly 5 times;
- then you need to open the valve and release the pressure. This operation must be performed until the liquid flows out.