When the fuel sensor does not work , the driver will not be able to calculate how long the fuel in the tank will last. Plus the arrow that shows an empty tank is undoubtedly unnerving. Depending on the type of fuel level sensor (FLS), the most common causes may be abrasion of the resistive elements, damage to the float on the operating lever, or problems with the wiring. However, there are others that are also worth knowing about. Often, checking and basic repair of the sensor can be carried out in a garage. But to diagnose electronic FLS, you will have to seek help from a car service center.
Where is the fuel level sensor located?
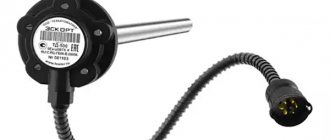
To understand why the fuel sensor shows incorrectly or does not work at all, you need to find out where it is located. True, there is no special secret here, because naturally it is located directly in the fuel tank. The only difference that may be is the version of its execution. Depending on the design, it can be built into the fuel module, which is a single device consisting of a fuel sensor, check valve, fuel pump and filter (for injection engines), or installed separately in the middle/side of the gas tank separately, or screwed into a separate device by a separate device. tank if it is a diesel car.
Replacement
You don't have to be a professional auto mechanic to replace a fuel sensor. It is enough to study the operating manual and understand the nuances of disassembling and assembling the unit.
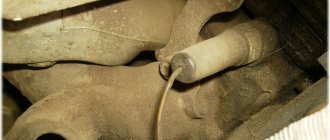
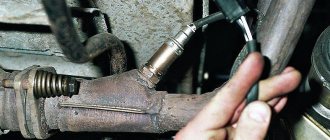
Alas, this cannot be done without related work. In order to get to the sensor, you will first have to remove the fuel pump .
Before starting work, drain the fuel so that as little fuel remains in the tank as possible. Tools you will find useful:
- Spanners;
- Screwdrivers;
- Hammer, etc.
So, let's start removing the fuel pump:
- Remove the floor covering you have in the trunk;
- Remove the fastenings of the rectangular cover, which is made in black;
- Disconnect the negative terminal from the battery;
- Make marks on the gas pipeline tubes so that you can later figure out which one is intended for supply and which one is intended for return;
- The fitting is unscrewed with a 17mm wrench, after which the supply pipe is removed;
- The outlet pipe is removed in a similar way;
- Use a 7 mm socket wrench to unscrew the nuts securing the pressure rim;
- A hammer may be required here, since the hardware is often firmly attached. Place a flathead screwdriver on the ridged part of the nut and give the handle a light hammer blow;
- With the rim free, lift the assembly and remove the float from the fuel tank;
- Now you can remove the pump and, accordingly, the sensor.
Types of fuel level sensors
Cars can use one of three main types of fuel level sensors. Namely:
- Lever. Refers to the type of float sensors. This is the oldest and simplest type of this device. It consists of a potentiometer (rheostat - variable resistor), a lever, and a float suspended on it. The advantage of a float sensor is its simplicity and reliability of design, as well as its low price. The disadvantage is the large error of the device. In addition, when the car is driven on an uneven road, the instrument needle on the panel often fluctuates, thereby reflecting the movement of fuel in the tank.
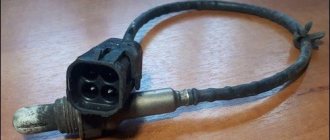
- Tubular. It is also float-operated. The design consists of a hollow tube, a float, a guide post, a signal wire (or wires) and a contact group. Provides a fairly high accuracy of fuel level readings, since the float is located in a limited space (inside a hollow tube). A fairly common model of fuel level sensor.
- Electronic. This is the newest type of sensor installed on modern cars and has its own control unit. Its other name is non-contact, which is due to its operating principle. Thus, the operating lever is directly located on the surface of the fuel, and the reading device is connected to it via a magnetic field. The error of such devices is minimal and does not exceed 1%, and often much less.
Please note that even modern sensors are dependent on the quality of the contacts on the connectors (in particular, operating and maintenance conditions). Therefore, any of the listed types of FLS can fail.
Calibration
When installing and cutting a capacitive fuel level meter, it will need to be calibrated. To do this, you need to set new parameters indicating the minimum and maximum volume of fuel. This can be done by simply measuring the fuel level in an empty and full tank.
Calibration process:
- Connect the FLS to the computer, first turning it over with the meter facing up.
- Fill the space between the tubes with the used fuel.
- When the indicators are recorded in the software on the computer, mark them with a full tank.
- Drain the fuel from the sensor, wait for stabilization in the software and mark the empty tank.
You can also perform the procedure using a reservoir, but this method will be much more complicated and require more time. Therefore, it is easier to use the available tools from the instructions above.
Operating principle of the fuel level sensor
Depending on the principle of operation of the sensors, the malfunctions that may occur with them will differ slightly. Let's look at the operating diagram of each type of fuel level sensor.
Float lever FLS
The operating principle of a float-type level sensor is based on the use of a rheostat. A lever is attached to its central part, at the end of which there is a float. Depending on the fuel level in the tank, the float will move, moving the rheostat lever accordingly along the contact path. During such movement, the resistance will change, which is recorded by the vehicle's electrical system. Accordingly, the arrow on the instrument panel will move in accordance with the indicated resistance on the rheostat. By the way, at a certain position of the float, and therefore the resistance value on the rheostat, a warning lamp on the dashboard will light up, indicating that there is little fuel left in the tank and refueling is necessary.
For clarity, let’s look at the operation of the fuel level sensor using the example of VAZ-2108/VAZ-2109, VAZ-21099 cars. Their design can use two sensors - for a high and low dashboard. They are structurally similar, but have different operating resistance. Specifically, for a high panel sensor, a resistance value between 238 and 262 ohms means the fuel tank is empty. With a resistance of 59...71 Ohms, the fuel gauge needle is approximately in the middle (accordingly, the tank is half full). If the resistance is within 17...23 Ohms, then this means that the car’s tank is completely filled.
As for the sensor for the low panel, the situation is similar. So, with a resistance of 285...335 Ohms, the arrow points to an empty tank. At 100...135 Ohms, the arrow will correspond to half, and at a value of 7...25 Ohms - at the end of the scale, pointing to a fully filled tank.
The specified resistances are important in the context of testing the sensor, since if it fails, the first thing to do is to check the internal resistance of the sensor using an electronic multimeter.
Please note that the indicated resistance values are relevant only for the listed VAZ models. For other machines, the corresponding values must be looked for additionally in the technical documentation (manual) attached to them. However, even these indicators can be used as a guide!
Tubular FLS
The design of the sensor is based on a housing with a guide post (actually a tube), at the other end of which there is a wire with a contact group (chip). The design also includes a float with slip rings located inside a hollow tube. The housing flange is secured using mounting bolts on the top wall of the fuel tank. By the way, this is a disadvantage of this type of sensor and imposes a limitation on its use. In particular, tubular type sensors can only be installed on tanks whose height is sufficiently large.
The operating algorithm of the tubular fuel level sensor is as follows:
- On the tube that touches the bottom, in its lower part, there is a hole (or two) through which fuel enters inside.
- The float located inside the tube has contact rings and when moving through the tube, as the fuel level in the tank changes, the resistance also changes. Resistance is measured using one or two contact wires located along the guide tube.
- The movement of the float on the surface of the fuel naturally changes the value of electrical resistance on the contact wire when power is applied to it.
- At the moment when the float is in the upper position (the tank is completely full), a small section of the contact wire is activated, and accordingly, the resistance value is minimal. At the moment when the tank is empty, the float is at the lower extreme point, respectively, the length of the signal wire is maximum, which also corresponds to the maximum electrical resistance.
The resistance of the fuel level sensor will differ for different cars, so when measuring you need to use technical documentation.
Electronic FLS
Electronic fuel level sensors are installed on cars that use high-quality gasoline and diesel fuel produced on a biological basis. This not only provides very accurate sensor readings, but also allows the actuator to “avoid touching” the fuel directly. However, the peculiarity of using such sensors is that it does not provide smooth monitoring of the fuel level (in small steps). The design of contactless FLS is based on an inactive magnetic sensor. The diagram of the fuel level sensor according to which it works is as follows:
- The main part of the sensor is located in a sealed housing. Only the magnetic sensor (MAPPS) and its lever are in contact with the fuel.
- The movement of the float with a magnet occurs along a sector defined by metal plates of different lengths. A signal corresponding to a certain fuel level in the tank is generated depending on the position of the magnet on a separate plate.
The fuel level indicator in this case is formed using a discrete method since the amplitude of the feedback signal will change from segment to segment that the magnet passes through. Depending on the model of a particular sensor, the signal amplitude and other technical information differ. The operating error of such a system does not exceed 0.5%...1%, but the cost is also significantly higher than a conventional contact system, so these FLS data are installed only on business and premium class cars.
Let's sum it up
As you can see, the VAZ 2110 mass air flow sensor is a fairly important component of the car in the ECM device. This sensor closely interacts with the computer and determines the degree of enrichment of the fuel mixture with air.
It is quite obvious that any malfunction of the sensor will sharply reduce the efficiency of the engine. At the same time, selecting and replacing the sensor is not difficult. The main thing is to choose the right device and follow the instructions above.
We also recommend reading the article on how to replace the cabin filter on a Lada Granta. From this article you will learn when to change the cabin filter on a Grant, as well as how to change the cabin filter on a Grant with your own hands.
Finally, we note that if the sensor is dirty, it is not necessary to immediately resort to replacement. At the initial stage, it is cleaned, as well as the pipes are treated to remove accumulated debris, dust and dirt, and at the same time, all components of the sensor are inspected. However, if there is no positive result, it is necessary to purchase and replace the device.
Sources
- https://vaz-2110.ru/dvigatel/kak-pomenyat-datchik-topliva-na-vaz-2110.html
- https://auto-self.ru/datchik-davleniya-topliva-vaz-2110-zamena-neispravnosti/
- https://luxvaz.ru/vaz-2110/86-datchik-davleniya-topliva.html
- https://carfrance.ru/vaz-2110-zamena-datchika-urovnya-topliva/
- https://ladafakt.ru/ne-pokazyvaet-uroven-topliva-vaz-2110.html
- https://enginehack.ru/rdt-vaz-2110/
- https://KrutiMotor.ru/dmrv-vaz-2110-neispravnosti-i-zamena/
- https://MasteraVaza.ru/elektroprovodka-i-elektrooborudovanie/datchiki/zamena-datchika-topliva-vaz-2110-225
- https://Shinomontazh-Penza.ru/dvizhok/rdt-vaz-21124.html
- https://osensorax.ru/rashod-uroven/dmrv-vaz-2110
- https://vaz-2110.ru/dvigatel/regulyator-davleniya-topliva-vaz-2110-proverka-i-zamena.html
- https://luxvaz.ru/vaz-2110/98-datchik-urovnya-topliva.html
Fuel level sensor malfunctions
Externally, malfunctions of the fuel level sensor manifest themselves in one of the following situations:
- the arrow on the device is constantly in motion, twitching, jumping to extreme positions;
- when the fuel tank is full, the arrow indicates that it is partially filled or that it is completely empty;
- when the ignition is turned on, the needle on the instrument is at the zero mark, provided that there is guaranteed to be fuel in the tank;
If you have similar problems, it means that the fuel level sensor is not working, but if the needle movement does not drop to zero, and the minimum residue signal lamp does not light up or, on the contrary, lights up even when the tank is full, then this indicates a malfunction of the instrument panel itself.
On cars controlled by an ECU, you can find out about the presence of problems with the FLS by the error codes recorded in the RAM block; to do this, just connect a diagnostic scanner to read the memory and check the parameters of the sensors of various systems.
Fuel level sensor errors
The numbers of the main errors that correspond to malfunctions of the fuel level sensor:
- P0460 - “FLS electrical circuit malfunction.” In practice, this means damage or breakage of the power and/or signal wire. Often this is simply a deterioration of contacts due to their oxidation.
- P0461 - “Signal level out of acceptable limits.” An error is generated if the signal from the fuel level sensor is too weak or too strong. This may also be accompanied by interruptions in the fuel supply to the engine, and as a result, a decrease in its power up to a complete stop.
- P0462 - “Low signal level in the FLS circuit.” Usually the error is formed as a result of corrosion of contacts, open ground circuit, short circuit in the circuit, damage to the fuel tank (fuel leak).
- P0463 - “High signal level in the FLS circuit.” As a rule, the error is formed as a result of damage to either the fuel level sensor itself or its float. There are known cases when it occurred due to the fuel tank rusting.
- P0464 - “Unreliable contact in the FLS circuit.” The error is formed as a result of damage to the insulation on the wiring, oxidation of the contacts, interruptions in the transmission of the signal from the sensor to the electronic control unit.
Design features of FLS
Manufacturers sometimes change the design of fuel level sensors in some models, adding new elements to them. They are usually equipped with special components that add new functions or improve existing ones. The main meter circuit remains unchanged.
Remote control of FLS power supply
Sometimes the signal transmission from the fuel level meter stops. This happens for two reasons: a dead battery or a power outage. In some cases, unscrupulous drivers do this intentionally to drain fuel. The remote control function eliminates this situation and sends information to the fleet if the fuel sensors have been disabled.
Fuel temperature control
The temperature control function can even be present on ultrasonic fuel level sensors. It allows you to identify deviations in fuel heating and maintain the engine in good working order, but there is no practical use in it, since temperature indicators do not affect the service life of the machine.
Universal connection interface
The fuel level sensor with a universal connection interface allows you to choose between analogue and digital signals at any time. This feature is useful in cases where the device needs to be connected to an existing tracker or a whole batch of meters is purchased for a large fleet.
Fuel level indicator
The fuel indicator is located in the cockpit. It shows the exact amount of fuel remaining to control consumption. In some cases, the device has a disciplinary function. Using indicators in the cockpit, you can hint to an unscrupulous driver that the drain will be detected by the fuel level indicator and will lead to punishment.
FLS bend
If the gas tank has a complex shape, then a special FLS with the possibility of bending the measuring part may be required. Such models allow single bending at an angle of up to 70° without reducing the service life of the device.
CAN-like bus S6
The use of a CAN-like bus is being promoted in the FLS market as a means of creating a universal interface for connecting various devices in cars. Such devices with a fuel level meter transmit information via a CAN bus and provide a great advantage in the form of the ability to combine several sensors.
Explosion-proof version
FLS in explosion-proof design have a special design that provides increased safety. They are used on fuel tankers and other equipment transporting dangerous goods, where only such a fuel sensor can be installed by law.
Built-in GPS tracker in FLS
If your car does not require a full-fledged GPS monitoring system, but you need to track its location, then a FLS with a GPS tracker will be the best option. It helps to control fuel consumption and see the location of the car without purchasing additional expensive devices and saving space.
Causes of malfunction
The reasons why the fuel level sensor does not work or it shows incorrectly are the following faults:
- The float has lost its seal. This situation is relevant when a ball made of fragile plastic is used as a float, which can crack as a result of mechanical stress or as a result of operating the car in severe frosts. In this case, the float will be inside the liquid or, more often, it will simply sink and fall to the bottom. The result will be a constant reading from the device that there is no fuel in the tank. Repair measures include replacing the float or the entire assembly. Another rare option is that the float can simply detach from the lever on which it is attached and “go off on its own.”
- Deformation of the lever that holds the float. As a result, the float may lose mobility or reflect incorrect information. Often this situation occurs when the fuel module is inaccurately removed from the tank, but sometimes even as a result of long-term operation of the car on roads with uneven surfaces, that is, with constant vibrations while driving. You can try to return the lever to its original shape, but most often the corresponding lever is simply replaced with a new one.
- Damage to the sensor housing. As a result, the readings of the resistive elements may change or the lever that takes the corresponding readings may be damaged. In this case, the reason why the sensor does not show the fuel level correctly is the use of low-quality gasoline or mechanical shock loads on the part.
- Failure of resistive elements. This is a fairly common reason why the fuel level sensor does not work. Elements on the rheostat fail for natural reasons, that is, as a result of abrasion during long-term use. It is possible that the wear is partial, for example, in the middle. In this case, the instrument needle will twitch. It is also possible that there is no contact between the sliding element and the resistive track due to damage or wear of the resistive coating or loosening of the slider foot pressure. With such a malfunction, the arrow will lie at zero.
- Lack of electrical contact in a certain section of the circuit. As a rule, on contacts that are oxidized either by moisture or fuel. The wires, their insulation, or breakage may be damaged. There are also sometimes problems with electrical connectors.
- The signal wire has a short to ground. In this case, the value of its resistance will be distorted and tend to zero. With such a malfunction, the level sensor incorrectly displays the level, transmitting information that the tank is completely filled.
- The fuse responsible for the operation of the fuel level sensor has blown. The fuse number must be found in the electrical diagram of the specific vehicle.
- Failure to secure the sensor on the fuel tank body. For example, with a skew. As a rule, in such a situation, the smell of fuel spreads outwards, in particular, the smell of gasoline will be heard in the cabin.
- There are cases when the resistive board on which the slider moves simply falls off the fastening solder.
- Tubular fuel level sensors may have a broken signal wire. In this case, the arrow will constantly show an empty tank.
- Also, tubular sensors are characterized by a coating that can form on the guide post. This will naturally make it difficult (and even impossible) for the float to move. Plaque is usually formed as a result of using low-quality fuel (with a large amount of paraffin, gasoline instead of gasoline). In this case, the instrument needle will freeze in one position, and not necessarily in one of the extreme ones.
- For non-contact sensors, the magnetic sensor and/or its wiring may be damaged. Some of them have a special control and control board installed. The problem may be with her too. In this case, the sensor usually fails completely, that is, it does not indicate the fuel level at all.
Most often, problems arise with floats or resistive elements, which wear out over time and stop transmitting correct data. But note that when the fuel level is not displayed, it is not always the sensor that is to blame. Often the arrow does not work, and here the device on the panel, which, in fact, is a potentiometer, is to blame. Therefore, if the fuel sensor does not indicate the fuel correctly, then you need to remove it and check it with a multimeter and make a visual inspection.
How to check the fuel level sensor
The first thing to do when checking any fuel level sensor is to check whether power is supplied to it through the fuse. If the design of the car does not allow open access to the sensor, then you need to use the car's electrical circuit and connect to the corresponding terminals on the blocks. To do this you will need to use pieces of wire. If there is access (usually through the trunk or under the rear seat), then you need to disconnect the chip from the sensor and then use an electronic multimeter to check or test.
To understand which contacts you need to connect to, use the wiring diagram, but if you are dealing with a conventional resistive level sensor of an injection car, then as a guide you can look at the cross-section of the wires suitable for the block - the wires for the fuel pump are always thicker than for the sensor. In general terms, the verification algorithm will be as follows:
- With one tester probe, touch the positive terminal on the chip, and with the other, touch the negative terminal or the body of the car (it is advisable to choose a place where there is either no paint coating at all or it is minimal).
- If power comes in, the multimeter will show +12 Volts (in standard passenger cars).
If there is no power, first you need to check the integrity of the fuse, and then the integrity of the plus and minus wires. When there is power, but the fuel sensor shows incorrect data, you need to continue checking and make sure what the problem is - in the sensor or wiring.
Checking the fuel level sensor using the universal method
After checking whether power is supplied from the fuse to the fuel sensor, it is necessary to check both the operation of the sensor itself and the signals sent from it to the potentiometer on the dashboard, that is, the fuel level device.
There are three wires between the fuel sensor and the potentiometer used in cars with a carburetor engine. One of which is “ground”, the second is the resistance signal wire going to the device, and the third is the signal wire to the critical fuel level warning lamp!
There are four wires between the sensors and potentiometers on injection motors. The first is “ground”, the second is power to the fuel pump, the third is signal, the fourth is to signal lamp. There are also three wires between the electronic sensors and the device. The first two are power and ground, and the third is a signal going to the control unit, which will indicate the amount of fuel on the digital display of the dashboard.
When checking a float or tubular fuel level sensor, it makes sense to start with a universal method. It is performed in two versions - when the arrow is constantly at the beginning of the scale and when the arrow is constantly at the end of the scale. Let's start with the first one. To do this you need:
- Provide access to the sensor contact group on the fuel tank.
- Turn on the ignition.
- Break the signal wire circuit (using additional wires).
- Observe the behavior of the level indicator on the instrument panel.
If after this the arrow on the device moves to the end of the scale, the fuel level sensor is faulty. If the arrow remains in place, you need to check the integrity of the signal wire, that is, “ring” it.
If the arrow is constantly at the end of the scale, then the sensor is checked according to the following algorithm:
- Provide access to the sensor contact group above the gas tank.
- Turn on the ignition.
- The end of the signal wire going to the tidy is alternately shorted first to the sensor contact, and then to the body (“ground”).
- If the instrument needle remains at the zero mark in both cases, this means that, most likely, the signal wire connecting the sensor to the instrument has broken. Therefore, it needs to be called.
- If the arrow deviates in the opposite direction if the wire is shorted to the body, it means there is no contact of the sensor with ground.
- If the arrow moves in both cases, it means that the sensor is faulty and further diagnostics are required.
For more accurate diagnostics, it is better to check the fuel level sensor when it is removed.
During dismantling, make sure that debris from the cap or seal rim does not fall into the fuel tank. Therefore, before dismantling, it is advisable to wipe off the dust and dirt on the fuel module cover with a rag.
How to check a lever fuel level sensor with a multimeter
We will consider a specific example of how to check a float-type lever fuel level sensor in a removed state based on the VAZ-2108, VAZ-2109 and VAZ-21099 cars. The verification algorithm will be as follows:
- Turn on the multimeter in resistance measurement mode.
- We connect probes to the sensor terminals and move the resistive lever along the track. The resistance under different modes should gradually change.
- So, if the correction hangs below under its own weight (corresponds to an empty tank), then the resistance on the sensor should be in the range of 238...262 or 285...335 Ohms, depending on which sensor is used. If you raise the float down, the resistance should drop to 17...23 or 7...25 Ohms. In practice, the indicated values may differ SIGNIFICANTLY. If the readings differ significantly, do not change, or change abruptly as the float moves, the sensor is most likely faulty.
In addition to measuring the fuel level sensor with a multimeter, you also need to perform a visual check of it. In particular, you need to check the functionality by making sure that the wires and connectors do not have mechanical damage. It is also necessary to inspect the presence of oxides and/or debris on the variable resistance, and the strip with contacts is securely fastened and soldered to the terminals. You also need to check the contact density, that is, how tightly the “tongue” fits the variable resistance. If necessary, it will need to be bent (just be careful!).
On other cars (or when using other sensors), the verification algorithm will be the same, but you must first know the nominal value of the resistance of the installed sensors. This can be found in the instructions for them or in the technical documentation for the car (manual).
Please note that if the fuel level sensor is working, but the indicator on the dashboard still does not work correctly or does not work at all, it means that the indicator itself is faulty. Often repairs involve replacing (or adding) a trim resistor. This is required in order to correct the failed resistance on the device itself.
Malfunctions in vehicle operation with a faulty FLS
So:
- Let's say you see that your fuel level is changing rapidly. The reason for this phenomenon may be the contact path worn out under the influence of the slider.
- If there is slight wear, you can try to get out of this situation in this way: bend the runner mount a little more than the problem area. If the track wear is enormous, you will need to change the VAZ 2110 fuel level sensor.
- There is another difficulty that often arises: the device deceives - its indicator indicator shows the level of remaining fuel with a significant error. The device probably just needs to be configured.
- In this case, it is disassembled and the pointer is moved manually from the left extreme position “1” to the right position “0”, monitoring the accuracy of the readings. If the pointer does not reach the extreme positions, tighten the adjusting tab - this will increase the stroke of the arrow.
- There is also a similar picture: you have half a tank of fuel, but the device indicates that there is nothing there. In this case, it is necessary to check all contacts of the meter. First, those that are on the device panel - it is probably necessary to tighten the nuts that secure the wires.
- Everything is fine with the wires on the panel - check if the lever is jammed in transition positions. To establish the general functionality of the fuel gauge, it is necessary to check the connections of the ground wires and the handbrake handle.
Important! You have done the prevention, but there is no effect - this means that the VAZ 2110 fuel level sensor needs to be replaced.
Before purchasing a new device, check its labeling. For this purpose, there is a proper annotation in the machine’s operating manual. There are approximately 10 types of meters, differing in resistance levels. This coefficient is personal for any device.
Frequent malfunctions of the fuel sensor on the VAZ 2110
In principle, a fuel level sensor can present drivers with many unpleasant surprises, which are very confusing on the road:
- The fuel level readings start to fluctuate. In such a modification, the device can show anything - either the highest or the lowest fuel level. Understanding such a situation becomes absolutely unrealistic. The root cause of this phenomenon may be damage to roads on the board of the control body. Sooner or later they may wear out due to the continuous impact of the runner. If a similar symptom is found in your car, you can try to bend the slider, that is, move it to a significant area of the board. However, this can only help when the roads are not yet very worn out. Otherwise, the sensor needs to be replaced.
- The fuel level sensor constantly shows incorrect information. There may be a number of reasons for this phenomenon: ✔ If the level readings are constantly increased or decreased, in this case you can adjust the fuel gauge. ✔ The fuel level cursor indicates the fullness of the tank. In fact, you clearly know that the tank is only partially filled.
Problems
So:
- Let's say you notice that gasoline levels are changing dramatically. The reason for this phenomenon may be the contact track worn out under the influence of the slider.
- If there is slight wear, you can try to get out of this situation like this: bend the runner mount just above the problem area. If the wear on the track is very large, you will have to replace the VAZ 2110 fuel level sensor.
- There is another problem that arises no less often: the device is lying - the arrow of its indicator indicates the level of remaining fuel with a large error. The sensor may just need to be adjusted.
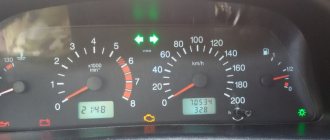
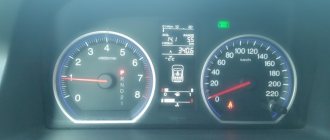
On the instrument cluster, the fuel indicator is on the right
- In this case, it is dismantled and the indicator is manually moved from the left extreme position “1” to the right position “0”, checking the correctness of the readings. If the arrow does not reach the extreme positions, bend the adjusting tongue - this will increase the stroke of the arrow.
- There is also the following situation: you have half a tank of gasoline, but the device shows that it is empty. In this case, you need to check all sensor contacts. First of all, those that are on the instrument panel - you may need to tighten the nuts that secure the wires.
- The wires on the panel are fine - check if the lever is stuck in intermediate positions. To determine the overall performance of the fuel gauge, you need to check the connections of the ground wires and the handbrake handle.
You have carried out preventive maintenance, but the result is zero - which means you need to replace the VAZ 2110 fuel level sensor. Before purchasing a new device, find out its markings. To do this, there are corresponding instructions in the car's operating manual. There are about a dozen types of sensors, differing in resistance levels. This indicator is individual for each device.
Features of measuring fuel pressure on a VAZ-2110
I would like to immediately note that this parameter can be measured in several ways. One of the most popular is to purchase a special kit, which includes a special adapter for connection, a pressure gauge (it is with this that the measurement is made), as well as a drain. You will have to allocate about 1,500 rubles to purchase such devices. You can do it differently - go to a service station, where specialists will carry out the necessary measurements for 300-500 rubles.
But there is a more sophisticated method that does not require additional costs - measuring fuel pressure using a regular pressure gauge, which is used to check tire pressure. In this case, for measurements it is better to use pressure gauges with a minimum limit (about 6-7 atmospheres). In this case, the error will be minimal.
But how to check? The sequence of actions will be as follows:
- Prepare a pressure gauge with a limit of 6-7 atmospheres and wind the foam directly under the pipe.
- Prepare an oxygen tube with a diameter of 9 mm and put it on top.
- Secure the fasteners on both sides with clamps.
- Cover the generator with something to prevent fire.
- Reduce fuel system pressure to a minimum. It's easy to do. Remove the fuse that powers the fuel pump (in the “ten” it is located under the trim near the control unit, on the far left side), start the engine and wait until it stalls.
- Twist off the plastic cap installed on the fuel rail.
- Look inside the cap - there will be a standard hole and nipple. Take the cap from the car wheel and unscrew it. Be prepared for a slight surge of fuel (this is caused by residual pressure).
- Now put the second edge of the hose onto the ramp outlet and then secure it with a clamp.
- Remove the “protection” from the generator and start the engine (don’t forget to put the fuse back in place).
This method of checking fuel pressure is considered one of the most accurate, simple and very effective. By the way, if you don’t have clamps at hand, you can use special bushings for the adjusting bolts to tighten them. In this case, a small rubber ring is put on the fitting for fixation. From the back of the sleeve you can solder a fitting to which the hose will be connected.
Normal fuel pressure should be between 2.8 and 3.2 bar (atmospheres). After removing the vacuum tube from the fuel pressure regulator, the readings may increase slightly - by an average of 0.2-0.7 atmospheres.
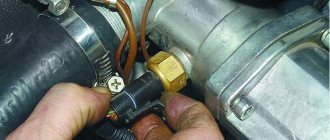
How to check the mass air flow sensor on a VAZ 2110 with a multimeter
Important! All disconnections and connections of connectors are made with the battery disconnected.
A. _ Checking the wiring harness and contacts. At this stage, the interaction between the ECU and the mass air flow sensor is tested. Performed with the connector removed and the ignition key in the “ON” position. You need to know the pinout of the sensor connector on the ECU side:
- Contact No. 1 is not involved in the test.
- Contact No. 2 - 12 volt power supply. A deviation of even 0.5 volts is not acceptable.
- Contact No. 3 - “ground”, mass.
- Contact No. 4 - 5 volt sensor power supply. Likewise: deviations are not allowed.
B. _ After making sure that the cable harness is intact and the ECU is working, we check the signal voltage on the connected flow meter. Turn the ignition key to the “ON” position and do not start the engine! We connect a digital multimeter to ground and contact No. 5 of the air flow sensor.
The multimeter is set to 2 volt measurement mode with an error of 1/100 volt. These readings accurately indicate the condition of the flow meter, so the accuracy class of the tester must be high.
If the device shows a voltage within 0.99-1.02 V, your flow meter is new or in excellent condition.
Readings from 1.03 to 1.05 volts are acceptable, but the air flow sensor will soon fail. You can still drive with such a sensor, but the quality of the fuel-air mixture will be far from ideal.
If there is no voltage or its level is above 1.05 V, the flow meter is faulty and requires replacement.
Advice: you should not skimp on replacing the mass air flow sensor. Excessive fuel consumption and increased engine wear will cover all the imaginary benefits.
Symptoms of a problem
Before moving directly to the process of replacing the regulator, you need to mention the signs of its malfunction. The main one is problems in the operation of the valve, especially when the valve does not hold well, i.e. fuel circulates freely. This in turn provokes a decrease in pressure. As a result, the engine power decreases, because it does not have enough fuel to increase speed.
When you turn on the engine, it becomes necessary to work for a long time with the starter (i.e., a device that spins the engine shaft in order to start it) in order to create the required pressure. If the valve is completely inoperative, fuel stops being discharged into the tank. This provokes an increase in pressure. As a result, there is excessive consumption of gasoline, as well as incomplete combustion.
In addition, there are other signs indicating a malfunction of the RTD in the VAZ 2110:
- the engine stalls at idle;
- the motor does not work at full power;
- unstable engine operation;
- the content of CO (carbon monoxide) and CH (methane) significantly exceeds the established standards;
- jerking while driving.
Typical faults
In the VAZ 2110 car, the fuel sensor is based on a rheostat with a resistor, which is made of nichrome particles. The moving element of the rheostat is lowered into the fuel and moves using a lever and a float.
The second part of the lever is, in fact, an additional contact. If you place it in a certain position, the circuit regulating the process of replenishing with spare fuel will be closed. In the domestic “ten”, the volume of reserve fuel is about 4-6.5 liters.
Alas, despite the importance of a fuel level meter, its quality is far from perfect, which is why car owners often have to deal with sensor malfunctions.
It is important to note that not all breakdowns necessarily require replacement. Sometimes you can get by with a simple tweak that will allow you to return the previous functionality to the pointer.
Typical breakdowns
Definition of markings
There are several characteristic faults that even a beginner can cope with.
- The fuel level indicator suddenly changes its values. Most likely, the contact track has worn out due to the slider. If the wear is not severe, it is enough to simply bend the fasteners of the slider so that it is slightly above the problem area. But when wear is severe, the contact track changes completely.
- The indicator arrow is at a level that is not true. For example, it shows an empty tank even though you just filled up. This will require some adjustment. Disconnect the sensor from the gasoline tank and adjust the indicator. It is enough to move the arrow from the value at which it is stuck to zero. Most often, this measure helps.
- The arrow barely moves and cannot reach the desired position. In such a situation, the tongue bends slightly, which allows you to increase the range of the pointer arrow. It is possible that the contacts on the pointers have broken or come loose. To do this, look under the dashboard and check the condition of the wiring.
- It is possible that the fasteners securing the wires have become loose. They need to be tightened up. If the instrument panel is in good condition, examine the entire wiring path. A short circuit often occurs, causing the measuring device to stop working.
If all the measures taken have not yielded any result, the sensor continues to show complete inoperability, you will have to replace it.
Fuel level sensor repair
First of all, you need to understand that repairing the fuel level sensor is impossible without removing it from its seat.
If the resistive elements on the lever fuel level sensor are worn out, you can try to bend the “tongue”, which directly slides over them and transmits the current value to the monitoring device. At the same time, you can clean the contact tracks of the device. If the resistive track has worn out significantly, then repair is not possible and the FLS must only be replaced. If a board with a resistive track “walks” in its seat, it needs to be soldered again.
When there is a malfunction in the electrical circuit of the sensor, problems usually occur at the contacts. Accordingly, they need to be cleaned and tightened. It is also advisable to lubricate them with a special lubricant. If the wires are damaged, it is advisable to replace them with new ones (you can use a whole bundle). However, if the damage to the insulation is minor, you can use electrical tape or heat shrink for wires for repairs.
If the guide tube in the tubular sensor is dirty, it means that it needs to be cleaned and the deposits washed off using a spray with a cleaner. At the same time, you can also clean the signal wires located along the tube.
The disadvantage of the electronic fuel level sensor is its non-repairability. At least in a garage environment. Therefore, if this unit fails, contact a car service center or an official representative of your car manufacturer for help.