Production of the VAZ 2107 ended in 2012, but even today this brand remains one of the most used in the VAZ line, along with 2106 and 2109. Drivers consider a durable, hard-to-kill body to be a feature of the 2107 configuration, the elements of which, although not coated with zinc, show high performance characteristics.
Replacing a VAZ 2107 wing is a type of repair that every Zhiguli owner has to deal with sooner or later. The market offers a complete catalog of body parts for the entire VAZ line, so choosing an original part from official manufacturers is not difficult.
Guide to replacing the front wing on a VAZ 2107
Owners of all old sevens sooner or later are faced with the need to replace the front wing on a VAZ 2107. Buying a new wing in an auto shop for any VAZ models will not be difficult. It is better to buy body parts from a reliable manufacturer. After all, if the dimensions are slightly off, then it won’t be possible to fit the new part perfectly into place. Let's discuss how to replace the wing on a VAZ in a garage.
- In what cases are body parts replaced?
- Removing the old wing on a VAZ
- How to install a new wing on a VAZ
How to replace the front wing of a VAZ-2107
The reason for this is traces of corrosion or even through holes that have appeared over time, despite the fact that fairly high-quality metal was used during the production of the machine.
And those who purchased a VAZ-2107 car much later, and it was produced until 2012 at the Volzhsky Automobile Plant, could encounter such a problem as an accident. It is worth understanding that it is possible to resolve the issue of replacing the front fenders for such a car without even contacting expensive special service services. To do this, you need to be aware of at least the basic concepts of the work of a straightening welder. Even though this is a rather complicated procedure, you can still do it yourself.
Preparing the car for front wing replacement
Before deciding to replace the front fenders, you should make sure that such actions are necessary. If the damage is minor, the part can be straightened. It will cost much less than buying a new wing. If the wing has significant damage, then it is better to replace it.
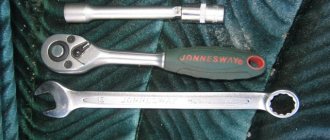
To replace the front fender yourself, you need to prepare the following tools:
- Drill for drilling holes.
- Angle grinder - grinder.
- A set of wrenches for removing the old and installing a new part.
- Impact screwdriver.
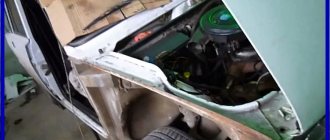
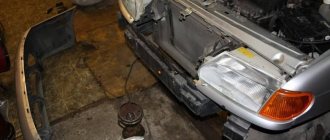
If you plan to replace a part, the first step is to replace the damaged device. This can only be done after dismantling the front door and headlights. To remove the door, you will need to use an impact screwdriver. To remove the front fender, you will also need to remove the front headlight unit on the right or left side, depending on the part being removed. You will also need to remove the wheel, fender liner and front bumper, after which you can begin dismantling and installing a new front wing on the VAZ 2107.
Replacing the front fender - when necessary
When is it necessary to replace the part in question? If you love your car and try to take care of it, then the first sign of corrosion will greatly upset you. However, in this case, you should not remove the part and replace it with a new one. Replacing the front wing on a VAZ 2107 is carried out for a number of the following reasons:
- Corrosion marks in the form of through holes. In this case, you can use soil substances and do without welding, but such repairs will not last long. The best option to prevent further damage to the part by corrosion is to replace it. You can use a repair insert or overlay, but to do this you need to cut out the rotten part and weld the metal overlay. This method is labor-intensive and requires the use of paints and varnishes.
- The part was damaged if the car was involved in an accident. Often it is the front wings that are affected. If the straightening specialist says that the wings cannot be repaired, then it is better to replace them.
To make a replacement, you will need to buy a new or used device. When purchasing, it is important to pay attention to the geometric dimensions of the part, as well as the color. You can do the replacement work yourself at home, but we’ll find out how to do it correctly below.
Removing the old wing
When carrying out dismantling work, you should use an impact screwdriver and WD-40. When it comes to the wing or wings themselves, before removing them it is necessary to clarify that they are secured with welds. To dismantle a wing secured by welding, you will need to use an angle grinder.
When the wing on a VAZ 2107 is dismantled, in order to prevent dust and dirt from entering the interior, it is better to first seal the doorway with polyethylene. It is advisable to put a cloth on the windshield that will prevent chips and abrasives from getting on it. After this, we proceed to dismantling manipulations:
- The first step is to cut off all welding joints by which the part is attached to the drain gutter.
- The connection near the headlamp also needs to be cut with a grinder, making an indent of about 2-3 mm.
- The cut from the side post must be made at a distance of 5 mm from the bend.
- The remaining parts are also removed using a grinder, and the joints ultimately need to be cleaned.
When the old wing is removed from the car, you can begin to prepare the area for installing the new part. To do this, we evaluate the condition of the car body. If there are no obvious damages (including corrosion), then we proceed to removing contaminants and cleaning the joints. Many people do not pay due attention to this process, but if the procedure is not performed properly, the result will be disastrous. Soon you will need to remove the front fender again and repair or replace it.
If there are places of corrosion, they must be cleaned with a grinder and then primed. Before installing a new wing, it is necessary to treat its cavities with primer and apply Movil. In this way, you can completely protect the part from the emergence of new corrosion foci.
Description of self-replacement of the front wing of a VAZ-2107
A drill or hole punch is used to make holes in a new car part so that it can later be welded to the body. Considering that the work is performed by a non-professional in a garage, and it is not possible to use resistance welding, it is better to use a semi-automatic machine. In this brand of car, the front fenders are welded, not screwed, so welding cannot be done without.
Using a grinding machine equipped with a special wheel, you need to clean the places where the welding took place. After this, you should install the door and hood, and return the headlight unit to its place. In order to align the replaced wing, it is necessary to adjust the gaps. Such events are carried out using a clamp. This will help secure the unwelded part and ensure that it is aligned correctly.
Then, using a semi-automatic machine, it is necessary to weld a new wing of the VAZ-2107 car. After all the holes are fixed, they need to be sanded with a grinding wheel.
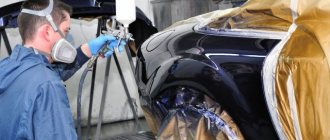
At the very last stage, painting work is carried out. First you need to prepare the surface. The new wing is available in black and is coated with a preservative, which must be removed before painting. It is better to perform these works manually, without using grinding machines, as the surface can be damaged, which will subsequently entail additional processing, the purchase of materials and painting work.
Replacement procedure
At the beginning of the dismantling operation, the front or rear wing of the car is removed by cutting with a grinder or cutting with a pneumatic chisel at a distance of 10-15 mm from the edge.
Before starting dirty and loud work, it is necessary to remove all adjacent intact parts: the front door, bumper, light fixtures. After dismantling the VAZ 2105 wing, VAZ 2107 wing, it is necessary to clean the joints, drill out the weld points, removing excess metal, and separate the drain using a regular chisel.
After separating the old wing and removing the remaining weld metal, it is necessary to clean the joint with a grinder along the circle of the future joining of the new wing and the body. Mechanical cleaning will remove dirt and traces of rust.
It is necessary to clean the new wing from the transport soil using a grinder and coat the inner surface with fresh product. To ensure a good fit of the fender to the drain at the bottom and the threshold of the car, you need to drill holes for welding and grind the places from the inside for alignment and a tight fit.
Before welding, it is recommended to fix the fender in place using self-tapping screws to adjust the distances to the hood and door of the car.
Welding can be done either with resistance welding pliers (if available) or with conventional electrodes with an intermittent seam 10 mm long and at intervals of 15-20 mm.
After welding, it is necessary to check the mating of the parts and correct any inaccuracies.
Then you need to sand the joints and prime the surface to prepare for painting. After painting, reinstall all the removed parts in their original places: bumper, front door, light fixtures. Stand in front of the car and admire the well-done repair.
At the same time, the only disadvantage is the time spent on this, which is covered by minimal costs, acquired knowledge and skills, and a feeling of satisfaction from quality work done with your own hands.
How to install a new wing on a VAZ
To install the wing, you need to know how to work with a welding machine. Gas or semi-automatic welding is suitable. It is better, of course, to use the second option. This will prevent the use of explosive gas containers.
Before installing the new wing, replace all other previously removed body elements: bumper, headlight, door and hood. This is done temporarily to fit the new wing and set the gaps.
Now you can get started:
- align the part, observing the gaps with other body parts;
- secure it with clamps;
- dismantle the previously installed body elements again;
- temporarily weld the wing in several places so that it does not move with the clamps removed;
- make sure that the part is installed correctly;
- finally secure it in place using spot welding.
After the work has been completed, finally install the removed body elements, clean the welded areas, prime them and paint them.
1200 rub. for the photo report
We pay for photo reports on car repairs. Earnings from 10,000 rubles/month.
Write:
If you are concerned about the question “how to change the front wing on a VAZ 2107,” then this video, if not an instruction, is a fairly detailed answer. In addition, here you can learn how to straighten an apron on a “seven”.
So, replacing the front wing of a VAZ 2106 or VAZ 2107 begins with cutting off the damaged body part. If the damage is significant, then you may have to start with cleaning, that is, dismantling, in the engine compartment. Then you can begin to prepare the apron for straightening.
You can learn more about how to do such a body repair as replacing the front wing of a VAZ 2107 and straightening the apron by watching this video.
Hello! Today’s post will be dedicated to replacing the rear wing on VAZ 2105 - 2107 cars, I will also give a couple of tips on how to replace the wing and what to pay attention to.
Replacing the rear wing on a VAZ 2105 - 2107
First, let's talk about the theory of replacement, as well as the devices and tools that we will need in the replacement process. It is necessary to replace the wing in case of large deformations due to impacts and accidents, if the part is severely damaged by corrosion.
Important! New body parts are now not of very high quality, this applies both to the quality of workmanship (risks, minor deformations during stamping) and to the thickness and quality of the metal itself - the metal is thin and rusts very actively.
Thus, in every repair I try to preserve the original factory part as much as possible, changing only part of the part, making patches, etc. On a car assembled from new parts it is quite difficult, if not impossible (the bends do not match.
But despite my persuasion, the owner of the car shown here firmly decided to change the entire wing, and there was a lot of work to do with it.
Tool for replacing the rear wing on a VAZ 2107:
- Semi-automatic for welding the wing and patching holes under the wing. Read about my semi-automatic
- Drill for drilling spot welds and drilling holes for welding in a new part.
- Grinder, screws, screwdriver
Often, when replacing a rear fender, it becomes necessary to replace the spare wheel or tank, depending on the side. Also, if the car is rotten, then it is not a bad idea to purchase the outer part of the inner rear wheel arch or patch it.
I highly recommend that before cutting the old fender off the car, you look at the gaps between the door and the fender, the fender and the trunk. This is necessary in order to know where it is necessary to trim, tighten (if possible) to obtain the required gap. To cut off the wing, you need to start by drilling out all the spot welds, try not to drill through (as I did when replacing the front wing of the Tavria), I first drill and then carefully tear off the wing with a screwdriver. Take your time to minimize deformation of adjacent parts.
Removing the old wing on a VAZ
Dismantling, depending on the method of its installation, will be different. How to change the front wing on a VAZ 2107 if the original part is installed on the body by welding? The process of dismantling the old element step by step:
- Determine spot welding locations. At the service station, to dismantle the wing, they do not use cutting out the part with a chisel, but welding it with a welding machine.
- Drill out the welding points of the gutter on the body, cut off the gutter with a chisel.
- Cut off the connection between the fender and the front panel from the headlight downwards.
- Cut the connecting seam in the area of the side post, 5 mm away from the bend line.
- Use a grinder to cut out the remaining parts of the wing.
- Clean the cut areas and straighten the deformed edges.
- Inspect the body cavity, if there is rust or corrosion plaques, carry out repairs and treat the surface with anti-corrosive or zinc-chromate primer class GF-073. Experienced drivers recommend using Movil for any body work. This will protect the new wing from corrosion.
To dismantle a removable element that is installed on the body with bolts, you must use a power screwdriver. With this replacement, there is no need to remove the hood and door covers, and also protect the windshield from welding. Dismantling process step by step:
- Raise the hood and install the support stand.
- If the model is equipped with special protection, remove it.
When replacing the right fender, the steering wheel is turned all the way to the right; when replacing the left fender, it is turned to the left.
The part is attached to the VAZ 2107 using 8 bolts. The process of replacing removable, often plastic elements is a fairly simple procedure even for an inexperienced technician. Repairs take up to 2 hours and are carried out in the garage.
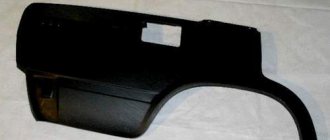
Replacing the front fender
Before you begin removing the damaged fender, remove the bumper, front door, hood, and antenna (if equipped) from the vehicle. Next, remove the headlight, side turn signal, and trim from the front of the car. Visually identify the spots of spot welding - they are in the front part where the headlight was attached, on the gutter near the engine compartment and in the place where the door is hung. Take a drill and drill out the resistance welding points. Now you need a well-sharpened chisel. They need to cut off the joints with the front, the bottom of the sidewall and its A-pillar. After this, you can remove the wing and, using a grinder and the same chisel, knock off the remains of the old damaged body element.
At the next stage, sand the attachment points (you can use a grinder with a Velcro circle). After this, you can hang the hood, door and install a new wing; it must be adjusted so that there are no gaps. Next, secure the new body element, for example with a clamp, and weld it temporarily first. Remove the clamp, make sure that all gaps are maintained and thoroughly weld the new wing.
Replacing the wing of a VAZ 2101
Most car owners carefully monitor the appearance of their “horse” and literally blow away specks of dust from it. Regular washing and polishing at least once a month is a mandatory procedure for which no expense is spared. But active use sooner or later is reflected in the appearance - abrasions, chips, cracks, traces of corrosion and even dents appear. In this case, the car's wings (both front and rear) suffer the most. But don't worry. Replacing a fender is possible if you have love for your car, hands, the necessary equipment and a desire to save money.
When to change?
There are car enthusiasts who, when the first scratch appears, rush to the service station and ask for a new wing to be installed. Take your time:
— firstly, such a service (when ordered on the service) can hardly be called cheap. If you need to change several wings, this can cost a pretty penny. Please note that you will have to pay a considerable amount not only for the work, but also for the new wing;
- secondly, if replacing the wing is necessary and straightening will not help, then do the work yourself. If you follow simple instructions, this is a matter of a few hours. In addition to everything, you have a chance to study the body part of your car, which will definitely come in handy in the future.
When does a wing require replacement:
- If you are in an accident and the damage is minor, then straightening and putty can help out. If the impact was very strong and the wing is severely deformed or even torn, it is better to replace it.
- Corrosion is the main enemy of a metal body. She mercilessly destroys metal and starts with the fenders of the car. It is better not to “treat” serious (through) damage to the body, but to replace it immediately.
If you are in doubt about what is the best thing to do - straighten or change the wing, it is better to consult with several specialists and then make a decision.
Front fender
So you've decided that fender replacement is the best option. Great. Stock up on a new part, the necessary tools and get down to business. By the way, the specifics of replacement are different for each car (for obvious reasons). In this article we will pay attention to the real “father of the classics” - the VAZ-2101:
- Remove everything that may interfere with further work - the hood, bumper, front door. Immediately remove the turn signal on the fender, the sidelights and the headlight itself. Only after this can you work on the wing.
- Use a grinder or a sharp chisel to cut off the wing joints:
— with the lower element of the side of the body (horizontal/vertical – 18/12 cm). The optimal distance from the edge of the wing is about 2.5 centimeters;
— with the front pillar of the side of the frame. It is advisable to deviate from the inflection point of the vertical amplifier by about 4-5 mm;
— with a front panel (20.8 cm). Be sure to move down from the headlight at least a couple of millimeters (usually 2-3 is enough).
- Now move on to the horizontal amplifier. Carefully drill out all the spot welding joints connecting the fender to the front of the car.
- Using a chisel with a thin tip and a slightly bent edge, “rip” the wing out of its place.
- Be sure to clean the joints with the body where strips remain with a sharp chisel.
- Clean the seats (on the body and fender). Use a sander for this.
- Remove all unnecessary debris from the cavity under the old wing (dirt, debris and signs of corrosion). All this “junk” has certainly accumulated there over the years of operation.
- Treat everything with a primer (you can use GF-073).
- Place the new fender against the car and attach it using the quick release clamps.
- Take a gas welder and tack the new part to the body in several places - along the edges of the horizontal amplifier, in the place where the wing meets the headlight (more precisely, its casing), with the trim (lower side part) and the front panel. To get the desired result, it is better to use brass rods like L-62, L-63.
- Go through all the gaps and make sure that there are no discrepancies (the exact dimensions can be found in the VAZ operating instructions).
- Perform resistance welding along all the joints of the wing (the ideal step is 4-5 centimeters). As a last resort, you can use:
- electric welding, but in a CO2 environment. In this case, it is necessary to use semi-automatic wire of the Sv08G1S series (optimal diameter - 0.8 mm);
- gas welding for attaching the gutter with the splash guard. In this case, it is advisable to use SV 08 wire (optimal diameter - 1.6-2 mm). In turn, to connect the front pillar to the amplifier of the installed part, it is worth using brass solder L 62 (or L63) and rod diameters of 2-3 millimeters.
Rear wing
Here the sequence of actions is as follows:
- Remove all unnecessary things - the reflector, remove the taillight and rear bumper.
- Completely clean the luggage compartment, remove the floor covering and rubber seal. The gas tank will also get in the way - drain the fuel and remove it with a container. Disconnect the wiring.
- Cut (with a grinder) or chip (with a chisel) the following joints:
- with the back side of the side part (it is advisable to step back from the edge of the wing fold about 1.5-2 cm);
— with a panel of the transverse part of the window (the optimal distance from the edge of the wing fold is about two millimeters);
— with the rear panel of the car body (here it is better to retreat 2 mm from the joining line);
— with the floor of the gas tank (spare tire) at the bend (ideal indentation is about 1.2-1.5 cm);
— with an arch above the rear wheel (distance from the edge is about 2 cm).
- Knock down the square connecting the panel (rear upper part) and the wing. In this case, you should retreat 1.5 cm from the edge of the square.
- To remove the wing, go through the attachment points of the body with the roof and drill out all the welding joints.
- As in the previous case, get rid of excess strips and clean all seats (fender and body) using a grinder.
- Attach the wing to the body, adjust it and attach it using special grips.
- Gas weld the wing into place.
Conclusion
Replacing the wing, as you already understood, can also be done in a garage. The only difficulty is that you need to have welding equipment on hand, and experience in welding work. If you have doubts about your abilities, you can always contact a service station. Good luck.
How to change the wing on a VAZ 2107
The VAZ 2107 brand car is known not only in Russia, but also in neighboring countries. Its production began in the 80s, and production was closed in 2012. A lot of time has passed, but the car continues to be popular. Over time, it is possible that you will get into an accident or cause corrosion to appear. Usually the front fenders are the first to suffer. If any of these troubles happen, then repairing or replacing the damaged front wing on a VAZ 2107 will help maintain its appearance.
Wing replacement
#1 darvinpavel
- Users
- 10 messages
- 0 thanks
- City VAZ 2106, Voronezh,
- Top
- Answer
- Quote
- Insert nickname or quote
#2 darvinpavel
- City VAZ 2106, Voronezh,
- Top
- Answer
- Quote
- Insert nickname or quote
#3 Serge_Spyder
- City VAZ 21053i, Samara,
Max: 176
km/h
- Top
- Answer
- Quote
- Insert nickname or quote
#4 Eugen[kgn]
Master of all things
- Protection against spam bots: 123
- The city is growing forward!
- Auto: sharp, like diarrhea))
Why didn't you like the new wing? It will be much easier to work with than with a used one.
- Top
- Answer
- Quote
- Insert nickname or quote
#5 darvinpavel
- City VAZ 2106, Voronezh,
- Top
- Answer
- Quote
- Insert nickname or quote
#6 mirei2
- City VAZ 2107, St. Petersburg,
- Top
- Answer
- Quote
- Insert nickname or quote
#7 darvinpavel
- City VAZ 2106, Voronezh,
- Top
- Answer
- Quote
- Insert nickname or quote
#8 Eugen[kgn]
Master of all things
- Protection against spam bots: 123
- The city is growing forward!
- Auto: sharp, like diarrhea))
Our factory one costs about 1000 rubles.
- Top
- Answer
- Quote
- Insert nickname or quote
#9 Eugen[kgn]
Master of all things
- Protection against spam bots: 123
- The city is growing forward!
- Auto: sharp, like diarrhea))
- Top
- Answer
- Quote
- Insert nickname or quote
#10 mirei2
- City VAZ 2107, St. Petersburg,
- Top
- Answer
- Quote
- Insert nickname or quote
#11 darvinpavel
- City VAZ 2106, Voronezh,
- Top
- Answer
- Quote
- Insert nickname or quote
#12 darvinpavel
- City VAZ 2106, Voronezh,
- Top
- Answer
- Quote
- Insert nickname or quote
#13 Eugen[kgn]
Master of all things
- Protection against spam bots: 123
- The city is growing forward!
- Auto: sharp, like diarrhea))
- Top
- Answer
- Quote
- Insert nickname or quote
#14 Eugen[kgn]
Master of all things
- Protection against spam bots: 123
- The city is growing forward!
- Auto: sharp, like diarrhea))
The worst thing is when the wing is handicraft. As a rule, you'll expose him to hell.
And there is a lot of bending, bending, straightening, etc.
Once the wing is level, you can cook. Yes, by the way, the edges of the wing (where you will weld) will need to be stitched with a drill with a diameter of 5 mm. At a distance of at least 50 mm from each other. And then you cook through these holes (from the inside).
- Top
- Answer
- Quote
- Insert nickname or quote
#15 VantYs
- City Constructor, City Vegetable Hero:),
- Top
- Answer
- Quote
- Insert nickname or quote
Installation of a new VAZ 2107 wing
To install the wing, semi-automatic welding or gas welding is required. The first option is safer and does not require the use of explosive gas cylinders. To properly install a new VAZ 2107 wing, you need to replace the door, headlight, hood and bumper of the car. After this, the wing needs:
- align the wing, maintaining the gaps between it and other parts of the body;
- secure the wing with clamps.
Next, you will have to dismantle the doors, headlight, bumper and hood again. Before this, you can additionally “grab” the wing by welding in several places so that it does not move. Care should be taken not to damage the paintwork of other parts. Welding is carried out in three stages:
- the wing is welded temporarily, with several short seams, so that it cannot move even without clamps;
- the correct position of the wing on the car is checked;
- The final welding of the wing is carried out.
This completes the replacement of the VAZ 2107 wing. All that remains is to thoroughly clean the welding areas and prime, and then paint, the wing and welding areas.
Replacing the rear wing of a VAZ 2107 Zhiguli
- Repair manuals
- Repair manual for VAZ 2107 (Zhiguli) 1982+.
- Rear fender replacement
When replacing the fender, remove the taillight and bumper. Empty the trunk, remove the rubber seal of the trunk lid and the fuel tank (if the right wing is being replaced) and disconnect the electrical wiring.
Cut with a thin sharp chisel or cut with a grinder along the wing of the joint:
| Rice. 9–34. Replacing the rear fender. The arrows on the fragments indicate the places where the wing was cut. Dotted lines indicate cutting lines |
- with the rear wheel arch along the bend ( ), 12-15 mm away from the edge of the wing,
— with the floor of the spare wheel (or fuel tank) along the bend, 12–15 mm away from the edge of the wing;
— with the rear panel, 2 mm away from the connection line;
— with the rear window cross member panel, 2–3 mm away from the bend edge;
— with the rear part of the sidewall along the bend, 15–20 mm away from the edge of the wing.
Cut off the angle connecting the wing with the rear panel, stepping back from the edge of the angle 15 mm.
Using a 6-7mm drill, drill out the resistance welding points at the junction of the fender with the side roof panel and detach the fender. Remove the remaining wing strips, straighten the deformed edges and clean the seats of the body and the new wing.
| Rice. 9–35. Rear wing welding areas. In the main view, dots indicate resistance welding seams. Fragments show places of gas welding |
Adjust the new wing to the landing site, grab it with grips and gas weld it with L 62 or L 68 rods in the places indicated on the fragments.
Check the fit of the wing and weld it with resistance welding in 40–50 mm increments. In the absence of a resistance welding machine, gas welding by fusion of edges with an intermittent seam 20 mm long every 30 mm with an L 68 rod is allowed. In the door , electric welding in a carbon dioxide environment is allowed.
↓ Comments ↓
1. Vehicle operation and maintenance
1.0 Operation and maintenance of the vehicle 1.1. Vehicle operation 1.2 Vehicle maintenance
2. General information
2.0 General data 2.1 Technical characteristics of vehicles 2.2 Controls and monitoring devices 2.3. Ventilation control and interior heating
3. Engine
3.0 Engine 3.1 Removal and installation of the engine 3.2 Disassembling the engine 3.3 Possible engine malfunctions, their causes and methods of elimination 3.4 Engine assembly 3.5 Bench tests of the engine 3.6 Checking the engine on a car 3.7. Cylinder block 3.8. Pistons and connecting rods 3.9. Crankshaft and flywheel 3.10. Cylinder head and valve mechanism 3.11. Camshaft and its drive 3.12. Cooling system 3.13. Lubrication system 3.14. Supply system
4. Transmission
4.0 Transmission 4.1. Clutch 4.2. Gearbox 4.3. Cardan transmission 4.4. Rear axle
5. Chassis
5.0 Chassis 5.1. Front suspension 5.2. Rear suspension 5.3. Shock absorbers
6. Steering
6.0 Steering 6.1. Inspection, check and adjustment of steering 6.2. Steering mechanism 6.3. Steering rods and ball joints 6.4. Swing arm bracket
7. Brakes
7.0 Brakes 7.1. Checking and adjusting the brakes 7.2 Possible malfunctions of the brakes, their causes and methods of elimination 7.3 Bracket for the clutch and brake pedals 7.4. Vacuum booster 7.5. Brake master cylinder 7.6. Front brakes 7.7. Rear brakes 7.8. Rear brake pressure regulator 7.9. Parking brake
8. Electrical equipment
8.0 Electrical equipment 8.1 Electrical equipment diagram 8.2. Battery 8.3. Generator 8.4. Starter 8.5. Ignition system 8.6. Lighting and light signaling 8.7. Sound signals 8.8. Windshield cleaner 8.9 Headlight cleaner 8.10. Heater electric motor 8.12. Control devices
9. Body
9.0 Body 9.1. Doors 9.2 Possible body malfunctions, their causes and methods of elimination 9.3. Hood, trunk lid, bumpers 9.4. Body glazing 9.5. Windshield and headlight glass washers 9.6. Instrument panel 9.7. Seats 9.8. Heater and ventilation of the body interior 9.9. Body frame repair 9.10. Paint and varnish coatings 9.11. Anti-corrosion protection of the body
10. Modification and equipment of VAZ-2107 cars
10.0 Modification and equipment of VAZ-2107 vehicles 10.1. Car VAZ-21072 10.2 Car VAZ-21074 10.3. Car VAZ-21073-40
11. Applications
11.0 Appendices 11.1 Appendix 1. Tightening torques for threaded connections* 11.2 Appendix 2. Tools for repair and maintenance* 11.3 Appendix 3. Used fuels and lubricants and operating fluids 11.4 Appendix 4. Basic data for adjustment and control 11.5 Scheme