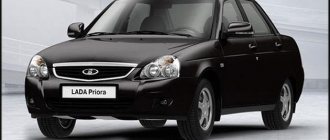
I bought a new MMS inexpensively for 2,500 rubles, they shared the phone number on the site. I wanted a new one with navigation, but the price kills all desire to buy it.
On the right side of the radio there is a USB connector, which is designed to connect:
1. USB Flash card (USB 2.0 and 3.0 up to 64 GB); 2.USB Flash player with a memory capacity of at least 1024 MB; 3.USB HDD with FAT32 file system; 4.Mobile phone (only in charging mode).
On the left side of the radio there is a slot for SD cards. SD Memory Card Slot: Supports SD, SDHC cards of 32 x 24 x 2.1mm size. SDHC up to 32 GB, SD up to 32 GB.
The file allocation table (FAT) of the connected device must be version FAT16 (2 GB). The maximum number of primary partitions should be no more than 4. It is advisable that the directory tree of the connected device have no more than eight levels. There should be no more than 1000 files in one directory.
While playing files, the display shows all the necessary information about the track. The playback source is selected using the AUDIO button on the left side of the radio. The radio has equalizer presets (JAZZ, POP, CLASSICAL, VOCAL and USER). The range of timbre adjustments for bass, treble, balance, and front/rear balance is from “‒7” to “+7” units.
The radio has Bluetooth and Handsfree functions. You can connect your phone by long pressing the handset button. When pairing on the phone, the inscription “MMC12” should appear in the list of found devices, the default password is “0000”. After successful connection, the BT icon will appear on the display of the radio. There is no phone book on the Kalina 2 and Grant radio, but it is possible to save up to 6 numbers in the radio’s memory. The audio system also remembers the last outgoing and incoming calls. The manufacturer does not guarantee operation of a phone in Handsfree mode that uses two or more SIM cards.
The radio allows you to listen to audio files from your mobile phone. To do this, you need to connect your phone to the radio via Bluetooth and launch the player on your phone. The manufacturer states that certain cell phone models may not work correctly with this radio, but this is not a sign of a malfunction.
The Kalina 2 and Granta radio has its own battery, which allows you to save user settings after disconnecting the battery for 10 days.
Supported Audio Formats
The audio system supports audio formats (MP3. With constant or variable bit rate, bit rate 32–320 kb/s and sampling rate 44.1/48 kHz; WMA. (without DRM protection). With constant bit rate and bit rate 10–320 kb/s , with variable bitrate and transmission speed 32–192 kb/sec).
Video review of the radio, the video is not mine.
The standard radio for Kalina 2 and Grant has all the necessary functions for a modern car. The audio system works flawlessly, there are no freezes, all operations are performed instantly. The build quality is at a high level. The only disadvantage is the lack of a CD/DVD drive, but nowadays discs are becoming a thing of the past. The standard radio of the Lada Kalina 2 and Granta without an LCD display is a good alternative for those who find physical buttons more convenient than a sensor.
The standard radio for the Lada Granta model is an improved device, the design basis of which is the “Sirf Atlas” processor, supplied by the well-known. In addition to the presence of a radio receiver, the device is equipped with a large touch screen and has the ability to connect an external source via a video input by replacing the software and performing firmware. However, in the basic configuration of a domestic car there is only a push-button radio. Many owners are not happy with this fact and want to connect a more modern radio. This article will tell you how to install a radio.
What is the functionality of the radio?
The fact that there is a standard radio in the domestic car Lada Granta Lux and in Kalina-2, and the devices are constantly being improved. A special feature of the radio is that it fits deep into the standard place, which is accompanied by minor difficulties when removing it. The large monochrome display displays a user-friendly interface.
Reviews from owners indicate that the software has an operating system based on the legendary Windows, the potential capabilities of which are increased by firmware. It is possible to create a desktop in the image of a household computer and connect to the Internet. To do this, you should use a 3g modem.
If you need to enter data, manipulation can be done using the on-screen keyboard. Own memory is not enough, so to meet the ever-growing demands of owners, it is recommended to use an SD card as a storage medium. This drawback is included in the list of reasons, due to the relevance of which, most motorists prefer choosing a foreign vehicle.
Read also: Effect of the parking prohibited sign
A convenient option for connecting with a mobile phone is available for the Lada Granta radio. This allows you to make calls without having to take your phone out of your pocket. You only need to activate a specific button on the device display. This is a kind of extended “hands-free” function.
The radio receiver is also not without pleasant features. If you program a news wave, the device will automatically switch to it from any other channel when a program on the designated topic begins broadcasting.
In the LADA Granta standard, the radio with an integrated LCD display is capable of supporting such file formats as:
- outdated "MP3";
- "WMA";
- "WAV";
- video files that support the “WMV” extension.
First impressions
At first glance at the radio, you can say that it fits harmoniously into the interior of the car. There is nothing superfluous that would raise questions from a design point of view. The build quality is pleasing; it is worth noting the smooth, smooth movement of the buttons, the absence of backlash and the plastic of the radio that is pleasant to the touch. The radio backlight is green.
The radio is turned on by pressing a special button in the upper left corner of the radio. Loading occurs within a few seconds, during which the inscription “Lada Kalina” is briefly displayed on the display.
How to install a head unit on a car with basic equipment?
Since the Lada Granta base is not equipped with musical equipment, and only a push-button radio is installed on board, the question justifiably arises: how is the standard radio installed in the cabin? In reality, this is a simpler procedure than it might seem at first. The occurrence of problems during installation is excluded, since a seat is already provided for the standard device on the Lada Granta panel, regardless of the level of equipment.
You can purchase the device in a retail chain or on an Internet site, where you can actually find an improved version, equipped with a navigation system with a detailed map of the Russian Federation. Don't forget to buy an additional luxury panel. Although multimedia will fit into the standard panel without any problems, the appearance will not be so beautiful. The price for this device reaches 2.5 thousand rubles.
Next comes the installation of the radio. The design feature of the landing niche in the Grants panel does not provide for the need for additional wiring.
- The first step is to remove the plastic pocket in the audio system opening. This is done using a flat-profile screwdriver. There is access to several connectors that involve connecting a radio.
- We remove the frame from the head unit and fix it at the location of the pocket.
- Next we move on to the connection. To do this, connect a couple of connectors and install the device in the landing niche.
- After this, you can install the speakers in the front door cards. The procedure involves the need to dismantle door trims with unlocking handles and adjust the position of the glass. Using a special template, we begin cutting out the mounting holes.
We attach the speakers to the cards using self-tapping screws. We insert the cables from the speakers into the input connectors intended for this on the rear panel of the car radio. We install the decorative door panels in their original places and evaluate the sound provided by the standard head unit. Thus, the radio is connected.
Attention! We carry out all manipulations with the battery disconnected from the on-board network!
Lada car radio: review and installation
The standard Lada car radio will be presented in this article. The reader will learn everything about its technical characteristics and capabilities. In addition, the process during which the car radio for the Lada Grant is installed inside the cabin will be described.
Car radio review
Granta Lada car radio
Depending on the configuration, the standard radio of a Lada Granta car may be different. We are talking about its standard size: 1 din and 2 din. Both versions of car radios are installed in this car as standard.
Note. It is believed that such an opportunity is very rare for a domestic car.
In this article we will look at the Itelm head unit with a typical size of 2 din. I liked this car radio so much that it caused a storm of positive reviews from users.
Screen
Let's start our test with the Itelm car radio screen:
- Very sensitive and bright;
Lada Granta car radio
- The screen is resistive. In other words, there is a capacitive screen that performs very poorly in cold conditions. A resistive screen, on the contrary, is capable of functioning in harsh conditions, although working with it is not as comfortable as with a capacitive one;
- A good picture with normal color rendition. Of course, it cannot be compared with LED panels, but there is no glare in the sun, and everything looks quite decent.
Now let’s imagine how USB works on our head unit:
- Supports two file systems FAT16 and FAT32;
- USB has a separate button, which is located in the head unit menu;
- There is, however, no connection connector on the front panel;
- The USB connector is on the back. In principle, it is quite comfortable and nothing sticks out in front.
Note. The USB cable located at the back is wrapped in dark-colored foam. It is not connected in any way to the other wires of the head unit.
SD cards
What is a modern car radio without SD cards? Here we have them:
- Various cards up to 8 GB are supported;
- There were no problems detecting or playing music.
Note. The manufacturer strongly discourages connecting other devices to the SD and USB connectors, as this leads to damage to the equipment.
Hands Free function
A useful and necessary option today. Thanks to it, not only comfort but also safety when driving a vehicle increases. Here are the features of this function on the Lada Granta car radio:
- Phones running Android 2.1 and WM 6.5 communicate well via Bluetooth;
- Phone book loading is available, but it works with some freezes;
- It is possible to play audio via Bluetooth.
Note. Experts immediately saw two shortcomings of the Hands Free function on this car radio: it is difficult to call the phone’s operation with the head unit stable and the memory of two phones in the list is poor.
Playing video
Modern car radios must be able to reproduce video files perfectly. Let's see how our car radio is doing with this:
- The car radio supports WMV video format with a resolution of 320x240. The device copes poorly with other formats. Thus, the popular AVI 720p format does not open at all.
Note. The problem with poor playback of other higher-end formats can be easily solved. To do this, it will be enough to use some converter, for example, Xilisoft Video.
Well, of course, what kind of car radio should not reproduce sound perfectly. This is a very important parameter and the better the car radio copes with sound reproduction, the better. The head unit we are describing has the following audio capabilities:
- The car radio supports MP3/WAV/WMA formats;
- The sound is reproduced well, the quality is average. It is pleasant and clean, without high-frequency and low-frequency cuts;
- I liked that when playing music files, the screen displays information not only about the album, but also about the artist. And that's not all: even the album cover is shown, if there is one;
- The head unit is equipped with a good equalizer with several presets: Jazz, Rock, etc.
How to perform a flashing?
The stock firmware for the Lada Granta radio has become very popular among car enthusiasts. This does not require installation of a new type of radio. This function does not have any effect on the sound quality, but it allows you to provide the interface with additional options that are not available for the standard version of the radio. For example, you can generate a convenient touch keyboard that allows you to communicate with the Internet.
To flash stock multimedia, you should get an SD card formatted in “FAT” or “exFAT”.
- First, download the firmware from the network. It’s easier to find her among the “Grantavod” members of the forum.
- After downloading, we copy the necessary files to the root directory of the card itself, having previously saved them on a flash drive.
- We insert the card into the corresponding slot of the car radio and reboot it.
- After filling out the download status scale, we use the updated interface with expanded capabilities.
To resume options: “Radio” and “Bluetooth”, remove the SD card and reboot the system again.
Automotive forums will delight with the developments of many craftsmen who, as a result of experiments, offer firmware versions with the presence of updated radio software and other functions in the menu. There is an opinion that these “specialists” have learned the secret of reading and decoding data from the CAN bus combined with the MMC. Sometimes the firmware requires you to calibrate the screen before communicating with an alternative interface.
What is needed to set up the time in the grant?
Reasons why starline key fob time settings fail
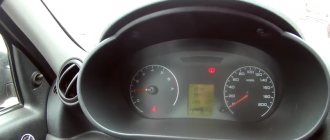
The clock in the Grant car we are considering today is located on a modern liquid crystal screen, respectively, on the instrument panel. All digits on this clock are significantly larger than any other digits or symbols on the rest of the screen. The display, in addition to the exact time, displays fuel consumption, total and daily mileage, and other information data.
Kalina starter repair
Lada Kalina won't start reasons
Lada Kalina fuel consumption per 100 km
Now you need to pay special attention if you want to know how to set the time with your own hands in a modern liftback from the AvtoVAZ automobile manufacturer. You must determine exactly where the following controls are located in your car:
- Button for self-control of the car dashboard display. This is the same button that resets the so-called daily mileage.
- A car ignition switch, or a size switch located on the instrument panel.
- The lever that controls the windshield wipers (this is the so-called steering column switch on the right). This lever performs various functions, including it always scrolls in a circle the modes of direct operation of that same display, thus displaying information about the current time, fuel consumption, and mileage.
How to connect an amplifier and subwoofer?
In addition to the need to connect a radio, many people want to connect a subwoofer and amplifier. Not every Lada Granta owner will be able to enjoy the sound generated by the standard radio. This fact forces car audiophiles to lean toward the additional installation of high-quality audio amplifiers and subwoofers. The goal is known - great sound.
To install the indicated devices yourself, we resort to the following simple manipulations.
- First, we dismantle the lower part of the center console.
- We remove the panel and find mini ISO connectors.
- We insert the plug of the previously purchased adapter into one of these sockets (indicated in yellow). We do not touch the blue and green cables. Owners who have already performed this procedure note the following - we can no longer use standard wires, so we resort to the “mini iso” connector.
- Next, we connect a special fuse to the battery, having previously connected the cable from the amplifier (marked in red) to it.
- The subwoofer in combination with the loudspeakers is connected to the amplifier. We connect the battery ground wire (black) to the LADA Granta body and the corresponding terminal on the amplifier.
- After the measures have been taken, we return the panel and radio to their place.
- Enjoy the updated and high-quality sound.
Let's sum it up
As you can see, there are no difficulties or obstacles to setting the time in the popular LADA Granta. The main thing is to follow the entire sequence of actions and you can easily set everything up in a matter of minutes. These setup instructions are also included in the user manual. Having done this procedure once, all subsequent times you will do without instructions, and in any place and time, you will make adjustments if necessary. Let us remind you that these setup instructions apply to all Grants, regardless of configuration.
Other features of standard multimedia
The general feelings of owners who have a standard radio in their car are positive. The display is informative and easy to read. The touch keyboard functions flawlessly. The standard radio itself is capable of high-quality reproduction of sound programs from micro-SD cards. However, using USB format media can be challenging.
Read also: Spark plugs brisk super dr15yc 1
The device also has some nice options:
- equalizer;
- activated replay mode;
- random sequence of playing tracks (“Random”).
Multimedia LADA Granta is capable of supporting images in 5 formats, which allows you to view photos without any problems. But not everyone can make the correct settings for the “phone” option on the first try. This function will be convenient for a busy owner who is forced to communicate by telephone even while on the road.
The standard speakers of the LADA Granta disappoint many, since even at a 45 percent volume level they emit wheezing, characteristic of bass overload. Some timid music lovers are alarmed by volume jumps when switching to “radio” mode.
Here is a list of shortcomings that provoked many Grantavods to purchase an alternative version of the radio. Today, the progressive version “2191” claims to replace the outdated standard device “2190”. The new device will please you:
- improved sound;
- interface for connecting with a rearview camera;
- navigation complex;
- integrated input for connecting a subwoofer.
Not every minimum configuration of a car today will please you with the presence of a standard radio. If, nevertheless, such a device is present in the database, it is far from a fact that it can please you with its informative interface and sound quality. If your version of the car has a push-button radio, then, as we found out from the article, installing a more modern radio, as well as the subsequent connection of the radio, is not a difficult matter, the main thing is to approach everything correctly.
The LADA Granta model also did not acquire the role of an exception in this list. After all, the trend of a modern car suggests the owner’s ability to carry out exciting measures to improve and tune his “iron horse,” and you shouldn’t be upset, because a push-button radio is easily replaced with a modern one.
Since the beginning of 2011, all Lada Granta models have been manufactured with audio preparation: factory radios and receivers. The quality of reception and sound is not always at the highest level due to its cheapness and simplicity. When purchasing a Lada Grant from the showroom, the owner receives audio preparation, acoustic wires, and installed electrical wiring.
The door panels have already prepared openings for installing speakers. True, few people use the standard seat, as they prefer the rear shelf to improve the sound.
pranic › Blog › Standard push-button car radio.
I bought a new MMS inexpensively for 2,500 rubles, they shared the phone number on the site. I wanted a new one with navigation, but the price kills all desire to buy it.
On the right side of the radio there is a USB connector, which is designed to connect:
1. USB Flash card (USB 2.0 and 3.0 up to 64 GB); 2.USB Flash player with a memory capacity of at least 1024 MB; 3.USB HDD with FAT32 file system; 4.Mobile phone (only in charging mode).
On the left side of the radio there is a slot for SD cards. SD Memory Card Slot: Supports SD, SDHC cards of 32 x 24 x 2.1mm size. SDHC up to 32 GB, SD up to 32 GB.
The file allocation table (FAT) of the connected device must be version FAT16 (2 GB). The maximum number of primary partitions should be no more than 4. It is advisable that the directory tree of the connected device have no more than eight levels. There should be no more than 1000 files in one directory.
While playing files, the display shows all the necessary information about the track. The playback source is selected using the AUDIO button on the left side of the radio. The radio has equalizer presets (JAZZ, POP, CLASSICAL, VOCAL and USER). The range of timbre adjustments for bass, treble, balance, and front/rear balance is from “‒7” to “+7” units.
The radio has Bluetooth and Handsfree functions. You can connect your phone by long pressing the handset button. When pairing on the phone, the inscription “MMC12” should appear in the list of found devices, the default password is “0000”. After successful connection, the BT icon will appear on the display of the radio. There is no phone book on the Kalina 2 and Grant radio, but it is possible to save up to 6 numbers in the radio’s memory. The audio system also remembers the last outgoing and incoming calls. The manufacturer does not guarantee operation of a phone in Handsfree mode that uses two or more SIM cards.
The radio allows you to listen to audio files from your mobile phone. To do this, you need to connect your phone to the radio via Bluetooth and launch the player on your phone. The manufacturer states that certain cell phone models may not work correctly with this radio, but this is not a sign of a malfunction.
The Kalina 2 and Granta radio has its own battery, which allows you to save user settings after disconnecting the battery for 10 days.
Supported Audio Formats
The audio system supports audio formats (MP3. With constant or variable bit rate, bit rate 32–320 kb/s and sampling rate 44.1/48 kHz; WMA. (without DRM protection). With constant bit rate and bit rate 10–320 kb/s , with variable bitrate and transmission speed 32–192 kb/sec).
Choosing the right radio size
We carry out installation either independently or by contacting specialists at the service center. In the second case, the service is paid.
By default, all VAZ and Lada models are equipped with a 1-DIN radio. The opening dimensions correspond to: 180 x 50 mm. This is an old standardization that has been in force since the times of the USSR. Modern audio modules can be purchased complete with a pre-installed LCD display. The size of the opening must comply with the standard: 180 x 100 mm, that is, doubled in height. Size marking: 2-DIN.
To install the radio in the Granta liftback, cut out the top pocket, remove the plastic, and install the assembled module. For a beginner, the process will seem somewhat complicated, so strictly follow the instructions.
MMS radio screen
The MMS display of the Lada Granta is resistive, designed to work in more severe conditions (cold or hot). The screen is quite bright and very sensitive to touch. The standard “rear view camera” function is supported. That is, a regular camera is connected to the MMS radio, which will display the image on the screen. It is installed as the car moves backwards, and thus you can see what is happening behind you without using the rear-view mirrors. This viewing method is much more effective, since the distance from the rear bumper to the obstacle can be more accurately calculated. The only drawback of this display is the absence of a visor, which contributes to glare in sunny weather. But this problem is not significant.
How to connect a Lada Granta head unit with a 1-DIN connector
- We carry out the work inside the car, having previously disconnected the terminals from the battery in order to prevent a short circuit in the circuit;
- We remove the plastic partition - pocket. It covers the hole, preventing objects from falling inside the torpedo. We use a flat-head screwdriver to unscrew the bolts;
- Two ISO plugs are visible behind the partition body. These types of wire terminals are manufactured in accordance with international automotive standards. More than 98% of all automakers use the standard when equipping technical equipment;
- We remove the metal frame - the block - from the body of the audio unit and place it in the cavity of the torpedo.
- We first connect the blocks with wires. Fitting into the connectors is accompanied by a characteristic click;
- We insert the module into the metal frame.
Note to the driver. Incorrect terminal connections result in a short circuit. To ensure the safety of the connection process, the connectors have guides that allow you to install the block in only one position.
Clock on JVC KD radio: settings features
Almost every electronic device has a clock. The JVC KD radio was no exception. She keeps up with progress and confidently walks in step with it. All models offered by the manufacturer are capable of providing information about the current time.
In order for the radio to perform not only its main functions, but also secondary ones, you will need to configure them. The equipment menu will help with this. First of all, you need to go into it. A number of points will be presented. For a specific case, the one called a watch is interesting. It is he who is responsible for what time is displayed on the display.
Common mistakes when installing a standard Granta liftback radio with your own hands
- when connecting additional terminals, manual twisting of wires is used instead of classical soldering;
- regular insulating tape is used on connections instead of heat-resistant sleeves;
- Incorrect connection of a large number of speakers on one branch leads to overload, heating, and short circuit.
Installing a sound amplifier
By liftback radio amplifier we mean:
- crossover installation;
- subwoofer installation.
The choice is up to the owner of the Lada Grant, as different goals are pursued: cleanliness, sound quality. Obviously, the cost of equipment will also increase. Crossovers are installed in the cavity of the glove box, since their dimensions do not exceed 100 x 150 mm and are rectangular in shape. Subwoofers are fixed in the luggage compartment. Equipment requires more space.
Connection of an external device is carried out strictly in accordance with the operating instructions:
- brown wire color: responsible for the operation of the system;
- black: power supply to equipment;
- yellow: audio module activation;
- red: settings and programming.
At the very end, do not forget to connect a red wire with a pre-installed fuse to the positive terminal of the battery. It directly connects the amplifier (subwoofer) to the current source.
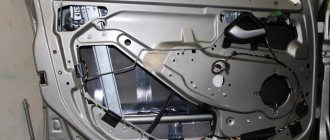
Installing two speakers in the front doors
- dismantle the door card, handle, control unit;
- We compare the standard cutouts for the speakers with the actual dimensions. If necessary, expand with a file or fine sandpaper. It is strictly forbidden to use cutting objects, as there is a high risk of damage to the plastic of the door card;
- we check for the absence of roughness in the hole, install the speaker, fix it, connect the standard terminals with wiring;
- we check the operation of the speaker, install the door card, and fix the metal grille to protect the speaker from mechanical damage.
Read also: Mercedes Benz Silver Lightning
What are the advantages of the device?
Commercially available on-board controllers, adapted for Lada Grants, are equipped with displays and are endowed with a significant amount of information memory. This feature is very useful for owners with poor eyesight, and will also prove to be an indispensable assistant for female drivers who are unsure of the purpose of the information elements of the dashboard.
In view of the noted features, the on-board controller can contribute to more comfortable driving due to the efficiency and timeliness of providing the driver with route information. After all, it is capable of displaying information regarding the following points:
- travel time;
- fuel consumption during various driving modes;
- average speed and specific fuel consumption;
- remaining fuel equivalent to mileage;
- speed of the car at the start of movement;
- fixed motor temperature at a certain time, whose control avoids overheating of the unit;
- occurrence of malfunctions in Lada Granta units that have feedback from the control unit;
- timely heating and drying of candles;
- temperature inside the cabin and a similar parameter outside.
In addition to the indicated functions, the on-board computer is equipped with options, including:
- non-volatile storage device;
- the ability to generate a signal about emerging problems;
- supervisor: the option warns about the unauthorized start of the car (rollback), left lights and turn indicators on;
- “afterburner”: the function allows you to cancel memory data that implies the use of fuel of questionable quality, and during sudden acceleration, return to the original settings.
To activate this option, you must use 95 gasoline as fuel.
The on-board computer in the basic modification is marked “State X1 M” (“Multi-Set”). This is the highest priority option for the Lada model family. Thanks to its compact dimensions, it can be easily integrated into the seat on the panel. If you are inclined to purchase a “standard” device, you will find instructions and cabling in the kit.
The on-board computer “State X1 M” has a processor capable of processing the entire amount of information required by the driver regarding the operation and diagnosis of on-board systems.
The computer diagnostic tester is equipped with a plasma lamp, a digital tachometer, and a speedometer. The tester allows you to accurately determine the position of the throttle valve of the power system and monitor the condition of the electrical network on board. This useful option allows you to prevent a possible short circuit or fire in the cable network in the car.
Characteristics of the standard radio "Lada Grants Liftback"
The radio for the Lada Granta liftback is supplied as standard equipment. Product in 2-DIM format (100 x 180 mm).
In addition to the classic radio, there is a built-in card reader, Bluetooth, and a USB output for connecting flash drives. The only disadvantage of the audio module is that it is a push-button type. Which is not to the liking of many car enthusiasts, which is why they install more modern modifications.
During the startup of the audio module, a greeting from Lada Kalina 2 is displayed. This is not an error, as many owners think. This type of audio was originally developed for the Lada Kalina 2. Obviously, the manufacturer did not change anything and started production for the Granta. Installation/disassembly of the module is somewhat complicated due to the tight fit, so be prepared for this.
It is based on the Windows operating system, which allows you to connect to the World Wide Web via a 3G modem. There is no such option out of the box; you first need to reflash the device, but more on that later.
Via Bluetooth, it is possible to connect to a phone, and the “hands-free” option is activated. Which is very convenient and practical when driving. The owners were also pleased with the stock radio. At first glance it looks simple, but it turns out not to be so. Available programming function for a specific channel on a given topic.
For example, as soon as a news broadcast comes on, the radio automatically switches to the programmed channel. The audio module reads the following formats: MP3, WMA, WAV, WMV. Control of the standard radio of the Lada Granta liftback is accessible and intuitive, even for an inexperienced owner.
Advice for future and current owners of VAZ push-button radios
The release of standard VAZ “devices”, devoid of an expensive “sensor”, has been expected for a long time. Back in the first half of the year, we were told that such a unit should appear in the fall. As you can see, VAZ was embarrassed to build a graphic display into the radio, and all information on the screen is displayed in standard symbols. The only available backlight color is emerald (there will be more of these colors in crossovers). The device is a “turn on and listen” device, and in standby mode the display displays the time.
The fact that the manufacturer placed the USB port right on the face of the radio is not bad. Now owners have the opportunity to quickly connect a USB drive, or use the standard port as a power source. It will be easy to connect a smartphone or tablet and place it on the dashboard. This is cool! It is recommended to immediately install a short USB flash drive into the USB port to protect it from dust. And it’s also advisable to occupy the port intended for SD cards with something.
All radios produced by Itelma LLC are well aware of a file system such as FAT32. This means that you need to format flash drives in it, onto which audio files in MP3 and WAV format will then be recorded. The signal to the speakers standardly installed in the doors comes without distortion, and the power of the built-in amplifiers is unlikely to seem insufficient to anyone. Enjoy it for your health.
How to flash the firmware
- Buy an SD card, format it in FAT, exFAT format;
- We download the firmware for free on the manufacturer’s official website;
- We save the data in the root directory of the SD card;
- We insert the SD card into the slot on the radio, start it, wait for the update to finish;
- Turn on and off the module;
- We customize the new interface for ourselves.
If the firmware is installed incorrectly, additional screen calibration using the CAN bus will be required. It is impossible to do this yourself, only in a service station. After successful flashing, the following is available:
- graphic equalizer;
- viewing photos, pictures, videos;
- improved sound quality;
- possibility of installing a navigation system.
Disadvantages of a standard radio
- Outdated firmware from the “box”;
- Not all options are initially available;
- The need for periodic software updates;
- Push-button interface.
Pairing with devices
The MMC head unit has a pairing function with other devices of various types. For example, a camera, phone, player, etc. can be connected to it. Pairing via Bluetooth is also possible. This allows you to listen to music stored on your phone through the radio. However, it is not recommended to use many different devices for connection, as their settings may be confused.
If you connect a camera to the radio via a USB connector, you must first make sure that it has the FAT 16 or FAT 32 file system, otherwise the camera simply will not work. The connection point for the connectors is located at the rear, and in order for devices to be conveniently connected, it will need to be brought out into the glove compartment yourself.
MMS with GPS and USB
Reviews
| Module type | Price, rub.) |
| Standard 1-DIM (push-button version) | from 3500 – 3700 |
| Standard 2-DIM (sensor) only for Lada Granta liftback | from 7500 – 8000 |
| Third party manufacturers, depending on configuration and specifications |
| № | Positive |
| 1. | Victor, 39 years old: after buying the car, he did not change the radio, despite the push-button control option. The sound quality is good, the radio reception is excellent, that's enough for me. |
| 2. | Konstantin, 41 years old: bought the car second-hand, second owner. I didn’t change anything, I left the original radio. The functionality is good, the build quality is also good, it reads from a flash drive. |
| 3. | Vasily, 44 years old: I listen to the radio more, the reception in the city is good. True, it causes interference near metal structures, but this is natural. |
| 4. | Kirill, 36 years old: I work as a taxi driver, on wheels all day. The standard tape recorder saves the day, it works properly. My friends recommended replacing it with a touchscreen model from the new Granta, but so far the old one hasn’t failed. |
| Negative | |
| 1. | Victor, 38 years old: the standard audio module, although not bad, seemed to me not enough, so I replaced it with a foreign one and supplemented it with an amplifier. Now the volume is good, the quality is high. |
| 2. | Mikhail, 42 years old: I work as a courier, I drive for the entire shift. I expected more from the standard radio, so I had to replace it with a new one. The volume suits me, I plan to connect an amplifier - a crossover. |
| 3. | Ivan, 33 years old: I bought the car second-hand, immediately replaced the audio module, the reviews are not good. New and high-quality equipment from Trinity, no problems. |
| 4. | Vladlen, 40 years old: friends gave me a gift in the form of a radio with touch control for our anniversary. Before this there was a push-button one. Can't compare, quality, sound, control, functionality at a high level. |
Conclusion The opinions of motorists on the functionality and sound quality of the standard radio are divided, which is obvious. Everyone evaluates according to their own criteria. Some people care about sound, others about functionality, and others about control. Regardless of the type of radio: push-button or touch-sensitive, the workmanship is good. No massive breakdowns or defects were recorded. Maintenance is not expensive, parts and components are available both at official representative offices and on the Internet. Now it will not be difficult for the owner to remove the radio on the Granta liftback with his own hands without contacting a service station.
Play audio, video and photos
MMC radio, supports playback of audio files in MP3, WAV and WMA formats. Simultaneously with the playback of the song, information about the artist, album, as well as a picture of the album, if available, will be displayed on the screen. Also, the radio has an equalizer with which you can adjust the lows, bass, balance between the left and right speakers, etc. As standard, there are 6 pre-programmed settings: Voice, Jazz, Rock and others. The quality of music playback is quite high.
Options for 2 Din Audio Players
As for video formats, there is only one – WMV (maximum resolution 320 x 240 pixels). If you upload a higher quality video, the picture will lag significantly behind the sound. This is explained by the fact that MMC has little RAM. Therefore, in order to watch any video on this radio, you will need to use a converter.
Also, the radio can reproduce photographs in the following formats: JPEG, JPE, PNG, JPG, BMP, and even animation - GIF. Depending on the quality of the photo, the speed of its opening is determined. For example, a photo with a resolution of 1400 x 800 pixels, weighing 1 MB. It will open in about 1 second, and a photo with a size of 1978 x 3456 pixels and weighing 9 MB will take as much as 9 seconds.
Installation of an audio system on Granta of different configurations
In the “standard” configuration in Grant, power wiring harnesses are already pre-installed, which are located in the console opening. The wires are connected exclusively to the car radio, so don’t be surprised if you can’t find them in the doorways.
In the Lada Granta Norma, the power wires coming from the console are already connected to the doorways. You just need to connect the sound system in full accordance with the assembly diagram. It often happens that the pre-installed door wiring does not match with some speaker connectors. Here we get out of the situation by purchasing additional suitable wires.
During assembly, the Lada Granta “luxury” is equipped with a special touchscreen multimedia system and already installed speakers. The improved radio is complemented by a Bluetooth system and a 5-inch display with a linear output.
Among other things, the built-in car radio allows you to connect a memory medium – a USB 2.0 flash card, through which you can listen to recorded music.
A few words about the radio of the “normal Kalina-2”
When looking at the “device”, which AvtoVAZ designates with the numbers 2190-7900010-40, it immediately becomes clear that installing such a device in a standard 1DIN compartment will not work. VAZ cars in the “Norma” configuration come from the factory with an empty compartment (its height is 1DIN), and in the “Norma+” radio tape recorder occupies the entire central part of the console. That is, the owner has the following choice: you can install a standard VAZ radio, but then the easy-to-use shelf will disappear, or you can look for and install a unit of standard height. The VAZ radio does not fit into the 1DIN high compartment. There is no touch screen on it, but under the “twist” there is a whole array of plastic buttons.