Without a cooling system, the operation of an internal combustion engine is impossible. The SOD serves to quickly warm up the engine to the optimal temperature and removes excess heat, preventing the power plant from overheating. The VAZ 2110 is equipped with a standard ODS. It is reliable, but if breakdowns occur, repair or replacement cannot be delayed. Otherwise, a faulty system threatens rapid wear of engine parts until it fails.
Cooling system
Design and operating principle of SOD VAZ 2110
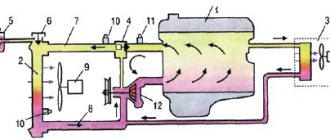
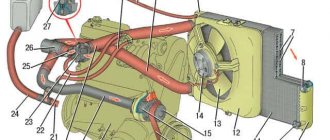
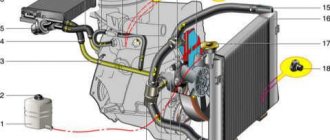
The diagram of the heat removal system installed on the VAZ 2110 is classic for an injector. The composition includes a main radiator, a heater, a water pump, a thermostat, an expansion tank, a forced cooling fan, a temperature sensor, an ECU and several connecting pipes.
Radiator
The radiator on the VAZ 2110 is used in the system only when antifreeze moves through a large duct - passing through it, the working fluid is cooled. It is usually an aluminum body with tubes on the inside and plates on the outside, also called honeycomb. It is equipped with two plastic tanks, separated by walls, through which antifreeze moves. When the large circle opens, the coolant enters the radiator through the upper outlet, and the outlet is the lower one.
Expansion tank
It is made of heat-resistant plastic and is intended for filling coolant and monitoring its level. There are “minimum” and “maximum” marks on the wall; in normal condition, the level should be at the middle mark. The tank has two pipes, one of them serves to remove steam from the main radiator, the other - excess heat from the stove radiator.
A special valve cover is installed on the expansion tank of the VAZ 2110, which is responsible for the tightness of the entire system. Structurally, it consists of inlet and outlet valves.
As the antifreeze heats up in the SOD, the pressure increases, the excess of which is released through the release valve. As the engine cools, the pressure decreases and air is forced through the intake valve.
Thermostat
The thermostat, by its purpose, is a bypass mechanism; it redistributes the flow of antifreeze from a small to a large circulation circle. When a cold engine starts, the liquid begins to move along a small circuit without entering the radiator - along the cylinder block jacket, the heater radiator and the heating of the throttle assembly. When the temperature reaches 87-90 degrees, the thermostat valve opens slightly. When the temperature reaches 102 degrees, the valve opens fully, allowing a flow of antifreeze through the radiator in front of the engine.
Water pump
Liquid circulation is ensured by a water pump. It has a single drive with a timing mechanism. A common cause of timing belt breakage is a jammed pump. The body is most often aluminum. At one end there is a rigidly fixed drive gear pulley, and at the other there is a plastic or aluminum impeller.
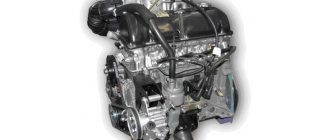
Various engines were installed on the VAZ 2110 - owners of the legendary 124 engine do not have to worry about the valves meeting the pistons when the timing belt breaks, this will not happen. The situation is different for owners of 21120 engines - their valves bend. It remains to be advised to monitor the condition of the pump more often and, if faults are detected, immediately replace it, since the part is not repairable.
Radiator fan
The coolant temperature is regulated not only by the radiator and thermostat, but also by the electric fan. It has 4 plastic blades and an electric motor. When the temperature of the working fluid reaches 110 degrees, the fan switch on sensor on the VAZ 2110 sends a signal to the electronic engine control unit, which transmits the readings to the relay - the electrical circuit is closed and the electric fan is turned on. It will blow on the radiator until the temperature drops to 90-95 degrees.
Coolant sensor and heater radiator
The coolant sensor is designed to monitor changes in the temperature of the antifreeze in the engine. It is located on the cylinder block and transmits readings to the ECU. Do not confuse it with the temperature sensor, which sends a signal to the instrument panel. The heater radiator serves to heat the interior with warm air. It is integrated into the cooling system using connecting hoses. Antifreeze circulates through it continuously, since it is included in a small circulation circle. The throttle assembly has two pipes: one serves to drain excess working fluid, and antifreeze is supplied through the other. The second pipe also contains a sensor that monitors the temperature and level of coolant.
In later VAZ 2110 models, the sensor is mounted in the aluminum throttle body, and the capacity of the expansion tank has become significantly larger.
Checking the VAZ 2110 stove controller
There is no need to explain for a long time the signs of a heater malfunction - it’s cold in the cabin, the air does not warm up to the desired temperature. This disgrace may be accompanied by a lack of response to the rotation of the left stove control knob, which is responsible for the air temperature.
Briefly about how the VAZ 2110 heater works
The stove of the tenth family operates under the control of an electronic temperature control unit. This means that mechanical components within the system are kept to a minimum.
Schematic diagram of climate control in the cabin of a VAZ 2110-2112.
Like any electronically controlled system, the VAZ 2110 stove consists of a sensor, a control unit and an actuator:
- The interior temperature sensor is installed under the headliner. It monitors the temperature in the car and sends an electrical pulse of the appropriate potential to the control unit.
- The electronic control unit receives an impulse and compares this data with the data set by the driver on the left handwheel. After this, the block sends a signal to the actuator.
- The role of the actuator is a gear motor that drives the heater damper. If necessary, it turns the damper, dispensing warm air. As soon as the temperature in the cabin reaches the desired limit, the motor closes the damper, reducing the supply of hot air. When the interior cools down, everything happens exactly the opposite - the damper opens, increasing the amount of incoming heat.
Main elements of the heating control system VAZ 2110-2112.
Motor-reducer of the damper drive of one of the new models.
How to check the VAZ 2110 heater controller yourself
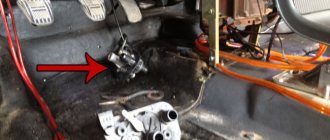
Before disassembling the stove or opening access to its components, let’s check whether the damper responds to the controller’s commands. This is easy to do - remove the deflector panel (it is held on by regular latches), turn on the ignition and set the temperature regulator (left regulator) first to the extreme left position, then to the extreme right.
We control the position of the heater damper with the deflector removed.
If this does not happen, check the controller as follows:
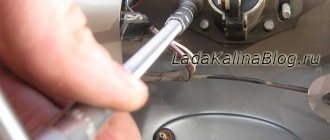
- Remove the controller from the console with the ignition off. We will need a test lamp or probe. One end, the positive contact of the probe or lamp, is installed on the contact by 3 X2 blocks (black wire). We place the second contact of the lamp on pin 6, it is located immediately under the third contact (blue wire).
- Turn on the ignition. Voltage must be supplied to the control lamp, the lamp must light up. This indicates that the controller is receiving power. If the lamp does not light up, we look for either an open circuit in the controller’s power supply circuit, or get ready to replace the control unit. At the same time, we take into account that the battery voltage must be at least 12-12.5 V.
- We turn off the control lamp and the large terminal block X1.
- For further testing we will need two wires with terminals and a multimeter. We install the wires on pin 2 (first from the right in the top row), connect the wire to the positive probe of the multimeter, and pin 8 (fourth from the right in the top row). We connect this conductor to the negative probe of the multimeter.
- Turn on the ignition, set the multimeter to voltage measurement mode within 20 V. Set the regulator to the central position. A slight potential in the range of 0.05-0.07V may appear on the multimeter display.
- We move the temperature regulator to the extreme right position, to maximum heating. In this case, the multimeter should show a voltage within 10-11 V. The voltage will be held for 10-15 seconds, after which the device readings will tend to zero.
- We move the temperature regulator to the extreme left position, to minimum heating. The voltage on the multimeter display will show the same 10-11 V, but with a minus sign.
If the controller passes the test successfully, there are no claims against it. Otherwise, he will be replaced.
Operating principle of SOD
The cooling system is closed and always works, no settings are required. Antifreeze is poured into the expansion tank. Most often, antifreeze or another coolant is used as a coolant. This is a solution of water with ethylene glycol, thanks to which the liquid does not freeze at low temperatures. The cooling system of the 10th family uses about 8 liters of coolant; it needs to be topped up if necessary. After reaching a mileage of 75,000 km, it is recommended to flush the system and change the coolant. The operating principle of the SOD can be divided into several stages:
- The circulation of the working fluid is carried out thanks to a centrifugal pump (pump). It is integrated into the cylinder block and driven by the timing belt.
- Circulating through the jacket of the cylinder block, the antifreeze begins to heat up from the parts that are heated as a result of the operation of the internal combustion engine. At this time, a sensor located right there measures the temperature of the coolant, which moves only along a small circuit. When the antifreeze heats up to 90 degrees, the thermostat valve opens slightly, allowing the liquid to circulate through a large circuit. This means that the coolant begins to pass through the main radiator, where it cools and returns to the system - this is how heat is removed. The small and large circuits operate in parallel. After the temperature rises to 102 degrees, circulation occurs only in a large circle.
The fluid in the radiator is cooled by the oncoming flow of air while the car is moving, but this does not always happen. For example, in traffic jams there is no way to cool the coolant with a counter flow of air. In this case, when the antifreeze heats up to more than 102 degrees, the temperature sensor monitors the excess of operating values and transmits information to the controller, which sends a signal to the electric fan relay to start forced cooling.
As the liquid heats up, it increases in volume. Excess antifreeze is returned through the steam pipe to the expansion tank, and after cooling it is fed into the system.
Welding work
Welding will be required both to replace the entire floor and during repairs, when the rotten part of the bottom is cut out and a patch is welded. The iron for the patch is cut out in advance; the size of the patch should be 2 cm larger than the hole around the perimeter. There is an option to use the original part of the bottom instead of a patch, which is sold separately.
Replacement of car underbody elements
After the car interior is cleared, a full inspection of the underbody is carried out. In some cases, you can limit yourself to a partial replacement—boil only the corroded areas. Rotting of the floor begins from the thresholds of the car; these elements are inspected first. Replacing the body also begins with reinstalling the thresholds.
The bottom of the VAZ 2110 consists of the main elements:
- support platform;
- bottom panels;
- threshold extension;
- side member amplifier;
- crossbars;
- connectors.
It is necessary to check the condition of the panels under the driver's feet, side member reinforcements, jacks or support platforms. If the overall condition of the bottom is satisfactory, you can limit yourself to installing a patch on the damaged area or replacing the bottom element from the repair kit:
- A drill is used to drill the spot welding points with which the element is installed on the structure.
- The element is cut out with a grinder.
- A metal patch is cut out.
- The bottom is sanded and a patch is welded.
- Welding seams are cut off with a grinder and cleaned.
- The element is primed, sanded, and treated with anticorrosive.
You can assess the condition of the body in a pit by tapping the bottom with a hammer from the outside, prying up the layer of old anticorrosive with an awl.
Replacing the entire bottom
In 90% of cases, drivers cannot use partial cutting of floor elements. Supporting panel components, such as amplifiers, can rot after 3 years if not properly maintained. Large through holes are the reason it is necessary to replace the entire bottom of the 2110.
Before this type of work, it is necessary to completely dismantle the exhaust system of the car.
Replacing the bottom with a solid panel is carried out simultaneously with replacing the thresholds, and the thresholds are installed first. When replacing a solid floor with a factory repair kit, it is necessary to install a bracket under the handbrake hummock and studs, which are not included in the part:
- Using a drill, drill out the spot welding areas.
- Use a chisel or grinder to cut out the bottom.
- Insert a new element from below, digest, grabbing in increments of 3-4 cm.
- Clean the weld seams with a grinder.
Cooling system malfunctions and ways to eliminate them
There can be a lot of problems with the cooling system. In most cases, this is due not so much to the reliability of the SOD, but to the low quality of the components. Typical malfunctions are as follows:
- low coolant level in the tank due to broken hose connections or damage to the tank;
- lack of pressure in the system caused by a failed water pump;
- overheating of the liquid due to the electric fan not working normally - the electric fan, relay, temperature sensor are faulty;
- failure of the thermostat - this malfunction can be determined by two signs: either the coolant circulates only in a large circle, or only in a small one, as a result the engine does not heat up or overheats.
It is recommended to regularly use the self-diagnosis mode to promptly detect temperature deviations and monitor the coolant level in the expansion tank.
Antifreeze leak
First you should check the coolant level in the expansion tank. If it is low, you need to inspect the engine compartment for leaks. Usually the reason for their appearance is a weak connection of the clamps, damage to the radiator or heater radiator. In all cases, replacement of elements will be required.
Antifreeze circulation in the system
To check the presence of pressure in the system, you should open the cap of the expansion tank and see how the antifreeze flows inside. Poor circulation may result from contamination of the SOD, in which case it will need to be flushed. Another reason is the failure of the pump, but in this case the timing belt is guaranteed to break, and expensive repairs of bent valves will follow.
The engine gets very hot
In most cases, the cause is a faulty thermostat. To check, you need to touch the lower and upper radiator pipes with your hand. If the top one is hot at engine operating temperature, but the bottom one remains cold, it means the thermostat is stuck in the closed position.
If it gets stuck open, the engine will take a long time to warm up. In the summer this is not scary, but in the winter it will bring a lot of inconvenience. In both cases, the thermostat must be replaced. The engine may overheat if there is an air lock in the system or the electric fan does not work. You also need to check the radiator - perhaps its cells are clogged with dirt.
Replacing the water pump
For convenience, it is better to remove and put the adsorber aside without disconnecting the hoses. The plastic cover on top of the engine and the timing belt guard also need to be removed. The further algorithm of actions is as follows:
- Use a jack to lift the right front side, thereby hanging the wheel; this will be needed in the future to install the marks.
- The wheel must be removed, unscrew the nut securing the crankshaft pulley and remove the pulley.
- Loosen the nuts securing the tensioner rollers and remove the timing belt.
- Insert a suitable block of wood between the camshaft gears to prevent them from turning.
- Unscrew the three mounting bolts securing the pump and remove the pump.
The new pump is installed in the reverse order; it is recommended to apply a small layer of silicone sealant to the points of contact with the block.
After completing the work, you need to add coolant and check the functionality of the system.
Radiator replacement
You should first drain the antifreeze from the system by unscrewing the drain plug at the bottom of the radiator, after placing a suitable container. Next, you need to drain the coolant from the block jacket. Further work is carried out as follows:
- Removing the wire plug and turning off the electric fan.
- Unscrew the two bolts on the left side.
- Unscrew the two nuts at the top and the bolt at the bottom.
- Now you can remove the radiator along with the electric fan, having first disconnected the lower and upper pipes.
The new radiator is installed in the reverse order; it is recommended to change the coolant.
Replacing the thermostat
Before replacing the thermostat, drain the coolant from the radiator and cylinder block. Now you need to loosen the clamps of the pipes going to the thermostat and dismantle it. The new device is installed in the reverse order; it is recommended to replace the clamps as well.
All this work, as well as replacing connecting hoses or the heater radiator, can be carried out in a garage. You don’t have to go to a car service center for this. Replacing a pump costs at least 800 rubles, a thermostat – 400-500, a radiator – 300-400. The amounts are not so large, but the work is not difficult. Do it yourself or use a service station - everyone chooses for themselves.
Replacing the thermostat
Before making repairs, you need to check the thermostat. The most convenient way is to check it directly on the car. After starting the engine, you need to touch the lower hose coming from the cooling radiator. It should be cold for some time, and then quickly warm up - this indicates that the liquid is circulating in both the small and large circles.
The thermostat replacement diagram is as follows:
The thermostat is located near the expansion tank - pipes come from it. Before dismantling the unit, it is necessary to drain the antifreeze from the system; Next, you need to loosen the clamps of the heater outlet hose;
The repair is completed, the installation of the new device is carried out in the reverse order.
Flushing the cooling system
In modern cars, antifreeze or antifreeze is used as a coolant. Sooner or later, the coolant begins to boil away, which means its level in the tank decreases. Previously, car enthusiasts added distilled water to the system, now they add antifreeze of the same brand. The coolant removes heat from the engine and, passing through the radiator, is cooled for further circulation. Antifreeze partially lubricates the elements and components of the cooling system, protecting them from corrosion.
With significant mileage (more than 75,000 km) without replacing the coolant, it practically loses all its properties, gradually darkens, and its smell changes. Such symptoms also indicate SOD contamination. In any case, you will need to replace the antifreeze with pre-flushing. If this is not done, the fresh liquid will quickly become contaminated and the procedure will have to be repeated.
Cleaning or flushing the cooling system consists of two main stages. First you need to remove the radiator and manually clean its grid-shaped honeycomb from dirt and insects. The best tool for this would be a high-pressure car washer - a directed jet will quickly knock out all the dirt from the honeycomb. At the same time, in order not to damage the soft aluminum plates, you need to handle the radiator from a distance of at least one meter.
At the next stage, you can begin flushing the system. This not only cleans the SOD from dirt, but also removes rust and scale (especially if water was used). Flushing will also be necessary after solving some problems with the engine, when engine oil and gases from the combustion chambers enter the cooling system, which also has a negative effect on the ODS. For cleaning, special products or ordinary distilled water are used.
Before starting the procedure, you should drain all old antifreeze from the radiator and cylinder block. To speed up the process, unscrew the expansion tank cap. In this case, the engine must be cool. Washing is carried out in a few simple steps:
- Tighten all drain plugs and pour distilled water or a special cleaning solution into the expansion tank.
- Start the engine and let it idle for 15-20 minutes until the temperature rises to operating values until forced cooling with an electric fan starts. While the engine is running, the heater must operate at maximum speed for heating.
If the temperature rises too quickly or there are other abnormalities, this may indicate the presence of air in the system. In this case, you need to get rid of the air lock in any available way. Then you can turn off the engine and let it cool, then drain the fluid from the system.
In case of severe contamination, the washing procedure should be repeated and continued until clean liquid begins to drain. After this, you can add antifreeze.
We wash SOD with our own hands
To do this, you only need to perform a standard coolant replacement. However, instead of liquid, you need to pour regular water into the system. If desired, add rinsing additives to the water. You can also use a special composition intended for washing.
Then you need to start the engine and let it run for a while. Afterwards the water must be drained. Dirt will flow out along with the water. This procedure must be repeated until the SOD is completely cleared.
To flush the system completely, you need to clean the radiator and engine. If you want to flush the radiator, you need to start by cleaning the honeycomb. A regular high pressure washer will work for this. This is an effective method, but you need to do everything carefully.
Ways to refine the SOD
Any domestic car cannot be considered technically perfect, and the VAZ 2110 is no exception. The cooling system can work better if tuning is carried out:
- Installing a 6-hole thermostat keeps the coolant temperature at a stable level.
- Install SOD from Lada Kalina - the antifreeze will warm up faster at low temperatures, and the pressure will decrease.
- Installing a more efficient water pump or installing an additional pump increases the circulation rate of antifreeze.
- Replacing the electric fan with a more powerful and less noisy one - cooling is faster, and the start can be adjusted.
- Installing alternative ECU firmware allows you to turn on the electric fan at a lower temperature.
You should also use only high-quality and proven antifreeze or antifreeze, the performance and reliability of the SOD depends on this. The cooling system on the VAZ 2110 may not be the most ideal in technical terms, but it is simple and reliable, and problems with it do not arise so often. If you change consumables in a timely manner, monitor the antifreeze level and check the system for faults, you can be sure of a long service life. All repair and replacement work can be carried out independently, it is not difficult. The only exception is replacing the pump, since you will have to deal with the timing drive.
We recommend reading:
- Modern muffler for VAZ 2110
- Maintenance and repair of the VAZ 2110 generator
- We install new injectors on a VAZ 2110
- Brake fluid in a VAZ 2110 car: replacement
- Replacing the thermostat VAZ 2110
- Instructions for replacing the fuel pump mesh on a VAZ 2110
Prevention measures
A huge portion of breakdowns can be avoided if you treat your own car accordingly. Yes, no one excludes unforeseen situations, but simple preventive measures should definitely become the norm for you when handling your car:
- Constantly check the coolant level in the reservoir and top up if necessary;
- For your VAZ 2110, do not skimp on high-quality coolant;
- Do not use plain water as a coolant, as it has a lower boiling point and promotes scale formation and corrosion inside the cooling system;
- Always look at the readings of the coolant temperature sensor located in the cabin. Avoid situations where the arrow crosses the red line.
Obviously, the CO is the most important unit in the engine compartment, the efficiency of which determines the condition, performance of the engine and more. Therefore, it is extremely important to treat the cooling system with care, monitor its condition, and take timely actions to eliminate any malfunctions that arise.