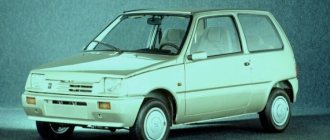
As they say, you can’t understand Russia with your mind, in this case, I didn’t understand how this brainchild of the Russian automobile industry was figured out. It would seem that everything should be ridiculously simple. But first, I’ll describe how I figured it out, or more precisely, how I screwed up.
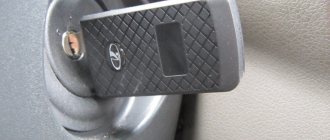
I look at the handle and notice a pin! Yeah, that means, logically, it needs to be knocked out in order to disassemble it, at least in the foreign cars I’ve come across this way. I look further, it only goes in one direction.
Yeah, and here we have a problem, I twist and turn, I find something else that can be done, and yes, that’s right, I find another pin to knock out.
Well, then I clicked on the locking pin, la la poplars and all that. When I decided to post this post, I realized that I didn’t take a few necessary photos as I thought and decided to find them on the Internet. But imagine my surprise when I saw the manual on one of the sites .
This is what he looks like.
What a harsh censorship flashed through my head. How can you, without knowing it, put a screwdriver into the slot to press this damn pin?! I wouldn’t even say that even a screwdriver will fit in there. In short, guys, if you disassemble any larva, always google it, especially as I understand the new domestic auto industry))) Foreign cars too, of course, but there is little information on them.
It is known that locks for VAZ-1118 car doors have an interesting property - you can replace their cylinder without removing the mechanism from the door itself. On previous models, dismantling is more difficult: you need to press the bracket holding the cylinder with a paper clip or an awl, getting into the hole on a mechanical drive. In the Kalina model, that is, VAZ-1118, this bracket is pressed out by pressing with a ruler or a screwdriver. Which, in turn, is done on the installed lock (there is no point in removing it). Next, the replacement operation is discussed in more detail.
Removing the lock and replacing the cylinder
The design of the trunk lock on the Lada Kalina consists of two parts: the cylinder where the key is inserted and the door locking mechanism itself. All this is disconnected separately and will be written about this in more detail below.
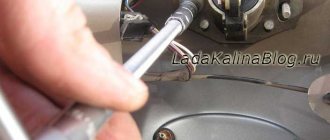
- If you need to replace the larva, it is quite easy to remove it. You can do this using an 8mm socket and a flathead screwdriver. Below is shown which bolts need to be unscrewed to release this part along with the body.
- Now that the bolts are unscrewed, take a plastic screwdriver and use it to pry off the plastic retainer that secures the rod to the body of the cylinder. For clarity, below is a photograph that clearly shows what needs to be done:
- Then, carefully take the larva so that its spring, which is located inside, does not jump out. If you need to replace a part, then replace it with a new one and assemble everything in the reverse order.
- If it is necessary to completely remove the entire mechanism, then you will have to do a little more work. We unscrew the door locking mechanism itself with a large Phillips screwdriver, there are only two bolts:
When everything is done, you need to pull it a little towards yourself and it can be easily removed; all that remains is to disconnect the plug with the power wires from this structure:
That's all the repairs, which will take about half an hour if you have the right tools and this manual. We install all the removed parts, which can be bought at absolutely any auto store, in the reverse order. I hope that I helped someone with this photo report using the example of my Lada Kalina station wagon.
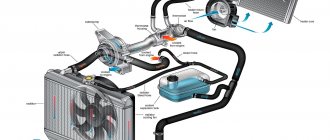
Today we will talk about such an important car system as the ignition system. Serving as a power control mechanism and responsible for starting the engine, the ignition is at the same time subject to quite serious breakdowns. We will talk about how to recognize a malfunction and how to fix it in this article.
How to replace the ignition switch on a VAZ 1117-VAZ 1119?
Note! Before you start changing the lock, disconnect the negative terminal from the battery, you still have to work with electronics! (For information on how to remove the terminal, see the article: “Replacing the battery on a VAZ”, in paragraph 1)
Removal: 1) At the beginning of the operation, you will need to remove the casing from the steering column, to do this, use a screwdriver and use it to remove the seven screws that secure the casing (see photo 1), after all the screws have been unscrewed, fully pull out the handle by which the steering wheel is adjusted (see photo 2, it is indicated by an arrow) and then remove the lower casing, and then lifting the upper one, also remove it from the steering column.
Note! When you remove the lower and upper casings, look at the side of them or look under the pedals for the rubber o-ring that is needed to seal the ignition switch from dust and dirt!
2) Then you will need to look at the lock itself and pay special attention to the wires that come from it, Kalina also has an immobilizer in addition, so there will be a lot of wires coming from the lock itself, and there will be only two wire connectors (One of the connectors will go to the starter is thus responsible for starting the car, and the second connector will go to the immobilizer and it is responsible for preventing the car from being stolen), so disconnect each connector from the pads (Each connector will be connected to the other two pads), to do this, grab your hand connector and simply disconnect it from the block using a little force (Do the same operation with the other connector).
Note! The photo above shows an example with an arrow where the wire connector coming from the ignition switch is connected to another block (This connector goes to the starter, the one that goes to the immobilizer looks a little smaller)!
3) Next, as shown in the photo below, using a hammer and chisel, remove the four bolts (They have no edges and are indicated by arrows) that secure the lock to the steering column, how do you remove them, you ask? Let's explain! Take a chisel and a hammer in your hands and place the chisel on the edge of a bolt, then hit it and thereby try to move the bolt out of place, etc., until the bolts are completely turned out.
Note! If you don’t like this method, then you can also drill out these bolts, but only in this case, be careful not to damage anything!
4) When you have removed all four bolts, remove the bracket on one side of the steering shaft, which is indicated by the arrow, and on the other side, remove the ignition switch itself and put it aside if you no longer need it and you are going to put a new one in its place.
Note! In the event that you still suddenly need the old lock (For example, not all new locks are sold with a contact group, so you have to remove it from the old lock and install it on a new one), to remove the contact group from the lock, you must first be convinced that it’s not all about it, but about the lock and it needs to be replaced, for example, if you have problems with the electronics in the cabin, let’s say you turn the key and the devices don’t light up, then most likely it’s all in the contact group and the lock itself can’t be changed necessarily (But it’s not a fact that there may be a problem with the immobilizer, to do this, disassemble the contact group and check which contacts it has, oxidized or not), so here’s how to remove the contact group from the lock, for this:
1. Using a screwdriver or by hand, bend the lock that is located on the wire connector and then remove all the terminals together with the wires from this connector (see photo 1, but be sure to remember the location of each wire in the connector, although just below we described how you can install the wires into the connector without previously remembering their location, but it’s still better to remember so that problems do not arise in the future), then squeezing the latches of the contact group cover (see photo 2) remove it from the lock body itself (see photo 3) and then bending two plastic latches (see photo 4), separate the contact group cover and the contact group itself (see photo 5), and after the contact group itself is in your hands, remove the moving part from it and inspect all its contacts as shown in the sixth photo, if the contacts are found oxidized or burnt, then try cleaning them with fine-grained sandpaper, and if the contacts are severely damaged and cleaning them will not lead to anything, then in this case replace the contact group itself.
Note! When you reassemble the moving part of the contact group, install it so that the widest part that is present on it engages the protrusion on the cover as shown in the photo below:
Installation: The new lock is installed in the reverse order of removal and assembled the same way, but only during assembly there are some nuances, namely, when you install the terminals of the wires coming from the contact group into the wire connector, pay attention to the fact that each terminal must have its own position , so find the block of wires to which this connector will be connected and, looking at it, connect all the wires into the connector exactly in the same places where they go on the block, for example, on the block of wires you see that the red wire runs on the far left side, then, accordingly, do it on the wire connector in such a way that the same red wire can be connected to that wire, so that you can at least understand the situation a little lower, we posted a photo showing two terminals, and so the terminals and the wire connector will be exactly the same same terminals (there will be Males on the connector and females on the block) so try to combine them so that each color of the wire matches.
Note! When installing the lock, be sure to insert the key into it and turn it from the “0” position!
Egnition lock
The ignition switch is a complex device designed to control the supply of power to vehicle systems, prevent battery discharge and ensure that the engine starts from the starter system. The castle includes two components:
- mechanical, represented by a lock cylinder;
- electrical, which is a set of contacts that close electrical impulses when the key is turned in one way or another.
The ignition switch on the Lada Kalina has three modes:
- Mode "0". In this position, the key can be easily removed, and the lighting, emergency lights, and audio system work.
- Mode "1", fixed. It is no longer possible to remove the key from this position; when it turns on, the ignition system is turned on and power is supplied to all systems except the starter. But it is worth considering that keeping the key in mode “1” for a long time can lead to battery discharge. This position is used when turning on the starter, so that the running fuel pump pumps up the required pressure to ensure further ideal operation of the starter.
- Mode “2”—activation of the starter system.
The Lada Kalina ignition switch kit contains a key for the lock, which serves not only in its straight profile, but also as a key for the doors and trunk.
Ignition switch malfunctions
Like any electronic device, the ignition switch of the Lada Kalina is subject to frequent breakdowns. Malfunctions can occur for a variety of reasons, the most common of which are the following.
- Oxidation of contacts always leads to serious damage (usually due to moisture and dampness in the machine)
- Contact burnout , which occurs due to sudden voltage surges. Voltage drops usually occur when the power unit is started, during which the temperature inside the system rises sharply, causing the insulation to simply burn out. This is why it is so important to approach the launch issue wisely.
- Mechanical damage . If, when you are about to turn the key, you notice that it has become more difficult to do so than usual, it means that something happened to the lock cylinder, perhaps it was simply clogged with dirt or dust, or maybe there was a defect at the factory that came to light only now.
If the problem lies in burnout or oxidation, then when you turn the key in the lock, you will not see any reaction from the ignition system. In this case, you just need to replace the contacts without changing the entire lock; if the defect in the wires is not severe, then you can get by with cleaning the contacts.
Damage to the lock cylinder also occurs when someone tries to steal a car. In any case, the lock needs to be changed completely. But how to do it yourself?
Troubleshooting methods
When the Lada Kalina door lock behaves strangely: it jams, does not allow the key to be removed, or the unlocking device gets stuck in the mechanism, then there are several options for eliminating the problem. To identify the cause of the malfunction, you will need to disassemble the cylinder. Removal will not always solve the problem if the breakdown is caused by a poorly adjusted mechanism or door leaf. Algorithm of actions:
| Cause | Solution |
| The key moves poorly: it is difficult to turn and remove from the core. | Preventive actions: disassembling the cylinder, lubricating the pins. |
| Jamming, unauthorized blocking of the structure. | Adjusting the lock: modifying the latch, loosening the bolts with a screwdriver. Stopper insert with notches. Split teeth. |
| The lock does not close due to the fact that the door does not fit well to the body part. | Door adjustment: adjusting the plumb part or eliminating body movement. You can loosen or tighten two bolts at the end of the structure. |
Sometimes it is enough to lubricate the parts with a special product for the driver's door lock to work properly again.
Replacing the ignition switch yourself
Unfortunately, the Lada Kalina cannot please you with its reliability and durability; many systems, including the ignition switch, fail within a couple of years, so in order to save on repairs at expensive car repair shops, it is better to find out how to do it yourself. So, having come to the conclusion that the lock needs to be changed, we buy a new lock, which costs around a thousand rubles. In the kit we will receive three cylinders (on the doors and trunk) and 2 keys. You also need to purchase four shear bolts , since the old ones will no longer be suitable after dismantling.
How to remove the lock and replace the cylinder
To gain access to the trunk lock of the Kalina sedan, it is necessary to dismantle the internal plastic trim. It is held on by two bolts, which makes it easy to remove. They are located in the places where the handle is installed, in the so-called latching pistons. You can pry them off using an ordinary screwdriver.
The design of the trunk lock of the Kalina hatchback consists of two parts. This is the larva and the mechanism itself responsible for blocking the door. Elements must be disconnected individually. Below you will find information about such deletion.
If you need to replace the larva, everything can be done in a couple of movements. All you need is a deep socket and a flathead screwdriver. Then you should unscrew the bolts and release the desired part of the housing. When the work is done, you need to use a plastic screwdriver to remove the clamp, which is attached to the body of the larva. Next, it is carefully removed, holding the spring. Then the replacement is made, but in the reverse order.
Replacing a trunk lock or disassembling the entire mechanism requires a lot of effort. You need to unscrew the door lock using a screwdriver. There are only two bolts, so the job is quick. You can remove the mechanism using a Phillips screwdriver. When everything is done, just pull the lock and it will come out easily.
To summarize, it is necessary to note what tools are needed for the job. These include:
- plastic screwdriver;
- deep head;
- Phillips screwdriver.
The work is not at all difficult, the main thing is to purchase an electric trunk lock and perform all the steps described.
Design of VAZ-2109 locks and disadvantages
The lock cylinder is a cylinder that is equipped with a secret mechanism. In all locks with a flat key, the cylinder is replaceable. For example, on VAZ-2109 cars it is replaced like this.
Door mechanism VAZ-2109
The rotating part that is connected to the rod is called the “drive”. As we can see, this drive has a hole for removing the cylinder. By applying pressure with a thin axle or an awl, the larva is pulled out.
Actions after releasing the fastener
There is only one drawback - it is hardly possible to complete the steps indicated here without first removing the lock completely.
It should be noted that even when the mechanism is removed, it will not be easy to pull the larva out of it.
Therefore, before dismantling, be sure to insert a key into the cylinder and turn it left or right 90 degrees. The purpose of this action is to be able to dismantle the larva. This action is performed effortlessly, and the key is then simply pulled towards you.
Electric drive: easy installation option
The technique is simple, the only thing you need is to make a rotating plate and a rod for it yourself. The wiring should be routed to the electric lock and connected to a special control unit. When disarming the car, the electric trunk lock will be activated after the fifth door opening button is unlocked.
The entire installation task is based on connecting the electric lock to two wires. You can purchase the part at any auto store. The trunk end must be additionally hidden to prevent water from getting into it. Otherwise, it will periodically short out during rain. An important attribute is the trunk hinges. Wires are often broken in this place, so their condition must be carefully monitored.
Before installing the electric drive, the trunk lid trim is removed. The main thing is not to damage it during this process. It is recommended to choose a lock that will not need to be modified during operation.
An important step in the installation process is wiring; you can use those wires that are standardly suitable for the fifth door of the car.
Power is taken from the cigarette lighter. An important point is the installation of a protective fuse. The wire is laid along the threshold; it will take approximately 3.5 meters. Then the installation takes place.
It is advisable to choose an option that does not require drilling additional holes. The procedure consists of connecting the wires according to the diagram. Important: you can use the wire that goes to the trunk light.
Installing an electric drive is not difficult, but for the first time it is a labor-intensive process. If difficulties arise, you can seek help from a service station.
In order to gain access to the rear door (trunk) lock, you first need to remove the inner plastic trim, which is attached to two bolts at the handle attachment points and latch pins, which are pryed off with a flat screwdriver and removed.
How to repair the front door of a Lada Kalina
Removing the front door glass
Removing the glass trim
Install the glass in the upper position
Use a 8mm socket to unscrew the four bolts.
fastening the glass to two sliders.
and take out the glass.
If necessary, peel off the protective film from the glass holder. Install the front door glass in reverse order.
Removing the front door power window
Remove the front door glass.
Disconnect the wire terminal from the negative terminal of the battery.
1. Before disconnecting the power window connector
from the switch block wire block, unfold the wrapping
material at the connection of the pads and disconnect the pads
2. Using a 10mm socket, unscrew the 11 nuts securing the power window mechanism.
3. Remove the power window mechanism from the door
through the bottom hole of the inner panel.
4. Power window mechanism
We install the power window mechanism in the reverse order.
In order to prevent knocking on the doors, we cover the connection of the pads with soft material (foam rubber).
Removal and installation of the external handle and lock of the front door
1. Front door lock with locking drive and outside handle
2. Remove the front door trim.
Using a Phillips screwdriver, unscrew the screw securing the base of the inner handle and remove it from the mounting pin. We bend the edge of the protective material behind the inner door panel.
Using a screwdriver, we disconnect the rod from the cylinder mechanism of the outer handle lock.
Similarly, disconnect the rod of the outer handle.
Using a 8mm socket, unscrew the bolt securing the outer handle.
Use a 8mm socket to unscrew the handle securing nut.
Remove the outer handle.
Using a Phillips screwdriver, unscrew the three screws securing the door lock.
Slide the red block lock up and disconnect the block from the locking drive
Using a screwdriver, press out the rod lock, turning it around its axis. Having disconnected the rod of the inner handle from the lock, remove the rod.
We remove the front door lock along with the locking drive and rods through the technological opening in the inner door panel.
Install in reverse order
Removing the lock and replacing the cylinder
The design of the trunk lock on the Lada Kalina consists of two parts: the cylinder where the key is inserted and the door locking mechanism itself. All this is disconnected separately and will be written about this in more detail below.
- If you need to replace the larva, it is quite easy to remove it. You can do this using an 8mm socket and a flathead screwdriver. Below is shown which bolts need to be unscrewed to release this part along with the body.
- Now that the bolts are unscrewed, take a plastic screwdriver and use it to pry off the plastic retainer that secures the rod to the body of the cylinder. For clarity, below is a photograph that clearly shows what needs to be done:
- Then, carefully take the larva so that its spring, which is located inside, does not jump out. If you need to replace a part, then replace it with a new one and assemble everything in the reverse order.
- If it is necessary to completely remove the entire mechanism, then you will have to do a little more work. We unscrew the door locking mechanism itself with a large Phillips screwdriver, there are only two bolts:
When everything is done, you need to pull it a little towards yourself and it can be easily removed; all that remains is to disconnect the plug with the power wires from this structure:
That's all the repairs, which will take about half an hour if you have the right tools and this manual. We install all the removed parts, which can be bought at absolutely any auto store, in the reverse order. I hope that I helped someone with this photo report using the example of my Lada Kalina station wagon.
In order to successfully replace the trunk lock in a domestic car Lada Kalina in a sedan, station wagon and even a hatchback, you will need to stock up on some tools and accessories. The algorithm of actions is simple, so such work is available to owners subject to responsible preparation.
Features of standard locks
Getting to know the car begins with opening the doors. The first impression can be spoiled by careless adjustments, the use of low-quality materials or imperfect design. The entire Lada Kalina family (sedan, station wagon and hatchback) to one degree or another has these disadvantages. These disadvantages appear even with slight wear of parts, especially the rear doors of the car.
On modifications of the new generation of Kalina, including the “Lux” package, silent locks are installed. Instead of a metal locking device, they use wear-resistant plastics, which significantly improve the operation of the mechanism and provide more comfortable operation. But complaints about poor adjustment of moving body parts persisted in relation to new models. Car owners are also unhappy with the difficulty of opening the rear doors.
How to dismantle the lock to replace the cylinder?
You can gain access to the lock mechanism by removing the plastic upholstery inside the luggage compartment. This protective component is fixed by means of two bolts, which are located in the places where the special handle is installed. They are also called latch caps. They are pryed off with an ordinary screwdriver.
Structurally, the trunk lock in the Lada Kalina is made of two parts, regardless of the body type, hatchback, station wagon or sedan. They are presented in the form of a cylinder and the unlocking mechanism itself. If it is necessary to replace the trunk lock, then the dismantling of these components is carried out in a separate order.
When you only need to replace the larva, this can be done in a few simple steps. Here you will need a screwdriver and a socket.
- By unscrewing the bolts, we release the necessary part of the body.
- Next, remove the retainer using a screwdriver. It is attached directly to the body of the larva itself.
- It is recommended to remove it very carefully, while holding the spring.
- Installation of a new element is carried out strictly according to the reverse manipulation algorithm.
If there is a need to replace the lock itself, the operation becomes a little more complicated due to the need for additional actions.
- First, the door lock is unscrewed using a screwdriver. This is not difficult since the element is held in place with only two screws.
- Now we pull the trunk lock outward, and it freely comes out of the landing niche.
As you can see, removing the trunk lock is not difficult.
Troubleshooting methods
When the Lada Kalina door lock behaves strangely: it jams, does not allow the key to be removed, or the unlocking device gets stuck in the mechanism, then there are several options for eliminating the problem. To identify the cause of the malfunction, you will need to disassemble the cylinder. Removal will not always solve the problem if the breakdown is caused by a poorly adjusted mechanism or door leaf. Algorithm of actions:
| Cause | Solution |
| The key moves poorly: it is difficult to turn and remove from the core. | Preventive actions: disassembling the cylinder, lubricating the pins. |
| Jamming, unauthorized blocking of the structure. | Adjusting the lock: modifying the latch, loosening the bolts with a screwdriver. Stopper insert with notches. Split teeth. |
| The lock does not close due to the fact that the door does not fit well to the body part. | Door adjustment: adjusting the plumb part or eliminating body movement. You can loosen or tighten two bolts at the end of the structure. |
Sometimes it is enough to lubricate the parts with a special product for the driver's door lock to work properly again.
How is the activator installed?
The only way to get inside the trunk of a Lada Kalina is this manipulation - turn the key and press the button. This action is not always associated with convenience. For example, in bad weather or when your hands are full, this is not easy to do. This circumstance prompts owners to consider purchasing and installing an activator. Installing this useful element is quite simple. Here you will need a self-tapping screw, which will secure the device we are considering. To check the functionality of the activator, you should connect it with the standard connector from the on-board network.
After the current supply to the activator is stopped, the door is locked with the first latch, but remains not completely closed. To get back inside the luggage compartment you will need to use the key.
Installing a push-button lock is not a very difficult task. To implement it, you will need to assemble a circuit, which requires wiring. Here you will need to “attract” the programmable channel present in the alarm.
You can connect the device using two options.
- We connect the button with the positive output of the activator (12 V), bypassing the relay. The advantage of this scheme is the absence of unnecessary components and simple connection. As a negative aspect, it should be noted the need to lay additional wire lines.
- The second method is more labor-intensive. Here you will need to use additional components (diodes). You also need to find the ground connection point. The main advantage is the need for a minimum number of wire lines.
Experts prefer the first method because it is simpler. For switching, you can use copper wire type PV-3, the cross-section of which is 1 mm2. Laying should be done on the left side along the thresholds. You can connect by means of a clamp and subsequent wrapping with electrical tape.
The control wire of the activator may be a standard red-pink cable. It is subject to commutation with the relay, followed by winding the contact and placing it under the BUS fixation frame. The entire list of manipulations is performed with the battery disconnected.
How to install the activator
The only way for the viburnum to get into the trunk is to turn the key and press the button. Naturally, doing this is not always convenient. Weather, busy hands and other troubles contribute. At this stage, many car enthusiasts begin to think about the trunk activator. It is quite possible to do this, you just need to try a little.
The Kalina station wagon trunk lock activator is easy to install. It is enough to take a self-drilling screw and secure it on one side with it and on the other with a wire holder. To check the device, you need to connect it to the standard connector.
The only problem in all this work may be the back door being picked up at the wrong time. After the current stops supplying the activator, it closes with the first latch, but the trunk is not completely closed. In order to get into the so-called fifth door, you will have to use the key again.
A lock with a button is not difficult. But during work it is necessary to assemble the circuit and stretch the wires. In this case, one programmable alarm channel (additional) should be used. There are two main connection options. First: the button goes to +12 on the activator, bypassing the relay. The advantage of this connection is its simplicity and the absence of unnecessary elements, the disadvantage is the need to run additional wires.
Installing the activator using the second method is more labor-intensive. You will have to use additional elements, namely diodes. In addition, there is a need to search for “mass”. The main advantage is the use of a minimum number of wires.
Many experts prefer the first option due to its simplicity. The wire can be copper PV-3 with a square cross-section. It must be pulled along the left side and thresholds. The switching can be crimping and electrical tape on top.
A standard pink-red wire is used to control the activator. It must be connected to the relay, wrapped and hidden under the BUS mounting frame. All operations are carried out with the negative battery terminal removed. This is how the electric trunk lock drive is mounted.
Electric drive: easy installation
The manipulation algorithm is very simple. Here you will need to make the rotary plate together with the rod yourself. The wiring is laid directly to the lock and connected to a special control unit. When the car is “disarmed”, the electric drive of the luggage lock is activated following the unlocking of the button responsible for opening the rear door of the Lada Kalina.
The whole essence of the action comes down to connecting the electric lock to two cable lines. You can buy the product at a specialized retail outlet. The end of the luggage compartment will need to be hidden in order to prevent the risk of moisture getting into it. If this is neglected, then with the penetration of water a short circuit will be observed in the designated area.
Much attention should be paid to the area near the door hinges, because broken wires are a common occurrence here. To prevent this, it is recommended to regularly monitor this section of the highway.
Before starting the procedure for installing the electric drive in a Lada Kalina car, you will need to remove the plastic trim. Here you need to be careful not to damage the specified protective element.
The choice of a lock for LADA Kalina should mean that there is no subsequent need for modifications before installation. This means drilling additional holes.
An important point in the installation procedure is the laying of electrical lines. For these purposes, you will need about 3.5 m of appropriate cable. You can use standard wiring suitable for the rear door. The power source can be a cigarette lighter socket. It is also important to install the fuse correctly.
We do all switching in LADA Kalina in accordance with the diagram.
Important! The main line in this version may include a wire that goes to the courtesy lamp for lighting the space inside the trunk.