How to correctly install the VAZ 2109 fan switch button
There are two options - through a relay or using just a switch.
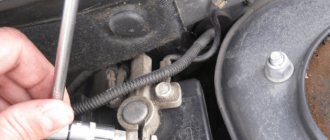
The relay connection diagram is simple - you need to connect two wires parallel to the sensor. They both must go to the normally open terminals of the electromagnetic relay. This scheme avoids the presence of high current in the switch. Two thin wires must be brought out under the dashboard and connected to the contacts of the button (or switch). Thus, a control element for the low-current winding of an electromagnetic relay is installed inside the car, and all high-current circuits are located under the hood.
And now, if the VAZ 2109 fan sensor fails, you just need to press a button to cool the engine. For this purpose, a standard relay with normally open contacts is used. Similar ones are installed on light and electric motor drives. Its price in the store is about 50-70 rubles.
The cost of the fan switch sensor is about 100 rubles. As a result, after spending a couple of hundred and half an hour of time, you will create a reliable system that will not let you down in difficult times.
I will say for myself: after it boiled in traffic a couple of times, due to the fan not turning on, I had to install a regular switch and relay. Unfortunately, nothing was found except the heater fan switch from the six, so I installed it. And now, as soon as I approach a jam, I simply turn on the fan. And I turn it off after stopping. This does not affect maneuverability and speed. Even taking into account that the carburetor nine (holds idle 900-930), no jerks or attempts to stall occur.
But you can, of course, use a different scheme - for example, turn on the VAZ 2109 fan directly with a switch, without using a relay. But this risks the fact that the contacts of the switch will constantly burn out, and its service life becomes much shorter.
Or you can use buttons without locks; to do this, you need to include one semiconductor diode in the control circuit for turning on the VAZ 2109 fan. But turning off such a system is possible if you break the power circuit with the second button.
But these are trifles for a person who more or less understands electrics. These are useful little things worth adding to your car so that the failure of the VAZ 2109 fan sensor does not take you by surprise.
Video about the fan on the VAZ 2109:
"Folk" way
Folk craftsmen - these are brave and very desperate craftsmen - offer a much less labor-intensive method. The bottom line is that replacing the stove pipes (and the stove itself) is done without draining the coolant and without dismantling the instrument panel. The tools you will need are a set of screwdrivers, rags and a container (small) to drain the liquid from the pipes. In this case, replacing the heater radiator pipes is carried out according to the following scheme:
- Removing the terminals from the battery
- Close the heater tap
- We remove the right front seat (to make it easier to do the work)
- We unscrew the two screws securing the dashboard on the right side, and one screw located in the glove compartment, then, pulling the dashboard towards you, we place a wooden block
- Now there is a gap on the side of the passenger seat and you can get to the pipes and to the heater radiator itself
- Lay a rag on the floor of the cabin and prepare a container to collect the coolant
- Which will spill from the radiator and pipes
- We loosen the clamps of the pipes (photo above) and carefully, one by one, remove them from the radiator, replacing the container. 200 - 300 grams of coolant will drain into it
- Replace the pipes with new ones, and change the clamps, just in case.
- If necessary, unscrew the three bolts that secure the radiator to the stove and pull it down to the right
- We install the pipes and the new radiator in the reverse order.
Here are both methods, choose the one that suits you, and also watch a video on this topic.
Installation of new pipes
Malfunction of the VAZ 2106 cooling system
It is recommended to buy a set of new clamps for a set of new pipes. It is necessary to put them on the pipes before installing them, they must be in a free position, we will tighten them after installing the hoses on the fittings.
If the pipe does not fit well onto the fitting, do not make much effort, just lubricate the fitting. Apply efforts evenly, after successful installation, tighten the metal clamp. It must fit evenly over the entire surface, distortions are not allowed.
In general, the installation of pipes is complete. Upon completion, it is necessary to visually check again and perform a final tightening. Next, fill in new coolant. To do this, we lift the nose of the car so that the new fluid does not create air pockets. Next, turn on the stove to maximum and fill in the liquid. We wait until it completely fills the radiator, heating stove, and block. As soon as the level is at the desired level, you can close the expansion tank cap. At this point the procedure is considered completed.
Upon completion of repairs, periodically check the coolant level. The absence of stains under the car engine, and a constant level of fluid in the expansion tank will tell you that you did everything right, and there is nothing to worry about for the next 3-5 years. In conclusion, I would like to note that this type of repair is not something fantastic, this procedure is carried out frequently and allows you to avoid engine overheating.
Dismantling
If it becomes necessary to remove the thermostat, then it will not be possible to do without draining the coolant. Some craftsmen claim that they were able to avoid the above procedure, but in reality it turns out that this option requires much more labor and still leads to the loss of 3 out of 5 liters of liquid. Therefore, it is better not to suffer and do everything as it should be. To do this, unscrew the plug located at the bottom of the radiator and drain the coolant into a suitable container. Then:
- remove the air filter;
- loosen the clamps holding the hoses;
- disconnect the mass from the thermostat;
- Unscrew the nut and pin holding the device.
DIY heating repair
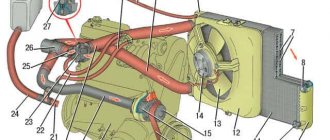
Cooling system diagram for VAZ-2112 16 valves injector
I remember distant times when this was practically impossible! Now technology has come so far - you can buy a rear window repair kit just to restore these narrow strips. I suspect that there is some kind of metallized composition or paint - but it is called conductive glue.
This glue can withstand temperatures from – 60 to + 100 degrees Celsius. This is exactly what we need to buy. The only thing I want to tell you is - don’t take the cheapest composition, now in my opinion it’s about 150 - 200 rubles, take a little more expensive one, about 300 - 400 rubles, such compositions work much longer.
Now the actual instructions for recovery:
- First you need a little, I repeat a little - to clean the edges of the strip in places where it breaks. It is necessary to remove carbon deposits and other deposits that form on the glass. Zero-grit sandpaper is ideal for this, just a couple of movements and you're done.
- Wipe with alcohol to remove all plaque.
- Now we take tape and stick strips on the sides, as thick as it is. The tape should not cover the strip, but it should not extend away from it at a large distance exactly along the width of the thread, so that there are no gaps.
- Next we take our composition, “conductive glue”. He either has a syringe or a special brush. We begin to paint the place that we have prepared. How many layers to apply will be written in the instructions. It is worth noting that you need to enter the working sections of the strip 1 centimeter to the right and left.
Now we need the composition to dry. Remove the tape and wait. Usually about 24 hours is enough. BUT NOT SOON! After that, we turn it on and check the functionality, everything should work.
That's all, these are not complicated instructions. Now we are watching the video version.
I’ll finish this, read our AUTOBLOG
(3 votes, average: 4.67 out of 5)
Radiator fan on VAZ 21093 (carburetor) failed
Purpose and principle of operation of the cooling system fan
Good day! Here's the thing: the fan stopped working. More precisely, it worked intermittently for some time, and then completely died. Replaced the fuse. Did not help. Cleaned the contacts. Did not help. Where to look for the reason? This is the first machine and I don’t have much experience in troubleshooting. I hope you can help me))) Power it directly from the battery. If it doesn’t turn, then the carloson is broken and you’ll have to replace the whole thing. The motor there doesn't last forever.
Thank you. I'll try. And if you spin, what could it be?
And if it spins, then it is, as correctly said, a temperature sensor. By the way, it is correctly said, try to close the contacts on the sensor with the ignition on. If it turns, it's definitely the sensor. if not, try it directly.
try jumping the sensor wires to the radiator, if it doesn’t work, look at the power supply; 2 fuses are responsible for it
Thanks again for the advice. I will stay)). If anything, then come here again for help!
Good night! A short report on the work done: today I started working on the fan. Actually, I checked its functionality by closing the contacts on the temperature sensor. The fan turned out to be working. I purchased a new sensor, antifreeze plus flushing fluid for the entire cooling system, because... It’s unknown how many years nothing was done with it. The sensor was successfully removed, a new one was installed, and the system was flushed. The temperature rose to a stable level of 90. But in the evening, while in a traffic jam, I noticed that the temperature began to rise to somewhere around 105-110 degrees. I stood on the side of the road and opened the hood. but the fan does not spin. And the question actually arises: at what temperature does the fan start working? And could it be that the problem is not in the sensor at all? I'm afraid the engine will overheat.
It is not a fact that the sensor is working. In stores now, if parts that are not working are returned, they are not thrown away, but sold again. And the cause of engine overheating may be a faulty thermostat, then the antifreeze flows in a small circle, but does not go to the radiator. Check whether the radiator is heating up in the area of the sensor, and also check the antifreeze level in the expansion tank. If there is not enough antifreeze, the sensor may also not work. And one more piece of advice, if the sensor does not work, remove the terminals from the sensor, short them together, insulate them, and continue moving, let the fan spin constantly. This is not terrible in the summer, it will be worse if the engine overheats.
What sensor did you buy? They operate at different temperatures at 9 up to 115 degrees, the sensors are installed.
What to do if the engine overheats
First of all, it should be remembered that if the overheating is short-term (for example, the temperature needle rises in a traffic jam), then you should observe whether the temperature will drop after you start driving (counter air flow appears) or as a result of turning on the radiator fan.
If the car was already in motion and the engine temperature reached a critical level, you should not immediately turn off the engine. Also, you should not try to cool the engine by pouring water on it from outside, pouring cold water into the radiator, etc. Such actions will lead to the need to repair the internal combustion engine, and it may be necessary to change the BC and cylinder head.
Next, you need to wait a few minutes, while simultaneously inspecting for obvious and strong signs of antifreeze/antifreeze leakage under the car or in the engine compartment. If no leaks are visible, but the temperature does not drop, the unit must be turned off.
Please note that you need to immediately turn off the engine when steam starts coming out from under the hood; traces of intense coolant leakage are clearly visible. In this case, the engine must be stopped, without expecting that turning on the stove will reduce the heating.
Reasons for appearance
Cooling systems of modern vehicles are designed for stable high pressure (up to 100 kPa). This design makes it possible to increase the boiling point of the liquid to 120-125 degrees.
However, such a temperature range and effective cooling of the motor are only possible when the system is fully operational. One of the most common problems in the cooling system is the occurrence of air plugs.
There are several reasons why air accumulates in the cooling system channels. An air lock is formed due to:
- System leaks. Leaks at the junctions of the pipes lead to the fact that when the liquid flow moves, a vacuum is formed, which sucks air into the system. Gradually the amount of air increases, then it accumulates in one place, forming a plug.
- Loss of tightness in the water pump. If the sealing gasket under the pump is damaged, the unit will suck in air during operation.
- Violation of technology for replacing or adding antifreeze. If you immediately pour a large amount of liquid, the air in the pipes will not escape and the antifreeze will push air bubbles into the system with its own weight. After starting the engine, the air will gather in one place, interrupting the flow.
- Damage to the cylinder head gasket due to overheating. If the resulting breakdown connects the cooling system channel to the atmosphere, the liquid will draw in air from outside. Airing appears if a breakdown connects the channel to the cylinder. In this case, exhaust gases will break into the cooling system, which, in addition to the appearance of an air lock, is accompanied by the bubbling of antifreeze in the expansion tank.
Drain the liquid
You will need an inspection hole, overpass, jack or lift. Since the liquid can only be drained from under the bottom of the car, it needs to be raised.
Set of pipes: radiator pipes with clamps (3 pcs.); steam outlet pipe and expansion tank pipe. An important point: hot coolant cannot be drained. Let it cool and then proceed.
First, unscrew the cap of the expansion tank. This is necessary to completely drain the liquid from the system. It is best to place the car in such a position that the nose is not tilted up, otherwise some of the antifreeze will simply remain in the system. You will need a container to collect old coolant. It is better to take the volume with a reserve, 10 liters.
We unscrew the engine protection and find a drain plug in the radiator area, substitute a canister, unscrew the plug and drain it. Next, it is better to return the plug to its place.
Design of the VAZ 21099 carburetor engine cooling system
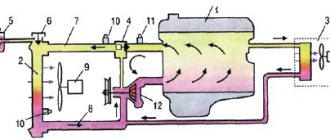
So, you started the cold engine. When fuel burns, it heats the engine cylinders and combustion chambers of the cylinder head. Both the head and the block are penetrated by a network of channels filled with coolant (TOSOL).
Coolant circulation is provided by pump 17 (“pump”), driven by a timing belt. The heated antifreeze is removed from the cylinder head through the outlet pipe 25, connected to it by a channel, and again enters the block through the pump. In this case, if the heater tap 21 is open, the liquid warms up (while cooling itself) the heater radiator 22. And so on in a circle called small.
As the coolant temperature increases, thermostat valve 29 opens and antifreeze starts to move through radiator 12 (in a large circle).
Since TOSOL significantly increases in volume when heated, it is necessary to compensate for the lack of space. For this purpose, there is expansion tank 1. If it were not in the system, then as a result of excess pressure, at a minimum, the heater or radiator pipes would be torn off the fittings.
The expansion tank cap valve 2 controls the pressure in the system, preventing both fluid loss and premature boiling.
If the liquid temperature rises to 99°C, the contacts of sensor 9 close and the electric radiator fan 15 turns on. Since 1998, sensors have been produced with reinforced contacts, so the fan is turned on without an additional relay in the mounting block.
To control the temperature, a temperature sensor 28 is screwed into the cylinder head, the signal from which is displayed on a pointer in the instrument panel.
To heat the carburetor, hose 23 is removed from the inlet pipe.
"UAZ BUKHANKA" | Topic author: Alexander
tell me why the lower hose is cold but warms up while driving, stopped, ran at idle, cold again
Sergey (Yaasai) Most likely your thermostat is faithfully performing its duties.
NIKOLAI (Yousef) Look at the pump
Valery (Ellis) maybe the pipe has decomposed inside or remove the thermostat, try it without a thermostat
Alexander (Nantlais) yes I will try something simple
Makhov (Eiriol) Don’t worry, your thermostat is working fine
Vitaly (Iakovos) my front heater works well, but is the rear cold pump new and the hoses?
Makhov (Eiriol) Remake the system hose from the head to the front stove return to the lower pipe of the rear return to the pump
VAZ 2109 fuse diagram
Has the fuse blown again? Because you loaded your VAZ 2109 with a powerful light or installed a sub for which the wiring and fuse box were not designed? Then this fuse diagram will come in handy!
| № | Ampere | Purpose |
| 1 | 8 | Right fog lamp |
| 2 | 8 | Left fog lamp |
| 3 | 8 | Headlight cleaners (at the moment of switching on) Headlight cleaner switching relay (contacts) Headlight washer switching valve |
| 4 | 16 | Headlight wiper motor Headlight wiper relay (winding) Heater motor Window washer motor Rear window wiper motor Rear window washer timing relay Windshield and rear window washer activation valve Cooling system electric fan relay relay coil Coil of the rear window heating relay coil Rear window heating control lamp Wardrobe lighting lamp box |
| 5 | 8 | Turn indicators in turn signal mode and the corresponding indicator lamp Rear lights (reversing lamps) Indicator lamp for fuel reserve, oil pressure, parking brake, brake fluid level, carburetor choke Voltmeter and indicator lamp for charging the battery Gearmotor and windshield wiper switch relay Generator excitation winding (at start-up) “STOP” indicator lamp Coolant temperature and fuel level indicators |
| 6 | 8 | Rear lights (brake lights) Body interior light Power windows and power window relay |
| 7 | 8 | License plate lights Engine compartment lamp Indicator lamp for turning on side lighting Instrument lighting lamp and cigarette lighter lamp Heater lever illumination panel |
| 8 | 16 | Engine cooling fan electric motor and its activation relay (contacts) Sound signal and its activation relay |
| 9 | 8 | Left headlight (side light) Left rear light (side light) |
| 10 | 8 | Right headlight (side light) Right rear light (side light) |
| 11 | 8 | Direction indicators and hazard warning relay (in hazard mode) Hazard warning lamp |
| 12 | 16 | Heated rear window element and heating relay Cigarette lighter Socket for portable lamp |
| 13 | 8 | Right headlight (high beam) |
| 14 | 8 | Left headlight (high beam) High beam indicator lamp |
| 15 | 8 | Left headlight (low beam) |
| 16 | 8 | Right headlight (low beam) |
| Relay | ||
| K1 | Rear window washer time relay (451.3747 / 2108-3747110, 2108-3747110-06) | |
| K2 | Relay-breaker for direction indicators and hazard warning lights (493.3747 / 2108-3747010-02) | |
| K3 | Windshield wiper relay breaker (522.3747 / 2108-3747710) | |
| K4 | Contact jumpers in place of the lamp integrity monitoring relay. Lamp integrity monitoring relay (4402.3747 / 21083-3747410, 21083-3747410-06) | |
| K5 | Headlight high beam relay (113.3747 / 2105-3747210-10, 2105-3747210-12) | |
| K6 | Headlight cleaner relay (112.3747 / 2105-3747210, 2105-3747210-02) | |
| K7 | Power window relay (13.3747 / 2105-3747210-10, 2105-3747210-12) | |
| K8 | Relay for turning on sound signals (13.3747 / 2105-3747210-10, 2105-3747210-12) | |
| K9 | Relay for turning on the electric cooling fan (13.3747 / 2105-3747210-10, 2105-3747210-12) | |
| K10 | Relay for turning on the heated rear window (13.3747 / 2105-3747210-10, 2105-3747210-12) | |
| K11 | Relay for low beam headlights (13.3747 / 2105-3747210-10, 2105-3747210-12) |