The car's heater is used very actively, especially in cold weather. Very often, after a long mileage, when you turn on the heater, an annoying whistle is heard, which disappears after turning off the fan, so it becomes clear that the problem is not in the stove itself, but only in the fan.
You will learn what to do if the heater fan on your Lada Kalina whistles in our article. In most cases, when a whistle appears, the breakdown can be fixed, and in more than half of the cases this can be done independently.
Determining a malfunction in the cooling system
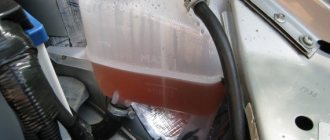
The first sign that something is wrong with the cooling system is a decrease in the level of antifreeze in the expansion tank.
The amount of coolant should be constantly monitored. In a working system, its level should be maintained between the minimum and maximum marks. If the amount of antifreeze begins to decrease, the engine will heat up faster and the risk of overheating will increase. On Kalina there is no engine temperature indicator, there is only a light on the instrument panel that signals the critical temperature of the coolant. If you have to add antifreeze frequently, you should look for the leak. If the hoses are broken, they can be replaced, just like the clamps.
The next thing to check is the circulation of coolant in the system
After starting the engine, you need to pay attention to the expansion tank. Poor circulation may be caused by a faulty water pump (cannot be repaired) or a clogged cooling system - in this case it needs to be cleaned
If after a full check the fault is not found, the cause of the stove malfunction is an air lock. After removing excess air, the heater’s operation returns to normal.
Cooling system problems
Most often, Lada Kalina car owners have to deal with the following malfunctions:
- engine overheating due to untimely switching on or failure of the main fan;
- the stove fan fails;
- the heater tap or the radiator itself leaks, which leads to a complete replacement of the Kalina heater;
- The VAZ 2118 power unit does not warm up to operating temperature due to the fact that the fan is constantly running.
Forced cooling of Kalina is controlled by an electronic control unit (ECU), based on pulses transmitted by the temperature sensor for turning on the fan. When the antifreeze in the upper pipe heats up to 103-105 °C, this sensor transmits a signal to the ECU, which starts the impeller through a relay.
If the fan switch-on temperature is reached and the cooler is not started, then the fault lies in the sensor itself or in the relay contacts.
When the cooling fan does not work, this threatens to overheat the engine, leading to the replacement of the piston group. But if the impeller rotates constantly, regardless of temperature, then you must immediately open the relay block. In one of them, which is responsible for the operation of the cooler, the contacts are probably stuck. A decrease in fluid temperature or engine overheating can also be caused by a jammed thermostat, which must only be replaced.
Also, only replacing the stove on Kalina can correct the situation when a leak appears in its radiator. The reason is that the factory parts are made of aluminum and cannot be soldered. It often happens that the heater fan does not withstand harsh operating conditions and fails. Here, too, only replacing the heater motor will help.
The trick is that the first group of faults, after correct diagnosis, can be eliminated quite easily. There is nothing difficult about changing the fan switch sensor or cleaning the relay contacts. Installing a new thermostat will take a little more time, but replacing a stove fan or radiator is quite a task.
You will have to remove the entire instrument panel, which is a lengthy process. That’s why information on how to change Kalina’s stove without dismantling the dashboard is so important.
Method without removing the dashboard
Replacing a Priora heater motor with air conditioning
Replacing a heater radiator on a Lada Kalina without removing the panel has become popular due to its speed and the need to dismantle a minimum number of components. The algorithm has some differences from the classic one.
- We drain the coolant and remove everything unnecessary under the hood, unscrew the clamps that secure the hoses at the inlet and outlet of the stove.
- In the cabin, we begin to disassemble the steering column - dismantle the protective cover, steering column switches, and all the wiring to them. We free access to the steering column and pedal assembly.
- The steering column is removed at the location where the electric power steering is mounted. It is held on by 4 bolts and is detached from the cardan.
- The gas pedal (3 bolts) is removed from the passenger compartment and the gas cable is disconnected. The brake pedal does not interfere with removing the radiator, but if you remove it, it will be much more convenient to work.
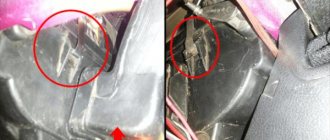
- The side wall of the heater is now accessible and can be pulled out. To do this, remove the decorative heater cover by unscrewing 3 screws.
- It becomes clear that the entire radiator will not fit into the hole. To widen the hole, use a hacksaw, jigsaw, or small grinder to cut through the body. Cut out in one whole piece. After replacing the stove, it will need to be glued in place. The pipes can be cut off - they will no longer be useful.
- We pull out the stove in the direction of the pedal assembly. There will still be some coolant left in it.
- We try on the new radiator in place. For ease of installation, the pipes are shortened by 1-2 cm. We glue anti-vibration strips and a seal around the perimeter.
- We pull the hoses onto the fittings, fix them with clamps, firmly fix the stove in the heater body and close the decorative cover. We install a cut piece of plastic onto the sealant or glue.
- We assemble the remaining components in the reverse order, fill in antifreeze and check the functionality of the entire system.
The advantages of this method are obvious: labor-intensive disassembly and disconnection of numerous connectors is not required. Crickets will not appear in the front panel after assembly, and later disassembling and replacing the heater radiator is much easier. This does not reduce the efficiency of the stove.
Video: Lada Kalina - replacing the heater radiator (without removing the panel)
As operating experience shows, a new radiator lasts for 3-5 years of operation, after which problems inevitably begin. The driver decides how to repair. Having the simplest car maintenance skills will be enough to replace it yourself in the garage. Otherwise, you should contact the service. “Kalina” with air conditioning has a more complex climate control system with two radiators, and replacing the interior heater involves disassembling the entire front panel.
Home →
Maintenance and Repair →
Website about joints
How to replace the heater motor (fan) of a Lada Kalina car with your own hands. Replacement occurs without removing the panel or seats. Everything should take no more than 1 hour.
With the onset of cold weather, the stove motor began to buzz loudly, and then jammed and stopped working altogether, which was saved by a strong blow to the panel. The owner did not wait for it to completely break down and decided to replace it. There is no need to completely disassemble the panel; just remove the glove compartment, unscrew a couple of plastic covers and we get direct access to the motor mounts. It is necessary to remove the old motor carefully, as the “snail” can easily be damaged.
New motor with LUZAR double bearing system:
The new motor performed well, the only drawback was that the operating noise was slightly increased compared to the original.
Video of replacing the Kalina stove motor:
Youtube video reserve:
When they pulled out the old stove motor, it turned out that the bearing in it was broken.
If the stove does not heat well or blows cold air on Kalina, see our detailed instructions in the problems and solutions section.
Information on how to change the stove on Kalina yourself is very popular for all motorists who have at least once encountered malfunctions of this VAZ 2118 unit.
The heating and ventilation system of Kalina itself is quite simple, but getting to its elements hidden behind the front panel (dashboard) is very difficult. Therefore, issues related to malfunctions of the cooling system in general and the heater radiator in particular deserve detailed consideration.
Replacing the fan (motor) of the Lada Kalina stove
Introduction
Checking for serviceability and replacing the heater damper gearmotor VAZ 2110
Hello, dear car enthusiasts! The topic of the article is addressed to owners of a Lada Kalina car who are faced with the problem of a failure of the heater fan. In winter conditions, heating the car interior is an urgent need. Therefore, you need to change the faulty Kalina stove motor immediately. But not everyone knows where the stove fan is located and how to remove this unit. You will learn about this and much more if you read the article to the end.
Why do you need a heater fan on the Lada Kalina?
The main purpose of the heater on Kalina is to maintain the required temperature in the car interior and prevent the windows from freezing. If the heating system stops functioning for some reason, then operating the car in winter is practically impossible. The operating principle of Kalina's stove is traditional, and does not differ much from similar systems in other cars. Antifreeze is heated in the engine heating system, and then enters the heater radiator through pipes. Next, according to the principle of heat exchange, the hot liquid heats the air, is cooled and sent to cool the motor. The fan blows on the heater core and directs hot air into the passenger compartment. If the motor fails, it’s cold in the cabin.
Methods for replacing the unit
Replacing the Kalina stove fan is not the most difficult procedure. Even a novice car enthusiast can cope with it. The whole problem is that the unit is not very conveniently located. Therefore, before removing the device, you will have to tinker a little. There is an option to contact the service station. However, this repair is quite expensive. If you don’t have extra money or you want to personally change the fan, just out of “sporting interest,” then we’ll consider several options for replacing the unit.
Replacing the fan with removing the dashboard
This method is recommended by the manufacturer of the Lada Kalina. However, due to its complexity, not many car enthusiasts in the “domestic” conditions of an ordinary garage decide to change the unit using this method. If you want to try it, here is the sequence of the operation. To work, you will need a set of Phillips and flat-head screwdrivers, heads for 8, 10, 13.
Procedure:
- Removing the dashboard:
- separate the negative terminal of the battery;
- drain the antifreeze;
- separate the pipes;
- remove the cabin filter;
- unscrew the fastening nuts and lower the steering column to the stop;
- remove the stop signal switch from the wiring;
- snap off the plastic clips and remove the upholstery of the pillars;
- unscrew the fastening bolts and remove the front panel trim;
- disconnect and move the air ducts;
- remove the dashboard.
- Removing the fan:
- disconnect the block with wires from the electric motor;
- remove the ventilation hose;
- remove the engine;
- we change the unit.
Next, we carry out all the steps in reverse order. As can be seen from the description, replacing a fan in this way is quite problematic and will take a lot of time. You also can’t do without assistants. For this reason, many car enthusiasts prefer to change the device in a simpler, so to speak “folk” way.
Replacing the stove fan without removing the panel
It is not wise to remove the entire dashboard just to change one fan. The problem can be solved much easier. You only have to lift the right side of the panel. We take a position upside down. Take a knife and a flashlight. We cut off pieces of sound insulation that prevent access to the fan. Unscrew the mounting screws and remove the unit. Everything is much simpler and faster than in the first case.
Conclusion
Any breakdown in a car, as a rule, is not associated with the failure of just one part. Before you start replacing the fan, diagnose the entire heating system. Otherwise, you will have to change the stove motor very often. Carry out vehicle maintenance in a timely manner and there will be no problems with the operation of Kalina.
See you soon and good luck on the roads!
What to do if the heater fan whistles on a Lada Kalina
The car's heater is used very actively, especially in cold weather. Very often, after a long mileage, when you turn on the heater, an annoying whistle is heard, which disappears after turning off the fan, so it becomes clear that the problem is not in the stove itself, but only in the fan.
You will learn what to do if the heater fan on your Lada Kalina whistles in our article. In most cases, when a whistle appears, the breakdown can be fixed, and in more than half of the cases this can be done independently.
The essence of the problem
The design of the heater is quite simple: a special powerful fan blows onto the radiator, which has several operating modes. If a whistle or noise appears, then the heater radiator definitely has nothing to do with it; most likely, it is the fan that will have to be removed.
Major breakdowns
Noise and whistling are already a breakdown; it is worth noting that the stove either works or it doesn’t. If there is no airflow from it at all, then most likely the motor is jammed or the brushes are worn out. And if there was noise and then at one point it disappeared and the heater stopped working altogether, this means that the motor has stopped and the bearing or bushings need to be checked.
By the way, the appearance of a noise or whistle is not always a signal that the engine is failing; it may also be that a large amount of dirt has accumulated in it and just needs to be cleaned.
Therefore, first of all, when noise appears, disassemble the heater and try to clean and lubricate it, in most cases this helps.
Disassemble and clean the fan
The main thing is that before starting work, do not forget to disconnect the terminals from the car’s battery so that a short circuit does not occur.
There are two options for developing actions:
- Just clean it: to understand what the problem is, you will need to spin the already removed engine; if it turns over with difficulty, sometimes even familiar noisy sounds appear, then in this case you will need to vacuum the engine and lubricate the bearings and other rotating parts. You can lubricate with any silicone grease or WD-40. Also be sure to clean all dirt from the shaft. In 65% of cases, these actions are enough to get rid of extraneous sounds from the stove and will last for a long time.
- Repair or replace shaft bearings: To determine whether any work needs to be done on the shaft bearings, you first need to look at their condition. If they don't turn at all, then you will have to disassemble the motor. Bearings may fall apart or become jammed from prolonged operation. Of course, you can just buy a new motor and not have to worry about repairs, but a new part costs a lot and if you try really hard, you can still fix the old one yourself.
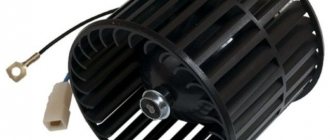
How to remove the fan on Lada Kalina
If the stove on Kalina is humming, it is already clear from what has been described above that it is simply necessary to repair or replace the fan motor. Therefore, we begin dismantling by removing the outer plastic grille and removing the cabin filter.
- Then remove all debris from the seat so that it does not fall on your head while removing the fan.
- To proceed further, you will have to remove the front passenger seat, otherwise you will need to take an acrobatic pose inside the Kalina's cabin.
- The fan runners are held on by four nuts that need to be unscrewed. Then open the glove compartment and empty it of its contents, unscrew the four screws on its back wall and don’t forget about one more on the outside, under the airflow grille.
- Remove the decorative trim from the front right pillar; under it there are two more screws that secure the plastic panel and the blower unit. You need to unscrew them, remove the blower unit and lift the plastic panel, which is held on by Velcro. Underneath you will find two nuts; you will need to loosen them using a socket wrench. Then move the torpedo as far as possible and lock it in this position.
- Sit comfortably on the floor of the Lada Kalina and remove the heater fan, while disconnecting the electrical connector. You will need to replace its turbine with a new motor or repair the old one and put it back. Then install the unit in its place and reassemble everything in reverse order.
Procedure for resuscitation of the Lada Kalina stove fan motor
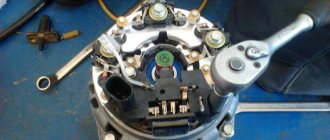
- Before removing the clamp, mark the location of the impeller relative to the shaft and remove the impeller.
- After you gain access to the two bolts, you need to unscrew them and open the motor.
- Unhook the anchor lock at the top, remove the washers and pull out the anchor.
- This will give you access to the bushings.
- Clean and lubricate parts.
- At anchor, wipe and sand the contact plates with the finest grain sandpaper.
- You also need to clean the contact pads and wipe them down.
- Do not lubricate the contact surfaces under any circumstances! Everything should be sterile clean and shiny.
- Use graphite lubricant only to lubricate high friction surfaces. But under no circumstances use oil or grease for these purposes, as they will leak in the future.
Important! Do not drill holes or pour oil onto the shaft or spray WD while removing the cooling hose. This is not recommended, although you can find many recommendations on this matter on the Internet. Such actions are dangerous for the motor and can lead to its failure.
- Reassemble the motor in reverse order. Now it will not buzz and will spin without squeaks or noises.
- Reassemble all other parts in reverse order.
As you can see, the steps are not at all complicated, the main thing is not to get confused about what to screw on during assembly. If you have problems with heater fan noise, try to solve the problem yourself as much as possible. If repairing the problematic part is impossible, then replace it with a new one, and if you still doubt your abilities, seek the help of specialists.
remam.ru
How to choose the right heater radiator
Construction of a viburnum stove/heater
Before choosing a stove radiator, you should know that they can be either aluminum or copper-brass. It is difficult to clearly prioritize the choice of one material, but each one has specific features of its work. These features are dictated by the properties of the material. Copper has a slightly lower thermal conductivity than aluminum, and therefore warms up more slowly. This cannot be said to be bad, since the thermal inertia of such a radiator is quite large. This means that it may not cool down for a long time.
An aluminum radiator is the opposite. It warms up quickly, but cools down just as quickly. It has a few more disadvantages. Firstly, the aluminum radiator cannot be repaired. Once it drips, you can throw it away. Copper is soldered quite simply and as many times as necessary. You just need to choose it correctly, because when selling, especially in the car market, you may come across a repaired copy with the partitions removed. It won't leak, but it won't provide heat either. Antifreeze will simply pass through such a radiator as if through a pipe.
It is also worth paying attention to the presence of plastic liquid swirlers. You can see them if you look into the pipe
These are spiral-shaped plastic plates that increase the efficiency of the radiator by 25%. The price of a heater radiator for Kalina can range from 900 rubles for the original, and little-known companies can offer their radiators for 600-800 rubles. Naturally, it is better to overpay and buy an original new one. Copper or aluminum - at the discretion of the owner.
Method for removing the dashboard on Kalina
This method is recommended by the factory and is used in all official services. The advantages of this method include the safety of all plastic elements and the tight installation of the stove in its seat.
We begin dismantling by disconnecting the negative terminal of the battery and removing the decorative frill under the hood. Together with it, we remove the air filter housing and the battery itself, freeing access to the heating radiator pipes.
Pour the antifreeze into the prepared container. Now you can disconnect the hoses going to the stove and unscrew the bolt securing the heater to the engine shield.
We go into the car interior and begin to unscrew the screws on both sides of the front panel. We remove the decorative trim in front of the windshield, air duct deflectors, radio, and climate control knobs. Remove the climate control unit by carefully disconnecting all wires and rods
There are two screws underneath that need to be removed as they hold the panel in place. We dismantle the decorative casing around the steering column, under it we remove the steering column switches and the ignition switch.
To remove the entire panel, unscrew 9 nuts and carefully, without breaking the wires, pull it out of the car. A heater block opens before us, which is screwed to the vertical stiffeners
We disconnect all the fasteners and pull out the entire body. We disassemble and replace the faulty part
A heater block opens before us, which is screwed to the vertical stiffeners. We disconnect all the fasteners and pull out the entire body. We disassemble and replace the faulty part
There should be no gaps between the heater radiator and the housing wall. Assembly is carried out in reverse order. When installing the front panel in place, we connect all the electrical connectors and put the wiring in its place. The dashboard should fit easily and effortlessly to the engine shield, and the mounting holes should match. We collect small decorative elements and connect the hoses under the hood of the car. We fill in antifreeze, start the engine, and check the functionality of the repaired heater.
It is convenient to combine the procedure for replacing the radiator with complete disassembly with soundproofing the car or other similar work when disassembling the interior is necessary.
Replacement with panel removal
Car enthusiasts do not like this method not only because of its complexity. They rightly believe that after disassembly, a large number of “crickets”, that is, extraneous sounds, will appear in the cabin of the Kalina. This is indeed true; factory assembly is difficult to replicate and, nevertheless, it is strongly recommended to use this method.
It must be remembered that dismantling the panel involves working with electricity, so first of all you need to disconnect the battery
Now you can proceed directly to the replacement process.
The sequence of actions is as follows:
- Remove the air filter along with the pipe, battery and decorative engine cover.
- Drain the antifreeze.
- Loosen the clamps and disconnect the hoses from the stove pipes. There is also a nut securing it to the partition of the engine compartment; unscrew it with a suitable 10mm wrench.
- In the niche where the wiper drive is installed, the decorative trim is removed on the right side, the cabin filter is dismantled, and 4 screws are unscrewed under it.
- All other work must be done inside the car.
- Bend back the latches and remove the decorative panels of the A-pillars. There will be screws under them, they need to be unscrewed.
- Open the 7 nuts securing the front panel to the body and unscrew them. Remove the air duct grilles, radio, and all knobs from the stove control panel.
- Remove the heater control panel; it is held on by two screws.
- Unscrew the screws of the steering column casing and remove it.
- Remove the light and wiper switches, as well as the ignition switch.
- After unscrewing the 2 nuts to 13, move the steering column to the side.
- The panel remained held on by 9 bolts, 4 of them large, on one and the other side of the dashboard.
- Now the panel can be removed, but it is better to do this with an assistant so as not to damage the wiring.
- Now you can easily dismantle the radiator; it is attached with two bolts to the body stiffeners.
- Replace the radiator with a new one, making sure that it sits exactly in its place and that there are no gaps left between the fins and the casing.
- Assembly should be done in reverse order.
On paper, replacing the radiator of the Kalina stove does not seem very difficult, but in practice it will not be easy, but it is better not to rush, even if the work drags on for several days. The bonus will be 6,000 rubles saved, which is exactly the cost of working in the service.
The sequence of replacing a heating unit element is shown in more detail in this video.
Device repair
Repairing this part of the heater, unfortunately, is not always possible, but you can still try to do something.
- To begin, slightly bend the pressed side and remove the cover from the gearmotor.
- Look at the condition of the commutator, brushes and bearings.
- If possible, replace or correct faulty parts.
- Be sure to lubricate the bearings, but to do this, use silicone-based lubricants, they extend the life of the parts.
- Try to repair the damper if it is faulty or simply replace it with a new one.
- If there is no positive effect from the actions taken, replace the gearmotor with a new one.
The stove installed by the manufacturer copes quite well with its task of heating the interior. But there is one thing - the drive of the central heater damper of the Lada Kalina often suffers. This problem is not serious and in most cases, by following simple steps, you can get rid of it quite easily.
source
Purpose of the heating fan in the Lada Kalina
To understand why a car needs a heating fan, you should have a good understanding of how its heating system functions. The Kalina engine is constantly cooled with antifreeze. Having warmed up, the antifreeze from the engine goes to the main radiator, blown by the main fan. If this happens in the cold season and the driver turns on the heater, then hot antifreeze from the main radiator enters the heating radiator, which is half the size of the main one.
The Kalina heating fan is made of very unreliable plastic
The heater radiator quickly heats up with boiling antifreeze. The heat emanating from it is supplied through an air duct system to the interior of the car. And this hot air is pumped in using a heating fan, which constantly blows on the stove radiator and is driven by a small electric motor, and the intensity of heating of the interior directly depends on the rotation speed of the heating fan. Thus, without a heating fan, hot air simply cannot enter the car’s interior, and any breakdown of this device leads to the fact that the driver in the cabin begins to freeze.
Where is the heating fan located?
The heating fan on the Lada Kalina is located behind the heating radiator, which, in turn, is located under the central panel of the car, to the right of the driver. It is not possible to see this entire structure from the interior.
Air ducts and ventilation nozzles in the Lada Kalina are located throughout the front panel
To replace the heating fan, the driver will have to completely or partially dismantle the central panel. There are no other options.
Conclusion
Any breakdown in a car, as a rule, is not associated with the failure of just one part. Before you start replacing the fan, diagnose the entire heating system. Otherwise, you will have to change the stove motor very often. Carry out vehicle maintenance in a timely manner and there will be no problems with the operation of Kalina.
Perhaps you know how to fix a broken stove on a Lada Kalina using some other method? Or are there any additions or recommendations to the methods described in the article? Share your experience and opinion in the comments. Any information will be very useful to readers.
See you soon and good luck on the roads!
How to change the stove yourself on a Lada Kalina
The stove is responsible for the heat inside the car
. If any problems arise with heating, you immediately need to figure out what, in fact, is the reason for the lack of heat. This article will talk about how to repair and replace the stove on Kalina.
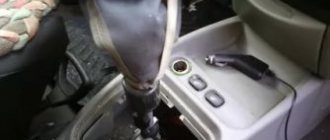
First option
We remove the front seats, this will give us more space for maneuvers. Now you need to remove the gear shift mechanism assembled with the drive (to do this, you need to loosen the gearbox linkage clamp under the hood and remove it from engagement with the rocker). Then, in the cabin, unscrew the bolts securing the gear shift mechanism to the floor, and then pull out the entire unit. Next, remove the center console by unscrewing the four nuts and two bolts securing it to the floor, and remove the air flow distributor casing. Using a Phillips screwdriver, unscrew the screws securing the heater protective casing. After completing all this work, we got to the stove radiator, which can now easily be replaced with a new one. We perform assembly in reverse order.
READ Kiger expands Renault SUV range in India
The main reasons why the radiator cooling fan does not work
Let's look at the main options and places to look for faults:
- Thermostat.
Thermostat removed from Lada Kalina
If it fails, this is the reason why the cooling fan does not work correctly. To diagnose this malfunction, you should touch the lower pipe. If it is cold, then the thermostat is dead. Many Kalina car owners are accustomed to this phenomenon, since it often breaks down, and they carry a spare one with them.
- If it's not the thermostat, then the next step is the fuses. You need to make sure that they are working and all controllers too. The easiest way is to test them using a tester or ohmmeter. The fuse diagram is here.
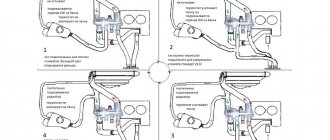
Relay and fuse boxIf the fuse is alive, then you will have to remove the additional fan control unit. To do this, it is worth moving the warm air duct and using a 10 mm wrench to unscrew the fastenings of the unit. Now you can get it freely. It has two relays that are responsible for turning on the fan and for high speeds. Let's diagnose both.
- Now, we can move on to the darkest option - we climb under the hood and “ring” the contact wires of the fan itself. Of course, there may be a break or break in the wire, but there is nothing worse than a burnt winding inside the fan. Most likely the fan in this case will need to be replaced.
- Another reason for the fan not turning on may be a broken thermostat sensor. In order for the fan to start in emergency mode, you will have to remove the connectors from it. You can check the sensor by removing the thermostat and placing it in a pan of hot water; the thermostat should open.
- The last reason why the fan may not work is a break in the switching circuit itself.
Electrical circuit diagram of the cooling fan
We recommend: What to do if the VAZ-2112 16-valve engine fails
Signs and causes of furnace fan failure
The owner of the Lada Kalina will immediately know that the stove fan has broken down. Here are the characteristic signs of failure of this part:
- the pressure of hot air blown out of the deflectors is greatly weakened and practically does not depend on the position of the stove regulator;
- The operation of the heater is accompanied by a loud creaking noise, which turns into a grinding noise when the fan speed increases.
All this happens for the following reasons:
- One or more fan blades are damaged. The fact is that the fan on the Lada Kalina is made of plastic, and this plastic is far from being of the best quality. This is especially true in severe frost. If there is a small crack on the blade, then at low temperatures it is guaranteed to increase and the blade will completely collapse. This, in turn, will reduce the pressure of air pumped into the cabin, which will immediately become noticeable to the driver and passengers by the lack of pressure in the deflectors;
- Fan squeaking occurs due to wear of the bushing on which the fan is mounted. This bushing lasts an average of five to six years, after which it will inevitably have to be replaced, since during this time it wears out almost completely (and it is advisable to install a ball bearing in place of the bushing, since its service life is twice as long).
Here we should make one digression and tell a real-life incident. As mentioned above, when replacing a furnace fan, drivers try to install them not on bushings, but on ball bearings. Until recently, there were no problems with this: you had to go to the nearest auto parts store and buy a Luzar fan. But for some time now it has become difficult to find products from this company. I don’t know what this is connected with, but the fact remains: “original” VAZ fans with hubs are on sale everywhere, but devices with ball bearings cannot be found during the day. One driver I know solved the problem in a very original way: instead of rushing around car stores, he simply ordered the required part from the Chinese online auction “Aliexpress”. The ball bearing fan arrived in the mail about a month and a half later. According to him, it cost only a third more than Luzarov's. This is probably a markup for shipping.
The ball bearing heater from Luzar is currently in short supply
About lubrication of the Lada Kalina stove fan
Lubricating a squeaky bushing on a Lada Kalina fan is a pointless task. Yes, lubricant will remove the annoying squeak for a while. But if the bushing is worn out badly, then even the thickest lubricant will very soon be used up and the bushing will begin to creak with redoubled force. Therefore, car owners prefer not to lubricate worn bushings, but to replace them along with the fans. And this is the only rational option.
Step-by-step instructions for removing and installing the stove
The heat exchanger of the VAZ 2114 car is located in an extremely inconvenient place. Therefore, when removing and installing it, you will have to do a fairly large amount of disassembly and assembly operations.
The VAZ 2114 heater is equipped with air ducts, ventilation nozzles and levers for regulating the warm air flow
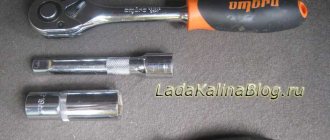
Tools and consumables
To work you will need the following tools:
- Phillips and slotted screwdrivers with short and long handles (screwdriver);
- set of wrenches;
- container and rubber hose for draining coolant;
- rags, a piece of oilcloth.
Procedure for replacement
In order to remove the heater radiator of a VAZ 2114 car, you should perform the following operations:
First, drain the antifreeze on a cold engine. Then unscrew the screw located behind the plastic plug.
Remove the glove compartment. First, unfasten and detach the bottom half. Then remove the cover along with the light bulb. Unscrew the screws securing the upper part and, with slight pressure and rotation, lower it down. In total, you will need to unscrew six screws.
Unscrew the two upper and two lower self-tapping screws securing the instrument panel.
Remove the lower protective cover from the steering column. To do this, remove three self-tapping screws and three screws from below.
Pull the plug out of the cigarette lighter socket.
Disconnect the connectors of the pads from the car radio and remove it from the slide.
On both sides, unscrew the screws securing the plastic console.
Pull out the flags that regulate the position of the damper and remove the heater fan mode switch.
Disconnect the console from the panel.
On the console, disconnect the terminals from the buttons for turning on the lights, heated rear window, fog lights, etc.
Be sure to mark them with a marker or notches in order of location. Disconnect the console from the panel.
Disconnect the ashtray light connector.
Unscrew the two screws from the diagnostic connector and carefully completely disconnect the console. Carefully remove the console and set it aside
Carefully remove the console and set it aside.
Unscrew the two screws securing the metal base to the floor - one on the left and the other on the right side of the bracket.
Unscrew the four self-tapping screws securing the front panel (“dashboard”) - two each to the left and right of the center of the console mounting.
First remove two large screws, then two smaller screws that secure the iron structure.
Pull the electronic control unit out from under the console.
To access the heating radiator, lift the left side of the dashboard using a jack.
In case antifreeze spills, place an oilcloth under the hoses and rags on it.
Unscrew the clamps from the hoses connecting the radiator to the engine cooling system. Remove the rubber tubes from the heat exchanger pipes. Drain the coolant from the radiator into a prepared container.
Remove the heater core from its socket. Install the new radiator by performing all operations in reverse order.
To prevent an air lock from forming in the cooling system, remove the hose from the throttle body after loosening the clamp. Pour antifreeze into the expansion tank in a thin stream.
At the same time, watch the end of the disconnected hose - as soon as liquid flows from it, put it in place and tighten the clamp.
Video: replacing the radiator of a VAZ 2114 stove
https://youtube.com/watch?v=JYC8ijuYJdg
During the operation of a car, situations arise that any car enthusiast can resolve independently. Replacing a stove radiator is precisely this type of operation. As you can see from the article, doing this yourself is quite simple. The main thing is that after removing and installing the radiator, you do not have any unnecessary parts left, and all screws and clamps are tightly tightened. Good luck on the roads!
Removing the old and installing a new radiator
Before replacing a leaking heater radiator, you need to prepare all the necessary tools, namely:
- hacksaw blade for metal;
- a set of socket and open-end wrenches;
- pliers, screwdriver;
- cut plastic canister or basin for antifreeze.
The first and main question: how to remove the stove on Kalina, so as not to disassemble the entire dashboard? First, you need to empty the cooling system by draining the liquid into a prepared container. Then the air filter is disconnected and removed along with the pipe, and the battery is also removed.
This opens up access to the pipes leading to the interior heater. They must be removed from the stove fittings, draining the remaining antifreeze into a basin.
Next to the fittings you can find a nut that secures the protective plate located inside the passenger compartment. It also needs to be unscrewed so that later the plate moves freely and does not interfere with dismantling the stove. Then you need to move into the interior and dismantle the following parts:
- Accelerator pedal. It is held on by 3 bolts; first you need to disconnect the cable and bend the plate.
- Side decorative panel.
- Plastic side cover of the stove.
- Brake pedal. There is no need to remove it entirely, just remove the metal rod so that the pedal rises.
Since the heater fittings stick out in the engine compartment, and its frame does not allow the radiator to be pulled out in the desired direction, for freedom of action it is necessary to cut out a piece of plastic from the side.
To do this, use a hacksaw blade to make the cut neat. After which the stove moves back a little and towards the driver's door, being removed from the socket. The new heater is installed in the same way, and the opening is sealed with plastic that was cut out earlier. The rest of the assembly is done in reverse order.
When the radiator is removed, it is possible to change the heater damper gear motor in case of incorrect operation. The gearbox and damper position sensor are manufactured as one unit, attached with 3 screws. You need to unscrew them, disconnect the gear motor and install a new one. Also, with the radiator removed, the heater tap can be easily replaced if such a need arises.
Replacing the stove motor
First of all, we purchase a new engine. The cost of the motor varies in the price range from 1500 to 2500 rubles. Most Lada Kalina owners prefer products. However, this is a subjective opinion and the choice, of course, is yours.
Quite often there are sellers who want to make money on the trust and simplicity of people. They tell customers that supposedly the electric motor for Kalina with air conditioning costs much more than for a regular one. In this case, the difference can reach 1000 rubles! If you suddenly come across such a “specialist salesperson” in a store, you shouldn’t trust him. The engine on the Lada Kalina with air conditioning is the same as the regular one. Accordingly, there cannot be a difference in price.
Replacing the motor should be carried out in a well-lit place. All parts are neatly folded in the order in which they were removed from the car. This simple measure will allow you to quickly install all components and assemblies in place after replacing the stove motor.
To work you will need:
- a set of flat and Phillips screwdrivers;
- set of heads;
- a set of keys.
- lamp;
- pliers.
Sequencing:
- dismantle the driver's seat (freeing up space for work);
- remove the glove compartment;
- remove the side trim of the passenger compartment pillar;
- unscrew the fastening bolts and move the instrument panel to the side, fix it;
- go around the block retainer from below and disconnect the power plug from the heater motor;
- remove the engine and replace it with a new one (When installing a new unit, you need to fix the impeller axis with glue so that it does not accidentally fall out).
As a rule, in order to remove the motor, you have to tear out several pieces of insulation. The whole job takes about 3 hours.