The VAZ 2107, as a representative of the VAZ “classic”, has a fairly loud cooling fan. The moment of its connection cannot be missed. The vibration of the body increases, a hum is heard from under the hood, if the turn-on time coincides with an increased load on the electrical network (blinking turn signals when the low beam is on, heated rear window) - then the arrow of the load on the power network begins to slide into the red zone.
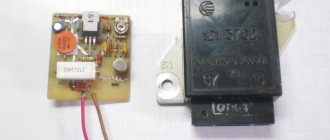
And even (if the carburetor is poorly adjusted), the emergency oil pressure light may start to burn. The cooling scheme of the VAZ 2107 is such that under normal conditions the fan does not turn on immediately, but only when a certain temperature in the system is reached. To determine this “convenient temperature moment” there is a sensor, or a fan on/off controller.
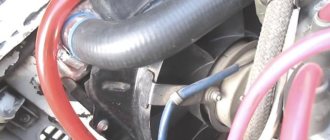
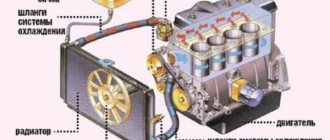
The location of the controller on the radiator is not accidental: after all, first the “small circle” of antifreeze is heated, then the cooling circuit provides for the passage of liquid through the radiator, the work of which is intensive heat exchange. And only when the temperature rises above 92 C°, the fan switch sensor is triggered.
About forced fan activation
The cooling circuit does not provide for constant fan operation. But in some cases it is possible to implement the principle of “forced fan connection”.
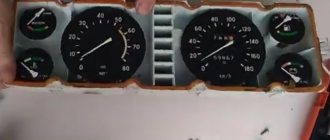
This is done if the sensor has failed and replacement on the road is impossible. You can check this as follows: the engine temperature controller has already shown the vertical position of the needle on the dial, it persistently “climbs” into the red zone, and the fan is silent and does not turn on. If this is the case, then there are most likely two possible reasons:
- The sensor itself, which turns on the fan of the VAZ 2107, has failed. This situation is more favorable than that described below. Firstly, the cooling circuit is complete, and the radiator works properly. This means that most of the heat is removed. There are two ways out of this situation; the following scheme of action is proposed:
- If there is a straight road ahead and the car will move without stopping, then you can monitor the temperature scale. In case of traffic jams or traffic lights, you can turn on the stove at full power at double blowing speed.
- You can decide to install forced fan activation. To do this, two contacts are pulled out of the controller and short-circuited. Attention! Before this, you must first remove the “minus, ground” from the battery. After the wires are short-circuited, the negative terminal is connected again, and the Carlson begins to work constantly, regardless of the engine temperature and the vehicle’s driving mode. After stopping the VAZ 2107, the fan will work until the battery is discharged, so after stopping you need to open the hood and disconnect the negative terminal.
This is very annoying for owners of a VAZ 2107 with central locking and an alarm system, so you can disconnect the fan wires, however, then they need to be reconnected and insulated. You also need to find a place for them in the engine compartment so that they do not get under the working impeller blades, because the layout of all the wires in the engine compartment is supposed to be in harnesses. Of course, it’s inconvenient to drive like this for a long time, because constantly opening and closing the hood to connect and turn off will get boring. In addition, no one will like constant noise, vibration and increased wear on the fan axis bearings. Forced activation is an emergency method.
How to remove and install a new sensor
After purchasing and checking the controller, you need to do the following:
- Disconnect the negative terminal from the battery;
- Remove the cover of the cooling distribution tank and the cap from the radiator;
- We substitute the container, turn off the tap on the radiator and drain the antifreeze;
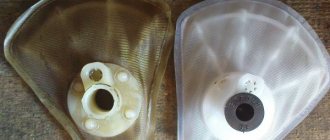
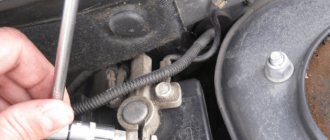
- Having removed the wires from the sensor, use a 30mm wrench to unscrew the sensor by the large brass nut;
- Next, the sensor is removed. Be careful not to drop the copper O-ring on the sensor.
After this, the sensor is replaced with a new one. When installing, do not forget to coat the contact areas of the sensor and radiator with a layer of high-temperature sealant before screwing the sensor. This must be done dry. This scheme of action allows you to avoid leakage of antifreeze.
- Now you need to tighten the cap on the radiator, fill in the collected antifreeze, and, by connecting the negative terminal to the battery, check the operation of the sensor and fan. Do not forget to push through the air pockets in the cooling lines of the VAZ 2107.
That's it, you can hit the road! The fan will run.
Hello everyone, today I would like to talk about why the fan on a VAZ 2107 car does not work. As you probably already know, two types of engines were installed on VAZ 2107 cars: a carburetor and an injector. Therefore, the voltage supply circuits to the cooling fan motor will be different. On a VAZ 2107 injection engine, a two-contact fan sensor, which is located in the upper pipe, when the coolant temperature rises above that for which it is designed, it should send a signal to the computer. The electronic control unit, having analyzed the signal, turns on the fan through a relay.
Therefore, the first step when troubleshooting is to remove the connector from the sensor. If the fan itself is working, then it should work. By inserting a load in the form of a light bulb into the connector terminals, it should stop. With this technique you check the circuit of the fan motor of a VAZ 2107 car. Therefore, if necessary, the sensor will have to be replaced.
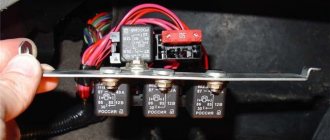
How to check a fuse
In the mounting block of the engine compartment there is a fuse responsible for the operation of the fan. Its designation on the power supply diagram is F-7, nominal value is 16A. Checking and replacing the fuse is carried out according to the instructions:
- Remove the negative terminal from the battery. Remove the mounting block cover.
- Pull the F-7 fuse out of its seat. Using a multitester, check it by connecting the probes to the contacts.
- If the device is blown, buy a new fuse and replace it with a new one.
This is the simplest repair option, which is carried out when the cooling fan does not work.
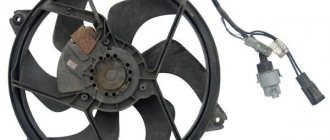
Electric cooling fan operation
The design of the “classic” cooling system does not provide for constant fan operation. It should turn on only after reaching a certain coolant temperature, we discussed this in more detail in this article. The fan switching sensor for the VAZ 2107 injector is installed in the radiator. Therefore, the fan turns on after the radiator itself can no longer cope with the cooling task. This is implemented as follows:
- After heating the antifreeze in the “small circle” of cooling, the thermostat opens.
- The coolant circulates in a “large circle” through the radiator, which ensures effective heat exchange with the environment.
- If the radiator does not “cope” with cooling, the contacts of the fan sensor close and it begins to intensively drive air flow through the radiator, increasing heat transfer.
If the sensor fails, the fan turns on when it overheats and the coolant may boil.
Where is the fan switch located?
For all outdated modifications of the “classic”, the sensor is located on the cooling radiator housing. Bottom right to be precise. From the outside, it looks like a brass nut “30” with two contacts out. Raise the hood and look at the back of the radiator. you will definitely see him. The principle of operation of the sensor is very simple. The thermocouple reacts to an increase in temperature, closes the contact, and voltage is supplied to the fan. For vehicles with controlled fuel injection, the fan is turned on by a command from the electronic unit based on data received from the sensor. In other words, the ECU itself controls all processes. But where is the fan switching sensor located on injection-powered “sevens”?
READ How to install a radio in a VAZ 2107
VAZ 2107 fan sensor malfunctions and performance check
It is easy to find out whether the VAZ 2107 fan switch sensor is working properly. The fan motor is quite noisy; you can hear it turning on even from inside the cabin. If the temperature gauge shows more than 90 degrees, but the fan does not turn on, you should check the sensor.
First you need to localize the source of the problem. If the antifreeze is hotter than 90 degrees, but the bottom of the radiator remains cold, the problem is the thermostat, not the fan. It is not possible to replace the thermostat on the road. To get out of the situation, you can increase the cooling by fully opening the heater damper and turning on its fan. Of course, such a solution will be extremely uncomfortable in the warm season, but, if you’re lucky, it will make it possible to get to the repair site without stopping. If this is not enough, you will have to make stops along the way to allow the engine to cool.
Another reason for overheating is low coolant level. In this case, it is necessary to quickly find and eliminate the leak and add antifreeze to the system. If it is not there, you can add water to the system. But then, as soon as possible, it is necessary to drain the liquid from the cooling system and add antifreeze.
Forced fan activation
If the VAZ 2107 fan sensor is broken, it is quite possible to drive on a good road without noticing it. But as soon as you drive onto a country road or get into city traffic jams, the engine will start to overheat. Replacing the fan sensor is not very difficult, but requires draining the coolant. Even if you have a spare sensor at hand, replacing it on the road is problematic. There is an easier way out of the situation.
The following operations must be performed:
- disconnect “mass”;
- remove two wires from the sensor terminals and connect (“short-circuit”) them;
- insulate the exposed contacts of the connected wires;
- connect ground.
In this case, the fan will run continuously. To turn it off, you will have to disconnect the ground and disconnect the contacts.
If you have already experienced problems with the fan sensor on the road, you can install a forced fan circuit on the car that operates in parallel with the sensor. To do this, just connect a couple of wires to the terminals going to the sensor contacts and stretch them into the engine compartment. Install a separate button (toggle switch) on the dashboard and connect the wires to it so that you can close them if necessary.
In this case, if the sensor malfunctions, there will be no need to crawl under the hood to force the fan to start.
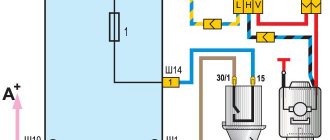
Explanation of symbols
Knowledge of the definitions of the 2107 Lada electrical circuit will help you quickly locate the required wire, diagnose it, identify and fix the malfunction. Of course, when replacing the cabin filter or changing the oil, such information will not be useful, but in specialized matters, deciphering the symbols will significantly simplify the repair process.
- 1 – head lights VAZ 2017;
- 2 – side turn signals;
- 3 – battery;
- 4 – starter activation relay;
- 5 – carburetor electro-pneumatic valve;
- 6 – internal carburetor switch;
- 7 – generator system 37.3701;
- 8 – gearmotors for headlight cleaners*;
- 9 – fan motor activation sensor;
- 10 – electric motor of the engine cooling fan;
- 11 – sound signals;
- 12 – ignition distributor;
- 13 – spark plugs;
- 14 – starter;
- 15 — coolant temperature indicator sensor;
- 16 – engine compartment lighting;
- 17 – critical oil pressure indicator sensor;
- 18 – warning lamp for insufficient brake fluid level;
- 19 – windshield wiper electric motor;
- 20 – power system valve control unit;
- 21 – ignition coil;
- 22 – electric motor of the headlight washer pump*;
- 23 – electric motor of the windshield washer pump;
- 24 – mounting block;
- 25 – windshield wiper relay;
- 26 – hazard warning and direction indicator relay;
- 27 – brake light switch;
- 28 – reverse lamp switch;
- 29 – ignition relay;
- 30 – ignition switch;
- 31 – three-lever switch;
- 32 – alarm switch;
- 33 – plug socket for a portable lamp**;
- 34 – heater heater fan switch;
- 35 – additional switch for the heater electric motor;
- 36 – indicator lamp for turning on the heated rear window;
- 37 – indicator lamp for insufficient brake fluid level VAZ;
- 38 – signaling unit;
- 39 – electric motor of the stove fan;
- 40 – glove compartment lighting lamp;
- 41 – lamp switches on the front door pillars;
- 42 – switches for warning lights of open front doors***;
- 43 – alarm lights for open front doors***;
- 44 – connecting block;
- 45 – cigarette lighter;
- 46 – hours;
- 47 – instrument lighting switch;
- 48 – diode for checking the serviceability of the warning lamp for insufficient oil pressure and brake fluid level;
- 49 – fuel level indicator;
- 50 – indicator lamp for insufficient gasoline level (fuel reserve);
- 51 – speedometer;
- 52 – control lamp for turning on the direction indicators on the dashboard;
- 53 – warning lamp for the carburetor air damper opening;
- 54 – indicator lamp for battery charge indicator;
- 55 – switch for signaling that the carburetor air damper is slightly open;
- 56 – instrument cluster;
- 57 – econometrician;
- 58 – lamp switches on the rear door pillars;
- 59 – coolant temperature indicator;
- 60 – tachometer;
- 61 – handbrake indicator lamp;
- 62 – low oil pressure indicator sensor;
- 63 – indicator lamp for high beam headlights;
- 64 – signaling device for turning on dimensions;
- 65 – voltmeter;
- 66 – parking brake warning switch;
- 67 – external lighting switch;
- 68 – rear window heating switch;
- 69 – rear fog light switch with on indicator*;
- 70 – fog light circuit fuse;
- 71 – interior lighting lamp****;
- 72 – rear lights;
- 73 – fuel level indicator and fuel reserve sensor;
- 74 – pads for connecting to the rear window heating element*;
- 75 – license plate lights.
* Some models have headlight and windshield wipers installed together. **Models up to 2000. ***Cars that came off the assembly line before 1998. ****One lamp in the center of the roof (before 2000) or two lamps located in the body pillars after this date.
Replacing the VAZ 2107 fan sensor (injector)
The procedure for replacing the sensor is as follows:
- disconnect the ground wire from the battery;
- remove the radiator cap and expansion tank cap (to avoid steam burns, do not open the cap on an overheated engine);
- place a container under the radiator drain hole;
- unscrew the plug (or turn the drain valve) and drain the antifreeze from the radiator;
- remove the wires from the sensor contacts;
- Unscrew the VAZ 2107 fan sensor (injector) with a wrench;
- check the condition of the copper sealing washer under the sensor and replace it if necessary;
- screw in the new sensor (don’t forget to put the sealing washer);
- pour antifreeze into the cooling system (it is better to pour new one, but you can also use previously drained one if it is clean and transparent);
- connect ground to the battery and start the car;
- with the engine running, press the rubber hoses of the cooling system with your fingers to remove air pockets;
- install the radiator cap and expansion tank cap;
- Warm up the engine to operating temperature and make sure the sensor is working.
After this, the car is ready for use.