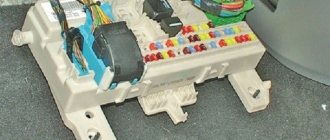
Mounting block
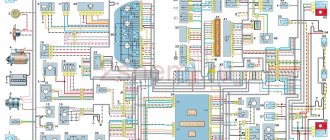
Lada Vesta fuse diagram
Interior mounting block
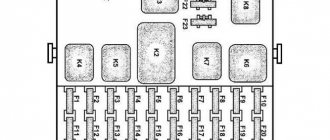
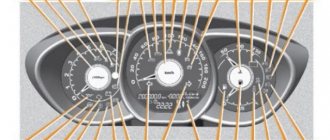
Schematic location of fuses
Body connector
Layout of buttons on the steering wheel
Lada Vesta is equipped with many electrical appliances, each of which is vulnerable to voltage surges. To protect consumers, there is a fuse in the circuit of each of them, and if for some reason it blows, it will have to be replaced, otherwise the electrical appliance will not work. Just first you need to find the Lada Vesta fuse box.
Why are fuses needed?
Fuses are elements of an electrical circuit that protect devices from voltage surges. They consist of a plastic case, two contacts and a working element.
The principle of their operation is simple: each element has an operating voltage, and if this value is exceeded, it will immediately burn out and the circuit will open. In fact, the protective component takes the blow, protecting electrical appliances from damage. Its purchase is much cheaper than replacing one or more consumers, which, among other things, can affect the control of the car.
Interesting!
The cigarette lighter in Lada Vesta has a fuse that blows more often than others. Usually the reason for this is connecting devices with high current consumption or several devices at once through a tee.
What does a blown fuse cause?
A blown fuse leaves the circuit it protects without power. If the fuse link, for example the DRL, is burned out, then the daytime lights will not turn on. In this case, the fuse must be replaced and the ignition must be turned on again. In most cases, the device will work properly again. The use of wire (bugs) can even lead to a car fire, so its use is not recommended.
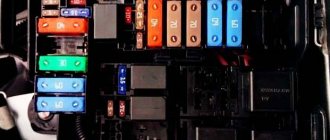
Lada Vesta fuse box with description (engine compartment
The required box is located above the battery, on the right side of the air filter. On the cover of the unit you can see warning signs in the form of a crossed out figure of a man with a hose and a lightning bolt.
To remove the cover, bend the two latches at the top and bottom. Be careful because... they are very fragile.
Schematic layout
The contents of this mounting block are as follows:
Mounting block
The current limit (amps) is indicated on each component. The Lada Vesta fuse diagram under the hood looks like this:
Lada Vesta fuse diagram
Which circuit each fuse belongs to and which consumer it is responsible for can be found in the table below.
Fuse Circuit Chart Fuse Chart Note: Depending on the configuration, some items may not be present.
Table with the designations of the relays that are present in the engine compartment block:
Relay designation table
Why do fuses blow?
If the insert burns out again, then there is some problem in the electrical circuit. This can happen for three reasons:
- Defective fuse. False alarms often occur with fuse links from cheap Chinese manufacturers. If the filament burns out, it is enough to simply replace the insert with a new one, but you should be prepared for the fact that replacing the fuse with a similar one after some time will lead to a similar result.
- Overload in the circuit. For example, the use of too powerful devices in the cigarette lighter creates an overload - the current in the electrical circuit exceeds the fuse rating. You should be careful with such devices as they can cause a fire.
- Short circuit. The car wiring may be interrupted by metal parts. For example, if the headlight circuit with plus and minus rubs against some metal mount or bracket in the engine compartment, a short circuit will occur: the current in the circuit will increase sharply, and the fuse-link will burn out. Often, short circuits in circuits occur as a result of unprofessional intervention when installing additional equipment, for example, a car alarm.
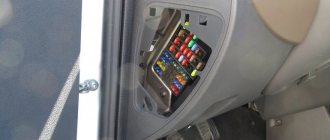
Lada Vesta fuse box with description (interior)
This mounting block is located in a place familiar to drivers - near the left foot. Actually, the space around the trunk opening button and the headlight adjustment control is the cover of the mounting block.
First, remove the plastic clips (nails) that secure the cover to the upholstery. One of them is located on the side of the ignition switch, the other is in the lower left part of the cover (may be absent on some cars). Next, turn the 3 plastic handles at the bottom and pull the lid, releasing all the holders.
Schematic layout
In the interior mounting block you will see the following picture:
Interior mounting block
On a note!
In the lower right corner there are spare fuses for the Lada Vesta.
Schematically the block looks like this:
Schematic arrangement of fuses It is deciphered as follows: Explanation of spare fuses Explanation of spare fuses Explanation of spare fuses Explanation of spare fuses Explanation of spare fuses Relays that are present in the cabin: Designations of the snout in the cabin Body connector Diagram of the buttons on the steering wheel
Why are relays needed in the Vesta mounting block?
They are used in the same mounting block as fuses and are needed for switching high-precision networks with low-current buttons.
Most of the buttons used inside the car have small contacts, otherwise they would be large and take up a lot of space on the panel. In order to close a circuit with such buttons, for example, a compressor clutch, it is necessary to use more powerful contacts.
Relays have such contacts. This device is an electromagnet with a contact and a core. The last two have a wider contact area, which means the switched current is greater. The button closes the relay coil and the magnet is activated, closing the contact and the core. In this way, control of a powerful consumer by a button with small contacts is achieved.
Relays do not have a protective function and do not blow out like fuses, but they can fail over time. When a car relay breaks down, it begins to crackle or its coil simply does not work. In this case, it is recommended to simply replace the faulty element. To do this, grasp the housing with your fingers and pull, rocking to the side, to pull it out of the socket.
Replacing the fuse
In one of the tables, find a device that has stopped working - next to it there will be a designation of a supposedly burnt-out element. At the same time, you will understand where the fuse box is located.
Open the block cover, find and remove the problematic fuse, following the diagrams. The same algorithm applies to a failed relay.
If the contact inside is broken, it means it has burned out. However, this is not always noticeable, so it is better to do a continuity test with a tester.
Important!
Before replacing, be sure to find out the cause of the burnout.
The new protective component must match all the characteristics of the old one: the same format, color and current limit designation.
How to select and replace the fuse correctly?
When an insert fails or burns out, it must be replaced. But it should be understood that such protection does not work just like that. If, after replacing the fuse, it blows again, do not attempt to replace it again. Most likely, there is a malfunction in the vehicle's electrical system or the insert rating is incorrect.
There are several fuse ratings that are used to protect a wide variety of electrical circuits. For example:
- 15A – can protect the cigarette lighter circuit;
- 50A – designed for a powerful cooling fan;
- 5A – automatic transmission control unit;
The more powerful the device, the higher the current that the fuse can pass through. If you install a 40A insert instead of 5A, the protected device will burn out, since the speed of such an insert will be too slow. You cannot use fuses and vice versa - instead of 40A, 5A. In this case, the insert will burn out when the consumer is turned on for the first time, since the current consumed will be too high. This is why it is very important to use inserts according to their rating. A special table is used for this.
To change the fuse, you need to follow a few simple steps:
- Diagnose the malfunction. For example, the radio does not work.
- Open the fuse cover in the passenger compartment and find the desired insert. To do this, you need to unfasten the lower part of the panel located under the steering column by removing the clips and pulling the panel towards you.
- Using pliers, pull out the burnt fuse and install a new one in the same way.
- Replace the cover.
Attention! The use of wire is prohibited even as a temporary alternative to a fuse.
Before changing the insert, you must check it. To do this, you can use a multimeter in continuity check mode or look at it visually.
Broken cigarette lighter
The next reason for failure may be a breakdown of the outlet itself. This may be indicated by the backlight not working when the side lights are turned on. For diagnostics, you will have to remove the device from the instrument panel. It is powered by three wires:
- Black – mass;
- Blue – backlight power;
- Red – plus on the socket.
All of them must be securely fixed to the terminals. If a separation is detected, the detached wire should be soldered in place, according to the electrical diagram.
Lada Vesta. REPLACING FUSES
When replacing fuses, you must use new fuses that are marked by current in accordance with Table 1.
To avoid melting of the insulation of the wires and the housing of the mounting block when operating the vehicle, you should use only types of fuses approved for use by AVTOVAZ PJSC, according to the table.
Lada Vesta. Mounting block
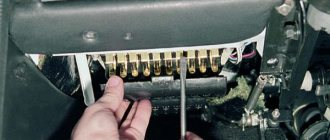
To access the mounting block located in the instrument panel, do the following:
— turn the plastic handles (3 pieces) holding the unit cover from below;
— pull the bottom of the cover, disconnect its upper holders to the instrument panel and remove the unit cover.
A faulty fuse is determined by the failed electrical circuits protected by this fuse, in accordance with Table 1. The current strength for which the fuse is designed is determined by the failed electrical circuits, in accordance with Table 1. The current strength for which the fuse is designed is indicated on its left side, and the fuse number is indicated on the body of the mounting block.
If the fuse fails again, contact your dealer to find out and eliminate the reasons that caused it to melt.
Electrical circuits of the interior mounting block
Table 1
Warning
The presence of fuses depends on the degree of electrical equipment of the vehicle.
Interior mounting block relay
table 2
| Relay | Denomination | Chain | Purpose |
| K1 | 70/50A | KI5R | Power supply for lighting and seat heating (not luxury/luxury) |
| K2 | ZOA | Free | |
| short circuit | ZOA | Heated rear window | |
| K4 | ZOA | Front windows | |
| K5 | 40A | Interior heater fan | |
| KB | ZOA | Rear window lifter | |
| K7 | 20A | Fuel pump module | |
| K8 | 20A | ACC (12V socket power supply) |
The presence of a relay depends on the degree of electrical equipment of the car.
Lada Vesta. Mounting block motor standard/norm/lux
Table 3
Warning
The presence of fuses depends on the degree of electrical equipment of the vehicle.
Lada Vesta. Engine compartment mounting block relay
Table 4
| K21 | Heated windshield | ZOA | Heated windshield relay 1 |
| K22 | Heated windshield | ZOA | Heated windshield relay 2 |
| K23 | ZOA | Starter relay | |
| K24 | 20A | Horn relay | |
| K25 | 20A | Alarm horn relay | |
| K27 | 20A | Main relay KSUD | |
| K 28 | Air conditioner | 20A | A/C compressor clutch relay |
| K 29 | Engine 11189 | 40A | Cooling fan relay |
Warning
The presence of a relay depends on the degree of electrical equipment of the car.
Fig.1. Location of fuses and relays in the engine compartment mounting block
Rice. 2. Location of fuses and relays in the interior mounting block
Rice. 3. Fuse box cover
Fuse box cover
To improve the fastening properties of the fuse box cover, a trim holder clamp is used (Fig. 3). Before removing the fuse box cover, you must first remove the trim holder retainer.
After installing the fuse block cover on the standard mounting points, in accordance with the “Operating Manual for the LADA Vesta and its modifications”, it is necessary to additionally secure it with the trim holder clamp, installing it in the hole in the fuse block cover.
Video on the topic “Lada Vesta. REPLACING FUSES"
Lada Vesta. Cigarette lighter fuse
https://youtube.com/watch?v=eSW_JQyzuuc
Lada Granta - Mounting block (fuses and relays)
Fuse box of Lada Granta. Mounting block.
Visual inspection of the fuse
Lada Vesta SV cross volume.
technical characteristics of Lada Vesta sw cross. clearance of the Lada Vesta St. Cross It is believed that the surest way to check the fuse is to visually inspect it for a break. To do this, the fuse is pulled out of the block and then examined in the light. If the wire inside is broken or there are burnt marks on it, then the circuit is broken due to the fuse.
This method is applicable for glass or transparent plastic fuses, which are the majority. However, the method has a significant disadvantage - it is based solely on human verification and does not have confirmation by a device. Visual inspection sometimes turns out to be erroneous, and it is better to use a tester to determine the integrity of the fuse.