02 September 2015 Lada.Online 25 218 0
The windshield of a car is replaced if it becomes scratched, scuffed or cracked. The process is not complicated, but requires knowledge of certain skills. Replacement of fixed body glazing for all Lada cars (Granta, Priora, Largus, Kalina, Niva 4x4, Vesta or XRAY) and foreign cars is similar, the only difference is in the requirements for glue.
Design features and when it may be necessary to replace the windshield on a Priora
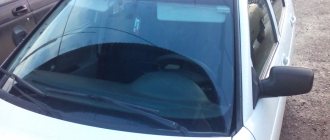
Unlike the Lada model range, starting from the VAZ-2101 and ending with the VAZ-2109, on the Priora the windshield is not attached with a rubber seal, but “sits” on the sealant. This method is modern and has some advantages. In addition to the aesthetic appearance, installing glass with sealant increases the reliability of its fastening. It is impossible to squeeze it out of the passenger compartment with your feet, since it is securely connected to the body part. However, in the event of an accident, you can break the glass itself to get out through the front.
The need to remove the windshield on a Priora arises in a number of the following cases:
- When it is necessary to replace a product due to the unsuitability for further use of the device installed on the vehicle. The reason for this may be damage to the glass in the form of chips and cracks.
- If the seal of the product has been broken. This can be determined by the corresponding signs of drips in the interior in the area where the device connects to the body part. Such phenomena often occur when installing a windshield without following the instructions.
- When to replace gutters. If these parts were installed poorly from the factory, they may come off during vehicle operation. To install them correctly, you will need to remove the windshield.
The need to dismantle the device may also arise if traces of corrosion appear in the front part of the roof or on the side pillars. To prevent further spread of negative consequences, the metal should be cleaned and processed. Usually in such cases, the areas of the body to which the windshield is attached are also affected.
If there is a need to replace the windshield on a Priora, then it is not at all necessary to visit a special service station for this. It is quite possible to do the work yourself, provided you have the appropriate tools. We will consider in detail what tools and materials will be needed to remove and install the windshield on the Lada Priora.
This is interesting! Often on a Priora the windshield is damaged during the removal and replacement of the windshield wiper trapezium.
Life hack: heated windshield of a Lada Priora car
You have to strictly monitor the cleanliness of the windshield - at different times of the year it becomes covered with raindrops, snow, dirt or fogs up. It’s impossible to move like that and just scary. Therefore, a modern car is ready for anything, and the installed devices work to quickly clear the windshield of “interference.”
The windshield of a Lada Priora car is installed with additional equipment that helps the driver. And for convenience, a heated element is installed. In order to restore its functionality in time, it is necessary to monitor the windshield heating relay and sometimes, during operation, it may be necessary to replace the windshield on a Priora.
It is also considered a good idea to change windshield wipers to those that clean a larger area of glass - this concerns the issue of road safety. The driver’s task is to do everything to ensure that visibility from his workplace is clear.
Standard glass on the Priora - article number and price The heated windshield for the Lada Priora car was manufactured in several versions by the BOR plant and was inherited by it from the VAZ-2110. Catalog number: 2110-05206016-15. Price – about 2,500 rubles. Priora has the following views:
- With rain sensor;
- With heating (a second option is also available – with a rain sensor).
- Standard equipment.
At the same time, a heated windshield on a Priora can be purchased immediately with sun protection.
What is needed to replace the windshield on a Priora
On the Priora, the windshield is mounted on a sealant, which somewhat complicates the process of dismantling work. As for installing a new product, it is much easier to do this than, for example, if it were installed on a rubber seal (like on a classic). To dismantle the windshield from a Priora, you will need the following list of tools:
- string - it is important to use a string, and not a fishing line or ropes;
- string holders - special handles;
- awl for removing the windshield. It is distinguished by a specific design - a flat surface of the knife with a cutout in the end part;
- flat-head screwdriver for removing standard glass displacement limiters.
Having such a tool at your disposal, you can not only remove the windshield from the Priora yourself, but also carry out such work at a professional level. However, as you understand, having a special tool does not mean that the work will be done correctly. That is why below are detailed instructions on how to remove the windshield on a Priora.
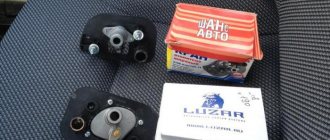
After dismantling, you will need to install a new product. To implement this process you need the following materials:
- adhesive-sealant on which the windshield will be glued (special set);
- kit for replacing the windshield on a Priora. It includes such elements as side gutters or edging, top sealing rubber and glass movement limiters;
- degreaser;
- new windshield.
After preparing a complete list of tools, you can resort to implementing actions. To do this, we will consider in detail the process of how to replace the windshield on a Priora yourself.
Replacing the windshield of Lada Priora
We are pleased to offer to your attention a rather rare item: a Lada Priora heated windshield. The heating on this glass is made in the form of spiral threads that cover the entire area of the windshield, making heating fast and efficient. Replacing a Priora windshield with full heating is quite a difficult thing. After all, when replacing, under no circumstances should the electrical circuit of the new Priora windshield be damaged; if damaged, it cannot be restored. In the event that the replacement of a Priora windshield with full heating is carried out by our specialists, we guarantee 100% efficiency of the heating, we will preserve expensive moldings in any case, we give an unlimited guarantee against leaks and peeling.
If you decide to replace the windshield of a Lada Priora with heating in our service, you are guaranteed to spend exactly the amount that our managers will announce without any overpayments and, importantly, the whole procedure will take no more than an hour!
By installing a Lada Priora windshield with heating / heating, you get the following advantages: - the fastest defogging of the Priora windshield - the fastest defrosting of the windshield in winter - the best visibility in any weather through the windshield of Priora heated windshields - you do not need to use a scraper in winter, you you scratch the glass less, which means a longer service life of the glass - this is a really cool tuning that will appreciate your surroundings. Next, we will list the prices for a standard windshield replacement on a Priora:
By purchasing and installing a Lada Priora windshield with KMK heating, you get strong and wear-resistant glass compared to other manufacturers.
In our store you can buy Lada Priora windshields made in Russia and China. All glass offered by our managers is in stock; if the glass is not in stock, it can be delivered within 24 hours by pre-order.
Windshield Lada Priora price:
Replace Lada Priora windshield
You can replace the windshield of a Lada Priora in our company with a lifetime guarantee, provided that you do not have a damaged car and there are no traces of rust on the body in the area of the windshield. But even if your car has the above defects, this will not prevent our specialists from qualitatively replacing your Lada Priora windshield heating with a long-term guarantee against leaks and peeling. Check the cost of glass with our managers by phone.
From us you can buy Lada Priora windshield from world manufacturers FYG, Benson, KMK, KSB, BOR, etc. Replacing the windshield of a Lada Priora in our company takes about an hour, after which the vehicle is allowed to be used.
Replacing a Lada Priora windshield costs from 1,800 rubles if you purchase the glass from us. If you bring your own glass, the cost of installation will be from 2000 rubles.
The cost of installing a Lada Priora windshield depends on several nuances: the presence or absence of molding on the glass, as well as a rain and heating sensor.
In 2012, we were the only company that operated from the Bor Glass Factory. We were the only ones who installed and can still replace the windshield for a Priora with full heating/heating and a lifetime warranty on the work performed under the best conditions! Unfortunately, replacing the Priora windshield is still a big problem, because... Deliveries from the factory of these products are strictly limited. And many companies do not even know that the Lada Priora was equipped with heated windshields and even a rain sensor. We will briefly describe how to replace the windshield on a Lada Priora.
First you need to remove the wipers and plastic from the bottom of the glass, then carefully unclip the trim of the passenger compartment pillars along the glass.
Next, using an 18mm knife, we begin to cut off the Priora windshield from the inside, so as not to damage the side moldings. Actually, this is the point of cutting with a knife in order to preserve expensive moldings. Carefully pull out the rubber molding on top; if you can’t pull it out, then don’t blame me, but you won’t be able to replace the windshield on a Priora competently and cheaply. And this is not meant as an insult, it is a purely mathematical calculation. Glue and primer are the cheapest, poor quality 400 RUR + factory moldings 1500 RUR. + little things in the form of tape, some kind of key or screwdriver, 300 rubles, and + a lot of wasted time without a 100-year final result. You decide. If everything is taken out, we begin to cut off the Priora windshield like this
Instructions for replacing the windshield on a Priora: how to dismantle it
First, let's take a closer look at the process of removing the windshield. Why isn't it easier to knock out the windshield? After all, it is mounted on a sealant, and even if the main part of it is removed by destruction, you will still have to remove fragments around the perimeter. This will be much more difficult to do than cutting glass using a string.
It should also be noted that the dismantling process is not at all difficult, and it is quite possible to cope with it yourself. To do this, it is important to arm yourself with the necessary tools and get down to business. To remove the windshield from a VAZ-2170-74 Priora, you need to do the following manipulations:
- Before you begin, you should take care of safety precautions. Be sure to wear safety glasses when cutting the glass, as while cutting the glass a piece may break off and fly in your direction. In addition to glasses, it is also important to use gloves.
- Remove the hood. This will greatly simplify all manipulations. However, this is not at all necessary to remove the windshield. If you plan to carry out work without removing the hood, then it should be covered with thick fabric so as not to be scratched during the work.
- Remove the right and left parts of the frill (plastic part under the windshield). First remove the wiper arms along with the windshield wiper blades.
- Remove gutters. It is almost impossible to remove them without damage, so you should definitely buy new ones first, which will be installed along with the glass.
- It is also important to dismantle some elements in the interior. In particular, you need to remove the plastic trim of the side pillars.
- There is no need to completely remove the headliner, but you should definitely loosen the fastening of the front part and move it to the side.
- If possible, move all wires to the side so that they are not damaged by the string during the process of cutting the glass.
- Remove the standard glass displacement limiter with a screwdriver.
- Next, we move on to directly removing the windshield, for which you will need to first disconnect it from the sealant. A steel string will help us in this matter. We insert one part of the string into a special holder (you can use a screwdriver instead of a holder).
- The second part is attached to the end of a forked awl.
- Next, we go into the interior of the car, and using an awl, we pass the string through the glass in the lower part in the center (or in any other place on the windshield, but in its central part).
- The photo below shows what this procedure is.
- When the string is passed through the glass, all that remains is to attach the holder to its other end, and then carry out the appropriate manipulations around the perimeter of cutting or sawing out the sealant (separation of the glass from the body).
- The sealant should be cut off slowly and carefully, avoiding damage to the glass. Usually this procedure takes 20-30 minutes. In this case, it is important to move sequentially: starting from the center from the bottom, you need to reach the corner, and then, without removing the strings, reach the top. After this, cut off the sealant from the top, go down to the side and from the bottom reach the center.
- When you move in the upper part, be sure to control the position of the string so as not to cut off the paint on the roof, otherwise this will subsequently lead to the accelerated appearance of “saffron marks”.
- After successfully completing these manipulations, all that remains is to remove the windshield from the Priora.
It is recommended to invite an assistant to remove it from the car body. In addition, it should be lifted using special clamps with suction cups. This will eliminate the possibility of it slipping out of your hands.
The video below shows how to dismantle the windshield on a Priora with your own hands without outside help.
Consider the sequence of work and follow all recommendations. After dismantling, before installing a new product (or one that has been removed), you need to carefully remove the old sealant (the most difficult stage).
How much does a windshield cost on a Priora: types and price
On average, in Russia the price of a windshield for a VAZ Priora ranges from 1,800 to 11,000 rubles . When purchasing and installing glass, you need to consider some points.
The windshield, like many other components and parts of the car, is a consumable material and must be replaced periodically during operation. The glass can be deformed in the event of a stone flying out from under the wheel of a car in front, a sudden influx of hot air from the heater in winter, or it can crack on its own due to shaking or strong vibration when the car gets into a hole. In such cases, it is better to replace the glass, since further operation will not adequately ensure the safety of the driver and passengers.
When choosing glass, you should pay attention to quality; as a rule, glasses with a very low price do not meet proper standards, or are made in violation of production technologies.
The cost of glass on a Priora will also depend on the following factors: manufacturer or country of origin, color shade, filter strip, rain sensor and heating.
How to install a windshield on a Lada Priora: replacement instructions
Initially, you need to carefully remove the old sealant. To do this, we use a sharp knife, with which all residues are cleaned. It is important to clean the seat before installing the windshield until it is in perfect condition. After all, this determines not only how long it will last, but also how well it will be planted.
Before installing a new windshield on a Priora, you need to clean the seat on the car body, as well as the surface of the windshield around the perimeter using a degreaser.
After this, we move on to the actual process of installing the windshield:
- The activator from the kit is applied around the perimeter of the glass and body opening. Use tweezers with cotton wool to apply.
- Before applying sealant to the body part, you should install the sealing rubber in the upper part of the windshield.
- And secure the gutters on both sides. By the way, the correct installation of drains is carried out only by removing the windshield.
- Before applying the sealant, treat the surface of the body and glass with a primer or primer from the kit (it is black).
- The primer dries for at least 10 minutes (read the instructions).
- We apply sealant around the perimeter, at least 0.5 cm thick, always using a gun. Preheat the sealant, since unlike silicone products, glass is much denser, and even when using a gun, it will be extremely difficult to squeeze it out without preheating.
- It is important not to leave any places where the sealant layer will be missing.
- When applying it, locks should be made at the interruption points, which will prevent the possibility of a decrease in tightness.
- Next, you should lean the windshield, placing it on the sealant. You need two people to do this to position it evenly. In addition, you need to hold it not with your hands, but with special suction cups (as shown in the photo below - this is not correct).
- After this, do not forget to install stops (adjusting wedges) that limit the likelihood of the windshield moving. With their help we adjust the position of the glass.
- The photo below shows where the adjusting wedges are installed.
- At the final stage you need to fix the glass (optional). To do this, it is recommended to use zip ties and a rubber bladder. Secure the tie around the pillars, then inflate the chamber previously located on the surface of the windshield, as shown in the photo. It is prohibited to perform any actions on the car while the sealant is drying, as this may result in a loose fit of the glass (you cannot even slam the doors).
The drying time of the sealant is at least 12 hours (indicated in the instructions). At this point, the process of replacing the windshield on a Lada Priora car is completed, and using expert instructions, it will not be difficult to implement such actions yourself. At the same time, you can save several thousand rubles and spend them on consumables or spare parts. Below is a video instruction on how to replace the windshield on a Priora.
After a day, you can start checking the windshield for the possibility of a leak. To do this, you should pour water around the perimeter and pay attention to the presence of leaks in the cabin. The absence of signs of moisture only indicates that the work was performed correctly and efficiently.
This is worth summing up and noting the importance of a responsible approach to the implementation of the process. If you are not confident in your abilities, then it is better to entrust the work to professionals and pay for their work, but using the above instructions, you will understand that it is not so difficult to dismantle and install the windshield on a Priora.
When to contact a specialist?
According to statistics, every few years you have to change the glass on your car - most often the windshield cracks, into which crushed stone, gravel, spikes, small nuts or bolts fly off from under the wheels of other cars. Larger damage cannot be repaired using traditional methods and in these cases replacement is chosen. It is better to contact specialists; it is difficult to do such work on your own.
You need to visit a specialist for the following glass damage:
- deep marks from wiper rubber bands;
- large scratches;
- impaired visibility due to “cobwebs” on the glass;
- deep cracks;
- when the image is distorted due to poor-quality glazing;
- for pre-sale preparation of cars.
The technician will conduct a diagnostic and assess whether the glazing requires replacement or whether polishing/repair can be done. A specialist will analyze the extent of the damage and agree on a solution with you. We do not impose additional services; we honestly advise our clients. That is why many try to contact us. If replacement is required, we will select the appropriate glazing for you based on manufacturer and price. Any models are available: front, rear or side doors.
How to replace the windshield on a VAZ 2170-VAZ 2172?
Note! We would like to warn you right away, if you don’t already know, on cars of the tenth family, as well as on Lada Prioras, Lada Grants, etc., the glass is attached to the body by gluing, but if you take the classics and the Samara family, then there is the glass is held in place by an elastic band (But by the way, you can also glue it into the body yourself), so installing and removing the windshield on Lada Priora is much longer and more difficult than replacing a windshield that is held on by an elastic band!
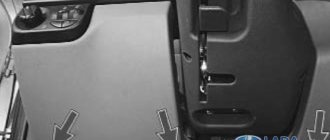
Removal: 1) First read the instructions for gluing the windshield that comes with the gluing kit, in these instructions, as a rule, everything is written in detail, but still we will additionally inform you by telling you and showing in pictures how to replace the windshield with a new one , but still, if the instructions say something differently, then proceed exactly according to it so that there are no problems with the glass in the future, well, let’s start replacing, first use a screwdriver to pry off the left and right facings of both stacks, one such facing is attached on three plastic holders, therefore, overcoming the force of these holders, disconnect the lining from the rack (When you remove both linings, check the condition of their latches and, if necessary, replace them with new ones).
2) Now we recommend that you remove the hood so that it does not interfere with the replacement of the windshield (You don’t have to remove it, but if you are carrying out the operation for the first time, we still recommend doing it), read the article about how to remove it: “Replacing the hood on a front-wheel drive car”, after removing it, immediately remove both windshield frame linings so that you understand what kind of linings they are, in the photo below we have indicated them with arrows, and how to remove one of them (the second is removed in the same way ), read the article: “Replacing the cabin filter on a Priora.”
3) Then completely lower the two front side windows, remove the two windshield adjusting wedges (see photo 1, which shows one, the left wedge) and open the front doors, after opening, remove the rubber seal on both sides and remove it from the windshield pillar glass (see photo 2), then pry the edge of the side trim using a screwdriver (see photo 3) and remove it from the glass (see photo 4), and remove the second trim in exactly the same way.
Types of windshields
The dimensions of the windshield, standard, and sensor-equipped windows are the same. Additional features and prices will vary. The most convenient way to select is by article number.
Standard
The most common glass without additional options. Installed on the factory rubber seal. The cost of the original glass model is approximately 2.5 thousand rubles; replacement will cost 2 thousand rubles if the work is done in a workshop.
Standard glass for Lada Priora may have a blue or green tint. The cost is 400 rubles higher.
Front windshield on Priora with rain sensor
The rain sensor automatically turns the windshield element and sometimes the washer system on and off. The essence of the operation of the unit is the refraction of an IR light beam. It passes through snow, mud, and water drops, coordinating the operation of a special photocell. The sensor can be rearranged after replacing the glass. The price of one product is from 5 to 9 thousand rubles, installation will cost 2 thousand rubles.
Heated
A product with a heating function can have different versions:
- heating of the entire working surface;
- warming up the working instrument area.
The principle of operation of the system is to heat thin filaments inside the glass. The unit operates automatically and switches off periodically, saving battery power and preventing overload of the on-board network. The ice crust thaws quickly in winter, providing good visibility and protection from fogging. Price – 6–10 thousand rubles, installation usually costs 2 thousand rubles.
There are combined models - with heating and a sensor; their installation will cost about 8-15 thousand rubles.