Costs for replacing VAZ 2110 thresholds
The work of replacing thresholds involves the use of both welding and abrasive tools. Carrying out painting, puttying and other work. In other words, this is an enterprise that should last at least several days with fairly good labor productivity. The easiest way to work is with a semi-automatic welding machine, with which anyone can learn how to weld.
If you don’t have it, then you probably shouldn’t run to the store. You can always contact your friends or a specialized workshop. After all, the unit costs approximately more than 15 thousand rubles. For a full repair of a VAZ 2110 at a service station, you will be asked for approximately 3 thousand rubles. And, as you understand, it will last for ten years. Let's estimate how much all the necessary materials cost to carry out the repairs yourself.
From the tool you will need:
- welding unit (the most convenient and simplest option would be semi-automatic welding);
- Bulgarian;
- grinding tool;
- electric drill;
- locksmith tool.
By the way, we do not specifically indicate the prices for the tool, since buying it solely to repair the thresholds of a VAZ 2110 is truly pointless. Now let's similarly determine the necessary materials:
- carriage for an angle grinder, about 300 rubles;
- several cutting discs for the grinder, because you will have to cut a lot of metal (about 300 rubles);
- cleaning wheels, we also buy several pieces and give 150 rubles;
- thresholds for the right and left parts of the car with amplifiers. Only 2000 rubles.
- associated costs (for example, a VAZ repair kit for a rotten bottom or rear wing), approximately 1000 rubles;
- jar of mastic, 200 rubles;
- soil, 200 rubles;
- other expenses for small materials and spare parts (brushes, solvent, drills, etc.), 300 rubles.
Having carried out a simple calculation, let's determine the material benefits of self-repair. Let's put aside the cost of the sills, wings and bottom. It turns out that you, one way or another, spend about 1,500 rubles on materials. Thus, the savings, taking into account the cost of repairing VAZ 2110 thresholds at a service station, will be about 1,500 rubles. In terms of time costs - several days (at least two or even three).
Body restoration
What affects the cost
The location of the repair is a major factor in the cost of replacement. If you carry out repairs yourself, drivers only spend money on purchasing the necessary material and parts. Tools are often either rented or already present in the garage.
When repairing at a service station, the work is expensive, and this is justified. The design of the threshold, despite its simplicity, requires great skill and care when replacing. If you are not confident in your skills as a welder, straightener and tinsmith, it is better to entrust the replacement of thresholds to a specialist.
Repair technology
When changing the thresholds on VAZ 2110 cars, thorough preparatory work must be carried out. You can't just pick it up and start replacing it. The technology requires dismantling the front and rear doors, locker; it is also necessary to remove the front passenger and driver's seats, and front fenders. The rear wheels and seat belts are also folded to the side, and the floor mats and sound insulation are removed.
Preparatory work alone can only take, with a fairly clear organization of work, about noon at best. The front and rear windshields of the VAZ 2110 should be reliably protected with cardboard curtains - since sparks flying from the cutting wheels of the grinder will inevitably leave indelible black spots on them, and you probably don’t want that at all. All other plastic and fusible materials must also be removed from the work area.
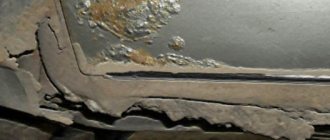
After which the time comes for the “operation” to save the VAZ. Beforehand, do not forget to completely disconnect the battery in order to prevent it from being affected by the potential of the welding machine. Now you need to pick up a grinder and cut a lot, a lot, removing the old VAZ 2110 sills, parts of the rotten bottom and the lower connector. The same fate awaits the upper connector in places where it has been eaten away by corrosion.
Afterwards the surface is thoroughly cleaned using a brush. Before installing new VAZ 2110 thresholds, we treat the metal with a rust neutralizer (converter) in order to prevent intense corrosion in the future. By the way, by default, the tens body technology does not provide a threshold amplifier. It is advisable to install it.
Then everything should go along the well-trodden path. The connectors are installed, then it’s the amplifier’s turn, and then the threshold itself is welded. The car may not yet look as kosher as we would like, but a good part of the main front of work on replacing the VAZ 2110 thresholds has already been completed.
Why a square pipe and not repair thresholds?
It’s not difficult to find body parts for classics, in particular sills, on sale. Yes, and they are inexpensive. Only their quality leaves much to be desired. I have heard this many times from different people. As you understand, I don’t want to change the thresholds so that they rot in a year. This is largely why it was decided to weld a 60×60 profile pipe instead of the thresholds.
Also, the decision was influenced by banal curiosity - I was just wondering what would come of it all. The idea itself is not new. I have repeatedly seen how the thresholds on the Niva are changed in a similar way.
And of course, one cannot help but admit that simply welding a pipe without worrying too much about aesthetics is somewhat easier than fiddling with repair thresholds.
The final stage of work. Finishing and painting
After completing the welding work, all that remains is to process the seams with a cleaning disk and roll the lower part of the VAZ 2110 threshold (clamp it onto the connector). You can take a few breaths, then it will be easier. From the outside, treat the car with a primer. Inside the cabin, the bottom is initially treated with mastic, then a layer of polyethylene is laid down, then back with mastic, sound insulation and carpet.
All that remains is to collect all the other parts in their places and you can hit the road again. Be prepared that the total scope of work may take at least three to four days. As you understand, having certain skills and tools will allow you to save a considerable amount of money, but it also takes a lot of time, so it’s up to you to decide whether it’s advisable to restore the VAZ 2110 thresholds yourself.
Practical installation recommendations
Before you begin repairing the car, you must remove the battery, as welding work will be carried out. The preparatory stage includes disassembling the side of the machine from which the threshold will be replaced. The following operations are performed:
- rugs are removed;
- sound insulation is removed;
- seat belts are disconnected;
- seats are removed;
- the door is removed;
- plastic panels are unscrewed;
- lockers are removed;
- the rear wheels are unscrewed;
- The front fender is removed.
About decorative thresholds VAZ 2110 (overlays)
After you install new metal sills on your updated VAZ 2110, you may want to go even further, thanks to plastic sill covers, creating a stylish aerodynamic tuning. Of course, it will only have a decorative role, but such a fashionable solution often looks very impressive on the VAZ 2110. By the way, the plastic sills from Priora are also excellent in the top ten.
It’s worth mentioning right away that the use of plastic overlays, although intended not least to protect the VAZ 2110 sills from the effects of road dirt and splashes flying from under the wheels, can equally have the opposite effect. At the same time, your stylish body kit may turn out to be the main catalyst for corrosion. Now let's explain how this happens.
Lada Priora thresholds
The thing is that dirt and road moisture penetrate into the space between the plastic of the trim and the threshold of the VAZ 2110, which should be cleaned out regularly. If this is not done, the humid environment becomes the main catalyst for metal oxidation and the car body becomes unusable ahead of time. A similar situation occurs as holes form in the thresholds themselves: dirt and moisture penetrate inside and corrosion continues from the inside.
But this does not mean at all that it is better to simply abandon thresholds. VAZ 2110 cars are supplied with them from the factory. They are also an important part of external auto tuning and additional protection for the thresholds of the VAZ 2110. All you need is to promptly monitor the appearance of dirt under the plastic covers and get rid of it.
By the way, the original plastic linings of the VAZ 2110 come in two types: old and new. Previously produced thresholds were made of lower quality and thin plastic, and were attached to pistons. On cars released later, the linings fit more firmly to the body and are fastened with self-tapping screws. A full-fledged stylish body kit for the VAZ 2110 will cost the owner approximately 3-5 thousand rubles.
Some useful tips
To keep the thresholds of the VAZ 2110 in good condition, it is enough to regularly monitor them. If you do not allow rust to eat through the holes, the sills can last a really long time even with extremely intense driving on dirty and wet roads. There are special products on sale that prevent the spread of rust.
In this case, after washing the car, it will be enough to clean the affected area of rust and treat it with a neutralizer. By the way, these tips are suitable not only for servicing the thresholds of the VAZ-2110, but also for the entire car as a whole. The doors, bottom and wheel arches are processed in a similar way, but this is material for a separate article.
This is where our article comes to its logical end. We sincerely hope that you found it useful. Don’t forget to monitor the condition of the sills on your VAZ 2110 and let rust never bother you.
The sequence of actions for replacing the threshold box
- It is necessary to place the car on a level surface; a level garage floor, boards, etc. will do. This is very important, because when repairing rotten cars, the gaps of doors and other elements can slip away.
- By marking the positions of the hinges on the pillars, you can remove the doors, as they interfere with the removal and installation of the threshold.
- If the car is rotten and you are afraid that the body will “fold”, you need to fix the original position. This can be done by inserting guy wires into the door opening, guy wires from the projection of the rear sofa and in the A-pillar, placing a block about 1 m long and pressing it lightly with a jack. Thanks to these simple manipulations, you will keep the gaps of all doors in their old position.
- Experienced people on my favorite body forum divided the replacement of thresholds into two options: correct and not quite correct. Proper repair involves replacing both fenders and sills. At worst, the threshold and the hams of the wings. This is necessary because the threshold is welded to the front pillar and to the rear arch far under the wings, and replacing the threshold without dismantling the wings remains problematic, if not impossible. But if everything is in more or less normal condition, then you can resort to the second method - welding the amplifier and butt welding the threshold trim.
- Also, before sawing the threshold, it is necessary to inspect the condition of the inside of the threshold with the noise insulation removed; if it is rotten, then it is necessary to weld a curved piece of metal that needs to be used to connect the inside of the threshold with the floor panels.
- After you have fixed the car body, you can begin to dismantle the old threshold. This can be done as you prefer, starting from the front or the back. It is better to brighten the weld spots, use a chisel less, because the edge is deformed, which is then quite difficult to straighten. For additional rigidity of the boxes, you can leave a strip from the old amplifier and lining in the area of the rubber seal, or one of them, this makes it easier to weld the new threshold and increases its rigidity.
- The threshold consists of three parts - an amplifier, a connector, and a threshold cover. When replacing thresholds, the connector is often not a standard one, but is made from a suitable piece of tin a little wider than the standard one.
- After dismantling the threshold, it is necessary to clean the edges from rust and old welding residues.
- VERY IMPORTANT! Thresholds must be replaced as quickly as possible, within reasonable limits, of course. That is, you should not cut off the threshold and leave the car for 2-3 days, it may lose its geometry.
- If the hinges of your doors are in order, but the upper corners of the doors touch the pillars, then this can be fixed. It is necessary, with the doors open, to use a jack and an extension to rest against the ledge of the rear sofa and the upper curtain of the door. Then grab this distance with a pipe from inside the rack. Try on the door if you need to add or remove. After welding the thresholds, the pipes can be cut off.
- The new threshold is welded in the following sequence - amplifier-plate-connector. After cleaning all the surfaces that will be welded, you can begin welding the threshold amplifier. It must be cooked semi-automatically in a carbon dioxide environment through drilled holes with a diameter of 5-6mm. To make it easier to install the amplifier in the area of the B-pillar, provided that the old amplifier is more or less intact, you can leave a piece of the old one and weld the new amplifier to it. In the lower part, a threshold connector is also welded through drilled holes. The CONNECTOR is welded at this step only to the amplifier! It is welded to the floor last.
- Attention! Trying on the threshold overlay is carried out only with the doors installed! Otherwise you might miss :)
- After welding the threshold amplifier, it is necessary to clean the welding points and weld the trim through the drilled holes in the threshold trim. The pad is welded to the rack in several ways, depending on what is more convenient, the main thing is that the connection is strong.
- Lastly, the connector is welded. There's a little trick here. The connector is welded to the floor panel; this can be done from a hole or through holes drilled in the floor panel. In order not to catch scale on your head, you can drill holes in the floor and, pressing the connector from below with a jack, weld it through the holes.
We recommend: Inflating tires with nitrogen - real benefits or a marketing ploy?