November 28, 2014 Lada.Online 340 740 16
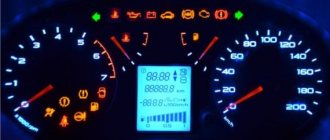
The combination of devices of Lada Granta and Lada Kalina 2nd generation is designed to display driving characteristics, the current state of vehicle systems that ensure traffic safety, as well as the correct operation of the entire vehicle as a whole. Next, we will consider a description of the Lada Granta dashboard, as well as the meaning of instruments and alarms.
Description of the Lada Granta/Kalina 2 panel:
- tachometer , shows the speed of the engine crankshaft, the red scale zone indicates a dangerous operating mode for the engine;
- engine management system malfunction indicator (Check Engine) , turns on orange when the ignition is turned on and goes out after the engine starts, the lamp is lit after starting the engine or while driving indicates the failure of any element of the engine management system (does not mean that the engine should be stopped immediately, however, the cause should be eliminated as soon as possible), the error can be determined using the diagnostic connector;
- left turn signal indicator;
- emergency low oil pressure indicator , turns on in red when the ignition is turned on and goes out after starting the engine, the lamp is lit when the engine is running and a constant (for 5 s) buzzer signal indicates insufficient oil pressure in the system;
- ABS anti-lock braking system status indicator (optional) turns on orange when the ignition is turned on and after 2 seconds. after the engine starts, it goes out; in other cases, the lamp is lit, indicating a system malfunction that should be repaired at a specialized service station;
- immobilizer mode indicator lights up orange and displays the status of the immobilizer and the vehicle security mode;
- The coolant overheat indicator turns on in red when the ignition is turned on and after 5 seconds. after starting the engine it goes out, the sound signal indicates engine overheating (t>115C), the signal will be repeated until the temperature drops below 110C, when the indicator turns on, it is prohibited to operate the car, otherwise it will lead to serious engine damage;
- brake system emergency indicator , turns on red when the ignition is turned on and goes out after the engine is started, the lamp is lit and the buzzer signal (5 lights on) when the engine is running indicates a drop in the brake fluid level below the “MIN” mark in the master cylinder reservoir, operate the car with the light on indicator is prohibited;
- indicator for turning on the right turn signal (with a green filter in the form of an arrow);
- battery charging indicator , turns on in red when the ignition is turned on and goes out after the engine starts, the lamp is lit or glows half-lit while the engine is running indicates a lack of charging current due to a malfunction of the generator or voltage regulator, as well as low voltage (or breakage) of the belt generator drive, operating the vehicle with the indicator on is prohibited;
- speedometer , shows how fast the car is currently moving;
- indicator of the operating mode of the exchange rate stability system (ESC) (in a variant version), turns on yellow when the ignition is turned on and goes out after starting the engine, the lighting of the “ESC OFF” lamp indicates that the system is turned off, and lighting and flashing while driving indicates the activation of the exchange rate control system stability, in other cases the burning of the lamp indicates a system malfunction;
- signaling device prohibiting transition to higher gear “O/D OFF” (not used);
- headlight high beam indicator , indicates that the headlights are on high beam;
- signaling device for turning on the rear fog lights , indicates that the ZPTF is turned on;
- low beam headlight indicator , indicates that the headlights are low beam;
- indicator for turning on the front fog lights , indicates that the PTF is turned on;
- daily mileage counter reset button , by pressing the button, set the daily mileage counter in the liquid crystal display to 0 or select the daily or total mileage display modes;
- liquid crystal display of the on-board computer , displays information from the BC, see description below;
- door open indicator , lights up red if the door is open;
- reserve fuel indicator indicates the need to refuel the vehicle; do not allow the gasoline to run out completely, as this may damage the fuel pump;
- low tire pressure indicator , lights up when tire pressure drops;
- the electric power steering status indicator (connected in a variant), turns on in orange when the ignition is turned on and goes out after the engine is started; the lamp is lit while the engine is running indicates a malfunction of the power steering, which must be eliminated as soon as possible;
- driver's seat belt warning light , lights up when the ignition is turned on if the seat belt is not fastened;
- power unit fault indicator (not used);
- Airbag status indicator turns on in orange when the ignition is turned on and goes out after the engine starts; in other cases, the lamp is lit indicating a system malfunction; you must contact service as soon as possible, because In addition to failure in an emergency, the airbag may unexpectedly inflate.
Symbols on the Lada Granta dashboard
Information panel Grants liftback in the “Standard” and “Norma” configurations:
- Tachometer needle: indicates the crankshaft speed in online mode. The green zone indicates the permissible speed, the red zone indicates exceeding the recommended range;
- engine breakdown: many are familiar with the “Check Engine” sign. The orange indicator goes out immediately after the engine starts, otherwise correct the problem. As soon as the indicator lights up while driving or does not go out after starting, immediately stop the power unit, carry out diagnostics, and repair the breakdown;
- left direction indicator (green color indicator);
- low engine oil level in the system (red): after starting the engine, the indicator should go out within the first five seconds;
- activation of the anti-lock braking system ABS: yellow indicator;
- immobilizer: yellow indicator color, displays the security mode of the equipment;
- critical temperature of the cooling system: red diode. When reaching 115 C, the indication is accompanied by a sound signal;
- emergency condition of the brake system: red indicator. The problem must be resolved quickly, as there is a high probability of the brake calipers blocking. Most often, the reason is insufficient brake fluid in the expansion tank of the master cylinder. It is installed in the engine compartment;
- right turn signal;
- battery status: red indicator. Common breakdowns: lack of charge, mechanical damage, impact;
- electronic speedometer needle;
- exchange rate stability system (ESC): when the engine starts, it operates in one of three modes: on, off, emergency;
- upshift: only with pre-installed automatic transmission;
- activation of high beam headlights;
- activation of PTF, running lights;
- low beam activation;
- cancellation of odometer readings: daily mileage;
- monochrome LCD display - on-board computer;
- car door open alarm;
- indicator of reserve fuel remaining in the fuel tank;
- low tire pressure indicator;
- electric power steering status indicator;
- airbag status indicator.
Video - Grant's Liftback logbook. We remove the dashboard. Cognac “ate” the credit card
The battery icon lights up if the voltage in the on-board network drops; often this problem is associated with a lack of battery charge from the generator, so it can also be called the “alternator icon”. On vehicles with a hybrid engine, this indicator is supplemented by the inscription “MAIN” at the bottom.
The oil icon, also known as a red oil can, indicates a drop in the oil level in the car engine. This icon lights up when you start the engine, and does not go out after a few seconds or may light up while driving. This fact indicates problems in the lubrication system or a drop in oil level or pressure.
The airbag icon can light up in several ways: either the red inscription SRS and AIRBAG, or “a red man wearing a seat belt,” with a circle in front of him. When one of these airbag icons lights up on the panel, the on-board computer notifies you of a malfunction in the passive safety system, and in the event of an accident, the airbags will not deploy. Read the article on the website for the reasons why the airbag sign lights up and how to fix the problem.
Read more: Gas distribution mechanism of an internal combustion engine: device, purpose, principle of operation
The handbrake is up, the brake pads are worn out or the brake fluid level is low. A low level is precisely what poses a danger, because the reason may not only be in heavily worn pads, as a result of which, when you press the pedal, the fluid disperses throughout the system, and the float gives a signal about a low level, the brake hose may be damaged somewhere, and this is much more serious.
An exclamation mark can also light up in the form of an “attention” sign, both on a red and yellow background. When the yellow “attention” sign lights up, it informs about a malfunction in the electronic stabilization system, and if it is on a red background, it simply warns the driver about something, and, as a rule, explanatory text is displayed on the dashboard display or combined with other informative text designation.
The ABS icon may have several display options on the dashboard, but regardless of this, it means the same thing on all cars - a problem has occurred in the ABS system, and that the anti-lock wheel system is not working at the moment. You can find out the reasons why ABS does not work in our article. In this case, movement can be made, but there is no need to rely on the ABS to activate; the brakes will operate as usual.
The ESP icon may either light up intermittently or stay on constantly. A light with this inscription indicates problems with the stabilization system. The Electronic Stability Program indicator, as a rule, lights up for one of two reasons - either the rotation angle sensor has failed, or the brake light sensor (aka “frog”) has died for a long time. Although, there can be a more serious problem, for example, the brake system pressure sensor is covered.
The engine icon, some drivers may call it the “injector icon” or check, may glow yellow when the engine is running. It informs about the presence of engine errors and malfunctions of its electronic systems. To determine the reason for its appearance on the dashboard display, self-diagnosis or computer diagnostics are performed.
The glow plug icon may light up on the dashboard of a diesel car; the meaning of such an indicator is exactly the same as the “check” icon on gasoline cars. When there are no errors in the electronic unit’s memory, the spiral icon should go out after the engine warms up and the glow plugs are turned off. Read how to check glow plugs here.
This material is informative for most car owners. And although absolutely all possible icons of all existing cars are not presented here, you will be able to independently understand the main symbols of the car’s dashboard, and will not sound the alarm when you see that the icon on the panel is on again.
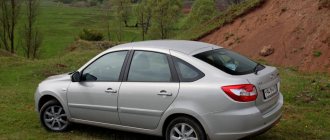
The Lada Granta instrument panel is specially designed to monitor all kinds of parameters and data while driving. Any such panel should be as informative as possible, functional, in addition, create a unique design of the car and contribute to the creation of a pleasant impression of it. The dashboard of the Lada Granta is no exception.
On-board computer capabilities
The LCD display accumulates data from a number of programmed sensors. They send information online for decryption and subsequent output.
For example:
- daily mileage data;
- remaining fuel;
- current time;
- current transmission;
- temperature outside.
*configuration may vary depending on the technical characteristics and modification of the vehicle.
Options for installing BC in Lada Granta
Any of the existing onboard devices can be installed and connected independently, regardless of the modification of the car. The exception is computer models in the “Lux” configuration - they are initially installed at the factory with a multimedia system, navigator, and audio system. The “State” X1 M device can be added to the “Standard” and “Norma” configurations.
An important advantage of the “State” X1 M is its compact size. The device is installed instead of a button cover. The kit includes the device, wires and instructions. Installation will not cause much difficulty. You need to take out the plug, place the computer in it, connecting it to the connector. Then, in accordance with the pinout, connect the second end of the wiring with the block to the diagnostic connector located on the bottom left side of the panel. In addition to the State X1 M, Multitronics are often installed on Lada Granta. You can attach it wherever it is convenient for the driver - on the dashboard, on the rearview mirror. The main difficulty is connecting the wiring, since it needs to be hidden. If you install the device on a panel, you will first have to remove its front side and make a hole for the wires, for example, using a heated knife. Then the BC visor is glued to “liquid nails” type glue.
This completes the installation, all that remains is to connect the on-board vehicle to the diagnostic block and wait for it to initiate with the electronic control unit of the Lada Granta. If the device doesn’t show anything other than the voltage of the on-board network, that is, it didn’t work out to make friends between the brains and the computer, then the reason is inappropriate software.
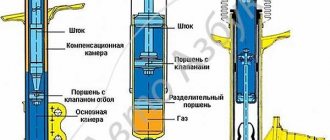
Typical malfunctions of the Granta liftback dashboard
- mechanical damage, which contributed to the failure of the contact board and terminals;
- exceeding the permissible voltage in the network, short circuit;
- failure of one / several sensors, which resulted in the transmission of incorrect, incomplete information to the on-board computer;
- ingress of moisture or aggressive chemical liquid, which resulted in failure;
- manufacturing defects;
- violation of installation technology;
- purchase of non-original products.
Installing the on-board computer STATE X1-G on the Lada Granta: three methods
The “simplest” on-board computer for the Lada Granta is the BC STATE X1-G. It is compatible with ITELMA M74, M75 units, as well as BOSCH ME17.9.7. The connection is made to the OBD connector, which is located in the cabin. No additional power is required. We will look at how to install it, as well as how to update the firmware. Sometimes you need to update it immediately to get compatibility with a new car. Therefore, read the review carefully.
All functions of BC STATE in one video.
Sequence of actions when dismantling the dashboard
The reasons for disassembling and replacing the Grantback liftback dashboard are very varied: damage, installation of a new diode, etc.
- We unscrew the three mounting bolts around the perimeter. Carefully remove the assembled unit so as not to damage the contact boards, electrical wiring, and terminals;
- Remove the instrument panel mount for the Lada Granta liftback;
- To replace the tachometer/speedometer needles, you need to move the lever up a little and turn it counterclockwise.
After the final replacement and maintenance, we reassemble the structure. Self-repair of the front panel of the Grant liftback is completed.
Dismantling instructions
To dismantle the device, you must follow the instructions:
- First remove the cover of the fuse box located to the left of the steering wheel.
- Unscrew the three bolts securing the plastic lining of the control panel.
- Dismantle the lining itself, and then unscrew four more bolts of the tidy. Pull it towards you.
- Next, squeeze the connector with the wires and disconnect it from the control panel.
- Dismantle the unit and repair or replace it. Assembly is carried out in reverse order.
Refinement of the Granta liftback dashboard
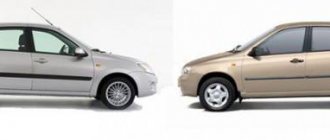
The basic equipment of the dashboard of the Lada Grant “Norma”, “Standard” is quite simple and uninformative. The defect was promptly corrected by manufacturing a new panel sample. It is installed exclusively on the “Lux” modification. An alternative option outside the factory version is provided. In order to increase the information content, a new instrument layout and external design are used:
- the borders of the instruments are separated by a chrome insert;
- more space is allocated for a computer monitor;
- the owner can independently choose the color design of the backlight in order to reduce eye strain;
- basic (important) information is now displayed at the top of the display.
Information about the Lada Granta instrument panel software
- turn off the ignition;
- press and hold the mileage reset button in pause mode;
- activate the ignition;
- release the pressed button.
Information about the software version and hardware model will appear on the monitor. The data must be used when purchasing a new shield.
What does the dashboard assembly look like?
This important segment of salon equipment is pleasantly impressive. The precision in the fitting of the elements (minimal and even gaps) is striking. The design solutions and color scheme of the components also achieve high marks, because everything looks like a stylish and logically completed product.
The material of the instrument elements is ordinary, but high-quality plastic with a pleasant texture to the touch. It is devoid of unpleasant creaks and crunches. There are no extraneous irritating sounds even after a long period of use. This indicates the reliable assembly of the panel and its high-quality fixation with other interior components.
Reviews from Lada Granta owners about the functionality of the dashboard
| № | Positive |
| 1. | Nikolay, 39 years old: in general, I am satisfied with the information content of the console, the display is bright. True, it shines a little in the sun, but this is not so significant. |
| 2. | Konstantin, 41 years old: I bought Grant a year ago in the “Lux” configuration with a new dashboard. I'm 100% satisfied. |
| 3. | Vitaly, 44 years old: I bought a Granta in 2013, the old instrument panel was good, but it was deformed after an accident, I replaced it with a new version from the “Lux” version. Identical in fastenings. |
| 4. | Dmitry, 37 years old: during a side collision with Renault, the dashboard and dashboard were damaged. I didn’t upgrade to a luxury one, I bought my original one. |
| 5. | Vladimir, 39 years old: he will buy Grant second-hand, he is happy with everything, the panel is good and informative. True, at night it is too bright, sometimes it strains the eyesight. |
| 6. | Kirill, 45 years old: I work as a taxi driver, I drive all the time, I’m happy with the panel, it’s informative. The on-board computer quickly displays all the necessary data. |
| 7. | Vladislav, 34 years old: after a major overhaul, friends recommended installing a new panel from the Luxury configuration, but he left the old one and is happy with everything. |
| Negative | |
| 1. | Vladlen, 44 years old: the old instrument panel is not very informative, often displays information and speedometer readings incorrectly. Installed from Lux configuration. Now there are no complaints. |
| 2. | Sergey, 33 years old: after the accident, I replaced the front console, including the panel, since the old version was unfinished and damp. |
| 3. | Vyacheslav, 39 years old: I drove the original device for a month and replaced it with a luxury version, it is much better and more informative. |
Owners' opinions on the functionality of the dashboard were divided, as expected. If we objectively compare the two panel models, then the winner is the “Lux” package. Regarding the duration of operation, efficiency of data output, and accuracy of readings, they are identical. The internal filling is the same, with the exception of the external design.
Electrical diagram of the grant of the rear part of the VAZ 2190
Electrical diagram of the rear part of the car: 1-block of the rear wiring harness to the block of the instrument panel wiring harness; 2-rear wiring harness block to the instrument panel wiring harness block; 3-side direction indicator right; 4-side direction indicator left; 5-handbrake sensor;
6-element for rear window heating; 7-interior lighting lamp; 8-switch in the driver's seat belt; 9-trunk light; 10-electric fuel pump module; 11-light right; 12-trunk lock electric motor; 13-switch for interior lighting; 14-additional brake signal;
15-left lamp; 16-rear wiring harness block to the rear left door wiring harness block; 17-rear wiring harness block to rear right door wiring harness block; 18-rear wiring harness block to the front right door wiring harness block; 19-rear wiring harness block to the front left door wiring harness block; 20-airbag control unit; 21-rear wiring harness block to license plate light wiring harness block.
- 1 – indicator of lubricant pressure in the crankcase of the power plant;
- 2 – generator connector;
- 3 – power supply to the fuel mixture supply valve;
- 4 – cooling system thermometer;
- 5 – sending a signal to the dashboard;
- 6 – adsorber purge;
- 7 – speedometer;
- 8 – mass air flow sensor;
- 9 – DPKV;
- 10 – DC in front of the catalyst;
- 11 – control pulse device;
- 12 – oxygen concentration sensor in exhaust gases;
- 13/14 – coil and spark plugs, respectively;
- 15 – injector drivers;
- 16 – ignition contact group;
- 17 – detonation measurement sensor.
Good day everyone, I’ve been on the Internet for two days now searching for a bunch of wires coming into the connector on the instrument panel. I need to find out which wire the signal is coming from so that the “seat belt not fastened” lamp turns off, and what appears on this contact plus or minus or disappears? There is no such information in repair magazines, but if I simply didn’t see it there, and you poke my nose at it, I won’t be offended, but I’ll say thank you.
Read more: Solex carburetor VAZ 2107 21073 installation device and adjustment instructions with photos and videos