Why flush the injector?
But now I will express my opinion on this matter in more detail.
Let’s start with the fact that I don’t quite understand the expression “wash the injector”, wash the nozzles on the injector”, “injector car” and the like. What is an injector? injector in translation is a nozzle. Just a nozzle.
Now let’s write these expressions in translation - “rinse the injector” (one??? Maybe it would be more correct to rinse the injectors?), “rinse the injectors on the injector”, “injector car”. Sounds like complete nonsense to me. And the meaning is even crazier
It is more correct, in my opinion, to put it this way: “wash the injectors on a car with an engine management system”
But washing the injectors without removing them from the car is an ineffective measure. Therefore, I only wash the injectors when removing them from the engine. This way you can visually evaluate the spray pattern of the injectors and check their shut-off properties. Look them in the eye, so to speak.
You can read about this in the article How to clean injectors
So why “wash the injector without removing the injectors”?
The fact is that this procedure is necessary not only on injection engines (engine with a control system), but also on carburetor engines (without an engine control system)
Do you get the point? This flush is also intended for carburetor engines, although there are no injectors. So what is there to rinse? And during this procedure the valves and combustion chamber are washed.
This is what we will be doing next, and not flushing the injector, as many people think. After all the procedures, I, dear Friends, will show you the result in numbers, so to speak.
Okay, it’s clear that we will wash the valves and combustion chambers. But why? What's so scary about it?
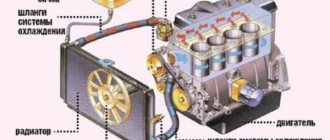
It's all about the design and operating principle of most injector engines.
Injectors replaced carburetors primarily for environmental reasons. By using the engine management system, emissions of harmful substances can be reduced. The injectors also made it possible to make the intake manifold dry and provide a more uniform fuel supply to each combustion chamber, which was not possible to achieve with a carburetor.
So here it is. The injector delivers fuel on our engines not directly into the combustion chamber, but into the intake manifold next to the intake valve. This is a very smart solution, since it is not gasoline that burns in the combustion chamber, but gasoline vapors with air. This is where “valve injection” plays a very important role, since the valve is hot, the fuel hitting it evaporates very quickly and mixes with air. This is very good.
But there is also another side to the coin. You always have to win something and lose something. So it is in this case.
When fuel hits a hot valve, it inevitably leaves traces of scale, all kinds of sediment, deposits, etc. on it.
Over time, the valve becomes more and more overgrown with this muck. And this muck, in turn, interferes with the evaporation of fuel. As a result, mixture formation is difficult, engine starting takes longer, and the opening time of the injectors at idle increases from 2.5 ms to 3, or even 4 ms. Hence the increased consumption, loss of throttle response at low speeds and other delights.
Carbon deposits in the combustion chamber also do not bring anything good. In particularly advanced cases, it can even lead to detonation, which is a direct threat to the engine.
So think - do the engine good now or continue to doubt the usefulness of this procedure
In order to more realistically demonstrate to you the result of flushing the valves, I washed the injectors in advance by removing them from the engine, and also did diagnostics of the engine before flushing, during flushing and after flushing. I also unscrewed one candle for a clear picture of what was happening. You don't need to do this.
So, let's go.
The best injector cleaners
In the modern world there is a wide range of cleaning products. However, it is difficult to find a truly effective liquid. After all, it is difficult to draw conclusions from consumer reviews, since they are often contradictory. Let's consider the rating of funds, which is based on tests conducted by experts.
Wynn's Injection System Purge
The manufacturing company has released this product both for cleaning injectors and for gasoline engines. The injectors are washed in a special installation. Moreover, the product can be used for cars of any brand. The entire cleaning process is very familiar to experienced car owners. First, the fuel tank is disconnected from the line. Then you need to start cleaning the nozzle. Cleaning is carried out when the engine is turned on. After all, the procedure for getting rid of soot occurs through combustion. Let us remind you that other means clean the injector by washing.
Company representatives claim that the product has additional functions. The fluid can clean the fuel line, fuel pressure regulator and intake tract. In addition, the product can be used for decarbonization. Due to the aggressive composition of the liquid, it is necessary to select durable and reliable hoses. The washing unit must be connected directly to the frame, without using rubber hoses. Testing has revealed that this product is highly effective.
In addition, reviews from real consumers are mostly positive. Wynn's is bottled in one-liter canisters, the cost of such a product is approximately 750 rubles.
LIQUI MOLY Fuel System Intensive Cleaner
The product is used for gasoline carburetors and injectors. Eliminates contamination from the fuel frame, line, and fuel rail. Please note that the product is sold in a can with a volume of 500 milliliters. After purchase, consumers dilute it with gasoline. If you want the cleaning to be effective, buy high quality gasoline. Add 4-4.5 liters of gasoline to the 500 milliliter concentrate. Thus, the output is five liters of cleaning product.
In order to clean an engine with a volume of 1500 cubic centimeters, you will need about 700-800 grams of the finished product. To clean the injectors, liquid is used in the washing unit. Testing has revealed that the product has high qualities. The liquid from this manufacturer cleans 80% of contaminants. And if deposits remain, they can soften and disappear over time due to engine operation. And with prolonged washing of the nozzle, you can get maximum results. Cost – about 1150 rubles.
Suprotec
This product is intended for cars with a gasoline engine. The liquid is produced by a domestic manufacturer. It is in great demand among consumers. This can be explained by good quality. In addition to the usual elements, the product contains oxygenates. Due to this, the amount of oxygen in gasoline increases. The advantages include the absence of components with harmful substances. Plus, the cleaner can reduce fuel consumption.
When using this liquid, fuel is consumed 3.5-4% less. In addition, hydrocarbons in the residue are reduced. The less residual hydrocarbons, the cleaner the engine. Based on the results of real testing, the product is included in the list of highly effective ones. If the engine is at low speed, the cleaner ensures that there is no jerking. Suprotec is great for cars with a gasoline engine. Moreover, the car manufacturer can be any. The bottle contains 250 milliliters. The cost of such a product is approximately 460 rubles.
LAVR ML 101 Injection System Purge
This domestically produced product is considered very popular among car enthusiasts. Testing has revealed that the liquid can clean up to 70% of contaminants. In order to use this product, the Lavr LT Pneumo installation is required. This suggests that you need to look for service stations or purchase a special installation yourself.
LAVR ML 101 can be used both for cleaning injectors and for reducing fuel consumption. Testing has shown that the liquid is highly effective. That is why the product is popular among car enthusiasts. The bottle contains 1 liter of liquid. The cost of such a product is 560 rubles.
Hi-Gear Formula Injector
Unlike all other injector cleaning products, this liquid must be poured into the fuel tank. The manufacturing company claims that with just one use you can achieve better cleaning. Moreover, the liquid can increase the service life of the injectors and also prevent it from freezing. An engine with a volume of 2500 cubic centimeters requires 295 milliliters of liquid. There is also a 946 ml bottle option.
If we consider passenger cars, then this liquid is enough to flush the engines of two cars. Testing revealed good quality of the liquid. The aggressiveness of the composition ensures high cleaning of resinous deposits. Liquid of 295 milliliters is the most popular packaging. The cost of such a product is approximately 450 rubles.
It should be noted that the positive result of using additives depends on the condition of the injectors, and not only on the quality of the additives. This is why additives that are designed to be added to fuel can only have a preventive effect. We hope that the presented list of injector cleaning products will help you make the right choice and eliminate problems.
Share your comments and don't forget to leave a review!
Flushing the injector, valves and combustion chamber
First, I’ll tell you about the preparatory nuances and safety. In this article, washing will be done using a plastic bottle. Please be aware that this is very dangerous. Plastics and flammable materials sometimes spontaneously ignite even from static electricity. Before my eyes, a fuel warehouse once burned down simply because a person poured gasoline into a plastic canister! Therefore, it is better to use a metal container for these purposes.
I used to have a homemade metal structure. Just a piece of pipe, and plugs with fittings are welded along the edges. But the looters did not disdain her either. It is not yet possible to weld another one, since the welding machine also went in an unknown direction. And we don’t have any more electricity than we have because of the shelling.
So keep this in mind and keep a fire extinguisher handy.
Do not hang the flush container by the hood above the engine compartment. Place the container outside the engine compartment. If, God forbid, the container bursts, the flushing will not spill onto the hot engine.
I’ll also focus on the filter. I don't use it when washing. I see no reason for the extra costs. But if you still use a filter, then do it wisely, and not according to the advice from YouTube, where one advises not to spend money and take a regular plastic carburetor filter. Such advice will sooner or later lead to trouble. These filters are not designed for pressures such as those in engines with a control system, which reach values above 4 atm. That's why our filters are made of metal, not plastic.
Remember - safety comes first!
Now about some nuances. It is advisable to have a set of old working spark plugs and install them while washing. I do this. Although on the new cans of Vince they already write that it is safe for spark plugs. Therefore, decide for yourself, but then I will show you what a candle can turn into during washing.
It is recommended to start flushing with a warm engine so that less fluid leaks into the crankcase. So, it seems that you don’t have to change the oil after the flushing procedure. But I start doing this on a cold engine. Why?
Firstly, I always do an injector flush before a scheduled oil change. Secondly, in my personal opinion, when starting a cold engine, some of the flushing will get on the rings, which will increase the chance of their decarbonization or prevent the rings from sticking.
Note. The modern composition of Vince does not require the mandatory replacement of spark plugs and oil
What is needed to flush the injector:
- Vince 1 can
- rags
- two valves for tubeless tires
- 1 meter of fuel hose with an internal diameter of 10mm
- plastic bottle 2l
- compressor or pump
- drill 10mm
- two clamps 12-20
I won’t show you in detail how to make a washing container from a bottle. If you have any questions, ask in the comments.
We simply drill holes with a 10mm drill in the bottom of the bottle and in the cap. It is important that the holes are smooth and not oval. Then we insert valves for tubeless tires into them.
To insert it into the bottom of the bottle, I put the valve on the welding electrode and, with its help, inserted the valve into the bottom of the bottle.
There is no need to close the valve all the way. The pressure will then press him tightly.
Attention! If you don’t want to bother with hoses and a bottle, then you can buy a ready-made washing kit. It has many adapters and accessories. Everything is in a convenient case. You can buy it here
Go.
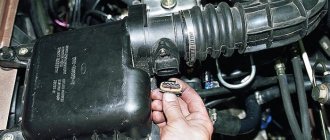
First of all, remove the cover from the fuse box in the engine compartment and remove the fuel pump power circuit fuse
We start the engine and let it run until it stops on its own. After this, turn the starter a couple more times. All of the above procedures are needed to relieve pressure in the fuel line.
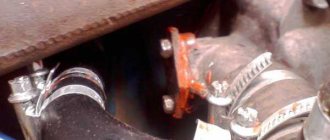
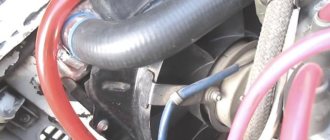
Now, pressing the plastic lock, remove the tube from the fuel rail. If you do this on a hot engine, then it makes sense to place a wet rag underneath so that the gasoline remaining in the ramp does not get on the hot engine
The hose itself can be covered, for example, with a bag and tied
We connect our prepared fuel hose to the ramp. Do not use the first tubes or transparent hoses you come across without reinforcement - they may not withstand the pressure!
We fix the second end of the hose with a clamp to the valve installed in the bottle.
Important!!! The spool itself must first be unscrewed from this valve. He's not needed there!
Connect the compressor to the valve in the lid and fix the bottle
This is what everything looks like assembled
Screw in another set of spark plugs
Now we pour Vince into the bottle and use a compressor or pump to pump up a pressure of 4 atm, simultaneously checking the connections so that there are no leaks anywhere.
We start the engine and let it idle for 20 minutes. At first it may stall and even try to stall. At this moment, you can help him with the accelerator pedal. After some time, the speed usually becomes stable and the engine runs confidently.
We monitor the pressure and, if necessary, pump it up to 4 bar. By the way, you have to pump it up very rarely.
Attention! If you are not sure about your bottle, then you can pump up the pressure to 2.5-3 bar. This way, everything will be washed off, it’s just that the engine will not work very stably and there will be dips when opening the throttle. But it will save you from troubles. Vince is very aggressive towards plastic and will inevitably leave marks on it if he rips the valve out of the bottle.
For those who are especially curious, I’ll note that after 95 gasoline, on Vince the corrections went up sharply
After the engine has been idling for 20 minutes, it must be stopped and allowed to stand for another 20 minutes.
Then we start the engine again and periodically raise the speed to 3 thousand. Hold this for a minute and reduce the speed. We repeat this sequence until all the washing liquid is gone.
Important!!! Raising the speed does not mean “losing the throttle”! The speed must be increased gradually. By sharply accelerating you will do more harm than good, since in this case a strong detonation will appear! Keep this in mind.
After Vince runs out, release the pressure in the bottle, reconnect the fuel line to the ramp, screw on the gas cap, insert the fuel pump fuse and start the engine on gasoline. Let it work in different modes for 20 minutes.
After this, change the engine oil and oil filter. How to do this is outlined on the Chevrolet Lacetti oil change page.
After changing the oil, we change the spark plugs and go for a drive in active mode for 20 minutes.
For those who are thinking about whether to change spark plugs or not, I’ll just show you a photo for general development.
On the right is the candle before washing begins, and on the left is what it turns into during washing
Well, now the most important thing is what have we achieved?
Well, the first is a clear increase in engine output. Especially at low speeds. Pulling away becomes clearly better and more confident. The idle speed is leveled out.
Feelings are sensations, but let's look at the numbers. They will definitely tell us the truth.
Here is the schedule before flushing the injector and valves
And here are the same parameters after washing the injector and valves
We have amazing results - the throttle valve has closed more than one and a half times, and the pressure in the manifold has decreased from 35 kPa to 31 kPa.
Here are some more impressive results. Engine operation before valve flushing
And here is the engine operation after flushing the valves
Notice how RHH’s steps have dropped by half? What about air consumption?
And finally, the most informative indicator for many. Here is the duration of the injection pulse before flushing the injector
But the duration of the injection pulse after flushing the injector
Not only did the duration of the injection pulse decrease after flushing the injector, but it also became more stable (the line on the graph became smoother).
So not only the engine, but also your wallet will thank you. The difference at first glance is not great, but over the course of a year you can save quite a bit of expensive gasoline.
In general, let's summarize.
Everyone decides for themselves what to do with their car, but I believed, believe and will continue to believe that flushing the injector is a necessary preventative procedure. Even if nothing changed on the graphs, you still need to wash it. After all, you change the oil for some reason, but this does not affect the behavior of the car. Right?
You just need to understand that we wash not so much the injectors, but the valves and combustion chamber. And we do this for preventive purposes, rather than trying to restore a burnt valve or resurrect a dead injector.
If you have any questions, additions or advice, you are welcome to comment below.
Cleaning methods
Currently, there are two main cleaning methods:
One of the simplest methods is to add a cleaning additive to the fuel through the gas tank, which dissolves deposits during operation. It is recommended to carry out such cleaning as a preventative measure approximately once every 5 thousand km. This method is only suitable if the car has low mileage. If the machine has been in use for a long time and the system is supposedly very dirty, such cleaning may only make the situation worse. When there is a lot of contaminants, it will not be possible to completely dissolve them with the help of additives, and the spray nozzles may become even more clogged. More deposits will get from the fuel tank into the fuel pump, which can cause it to break down.- Another method requires special equipment and skills. A flushing device is connected to the injector through special adapter fittings. Instead of fuel, the device receives a special washing liquid such as: Wynn's, Liqui Moly, C arbom clean, etc., from a cylinder, which is connected by tubes. Thanks to the fitting, the system does not need: a fuel filter, a gas tank, a gas line, or an electric fuel pump. A mixture of cleaning fluid and gasoline is supplied to the engine under pressure. The supply pressure must be set according to the technical parameters of the specific engine. Under the influence of the washing liquid, contaminants become limp, pass through the nozzles and burn in the cylinders. The cleaning procedure lasts 30−50 minutes.
It is also useful to read: Insulating a car engine for the winter: goals and advantages
It should be noted that this method will not get rid of dirty injectors 100%. After this, flushing fluid remains in the oil system and injector. Therefore, experts recommend driving 10-15 km in forced engine operation, and then changing the oil filter and changing the oil. This method requires a significant investment of time and will cost a lot.
However, both methods are most suitable when the car’s mileage is low, and dismantling the injectors is quite difficult due to their location.