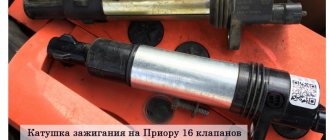
To go, you need to start! The ignition coil of a Priora car is not expensive. Its price for VAZ 2170 is from 2000+ rubles. On some machines this is a sore part that constantly breaks down. On a Priora with a 16-valve engine, there are about 4-5 analogues of this part.
Read the article to the end and find out how to check its performance and which one is better. Starting the engine of a Lada Priora car is a difficult procedure, which involves several parts and assemblies at once. At the same time, the standby engine start is carried out very quickly. At this time, several small subprocesses take place, and one of them is the creation of the first spark to ignite the fuel-air mixture.
To create a spark, it is not possible to place an open fire under the hood. The injection engine has become more “advanced” compared to its carburetor predecessor - it uses ignition coils, one installed with each cylinder.
An incident may occur, causing the engine to start “unevenly”. You will have to immediately look for how to check the elements of the ignition system. If it turns out that the problem is in these small parts, do not rush to despair, because in stores there is a good standard ignition coil for Priora 16 valves, the price of which is comparable to analogues. The wires to the ignition coils are an equally important component, which if it doesn’t work, you won’t go anywhere.
Basic faults
A normal Priora part should last from 50 to 100 thousand kilometers, depending on how often you start the engine. If an element of the Priora ignition system malfunctions, the following symptoms will occur:
- When accelerating, the car will jerk (as if the box is kicking in a car with an automatic transmission), or when driving in first or second gear.
- The integrity of the winding is broken. It is worth paying attention to the tip of the ignition coil of the Priora car.
- The motor "troits". This manifests itself in vibration and excess noise that appears under the hood, while traction decreases.
Electrical diagram of the Lada Priora dashboard
The dashboard displays driving characteristics, the current state of vehicle systems that ensure traffic safety, as well as the correct operation of the entire vehicle. The instrument panel wiring diagram helps to navigate the instrument and alarm indications in cases of malfunction. The instrument panel harness is marked with number 2170-3724030.
| № | Decoding |
| 1-3 | Front harness contact group |
| 4 | Rear harness contact group |
| 5 | Power supply from the central electrical system module |
| 6 | Connecting contact system for brake light group |
| 7 | Dashboard display |
| 8 | Lighting monitoring and control module |
| 9 | Contact group of the driver's emergency airbag activation module |
| 10 | Horn switch |
| 11 | Diagnostic connector |
| 12 | On-board computer control mode switch |
| 13 | Ignition coil controller |
| 14, 15 | Supply voltage to the electric power steering control unit |
| 16 | Electrical functionality controller |
| 17 | Light switch |
| 18 | Wiper switch |
| 19 | Air flow distribution gearmotor |
| 20 | Stove control unit |
| 21 | Heater drive switch |
| 22 | Heated rear window switch |
| 23 | Onboard clock |
| 24,25 | Instrument panel harness connector to radio |
| 26 | Emergency button |
| 27 | Glove box light |
| 28 | Glove box light control button |
| 29 | Ignition system harness |
| 30 | Control unit for airbag systems |
| A1, A2, A3 | Instrument panel harness grounding locations |
| B | Mounting block block. |
Design and principle of operation
So, starting the engine begins with turning the key in the ignition switch. At the same time, current must flow to the spark plugs, they give a spark to the fuel-air mixture, which is pumped up by the pump, the starter begins to rotate, causing the crankshaft to start moving. But the battery operates with low voltage electrical current.
Each coil is a small transformer. Two levels of winding are hidden under the housing of the element of the VAZ-2170 Priora ignition system. Its wires are low-voltage and high-voltage. The first ones receive current from the battery, the second ones transmit it to the spark plugs. When the current is converted, it is transferred to the spark plugs. The ECU “manages” this process, correctly distributing the force between the spark plugs.
As for how many ignition coils are in the Priora, there are 4 of them - one for each cylinder. Their work does not mix or overlap in any way. Each of them has “its own scope of work.”
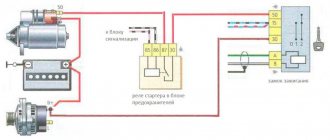
Electrical connection diagram for the ignition system of a Lada-Priora car
The spark ignition system wiring diagram section contains graphical information about the supply of current to the main automated instruments and the vehicle's electronic engine control system. From them, the voltage is distributed to the main blocks, power plants, as well as control sensors and ECUs.
| Contact no. | Decoding |
| 1 | ECU power supply |
| 2 | Connecting the ignition system harness to the dashboard harness |
| 3 | Fuse box |
| 4 | Measuring device for determining the speed of movement |
| 5 | Road roughness detection sensor (located on the shock absorber support cup) |
| 6 | Oil pressure warning light indicator |
| 7 | TPS sensor |
| 8 | DTOZh sensor |
| 9 | Coolant temperature indicator |
| 10 | MAF sensor (MAF sensor) |
| 11 | Idle air valve (IAC) |
| 12 | Main fuel pump relay |
| 13 | Power fuse for the fuel pump |
| 14 | Starter relay |
| 15 | Starter relay fuse (15A) |
| 16 | ECU fusible link |
| 17 | Crankshaft position sensor (CPS) |
| 18 | Oxygen sensor |
| 19 | Camshaft phase sensor |
| 20 | Knock Level Sensor |
| 21 | Solenoid valve for filter purge and vapor recovery |
| 22 | Lambda probe |
| 23 | Electronic ignition module power supply |
| 24 | Supplying voltage to spark plugs |
| 25 | Fuel injector power |
| 26 | Harness block from ignition coil to ECM harness |
| 27 | Harness block from the ignition system to the ignition coil wiring harness |
| 28 | Engine computer connector to injection system |
| 29 | Injection system harness block to ignition system harness |
| A | To terminal (+) AB |
| B1, B2 | Places for attaching ground wires of the ignition system |
| C1 | Place of attachment of the ground wire coming from the ignition coils |
Ignition system electrical harness, 2170-3724026.
Ignition coil electrical harness, 1118-3724148.
Injector electrical harness, 11186-3724036.
Manufacturers and prices of analogues - which ignition coils are better for the Priora
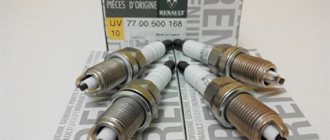
No one, not even AvtoVAZ, promises that the analogue will work as long as the standard model. There are a sufficient number of options on the market. It will take quite a long time to determine which is better. The following components are suitable for Priora 16cl:
- SOATE (manufactured in Stary Oskol) (article 2112-3705010-12), price – 1,200 rubles.
- MZATE-2 (article 59.3705), price - 1,000 rubles.
- Baker Priora 2112-3705010-10 – 1100 rubles.
- Fenox IC16085 (STK) – 1,300 rubles.
Performance check: how to check ignition coils on a Priora
Before you start replacing the ignition coils, you definitely need to check them and inspect them. Cracks, chips, and other damage to its body are unacceptable. If you see that the plastic is damaged, it means the part has overheated and cannot be used further.
The answer to the question of how to check an element of the 16-valve Priora ignition system is not limited to inspection. First you need to swap them and see if there are interruptions in the other cylinder. If there are interruptions, the problem is in the coil. There are several ways to use devices. To work you need:
- Secure the car in place and turn off the engine.
- Remove the negative from the battery.
- Disconnect the part from the motor, and then connect a fully functional spark plug to it.
- Turn off the fuel pump.
- Use protective equipment against electric shock, this is a must!
- Turn on the ignition and crank the starter. The spark plug should spark during normal operation.
- Sometimes repair of the Priora ignition coil begins after receiving data from the ECU. The codes start with 0301 and end with 0304, indicating each cylinder accordingly. However, the problem is displayed in the coil-plug module, so the culprit will have to be found out separately.
Now we check the ignition system element on the Priora with a multimeter. For this and further work with components, models AZ-1 or MD-1 are suitable. For this:
- Remove the part to be examined from under the hood.
- Set the measurement switch to the “200 Ohm” position, connect the probes. The display should show “0” or values close to it.
- Using probes, the external winding is checked. Pinout – 1.3. The display should show exactly 0.08 Ohm. The error is the number that the display showed during calibration; it must be subtracted. If nothing is shown, check that the probes are accurately touching the winding. If there is contact, but there is no result, the winding is broken and needs to be replaced.
- Set the multimeter to 2 MΩ measurement limit to test the high voltage winding. Connect the black probe to the terminal of the second connector, and the red probe to the terminal of the coil. The indicator should be 342 kOhm - but only for a cold part. It should be cooled before testing. This also requires checking the exact contact with the probe.
Remember that the winding of this spare part does not change, but the tip can be easily changed. Most often, repairs are limited to routine replacement - in order to be completely sure of the tightness of the part.
Checking the ignition coil and its circuits
To check the functionality of the ignition coil, release the pressure in the engine power supply system and do not replace the fuel pump fuse (see “Replacing the fuel filter”). Remove the ignition coil (see “Checking the condition and replacing spark plugs”). We insert a known-good spark plug into the rubber tip of the coil and connect the engine management system wiring harness block to the coil.
We place the spark plug on the cylinder head cover... ...so that there is contact between the side electrode of the spark plug and the engine ground.
To avoid electric shock, when cranking the crankshaft with the starter, do not touch the spark plug and the tip of the coil with your hands, but hold the coil by its plastic housing. An assistant, turning the ignition key to the “starter” position, turns the crankshaft. If the ignition coil and its circuits are in good working order...
...a spark should regularly jump between the electrodes of the spark plug. If this is not the case, you need to check the power supply and coil control circuits. To check the coil power circuit, disconnect the engine control system wiring harness block from it...
...and connect the tester probes to terminals “2” and “3” of the wiring harness block. When the ignition is turned on, the device should detect a voltage equal to the voltage at the battery terminals. If the voltage value does not correspond to the norm, check the serviceability of the circuits (open and short to ground) between terminal “3” of the wiring harness block and terminal “30” of the socket of the main relay of the engine management system (“+” power supply), as well as between terminal “ 2" wiring harness blocks and engine ground. To check the ignition coil control circuit, we use a probe with a 1.2 W lamp (you can use, for example, a cigarette lighter lamp).
We connect the probe probes to terminals “1” and “3” of the control system wiring harness block. If the control and power circuits of the ignition coil are working properly, the probe light should blink frequently when cranking the crankshaft with the starter. Otherwise, check the wire connecting terminal “1” of the wiring harness block to the corresponding (for each engine cylinder) terminal of the controller for open circuit and short to ground. If the power and control circuits of the ignition coil are working properly, but when checking there is no spark on the working spark plug inserted into the tip of the coil (see above), then the coil is faulty and must be replaced.
Removing and installing a coil on a Priora
To change the ignition system element in a 16 valve engine, follow these steps:
- Park the car level, securing it with the hand brake.
- Raise the hood and remove the negative from the battery.
- Undress the motor by removing its plastic protective casing.
- Find the spare part you need, and then the wire block connected to it.
- Squeeze the wire block clamp and turn off the power.
- Using the 10th key, unscrew the bolt that secures the part to the metal.
- Carefully remove the spool, trying to move it vertically. It would be a shame to damage the wiring at the very last moment.
- Remove the faulty part and replace it with a new one. Tighten the fastening bolt, connect the wire block and place the negative on the battery. Check functionality.
VAZ models 8 and 16 valves
Despite the similarity in engine design, the ignition system of the 1.5-liter injection 16-valve engine differs from the 1.6 16-valve engine. The 1.6 liter engine uses an electronic contactless ignition system with individual coils on each spark plug. Therefore, there was no need for an ignition module. Such a system is more reliable and cheaper to operate, since if one coil fails, there is no need to replace the entire module.
The 16-valve 1.5-liter VAZ 2112 injection engine used the same non-contact ignition system as the 8-valve engine, but a different ignition module was installed. Its catalog number is 2112-3705010. The design of the module remains the same - two ignition coils (for cylinders 1-4 and 2-3) plus switch keys in a single block. The spark is supplied to the cylinders in pairs using the idle spark method. This means that sparking occurs in two cylinders simultaneously - in one on the compression stroke (working spark), in the second on the exhaust stroke (idle spark).