The love of decorating your car is in our blood. And if it has practical benefits, so much the better. Today we will talk about such “cute” external tuning as illumination of car doors and thresholds. Yes, it looks beautiful and impressive, but you are unlikely to deny that it also increases safety in the dark.
The problem is that most motorists are inert people. Give them everything ready-made, and if they need to do something themselves, they say pass. They say your hands are crooked or you don’t have the necessary tools, much less experience. Well, you really have to work. But the participation of specialists is not at all necessary - all the work can be done independently.
Anton-FatTony › Blog › LED door lighting
Door lighting is not only a beautiful, but also a functional addition to any car, regardless of whether you are into tuning or not, everyone wants to see exactly where you place your foot when leaving the car... Door lighting is extremely useful, because no matter where you stop, You will always know where exactly you are going, because everyone is familiar with the situation when, having stopped at night in an unlit area, getting out of the car, your foot falls into a puddle, mud or something similar, you will agree, not a pleasant surprise...
And of course we must not forget about the aesthetic component of door edge lighting: even if you choose white lighting, you will always be the center of attention. But why limit yourself to just white? Your choice of backlight in any color: blue, red, green, yellow, orange, purple, etc.
Now a few words about the technology: To make door lights, we use a fully sealed LED strip of IP65 standard with increased brightness, which gives rich, even light and at the same time lasts much longer than its cheaper counterparts.
All connections and wires are reliably soldered and sealed, which makes the entire structure as reliable and durable as possible.
The connection is made to the standard wiring using Smart Connection; if the car is equipped with its own diagnostic system, adjustments are made using standard dealer equipment to ensure correct and error-free operation of the entire system.
In addition to illuminating the edges of the doors, we also suggest illuminating the trunk space, which is also quite functional, since now you can see everything that is in it not in the dim light of the standard lamp. The trunk lighting, by the way, looks quite beautiful not only in the evening, but also during the day, giving the car a certain charm.
You can find out the cost of work on lighting the interior of your car by phone or on our website:
And I remind you again:
On the eve of Valentine's Day, we, the team at Tuning Atelier Fat-Tony, want to congratulate you on this wonderful holiday and inform you that on February 14, everyone who signed up with us for any work, be it installing acoustics, illuminating the underbody or interior of a car, reupholstering vinyl of the body or interior, in general, for all all work, we give a 14% discount
Please your loved ones with an extraordinary gift: give them the embodiment of their dream associated with a personal car, let there be something special in it that will remind them of you every day they spend with their car.
February 14th 14% discount on all work at Tuning Atelier Fat-Tony! Don't miss your chance to please your loved ones!
Source
OSRAM › Blog › Interior lighting tuning: functionality and beauty
Until recently, car interior lighting was limited to a single ceiling lamp. But the level of comfort gradually increased. And now automakers are adding navigational directional lamps, lights in the glove compartment, illuminated vanity mirrors, lighting for thresholds, interior door handles, and even footwell lighting.
But this was not enough for tuning fans. They began to highlight niches, chairs, controls and interior elements. Car interiors began to flicker, pulsate and change colors at the owner's request.
Today we’ll talk about how to modify your interior lighting yourself.
Traffic regulations very strictly regulate the color, brightness, type and location of external lighting devices. But you won’t be fined for interior lighting tuning. But it is worth considering that turning on the interior lights at night reduces visual acuity. Even an ordinary lamp above the driver worsens the sensitivity of the retina, the eyes are less able to distinguish dark objects.
We recommend turning off the interior lighting while driving.
The pioneers of domestic lighting tuning simply replaced ordinary lamps in the ceiling lamps of their “nines” with blue or green ones. It looked impressive, but had to sacrifice functionality. It became impossible to see anything in the dim blue light.
Today, the best functional tuning of a ceiling lamp is the installation of LED white light lamps. They burn brightly and consume much less electricity than regular ones. This will be appreciated by absent-minded drivers who forget the light in the cabin at night. With LED lamps, the battery, of course, will not discharge so quickly.
You can also modify the instrument panel. For example, change the color of the backlight or make it brighter. To do this, you will have to tinker with dismantling the panel and replacing the lamps with diodes. But you can choose the lamps so that the shield becomes multi-colored, the main thing is to buy diodes with the right base and not to overdo it with the brightness.
Legroom
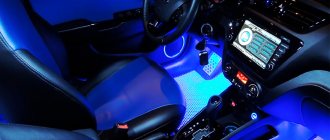
The designers of expensive luxury cars were the first to come up with the idea of illuminating the legs of passengers. It looks beautiful, creates a cozy atmosphere in the cabin and makes it easier to navigate in the dark. Gradually, this option appeared on cheaper cars.
You can mount the footlights yourself. Special LED strips will help you, which are attached with double-sided tape in an inconspicuous place and connected to the cigarette lighter. The main thing is to hide the wires properly so as not to spoil the whole look.
AlexxxGray › Blog › Lighting in the car door. Let there be light!
“Should I or should I not illuminate my car door?” — If such a question is relevant for someone, then my advice is yes, definitely do it (if you haven’t installed it yet). There are quite a few reasons for this - such as simple modding - the desire to highlight the individuality of your car or pretentious pampering,
and for practical reasons - illumination of the boarding area
and door end lighting to warn passing vehicles. And this means the safety of passengers getting out of the car.
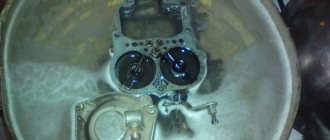
To be honest, the first installation of lighting for the landing zone in the door was inspired by pathos. This idea is not expensive and it is not very difficult to implement. I purchased sets of lights with my car's logos and an electrician installed everything within 1 hour. It looked very impressive in the dark. But time passed and the door lighting itself became something familiar and ordinary. Then the not-so-pleasant moments began: 1) over time, the logo began to fade 2) within a year, the backlights in two doors burned out 3) the battery charge dropped catastrophically quickly (within 2 weeks of the car being idle in the garage, you could end up with a pile of iron with locked doors and not responding to alarm). At that time, I did not associate current leaks with the lighting until a global rework of the electrical system began. As it turned out later, the diodes in the backlight not only shine well, but also do not heat up so much. Over the course of a year of operation, the diodes managed to melt the plastic lenses, which is why the logo turned out to be “insane”, and the design on the lens simply began to fade. Perhaps this is a problem with the manufacturer of my backlight, and not with everyone, but as they say, “a residue remains...” In addition, it turned out that the cable (thin two-core in transparent silicone protection), which was routed for backlighting, had become frayed and punished over the course of a year. Lights with the logo and wires took their rightful place in the trash. But since I was already deeply hooked on this topic (damn, it’s convenient to see where you’re stepping :))) and there were still holes in the plastic, I decided that I’d still make some lighting in the doors. I didn’t want to bother with the logo anymore, so the choice was towards more light and moisture protection. We bought these things that are used mainly for running lights.
Source
Door projection with Kafulee car logo (2 pcs)
Do-it-yourself footlights in a car: detailed description, photo
Customer reviews:
Review #1: The packaging does not inspire confidence, there are two light bulbs inside, each with an LED and a lens with a logo. They work, haven't installed them in the car yet. Delivery to Volgograd is about 2 weeks, sent quite quickly, 1-2 days. The parcel was fully and completely tracked. I can’t quite clearly evaluate it yet; it shines quite brightly under artificial lighting.
Review #2: Ordered on March 1, arrived on March 15. two weeks is even very fast. Thanks to the seller. I installed everything, it doesn’t seem to be buggy. Thank you.
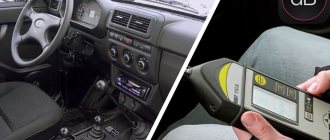
Review #3: Delivery a little over two weeks. The quality is excellent. Bright, I think it will illuminate enough in the dark. Judging by the dependence of current consumption on voltage (you can see in the photos), the LED has a power driver. I was able to notice a decrease in brightness (by a step) only when the voltage was reduced to 6.5 V for one flashlight and to 6.3 V for the second. In the range of 6.5-15 volts there is no visible change in brightness, the current consumption decreases from ~500 mA to ~150 mA. Aluminum body and nuts. Made carefully, the threads are cut smoothly. The heating is small; after ten minutes of operation at a voltage of 12.5 V, the case is slightly warm. The downside is that the case is not sealed. It is advisable to place the front protective glass on the sealant and fill the wire input with sealant so that water does not get inside. By the way, you can remove the insert with the logo, it will just be a spot of light, and if you want, print something of your own on a color printer on special transparent photographic paper (film) and replace it :)) I recommend it.
How to make car interior lighting with your own hands?
Internal car tuning is very popular.
And this is understandable, because any driver wants his car to impress not only pedestrians and other drivers, but also those who ride in the same cabin with him. And sometimes, you just want to please yourself with individual car interior lighting. Installing lighting in the car interior with your own hands is not a difficult procedure. To do this, you need to purchase high-quality material and prepare tools, as well as think in advance about what exactly you want to emphasize with the help of light.
How and in what places is LED lighting most often installed? What is the effect, from an aesthetic and functional point of view, of additional LED lighting? You will get answers to all these questions in this article.
Preparation
The simplest and most inexpensive option for car interior lighting is LED strips. Most often, the lighting turns on when the doors are opened, but you can choose another option. Now the automotive market offers a large number of lighting kits for car interiors. It is not difficult to find the most suitable option for a particular car.
To install such illumination you will need the following materials:
- LED strip of the required length;
- capacitor 3300 mF;
- heat-shrink tubing;
- insulating tape;
- a wire of a certain length, which depends on the connection method;
- lampshade;
- power supply for testing at home;
- controller for adjusting brightness (optional);
- male and female terminals;
- glue sealant.
In addition to the materials listed, to install lighting you will need the following tools:
- pliers;
- soldering iron with solder;
- Screwdriver Set;
- lighter;
- knife;
- tweezers.
Armed with the listed materials and tools, you can begin installing the LED strip inside the cabin. The location can be chosen as desired. For example, to install lighting under the feet, you can use a universal scheme that is suitable for almost any car.
How to choose lighting for a car interior?
Before starting work, you need to choose a place to place the interior lighting, its type, and also take care of the activation mechanism. For example, appliances and/or door opening mechanisms can be controlled by remote control. The best option is a combination of devices.
Today the market offers us two modernization options:
There is a clear advantage to first lighting a car's interior. This is the ease of installation of the tape. There is no need to purchase additional mounting hardware for installation. The LED strip included in the kit is simply attached to double-sided tape. A standard size lamp can be powered by a cigarette lighter and illuminate other small parts of the interior.
The positive properties of diodes include shock/strength and high tightness, as well as long-term operation in comparison with other interior lighting devices. It is important that the car's LED lighting turns on instantly. This allows you to create different lighting effects.
You can also create neon lighting for the car interior yourself. This will be a bright light, with the help of which a large space will be illuminated. Unfortunately, neon-based lamps are technically complex devices, and also very capricious in their operation. Neon lighting often burns out when constantly turned on/off, and is highly fragile.
Choosing a belt for the machine
I’ll try not to pour water, but will briefly look at what to look for when choosing an LED strip
LED Matrix Type
LED interior lighting. To illuminate the car interior, including the trunk, choose SMD 3528 60pcs/m (the size of one LED crystal is 3.5x2.8mm). Why she?
Firstly, we get an average power of 4.4-4.8 W per linear meter with a luminous flux of about 250-300 Lm. With such power, LEDs do not require heat dissipation and the LED strip can be easily mounted on plastic elements. And the luminous flux is sufficient to fully illuminate any interior elements.
Secondly, this is the most common tape on sale, we buy it in the first store we come across.
Options like SMD 5050, 5630, 5730 are not suitable due to their high power. Unpleasantly high brightness and the need to mount a heat sink make them not the best choice for LED car interior lighting.
Exterior car lighting. Here we turn on the head. If there is LED lighting under the bottom of the car, you can choose more powerful LEDs - SMD 5050 30/60 pcs/m. The aluminum profile will be our heat sink (more about installation later). For LED illumination of license plates or (God forbid) headlights, this is a bad choice. Such LED lighting will be a bait for traffic police inspectors (read about installation rules and fines at the end of the article).
Regular LEDs or RGB - there is no difference. RGB is a little more expensive, it is more difficult to connect and requires an additional control controller (read more about connecting an RGB strip). But it allows you to change the backlight color.
Protection class
There are mainly three protection classes on sale - IP20, IP65, IP68.
- IP20 – open tape without protective coatings, suitable for use indoors in dry rooms. Afraid of moisture, dust, and any mechanical influences.
- IP65 – with a protective silicone layer that can protect against condensation.
- IP68 - sealed, waterproof LEDs that can be placed on the bottom of the car.
LED class IP68
For LED illumination of the glove compartment or the bottom of the dashboard, IP20 is also suitable if no one pulls it or pours water on it.
For illumination of other elements, IP class 65-68 is desirable.
How to properly install an LED strip for car interior LED lighting?
Installation of a car with LED strip is carried out according to the standard scheme. First of all, you need to purchase a set of wires, heat shrink tubing, and tape.
It, like individual diodes, is purchased at automobile markets and/or in specialized automobile stores. You should not skimp on the quality and length of the tape; experts advise stocking up on good LEDs. It’s better to buy more diode strip than to realize at the last moment that you don’t have enough.
In addition to interior design, diode strips are actively used to illuminate car wheels.
Step-by-step instructions for diode connection of car interior lighting
Arrangement of lighting in the car, with your own hands, should begin with the instrument panel of the vehicle. To do this, standard equipment is removed: instruments, panel lighting, and diodes are installed. The installation process is very simple, since the diodes have bases similar to factory equipment.
Then you need to determine the installation locations. Many people prefer to mount diodes along the entire perimeter of the ceiling, parallel to the car body pillars. The summer is laid gradually, and the remains can be cut off.
The cut points are clearly visible: they are marked with special membranes. After the procedure, do not forget to clean the ends of the cut and solder them together. We close the connections with bushings and heat them with a hairdryer. In this case, it is better not to use an industrial hair dryer, since there is a high risk of overheating; an alternative is a regular household appliance.
Switching on is carried out similarly to the circuit of neon lamps. You need to be especially careful at this moment and not confuse the polarity points that are indicated on the tapes at the cut points.
Essentially, this is where the workflow ends. There is nothing complicated. Only the installation must be carried out sequentially and be careful about small elements when connecting them.
An important aspect when working is the combination of lighting aesthetics and its functionality, which will be discussed below.
Connection rules
LED strip is sold in rolls of five meters. However, the required length for mounting the backlight does not always coincide with this value. Therefore, you either need to simply cut it, or connect two pieces, or connect several strips at the same time. However, their schemes may differ. Let's look at the most popular options and their distinctive features.
Schemes for connecting two tapes to one power supply
Installing the tape is not difficult if all the parameters are calculated and the equipment is selected correctly. You just need to connect the contacts of the ice strip to the power supply, observing the polarity. If software control of the backlight is planned, then an appropriate controller is installed between the LED strip and the transformer. The circuit will become more complex when it becomes necessary to connect two ice strips.
The main difficulty is that the material of the LED crystals and the conductors connecting them is designed to withstand a load with a total circuit length of not more than five meters.
Therefore, if a piece of at least 5 cm in length is soldered to the end of such a strip or mounted using connectors, an overload will occur. As a result, either the ice elements will burn out, or the tracks will melt, or the brightness and glow of the diodes will significantly deteriorate due to constant overheating.
The way out of this situation is to connect two LED strips in parallel to the power supply using separate wires. If the backlight is three-color (RGB), then the conductors must be connected in the same way to the controller, and that in turn to the power supply. Naturally, with such a scheme we must not forget about the total value of the electrical parameters of the ice strips and the correspondence of the power supply to them.
If you need to connect four tapes
If you need to connect four LED strips at the same time (each no longer than 5 meters), you need to purchase two power supplies. The use of one powerful transformer is not justified because:
- Its cost is much higher than two with half the power.
- Connecting 4 LED strips to one transformer requires more wiring than 2 LED strips to two power supplies.
Connecting RGB strips
Three-color LED strips for illumination must be connected via an RGB controller, observing polarity. Unlike monochrome ones, here you need to connect four contacts. The markings on the ice strip material must be connected by similar terminals on the control unit:
- B - blue,
- R - red,
- G - green,
- V+ - general.
Connecting several RGB strips for illumination to the power supply is similar to the single-color analogues discussed above, that is, in parallel - no more than 5 meters long. However, the controllers of three-color ice strips must also withstand the load of the circuit and be designed for its total power. In practice, it is not always possible to find devices with such a reserve. Therefore, an RGB amplifier is used.
In the backlight circuit, the amplifier connects the subsequent LED strip to the previous one (thereby reducing the load on the controller), but at the same time it itself requires connection through a separate power supply (designed for one LED strip). In this way, through a set of amplifying blocks and transformers, you can assemble a fairly large chain of three-color ice stripes on a single controller.
Which wires to use
According to the rules of electrical installation work, conductors for lighting in a room or outdoors must be designed for the total power, rated voltage and current of the light source. In the case under consideration, when the length of the LED strip does not exceed 5 meters, it is optimal to use single- or multi-core copper wires with a cross-sectional area of 1.5 mm2.
Aesthetic and functional components of lighting in the car interior
Vehicle interior lighting, which is done on your own, simultaneously solves a number of problems:
Determining the functionality of lighting in a car interior is often somewhat more difficult. For many cars, installing additional lighting (tuning) is an opportunity to create comfortable conditions for passengers and the driver at night, which include:
It is also worth mentioning that the interior lighting can be synchronized with the subwoofer installed in the car's interior. This gives many interesting moments, in particular the pulsation of light to the beat of music, changing the color of the backlight, etc.
We can talk for a long time about useful functions, but we will focus on the above combinations.
To install or not
Before you buy a backlight kit for your car, think about whether you really need it. Think about what goals you set for yourself and how well the lanterns can satisfy them.
The presence of additional lighting in the doors makes travel more comfortable and somewhat safer. Suppose that on the way you needed to find some object lying in a door pocket. But I can’t find it at all. And here it will be useful to have additional lighting, which is not provided standard in the car. Although you should be objective, since many foreign cars, such as Toyota, Mercedes, Volkswagen and the same new Hyundai Grandeur already have lighting as standard, which cannot be said about domestic cars or old foreign cars.
So it turns out that the backlight acts as a tuning element, but at the same time performs some useful functions. Depending on the design and installation method, the door light can work when the door is closed or open.
Whether to install such equipment with your own hands or not, everyone decides for themselves.
Design aspect of lighting in the car interior
It is important to choose niches for car interior lighting and decide how to illuminate them. You can place and make lighting in the car interior in any place you like. But do not forget about the practical side of the issue. The most successful is the installation of lighting in the glove compartment, in the foot area and in the rear of the car, where passengers are located.
Interestingly, the rear seat lighting is the most productive. This applies to accessories and individual parts, including door handles. Car interior lighting as decor will look effective on air duct grilles and/or around the entire perimeter of the doors. You can combine directional light, or its individual elements, using a cigarette lighter or other electrical on-board network.
You can limit yourself to one-time activation and/or connect on an ongoing basis after dark. There are no clear recommendations on the use of one color scheme or another. However, the lighting in the car interior should be “polite”, that is, not irritate passengers, not be in the eyes, etc.
The main thing is that the chosen color does not distract the driver from driving, and corresponds to the general concept of the car’s interior.
The main types of such systems
Before choosing a system of this type for a vehicle, you should have information about how the various options differ from each other.
First of all, such lighting devices differ in the type of operation. The former require integration with the automotive electrical system for their operation, the latter operate completely autonomously, using built-in batteries or accumulators. Naturally, mobile systems are easier to install, since their installation location is practically unlimited. But it is worth remembering that the vehicle owner will have to periodically spend money to purchase and replace batteries.
The second important difference is the lighting elements. Today there are three most popular options:
- LED door lighting or LED type;
- Laser;
- Neon option.
The first two options are the most popular. There are a number of objective reasons for this:
- LED lighting is offered at a very affordable price and is easy to install. True, it requires connection to the vehicle’s electrical system.
- Compact laser projectors operate using autonomous power sources and are also quite easy to install - you can use regular double-sided tape. The only negative is the higher price.
Naturally, the choice of such products is a purely individual matter, however, you need to know about the range that is available on the market today.
What tools and materials are needed for additional interior lighting?
Using one or another version of car interior lighting, you will need the most common tools and consumables. Including:
From consumables:
In operation, individual lighting components must be connected to each other using a multi-core cable. In this case, the useful area of the cores should be 1–2 mm. Those places where soldering occurred, as well as connecting contacts, must be covered with insulating material. In the process of checking and monitoring the correct installation of car interior lighting with your own hands, you must use a multimeter.
Result
Let us remind you that in a similar way you can install additional lighting in the interior of a Lada car.
Photo: logbook Andrej877 and NI-kos
Keywords: Lada Granta doors | external lighting for Lada Granta | Lada Kalina doors | external lighting for Lada Kalina | Lada Priora doors | external lighting for Lada Priora
+4
Share on social networks:
Found an error? Select it and press Ctrl+Enter..
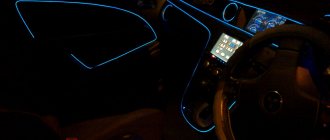
What do you need to know about car interior lighting with cold neon?
You can add individuality to your car and make it stand out from the general flow of traffic using cold neon, which looks original and is very effective. Today, neon lighting is one of the most common methods of interior tuning. This option has the following advantages:
Do-it-yourself car interior lighting using cold neon is not only beautiful, but also practical. Such tuning allows you to protect you and your passengers, and provides a huge field for imagination. By making lighting in the car interior with your own hands, you can get a single-color light, or in different colors, using different patterns, colors and combining their quantities. Installation with neon material is a minimum cost and minor interference in the electrical system of the car, which does not affect the stable operation of other (standard) vehicle systems.
Tuning interior lighting when opening the car doors
Every motorist wants to improve the operating conditions of his vehicle. In this article we will talk about how to illuminate car thresholds and doors when opening them with your own hands. In fact, this function is not the most important when using a car, however, it adds aesthetics to the car and practicality for the driver and passengers at night.
Backlighting is one of the most popular types of tuning; it makes your car more practical and doesn’t break your pocket.
Many drivers believe that taking on such work without experience is an impossible task, and yet it is possible to install interior lighting in a vehicle without the help of specialists, although this is a very labor-intensive process.
Neon lights
With neon lighting, things are a little more complicated. Here is a short list of characteristics of neon lamps:
- Brightness and saturation of lighting.
- Complexity of installation, which makes it difficult to install it yourself.
- Flashlights are quite demanding in terms of operating conditions.
- Poor response to rhythmic on-off cycle.
- Lack of resistance to mechanical damage.
Let's look at how you can install neon lights at the bottom of the car interior with your own hands, and lay an LED strip along the ceiling so that the backlight with the car brand logo in the door is triggered when the car doors are opened.
Popular articles Cool congratulations on Labor Day
Neon illumination of the front car door
Technology and features of installing lighting in a vehicle interior with your own hands
Interior lighting is not only a practical solution for illuminating a car at night, but also a modern type of tuning and decoration of a vehicle. Initially, you need to set the right tasks for yourself so that the result meets your expectations. The set of tools and the specifics of the work depend on exactly which areas of the interior you want to tune - these could be the car's sills, handles, dashboard, driver's foot lighting, and how the lighting should work - when you open the door, when you turn on the ignition, or on a special button. .
And also decide which lighting devices you want to use to illuminate the car interior. Most often, LEDs or neon glow elements are used for these purposes.
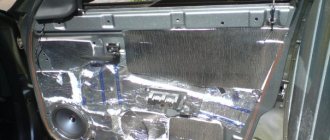
Car door illumination using LEDs
You can decorate the interior of a vehicle using LED strip. The tape is easier to install with your own hands, as it has a special self-adhesive coating and therefore does not require additional fasteners. It is also shock-resistant and can withstand different weather conditions well.
Purchasing special LED strips for car lighting can greatly facilitate the work of installing them, but their price category is much higher than LEDs per meter. It is necessary to improve and adapt the meter tape to the vehicle using a soldering iron.
To work, you will need to purchase heat-shrinkable pipe, LED strip and electrical wires. First, we try on the LED strip to the threshold of the car and cut off the required piece, it is better to take it with a small gap. To one end of the LED strip you need to solder two wires, minus and plus. For convenience, you can install female terminals on their ends. Separately, it is necessary to prepare four electrical wires with male terminals.
We insulate the soldering areas using heat-shrinkable tubing. The modules are ready to use. Next, you need to remove the trim from the doors and sills of the vehicle and install the developed blanks.
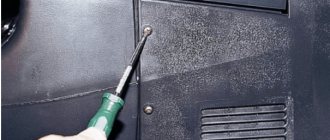
Two wires with male terminals on each door must be routed through the hinge, so they will stick out from it. We tighten the negative wires to the ends of the right and left doors, respectively. This will ensure that the threshold is illuminated exactly from the side where the car opens.
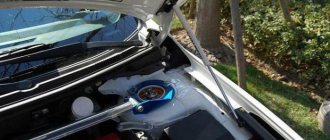
We connect the negative electrical wires to the diode modules, and connect the positive wires to any permanent positive in the vehicle. This could be a car's standard light source, a cigarette lighter, or a battery plus. It is important here not to confuse the polarity of the electrical wires. We check the operation of the installed LEDs. If everything is done correctly, they will light up every time the car is opened. We put the casing in place and enjoy the result.
Similarly, you can illuminate the dashboard of a vehicle, the driver’s feet or door handles. And also the negative ends of the wires can be brought out to a separate button. In this case, the backlight will only work when you turn it on yourself.
Installing neon lighting in the car interior
Neon lighting fixtures have a diffused glow, which greatly attracts the attention of car enthusiasts. Although, on the other hand, if we compare LED and neon devices in terms of service life, the former are distinguished by a long period of operation.
If you want neon lighting for the car interior, then the easiest way to work is with a neon cord. It is sold similarly to LED strips by the meter and is installed according to the same principle. For installation, it is necessary to remove the threshold covers and lay out neon cords of the required length along the outer edge. Ideally, when installing the casing in its place, it should be flush with the neon cable. Similarly to the previous method, we bring out the electrical wires to the ends of the doors and to the power supply.
Neon lamps are a more difficult lighting material to install, as they are prone to mechanical damage and are demanding in terms of operating conditions. To install neon lamps, you will need clamps, screws and aluminum corners. The aluminum corner is cut to the size of the neon light sources and attached in places above the dashboard using self-tapping screws. The same is done in the rear passenger seats. Neon light sources are attached to the installed corners with clamps. Wires are supplied to the door opening sensor and power supply to ensure that the lighting devices are turned on when the door is opened.
Installation of lighting based on neon lamps
Neon has been used in advertising as an inexpensive and economical light source for a very long time. Today it is being actively replaced by LED technologies, but motorists like the diffused glow that characterizes neon lamps. In terms of service life, they are noticeably inferior to LED prototypes, but this does not stop decoration lovers.
If you intend to use neon lighting when opening a car door, then the easiest way to implement your plan is to use a neon cord. It resembles LED strips in appearance and is mounted according to the same principle.
First, you need to dismantle the sill trims, and then carefully lay out the neon cords of the required length along the outer edge. It is advisable that after installing the casing in place, it should be positioned close to the backlight cable. In exactly the same way we install neon electrical wiring on the car door limit switches.
To secure the edges of the tape, we will need fastening elements such as self-tapping screws, tie clamps and aluminum corners. The corners are cut exactly to the size of the neon tracks, they are mounted under the dashboard using self-tapping screws. Clamps are needed to attach neon lamps to the corners. One end of the tape is connected to the door opening sensor, the other to the power source.
With this method of installing car door lights with your own hands, the illumination will light up automatically when the doors are opened.