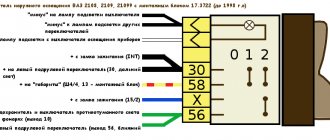
The external lighting switch in the electrical equipment of VAZ 2108. 21081, 21083, 2109, 21091, 21093, 21099 cars turns off and on the side lights, rear license plate lights, engine compartment lamp, low beam headlights, through it voltage is supplied to the fog lamp switch in the rear lights . It is installed in the instrument panel.
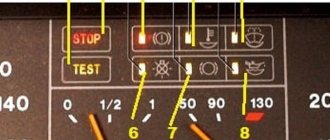
External lighting switch key positions
The starting position is “0” (the circuits are de-energized).
Position - “1” (the circuits of the dimensions in the front headlights and rear lights, the engine compartment lamp, the rear license plate lights, the fog lamps in the rear lights are powered). The indicator lamp for turning on the external lighting on the instrument panel lights up.
Position - “2” (low beam headlights).
External lighting switch connections diagram No. 1 (VAZ 2108, 2109, 21099 cars up to 1998 with mounting block 17.3722)
External lighting switch connections diagram No. 2 (VAZ 2108, 2109, 21099 cars after 1998 with mounting block 2114)
Notes and additions
— The external lighting switch of VAZ 2108, 2109, 21099 is always energized, even when the key is in the “O” - “parking” position in the ignition switch. Therefore, after stopping the engine, it is necessary to return its key to the “0” position - the original position, so as not to discharge the battery with the lights or low beams on.
External lighting switch for VAZ 2108, 2109, 21099 cars removed from the instrument panel
— There is a backlight on the switch button, which lights up after turning the ignition key to the “I” — “start” position.
— In addition to the above-mentioned contacts of the external lighting switch, there are several more installed in it, intended for circuits for switching on the dimensions separately on the right and left sides of the car (for VAZ 2108, 2109 of the first years of production).
— Marking of external lighting switch 581.3710.
— In addition to the circuits listed above, the exterior lighting switch supplies voltage to the interior lighting circuit of the vehicle.
More articles on electrical equipment of VAZ 2108, 2109, 21099 cars
Panel tuning options
If you decide to tune your instrument panel, then most likely you will be interested in knowing what options exist for doing it. The tuning shield, as you know, pleases the driver’s eye, so this issue is relevant for many car owners.
Dismantling the shield
To tune the dashboard, you first need to remove the device itself.
To do this, you only need to disconnect eight fasteners; to do this, you can use a regular knife:
- First, the fastenings on the driver’s side are disconnected;
- then you need to release the latches located there, on top;
- after this you can disconnect the middle part of the tidy;
- the panel itself is dismantled (the author of the video is Artem Volivach).
Improvement and replacement of backlight
To perform backlight tuning on a VAZ 2109, the lighting sources must be replaced after removal; in this case, it is advisable to use diode bulbs, and if necessary, the scale itself can be modified.
The tuning procedure includes the following steps:
- First, dismantle the standard insert where the scales are located. Remove all the arrows and set them aside, then make corresponding holes for them in the new pads. To prevent the arrows from sticking when operating the instruments, the holes can be made wider.
- Next, you need to remove all the standard lighting sources - just dismantle the entire circuit and install diode devices instead of the old light bulbs. When installing new sources, observe the polarity, since if it is confused, this will lead to the inoperability of the device as a whole.
- Once the lamps are installed, you can begin to refine the scales. Take the new pads and, using fluorescent paint or a marker, paint the numbers on the scales. Such a marker or paint will be required so that when the instrument is illuminated with LEDs, the numbers glow more brightly and stand out.
- After the backlight tuning is completed, you will need to carefully install the circuit and install new overlays on top of it. When installing, be careful not to damage the panel elements.
Removing and replacing rear lights
In order to remove the rear lighting equipment you will need: - an “8” key; - a convenient Phillips screwdriver.
All work consists of seven simple steps:
The first step is to open the trunk of your car. If it is filled with things that may interfere with the work process, free up the interior space. In order to gain unhindered access to the rear light housing, it is necessary to remove the decorative fabric trim. It is attached using several self-tapping screws, which can be easily unscrewed with a screwdriver. We remove the casing so that it does not interfere with the future process. On more modern VAZ 2114 models, the trim is attached using regular fabric Velcro. We feel for the contact chip that is attached to the headlight circuit board and carefully pull it out of the connector
In this case, do not shake the chip from side to side; carry out all manipulations extremely carefully. Now is the time to remove and remove the board itself. To do this, press on the special plastic clamp and pull the product out of the headlight housing. At this stage we will unscrew the rear light mounts.
Using an “8” wrench, we will need to unscrew one nut from the four mounting studs, which are located in the corners of each lamp. All that remains is to disconnect the device body from the car body. To do this, grab the headlight with both hands and pull it towards you. The reverse connection of the rear lights on the VAZ 2114 is carried out in a similar way, as well as the removal process.
Conclusion
- It is best to make the replacement before wiring problems begin.
- To work you need to remove the lights. On the VAZ 21099 it is hidden by a plastic decorative trim in the trunk.
- Now unscrew the fixing screws on the trim and remove them.
- Disconnect the block with wires and carefully remove it, being careful not to damage the board, because it sits tightly in place.
- Now, using a 10mm wrench, unscrew the 4 nuts securing the headlight housing. Remove the part from the machine. Now you can install the new part and calmly begin the replacement.
- The collection is done in reverse order (the author of the video is Automaniac1994).
Read more: Ritmix DVR (Rhythmix): description, models (AVR-330, 424 and others) and owner reviews
What to do if the instrument panel on a VAZ 2109 does not light up
:
- Types of panels
- Why doesn't it light up?
- Popular faults
We recommend: Tightening the cylinder head of VAZ 2109
When the instrument panel on a VAZ 2109 does not light up, this is one of the common malfunctions of this unit. To fix a problem, you first have to find the cause of its occurrence.
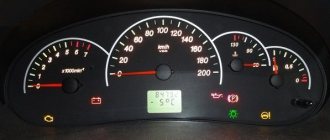
Tidying up nine
Types of panels
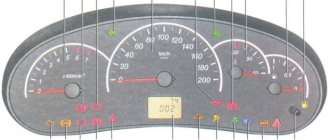
Instrument panels on the VAZ 2109 are of at least three types:
- Low panel;
- High panel;
- Electronic panel on nines with Europanel.
Europanel
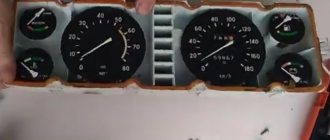
On versions with a low panel, failure of the entire panel is extremely rare. This is due to the fact that here the speedometer and econometer are equipped with mechanical drives. Therefore, it is unlikely that they will fail along with the electrical component.
Dashboards with a high panel do not have an econometer, but the speedometer is also based on a mechanical cable drive.
Why doesn't it light up?
If suddenly electrical appliances and indicator lamps on the dashboard stop working, certain actions must be taken.
- First, remove the cover of the mounting block and make sure that the fuse is intact. The fuse markings are located on the inner surface of the cover. You should look for fuse F16 or F5, depending on the year of manufacture of your VAZ 2109.
- If the fuse is intact, be sure to check whether the contacts of the fuse you are looking for have not oxidized. It is not uncommon for shields to fail due to broken contact.
- Check if there is power to the dashboard. To do this, you will need a warning light and the ignition on. Disconnect connector X4 in the mounting block and check for voltage at pin 3. The disadvantage of the VAZ 2109 design is that when it rains, the mounting block immediately becomes wet. This causes oxidation of the contacts in the pads, which causes the electrics to stop working. Sometimes not only the contact is oxidized, but also the board of the Nine mounting block.
If none of the above actions yielded results, you will have to be disappointed. After all, now you need to remove the dashboard and check the condition of the wiring, contacts, and negative connections. Here it is better to trust a professional electrician or set aside a whole day to troubleshoot problems yourself. There is no need to rush here.
Where did the backlight go?
Popular faults
If we talk about the dashboard of VAZ 2109 cars, then they are characterized by certain problems. We will tell you about them, and also tell you how to act correctly in a given situation.
| Fault type | Your actions |
| Gasoline level and temperature indicator does not work | In most percent of cases, this situation occurs due to breakdown of devices, sensors of these devices, or an open circuit of the power supply. Therefore, first check the circuit for continuity, make sure that the fuses have not blown. If this is not the case, check whether the gas level and temperature sensors are working. Only if none of the actions allowed you to get rid of the breakdown, you can begin to replace the devices themselves. No options, the problem lies in them |
| When the fuel tank is full, the arrow points to zero | If you have worked on the fuel level sensor, the fault most likely lies with you. When manipulating this device, the float limiter is often knocked down. Either the limiter is installed incorrectly or adjusted, causing the resistor winding to end. To resolve the problem, remove the sensor and then adjust the limiter again |
| The fuel gauge needle regularly jumps and ends up at zero | Here, most likely, the resistor has weak contact with the current collector. Another possible option is that there is a break in the resistor. To resolve this situation, we recommend replacing the hot level sensor with a new measuring device |
| The fuel level lamp is constantly on | If this lamp is constantly on, there is probably a short circuit in the fuel level sensor supply wiring to ground. Another option is that the sensor’s flexible bus is shorted to the fuel intake pipe. You will have to disassemble the device to align the bus and get rid of the resulting short circuit |
| Indicator lamps do not work on the dashboard | There is a high probability that the light bulbs have simply burned out, or they are poorly held in their seats due to loose contact. Replace the bulbs, but first try tightening the contacts. Traces of oxidation may be detected. When cleaned, the light bulbs can work normally again. Also, do not exclude the possibility of wiring breakage or oxidation of the tips of the supply wiring. Try going over the wires with a tester, cleaning the contacts if necessary. |
| The speedometer does not work, the flexible shaft is noisy | In such a situation, you will have to change the speedometer drive cable or replace the entire speedometer assembly. But before you bother so much, check that the fastening nuts of the tips are tightened correctly and properly. The flexible shaft may make noise during operation due to deformation or violation of the permissible bending of the shell of less than 10 centimeters during installation |
We recommend: Checking the Hall sensor and replacing it
Last resort - complete dismantling
The instrument panel of the VAZ 2109 is not so complicated that you cannot figure it out on your own. But in the absence of experience, it is better to entrust the repair to specialists, or to enlist the support of a partner who understands this matter.
PROCEDURE
Now let's figure out how to remove the drive when the speedometer on a VAZ 2109 does not work:
- To do this, release the cross member that secures the gearbox to the body, give back the nut that secures the drive
- Pry off the drive housing with a flat screwdriver (as in the photo below)
- By pressing the gearbox to the side (for example, with a piece of pipe) from the drive, we pull the drive out of it
- Then we check its serviceability
- To do this, twist the gear and see whether the groove for the speedometer cable begins to turn or not
- If the groove does not turn, then replace the speedometer drive
- When going to the store for a new drive, it’s better to take the old one with you as a sample just in case (you can confuse the number of teeth on its gear)
- And if you install a “foreign” (not the one you need) drive, then in no more than 100 meters it will break the box cover, because a mismatched gear pitch will simply turn the entire drive outward and result in serious damage to the gearbox
- To be able to use this gearbox in the future, it will be necessary to replace its rear cover and completely change the oil
- If the old one suddenly pours out, there will still be fragments and crumbs of the housing left in it, which can subsequently fall on a gear tooth or clog the oil channel
Now that you know how to determine what the reason is if the speedometer needle suddenly starts jumping and fix it with your own hands.
Drive repair
We only considered replacing the drive, if the speedometer does not work in the VAZ 21093, sometimes this is easier and cheaper to do:
- The speedometer drive is removed, as a rule, to replace its housing, or the sealing ring from under which lubricant flows, or the drive gear itself
- It can be removed without dismantling the gearbox assembly; for this purpose it is better to drive the car onto an overpass, inspection hole or lift
The repair procedure will look like this:
- Using a socket wrench, unscrew the bolt that secures the drive housing, pry it off with a screwdriver, then remove it
Unscrew the drive nut, remove it, then pry off the housing with a flat screwdriver and remove the drive
- Now we can remove the driven gear
- This gear is made of plastic, so it is important to carefully inspect it and if signs of wear are found, replace it immediately
We inspect the condition of the rubber seal (shown by the arrow), then remove and inspect the plastic gear
- In addition, it is important to pay attention to the condition of the mounting socket, where the tip of the flexible rod (cable) of the speedometer enters
- The socket should not have licked corners or be broken, otherwise such defects are the reason for replacing the gear
- It is also worth paying attention to the condition of the box body in the place where our drive is installed
- If traces of lubricant leaks are visible, then it will be necessary to replace the rubber ring of the drive seal, which is located on its body
- To remove it, you will need to remove the driven gear, then push the o-ring out of the groove
- All parts are then washed in clean kerosene
Of course, no one has canceled the service station services, if you are too lazy to tinker, although tinkering is probably not an applicable expression here (it only takes 10-20 minutes), and the price of their services suits you, then decide for yourself.
Replacing the cable
Almost everywhere, car owners are faced with the problem of speedometer failure, which is often caused by a faulty cable. To replace the cable, it is not at all necessary to go to a car service center, because you can easily cope with this task yourself, our instructions will help with this. So:
- Go down the car (on a pit or overpass), then you need to unscrew the cable from the drive of your speedometer, located on the side of the engine compartment, move the rubber cap up, and unscrew the nut on the cable
- After this, disconnect the cable
- To disconnect the cable from the speedometer, you must first remove the instrument panel from the dashboard
- At the same time, if your car has a low dashboard, then unscrew two bolts and carefully remove the visor, squeezing the spring-loaded clamps with your fingers
- Then you can remove the instrument cluster
- If the car has a high dashboard, then first you will need to remove the trim, then unscrew the instrument panel
- Then you should unscrew the cable nut from the speedometer from the back side and pull out the old cable through the engine compartment, remembering how it went through
- Because the next step will be laying (pulling) a new cable
- It will be much easier to insert the plug into the compartment bulkhead if you first lubricate it with oil, for example Lithol
Important: Since there are high and low instrument panels, there are two types of cables, shorter and longer, for different panels, respectively. When purchasing a new cable, you should either have a sample or know its length, otherwise it will either not fit (too short will not reach) or will dangle and snag.
- Having removed the instrument cluster, it will not be difficult for you to remove the speedometer and replace it
- Then we return the instruments to their place, having first screwed the cable nut to the speedometer, and insert the panel into its original place
Everything with the speedometer is clear; in addition, we offer you a training video.
Instrument panels VAZ VDO (LED)
You can install a more beautiful and convenient panel with LED indicators, the so-called VDO panel. Here VDO is the panel manufacturer.
| Connecting VDO on a Kalina car | ||
| 1 | Pink-white | To electric power steering |
| 2 | Blue and white | To the hazard warning indicator |
| 3 | Gray-blue | To emergency oil pressure sensor |
| 4 | Brown blue | To the parking brake switch |
| 5 | Yellow-blue | To the immobilizer control unit |
| 6 | Black | To the airbag control unit |
| 7 | Yellow | To the outside light switch |
| 8 | Blue | To the right turn signal switch |
| 9 | Blue with black | To left turn signal switch |
| 10 | White-blue | TO ECU |
| 11 | . | To brake pad wear sensor |
| 12 | . | To seat belt sensor |
| 13 | Black | To the traction control control unit |
| 14 | Red-blue | "RESET" key on the steering column switch |
| 15 | Pink-blue | To brake fluid level sensor |
| 16 | Black | To ABS |
| 17 | Green | To the high beam switch |
| 18 | White | To the instrument cluster light control |
| 19 | Brown | Panel weight |
| 20 | White-red | Terminal "30" |
| 21 | Orange | Terminal "15" |
| 22 | Yellow-red | To fuel flow sensor |
| 23 | Orange-white | MK key "forward" |
| 24 | White black | MK key "back" |
| 25 | Black and white | Outside temperature sensor (-) |
| 26 | Yellow-green | Outside temperature sensor (+) |
| 27 | Pink | Fuel level sensor |
| 28 | Grey | Speed sensor |
| 29 | Green-white | Coolant temperature sensor |
| 30 | Brown-red | Tachometer (low voltage) |
| 31 | . | Official. Panel diagnostics. |
| 32 | Brown-white | Terminal “L” of the generator relay regulator |
New fuse box
In the table we give the designation of fuses, what they protect and what current they are designed for:
| Fuse number | Rated current | Functions |
| 1. | 8A | Backup fuse |
| 2. | 8A | Backup fuse |
| 3. | 8A | Backup fuse |
| 4. | 16A | Radiator fan relay winding, electrical circuit of switch and heater motor |
| 5. | 3A | Hazard warning switch in turn signal mode, turn signal switch, turn signal switch, turn signal warning light, turn signal warning light, reverse optics switch, reverse lights, tachometer, voltmeter, gasoline level indicator, gasoline level sensor, gasoline level warning light, pointer coolant temperature, temperature sensor, warning lamp and emergency oil pressure sensor, brake emergency lamp, brake system hydraulic switch, hand brake switch |
| 6. | 8A | Brake light switch and bulbs, interior lighting |
| 7. | 8A | Room lighting lamps, indicator lamp for switching on the dimensions, lamp for illuminating the heater and cigarette lighter handles, glove compartment lamp, switch and lamp for instrument panel illumination |
| 8. | 16A | Horn, horn switch, radiator fan motor |
| 9. | 8A | Left side lamp, left rear side lamp |
| 10. | 8A | Right side lamp, right rear side lamp, fog light switch, fog light indicator light |
| 11. | 8A | Turn signal switch and breaker, turn signal lamps, warning lamp in hazard signal mode |
| 12. | 16A | Cigarette lighter, socket for carrying lamp |
| 13. | 8A | High beam right headlight |
| 14. | 8A | Main beam of the left headlight, high-range optics warning lamp |
| 15. | 8A | Low beam right headlight |
| 16. | 8A | Low beam left headlight |
Relay
The table shows the pinout of the fuse box of the new model 2109:
| Relay designation | What it does: |
| K1 | Without it, the rear window washer motor will not work. |
| K2 | Responsible for the operation of turn signal lamps and light signaling |
| K3 | Provides operation of the windshield wiper |
| K4 | Protects brake lights and vehicle dimensions |
| K5 | Provides operation of high beam lights |
| K6 | Guarantees operation of the optics washer device |
| K7 | Protects the power window motor if your vehicle has one. |
| K8 | Sound signal or just a horn |
| K9 | Protects against high voltage going to the engine cooling fan |
| K11 | Responsible for the operation of the rear window heating device |
| K12 | Provides operation of low beam lights |
Why the instrument panel on the VAZ 2109 carburetor does not work
Best site news
malfunctions and troubleshooting methods for the instrument panel on a VAZ 2108, VAZ 2109, VAZ 21099
Possible malfunctions of control devices, causes of malfunctions and solutions
2. Replace the temperature or fuel level sensor3. Check wires, restore connections
The fuel gauge needle returns to the beginning of the scale when the tank is full
The float travel limiter is installed incorrectly (the resistor winding is running out) Bend the limiter 1-2 mm downwards
The fuel gauge needle moves irregularly and often falls towards
1. Weak contact of the fuel level sensor resistor with the current collector 2. Break in the fuel level sensor resistor winding 1. Bend the fuel level sensor current collector 2. Replace the fuel level sensor
The fuel reserve indicator light is constantly on
1. Short circuit of the sensor wire with ground 2. Short circuit of the flexible tire of the sensor with the fuel intake tube 1. Check and eliminate the short circuit 2. Bend the tire
Any instrument panel warning lights do not work
1. The lamp is burnt out 2. Insufficient pressure of the lamp socket contacts to the printed circuit board 3. The sensor contacts are oxidized 4. The lamp sensor is faulty 5. Break in the wires, oxidation of the wire tips 1. Replace the lamp 2. Bend the lamp socket contacts or replace it 3. Clean the contacts sensor 4. Replace sensor 5. Replace damaged wires, clean tips
Speedometer doesn't work
1. The nuts securing the ends of the flexible shaft of the speedometer drive are not tightened 2. The flexible shaft of the speedometer drive is broken 3. The speedometer mechanism is damaged 1. Check and tighten the nuts
2. Replace the flexible speedometer drive shaft3. Replace the speedometer or instrument panel
Reasons for turning off the dashboard on the VAZ 2114
Turning off the dashboard lights does not bode well for either the driver or the car. Because this malfunction is usually followed by others. Therefore, the backlight should be repaired immediately.
Many drivers install LED lights instead of standard incandescent lamps.
You should also understand that if the lights on the dashboard go out, then the problem must be looked for somewhere in the on-board electrical system. This means you can’t do without a multimeter, a soldering iron and electrical tape. Here are the main reasons for turning off the backlight:
- fuse burned out;
- the light bulbs have burned out (or LEDs - in later VAZ 2114 models the panel is illuminated by them);
- the wiring in the on-board electrical network is damaged;
- The common contact board of the instrument panel burned out.
Let's consider these points in more detail.
Burnt fuse
80% of cases when the backlight turns off is due to a blown fuse. It is located in a safety block installed under the steering column of the car. Usually the fuse indicated in the documentation as F10 is lit.
In the block the fuse is located on the right and is designated as F10
We recommend: VAZ 2110 signal does not work
It is he who is responsible for the dashboard lighting, side lights and license plate lighting. On early VAZ 2114 models, fuse F10 was brown or red.
On early VAZ 2114 models, F10 fuses were brown
On later cars they started putting green ones. It is not difficult to understand that the fuse has blown. It's enough just to inspect it. The housing of a blown fuse may be slightly blackened or melted, and the conductor inside the housing may be severed. The faulty fuse is replaced with a new one. Typically this solves the problem.
Burnt out light bulbs
Dashboard lights operate under less than ideal conditions. They are regularly exposed to shaking, power surges in the car's electrical network and temperature changes. All this significantly reduces their service life. Especially if these are not LEDs, but ordinary incandescent lamps, which were equipped with the first VAZ 2114 models. There are a total of 19 lamps (but this number also varies depending on the year of manufacture of the car, and the number of lamps should be specified in the technical documentation for the car).
Another reason for light bulbs to burn out is their improper installation. This is most often observed on early VAZ 2114 models, where drivers decide to independently replace obsolete incandescent lamps with new LEDs, making some changes to the electrical circuit. Without proper qualifications, this operation is not so easy to perform. Here's what the sequence for replacing light bulbs looks like.
- The steering column is lowered to the bottom position until it stops. Above it is the dashboard cover with four mounting screws. They are unscrewed with a Phillips screwdriver.
To remove the dashboard cover, just unscrew 5 bolts
- To the right of the panel there is a row of buttons. Next to it there is another screw hidden by a plastic plug. It is pryed off with a knife (or a flat screwdriver). The screw is unscrewed.
- Now you need to remove the car radio from the niche by unscrewing its mounting bolts, and also remove the plastic handles from the heater controls.
- The instrument panel casing is freed from its fasteners. It should be pulled towards you, extending it 15–20 cm. This will be enough to gain access to the rear wall of the instrument unit.
- A number of recesses with light bulb sockets are visible on the wall. They are removed manually. To do this, the socket together with the lamp is turned counterclockwise until a characteristic click is heard.
The arrow on the back wall shows a socket with a light bulb; it is unscrewed by hand
- Burnt out lamps are replaced with new ones, then the instrument panel is reassembled.
Wiring damage
Problems with electrical wiring are the worst case. To figure this out on your own, the driver needs to have serious knowledge of electrical engineering. In particular, he must be able to read automotive electrical circuits well. Not all car enthusiasts can boast of such skills. It is for this reason that it is better to entrust the search for a damaged section of on-board electrical wiring to a qualified auto electrician.
His actions boil down to the following: he determines the key sections of the circuit and sequentially “rings” them using a multimeter until he finds a broken section of the wiring. Completing this work may take several minutes or several hours - it all depends on where exactly the circuit break occurred.
Panel contact board problems
If all of the above measures do not lead to anything, the last option remains: damage to the contact board in the dashboard. This part is a combination of several microcircuits. It is not possible to repair it in a garage without special diagnostic equipment. So the car owner has only one option - to replace the entire board. You can purchase it at any auto parts store. It costs about 400 rubles. Let us list the stages of its replacement.
- First, all the steps mentioned above in the paragraph on replacing light bulbs are performed.
- But instead of unscrewing the bulbs, you should unscrew the four bolts at the corners of the rear wall of the dashboard.
- The back wall is carefully removed along with the board, which is attached to the wall with plastic latches.
The contact board in the dashboard of the VAZ 2114 is held on by simple plastic latches
- The latches are bent with a knife, the damaged board is removed and replaced with a new one. The panel is then reassembled.
So, the owner of a VAZ 2114 can solve most problems with the dashboard lighting on his own. All that is required is the ability to use a screwdriver. The exception is the case of damaged wiring. It is strongly recommended that you contact an electrician to identify the damaged area. This will save a lot of time and nerves, which, as we know, are not restored.