Correct removal of the VAZ 2109 engine is necessary for scheduled and routine repairs. In most cases, temporary dismantling occurs along with the gearbox. The procedure is carried out in a specialized garage with a lift. Moreover, if a person knows how to remove a VAZ engine, everything can be done with his own hands in a few hours.
It is advisable that this procedure be carried out by a car owner with some experience. Even minor errors will lead to possible damage to individual elements of the VAZ 2109 vehicle system.
Preparatory stage
Before starting work, it is strongly recommended that you familiarize yourself with the structure of the “heart” of the iron horse. This will help avoid many problems associated with incorrect connection of individual system elements, such as:
- right front support;
- generator;
- engine;
- gearbox - it is necessary to remove the gearbox only if the engine is overhauled or replaced;
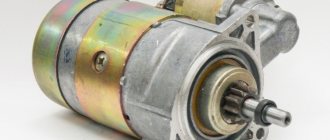
- starter;
- system for turning on the lights for reversing marks VAZ 2109;
- stretching;
- left front support;
- a plug that secures the hole for draining oil from the engine;
- front wheel drives on the right side;
- rear support-fix;
- hole for draining oil from the gearbox;
- left-hand front wheel drive;
- gearbox shift drive rod.
Beginners are advised to take photographs of the listed parts in assembled form. In order to successfully dismantle the VAZ engine, it is necessary to use the tools recommended by the manufacturer. A list of these can be found in the vehicle operating instructions. Regardless of the reason that prompted the need to carry out removal and diagnostics, you must adhere to the following scheme:
A carefully removed car ignition module will help you remove the engine correctly. Due to the fragile nature of the device, do not use excessive physical force. After this, the plug located on the block is dismantled. Only after all the liquid has been drained is the next element removed.
All plugs from the drive are disconnected in random order. The same thing happens with the throttle and hose cables. Before starting this stage, it is better to use a camera to record the initial position. The photo will be useful when the installation of the VAZ engine begins.
Literally, pinpoint precision is required when it comes to removing the hose leading to the gas line. To do this, you need a key set to “17”, which will not break the rather fragile system. Here, as in the case described above, it is necessary to carry out recording using a photo.
When returning the VAZ engine to its rightful place, the photograph will help to correctly connect all the elements. There is no room for error here. Only after you have completed removing all the tubes on the “head” can you move on to those parts that are directly attached to it.
Auto repair school – DIY car repair
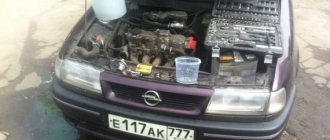
This article will describe the process of replacing the rear engine mount on a VAZ-2109 car . On VAZ 2108, 2109, 2109 and VAZ 2113-2115 cars, replacing the rear airbag is similar. But first, I will list the reasons why you should think about replacing the pillows or engine mount. Wear, breakage and destruction of the rubber or metal component of any engine mount leads to vibration and itching while driving, and shocks when starting and stopping the car. Therefore, if the above symptoms appear in your car, then pay attention to the condition of the airbags or, as they are also called, engine mounts. If large cracks, breaks or peelings of the rubber part of the cushion are detected (photo 1), replace the part. If the metal part of the pillow bursts or breaks, replace the part as soon as possible. I think there will be problems in this part. But questions regarding work related to replacement may arise! Right? Therefore, we continue to read further and at the end of this material the answers to the questions will be found)))
Spare parts . The rear engine mount for VAZ 2108, 2109, 2109 and VAZ 2113-2115 cars can be found on the Internet and purchased using the catalog number - 2108-1001033-10. According to the manufacturer, everything is simple - we buy a pillow from BRT or SEVI. Other options are not options...
Tools required for replacing the rear engine mount : a 17 socket wrench, a pair of 19 socket wrenches, a trapezoidal jack for fixing the engine. We carry out the replacement work in an inspection pit.
The procedure for replacing the rear engine mount (support) on a VAZ-2109 car:
We drive the car into the inspection hole. Remove the engine protection, if any.
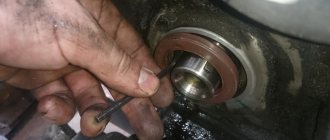
Place a jack under the gearbox and slightly lift the gearbox up (photo 2)
Actions requiring increased caution
Remove the muffler and camshaft pulley last. Further actions are taken taking into account the actual situation. If the star bolts are covered with a layer of dirt and oil, then there is no need to unscrew them. Remove everything together with the camshaft. It is better to unscrew them if the motor has been used recently.
The front crankshaft pulley will help you remove the engine correctly. To do this, it is recommended to use a folding key. It is installed through the top, not through the bottom. Before using it, it is recommended to switch to speed 4-5. After this, the VAZ engine is more easily subject to normalized physical impact. If the above recommendations do not help ease the movement of the key, you must use the services of an assistant.
One of the assistants gets into the car and presses the brake pedal. In this case, it is easier to remove the front crankshaft pulley. After this, the pipe and the generator bolts located on top are dismantled.
If the transmission bolts show signs of physical wear or significant contamination, it is better to replace them.
In this case, removing the engine will reduce the likelihood of failure in the future. After all, no one knows when the next time a car owner will look under the hood.
When removing the wires from the generator, it is necessary to gradually loosen the fastening of the device itself. The more accurately your hand moves, the less likely it is to get damaged. After this, the “crab” is removed with no less care. It is secured with two bolts, which we remove using a wrench. Before unscrewing the last bolt, the device is slowly moved to the side.
In what cases is it necessary to change the earbuds?
1. The main reason is simple physical wear and tear. As the liners wear, free movement of the crankshaft will appear, as well as a reduced degree of lubrication due to a drop in oil pressure.
2. Rotating the liners. The most common causes of this malfunction are the following:
- the lubricant has become extremely viscous, abrasive compounds have entered it, and it may be that it has disappeared altogether;
- the bearing caps are not tensioned sufficiently;
- excessively liquid consistency of the engine oil, as well as operation of the power unit at extreme conditions.
Preparing for the reverse process
The process is completed by fixing the VAZ engine using a timing belt. It would be a good idea to use 1-2 bricks to help prevent the engine from falling. After making sure that the massive unit is fixed in space, the cushion is loosened and the engine is directly removed. Having secured the belt with your hand, you need to slowly remove the pipe.
If by this time the engine has not come off on its own, it is recommended to use a pry bar. After this, the unit is transferred to a temporary storage location for subsequent work with it. You need to remember - install everything in exactly the reverse order. If some elements have reached the end of their service life, it is better to replace them in advance.
The process of removing the “heart” of a car is complex and multi-stage. Accuracy and precision of actions is the key to successful repairs on your own. After removal, it is recommended to carry out a mandatory inspection of all engine components.
Replacing the Lada 2109 engine (VAZ 2109)
- What to put?
- Underwater rocks
Tuning is not just about changing the appearance of a car, as many people think.
In fact, revisions often concern the technical component. Someone makes changes to the exhaust system, changes elements of the factory engine. But there is a more drastic, expensive and interesting option - change the engine. With the new engine you get different technical characteristics, increased power, increased maximum speed, better acceleration.
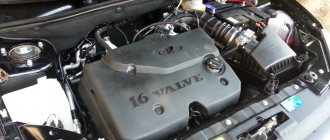
What's under your hood?
Replacing a motor is a fairly serious step that requires thinking through every stage, from choosing a new motor to the consequences that such work may result in.
Causes
There are several most common reasons why a car owner has to remove the engine from his car.
| Cause | Peculiarities |
| Major renovation | In the event of a serious accident or as a result of wear of key engine elements, it will not be possible to restore its functionality without a removal procedure. Therefore, they resort to dismantling the engine |
| Replacement | It’s not uncommon for VAZ 2109 owners to think about replacing the standard factory engine with a more efficient, powerful power unit. This is a serious step, where dismantling is one of the initial stages |
| Finalization | If there is no opportunity or desire to change the engine, some simply modify the existing one. Tuning can be quite complex, involving the need to completely remove the engine from the engine compartment |
Regardless of the reasons, you need to remove the engine carefully, following a clear sequence of your actions. Decide in advance whether you will dismantle the engine together with the gearbox or without removing it.
Features of the improvement
The biggest inconvenience when replacing the engine with a more advanced one is the need to make electrical adjustments. In particular, the problem arises with more advanced engines from foreign cars, primarily due to the presence of a large number of sensors and a more precise engine control system. Therefore, you will probably need the help of a person who understands electrics.
When installing a more powerful engine, the braking system
. This will avoid problems during inspection. Also, the safety of driving a car will increase significantly. Don’t forget about the radiator; it must match the power of the new unit, otherwise you will get an engine that regularly overheats, which will significantly reduce its service life.
Removal from gearbox
Follow the instructions clearly, be sure to watch the video tutorials. Plus, don't forget to check the condition of all engine mounts, since you'll probably be reassembling it again. All damaged elements will have to be replaced without fail.
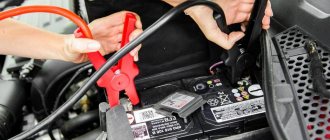
- First, disconnect the battery to completely cut off the power to the car.
- Drain the oil from the engine crankcase. Here it is better for the engine to be warm. This will allow the oil to drain out faster.
- Drain the coolant from the cooling system. A cold motor is already required here. Be careful.
- To disconnect the exhaust systems, you will have to completely remove the engine crankcase protection and dismantle the exhaust pipe.
- Remove the air filter housing, and then disconnect all hoses from the engine, power wiring, sensors, damper rods, and brake system vacuum hoses.
- Unscrew the fastening nut of the ground wire, put on the stud and located on the clutch housing.
- Disconnect the cooling system pipes and turn off the thermostat.
- Disconnect the central high voltage from the ignition distributor. After this, you can release the clamp of the block with the supply wiring and remove the entire block.
- Disconnect the fuel supply hoses from the fuel pump. To do this, just loosen the fastening clamp.
- Unscrew the adjusting nuts to remove the drive cable from the clutch lever.
- Disconnect the power supply wires from the starter - one wire from the battery going to the solenoid relay and the wiring block.
- Switch off the generator in the same way.
- Deprive power by disconnecting the corresponding wires from the coolant temperature sensor and oil pressure sensor.
- Disconnect a pair of pipes from the radiator for the car interior. Loosen the clamps, which will allow you to remove the elements.
- We go directly under the car. Here it is better to have a pit or overpass available, otherwise it is inconvenient and unsafe to remove the engine while lying down.
- Unscrew the fastening nuts of the drive rod from the tip of the gearbox shift joint. The speedometer drive rod and the reverse sensor are also disconnected here. You need to disconnect the power wires.
- Disconnect both guy wires, right and left. Before this, you need to loosen the clamp of the tensioner fastening nut to the suspension arm on both sides. Next, unscrew the three bolts of the bracket to the car body. It is not necessary to remove them completely, but just move them to the side. This way they will not interfere with further processes.
- The next step is to disconnect the tie rods. To achieve the desired result, remove the cotter pin and unscrew the nut. Next, armed with a special puller, press the pin out of the swing arm.
- We perform the same actions with the ball joint, which will need to be similarly disconnected from the lever.
- Using a pry bar, pull out the upper tail of the front wheel drive and move it slightly to the side. Don't forget to insert a technological plug in place of this tail. A plug from an old grenade will suit you just fine, if you have one available.
- Now comes the stage of directly dismantling the power unit itself.
- Securely secure the motor by tying it by the eyelets using a strong rope or metal wire. Rym translated from Dutch “ring” means ring. That is, instead of a head, the eye bolt and eye nut end in a ring. And the eye bolt and eye nut are intended for gripping and moving machines, parts, as well as during installation, disassembly, loading, etc.
Top extraction process
- The fastening rope is properly attached to the support or winch. It is best to remove the motor from the top, but a lifting mechanism will come in handy here.
- You can also remove the engine through the bottom. To do this, the engine is lowered to the floor, after which the front of the car is raised with jacks. Here, act at your own discretion and do not forget that the motor weighs quite a lot. We strongly do not recommend trying to get it out manually.
- Once you have secured the engine with ropes and a winch, unscrew the motor mounting nuts holding it to the supports.
- That's it, nothing now prevents you from removing the engine from its seat.
- Act as carefully as possible so that the engine elements are not damaged during removal, it does not touch or damage the body, and also does not fall off the mounts at the most inopportune moment.
Homemade support for dismantling
Accuracy is the main requirement when independently dismantling the power unit from a VAZ 2109 or any other car. Be sure to enlist the support of a partner, since it is quite difficult to complete all stages with two hands.
Take your time, don't try to get the job done in a few hours. It may take several days to remove the motor. The main thing here is not speed, but the quality and care of each manipulation.
What should you pay attention to?
What engine can be installed on the VAZ 2109 and 21099? Before answering this question, you should understand the legal and some technical features of this work. Recently, the motor has been considered an ordinary part, so no special documents are required to replace it. But, when buying a car with a replaced engine, it is better to ask the previous owner for documents, otherwise there is a risk that the unit was removed from a stolen car. In this case, you may have a number of problems. Although, there are not so many cases of checking engines (for example, when a place in the vehicle title runs out), so you can ignore this factor at your own peril and risk.
On the other hand, you may be sent for examination, which will not be very pleasant.
A more difficult issue is the need to select a motor suitable for the 2109. First of all, you should look at the size of the motor. The engine compartment space here is not too large, so this is one of the main conditions for selecting a unit. Also pay attention to the possibility of installing the engine. It is advisable to select options with a transverse arrangement, this will minimize the work of fitting the part.
Engine tuning options
VAZ 21093 engine tuning
As mentioned above, engine tuning involves several methods. They all have both their advantages and disadvantages.
Engine modernization in the first way
This option involves installing and replacing the following components:
- Lightweight connecting rods, which fit the size 121 mm.
- A lightweight crankshaft, the piston stroke of which should be 78 mm.
- Lightweight piston rings.
- Cylinder head borrowed from Lada Kalina.
- Forged pistons having a diameter of 82.5 mm.
- Camshaft size 11.3 mm.
Note. This modification of the engine gives considerable power, which in l/s is equal to 98. This also makes it possible to reach a maximum speed of 183 km/h.
Easy tuning of the VAZ 2109 engine
Method two
This method involves upgrading the engine by interfering with the operation of the transmission and carburetor. In this case, such modernization will not require too high financial costs, unless, of course, the work is carried out on its own. So:
- The first step is to install a new filter, which should have a diameter of 70 mm. This filter must have a direct-flow outlet device. This will make it possible to increase engine power by 10 l/s.
- We install a 5-speed transmission.
- We install a new oil cooler.
Option three
This method of engine modernization involves the installation of the following parts:
- New oil nozzles.
- Lightweight pistons.
- Lightweight crankshaft.
- New gearbox.
- Lightweight flywheel.
- Improved grip.
In addition to the above, a lot of new components are installed on the car, including a non-contact ignition system, a sports muffler (see: We do high-quality replacement of the muffler on a VAZ), a copper radiator, and so on.
Carburetor
This part of the car is given special attention when improving the engine. In particular, the carburetor is replaced along with other parts:
- First of all, the spring is removed from the vacuum drive of the second chamber damper. This gives a good increase in power.
- You can also modify the vacuum drive by inserting a homemade wire ring into the design.
- The diffuser is being replaced.
- The pump nozzle is being replaced.
Purpose of crankshaft bearings
These parts are sliding bearings that ensure acceptable operation of the connecting rods when they rotate the crankshaft. At this very point, during the operation of the power unit, colossal loads arise on the parts. Imagine, the piston, after igniting the fuel-air mixture, gains a simply monstrous speed and at the same time, at the lowest point of its stroke, it encounters an obstacle in the form of a shaft elbow, which provides it with a reciprocating maneuver. It is this “return” that puts the greatest load on the connecting rod bearings.
Of course, no one has yet canceled the laws of physics, therefore, due to friction, sooner or later the liners will fail, that is, they will no longer provide the contacting parts with minimal friction. As they wear out, the oil pressure will decrease and the so-called oil film will no longer provide the proper degree of protection.
It is also worth knowing that liners are divided into two groups: connecting rod and main. To see the difference between them, look at the image below to see which ones are located and where:
Boosting methods
In most cases, achieving the required indicators is achieved by increasing the volume of the car engine. To accomplish a task of this kind, there are several options:
The first involves increasing the diameter of the cylinder block to accommodate a larger piston diameter by boring. It is called “folk” because of its low cost, because in this case all that requires expenses is the purchase of a set of pistons and wheels, as well as payment for turning services.
The second is to replace the factory crankshaft with one that has a larger crank radius and therefore a larger piston stroke and larger volume. Its cost is much higher than the first method, since you will have to spend money on a crankshaft, a set of pistons suitable for the new crankshaft (since the height of the cylinder block has certain restrictions), and special rings for the pistons. In addition, it will be necessary to pay for work related to block boring.
For many, it may be surprising that the increased displacement of the “nine” engine is not always the most advantageous method of boosting. In some situations (it all depends on what the engine should ultimately be like), it is much easier and more efficient to modify the cylinder head (cylinder head) and then install a suitable camshaft. This type of boost will also make it possible to increase the power performance of the power unit.
Of course, to maximize all the capabilities and reserves of the camshaft, a fairly serious modification of the cylinder head will be required, which may even include repressing the seats and installing valves with a large diameter. For example, engines characterized by the presence of eight valves will fit similar parts from BMW, and sixteen-valve engines will fit components from Opel and Volkswagen. At the same time, one should not lose sight of the intake/exhaust channels intended for circulating the fuel-air mixture - they also require improvement. Their improvement involves increasing the cross-sectional diameter to maximum dimensions through internal polishing.
The technical characteristics of the VAZ 2109 cylinder block, like other components, leave their mark on the overall performance of the engine. You can, of course, study in more detail the influence of the types and shapes of pistons, the weight of crankshafts and much more that is somehow reflected in the operation of the engine, but this article is not about that.
The following characteristics have a particular impact on the performance of the internal combustion engine: the ratio of the length of the connecting rod to the piston stroke and the dimensions of the crankshaft crank (diameter).
The importance of the above parameters is due to the fact that the engine is essentially a pump that pumps a certain amount of mixture through itself over a specific period of time. It is these characteristics that will be discussed further.
Removing the head and replacing the cylinder head gasket
Burnout of the gasket under the cylinder head on VAZ 2109-2108 cars is the most common reason why the head has to be removed from the engine, and accordingly with further repairs, or rather, replacement of the gasket. If this problem is not noticed in time, it can lead to quite sad consequences, since the engine can overheat and even jam.
The procedure itself for removing the cylinder head and replacing its gasket is not complicated, but at the same time it requires certain technical skills and a small number of tools, the list of which is given below:
- Hex or similar bit with adapter for use with wrench
- Torque wrench - in this case I used the Ombra model with a range from 10 to 110 Nm, which is quite enough
- Flat screwdriver
- Extension
- Gasket Remover