Removing the lever, replacing silent blocks
We remove the lever from the car to replace it, as well as to replace the silent blocks of the lever.
The work is shown on the right lever; the left lever is removed in the same way. Disconnect the ball joint from the lever (see “Removing the ball joint”). Unscrew the nut securing the brace to the front suspension arm and remove the washer (see “Removing the brace”). We unscrew the nut of the bolt securing the stabilizer bar to the lever and remove the bolt (see “Removing the stabilizer bar”). Using a 19mm socket, unscrew the nut of the bolt securing the lever to the body, holding the bolt with a wrench of the same size. When removing the right lever, it is not possible to completely remove the fastening bolt due to the small gap between the bolt and the wheel drive shaft. That's why…
...resting a powerful screwdriver or mounting blade against the body, press the drive shaft together with the shock absorber strut and fist... ...and use a soft metal drift to knock out and remove the bolt.
We remove the lever from the bracket...
...and take it out by removing it from the rear end of the stretcher. When removing the left suspension arm, there is no need to press down the wheel drive shaft.
To replace the silent block of the lever, we press it out in a vice with tool heads or pipe sections of a suitable size. We wet the new silent block with soapy water and press it into the lever.
We knock down the silent block of the extension with a chisel. Having removed the silent block on one side of the lever, we similarly dismantle the silent block on the other side.
We pre-press new silent blocks in a vice...
...and finally press it, striking a punch with a diameter of 8 mm through three windows in the rubber layer. Install the lever in reverse order. We tighten the threaded connections of rubber-metal hinges in the “vehicle on wheels” position. After installing the lever, it is necessary to check and, if necessary, adjust the wheel alignment at a special stand - at a service station.
Insufficient strut resistance
If the front suspension of the VAZ-2109 has lost the tightness of the return or bypass valve, it is necessary to replace the damaged parts. If there is a small amount or leakage of the working mixture, it is necessary to check, replace worn parts, and add the used composition to the norm.
In addition, in case of wear, settlement, deformation of the guide bushing, rings of the cylinder-piston group, spring mechanism, unusable elements, filters should be replaced and new fluid should be added
It is also necessary to pay attention to the integrity of the additional spring elements, valve discs and hinge block. If necessary, deformed elements must be replaced as quickly as possible, which will facilitate the rapid restoration of the unit in question and prevent further damage to it
Lifehack: rear beam of a Priora car, main faults, replacement
Budget cars use a rear beam instead of an independent suspension; the Priora is mounted on a beam at the rear. This massive part is attached to the body on hinges. To make the car more stable, a rear beam stabilizer is provided. It is attached through the stabilizer bushings. There is also a front beam, it is attached to the body and holds the front suspension. These parts are powerful and massive, but even they can break. As the mileage progresses, the silent blocks of the front and rear beams will need to be replaced. The price of spare parts is from 3000 rubles and above. A new part on a Priora costs more than a tenth. But this is mainly marketing. Priora's spare parts are dozens more expensive, although many of the spare parts are the same. The silent block of the rear and front beams can be changed due to wear and due to accidental displacement - when the car gets into an accident, the beam shifts. Good drivers keep everything in their car safe and clean: this applies to the body, chassis, engine, and small details. It is worth periodically checking the suspension of the Lada Priora car - during trips, it experiences considerable load due to poor road surface. At the same time, attention is paid to small components and large ones such as the rear and front beam. All the suspension parts are actually attached to it, which allows the car to move, brake, and confidently overcome obstacles. It must be strong and “hardy” - that is, it must withstand many kilometers before the first malfunction appears. However, a part on a Priora sometimes has to be changed ahead of schedule.
The rear beam can be very damaged due to falling into a deep hole on the road surface, which can “overwhelm” the entire suspension while driving. An emergency situation can occur even after an unsuccessful accident. You can replace it yourself, just understand the complex process and prepare everything you need.
The device of the standard suspension of the Lada Priora
The main element of the suspension of the Lada Priora passenger car is a hydraulic strut, which is connected at the bottom to a special rotating element - a knuckle. A spring, a compression stroke buffer made of polyurethane, and a strut support are mounted on the telescopic strut.
The support is secured using 3 nuts to the stand. Due to the presence of a high degree of elasticity, the support is capable of ensuring the rack swings during the operating stroke of the car suspension and vibration damping. The bearing built into the support allows the rack to rotate simultaneously with the wheels.
The lower part of the knuckle is integrated with the ball joint and suspension arm. The forces acting on the suspension are transmitted using braces, which are combined by means of silent blocks on the Priora with levers and front supports. There are washers for adjustment at the attachment points of the braces, the lever and the front support.
With the help of the latter, the angle of inclination of the rotation axis is adjusted. The rotary cam is equipped with a closed type bearing. A hub is mounted on the inner rings of the bearing to secure the wheel. The bearing is tightened with a nut on the shank located on the Lada Priora wheel drive housing and is not subject to adjustment. All hub nuts are interchangeable and have right-hand threads.
The independent suspension on the Priora has a stabilizer bar, which is a bar. The knees of the rod are attached to the levers located below using racks with rubber-metal hinges. The torsion element is fixed to the body of the Lada Priora using special brackets through rubber cushions.
Springs are a special damper whose function is to dampen vibrations that occur in the suspension when it comes into contact with the road. If you choose the right springs for the air suspension on the Priora, you don’t have to worry about suspension breakdowns when hitting bumps if the road is not smooth.
Very often, in the process of tuning a Lada Priora, a screw suspension, which is a type of air suspension, is used to equip the car. This type of front suspension does not have good protection from the influence of road dust and dirt on the shock absorber rods, which act as a good abrasive on the guide bushings, which leads to malfunctions and jamming of the shock absorbers.
One of these breakdowns, which most often manifests itself, is a knocking sound in the front suspension. In addition, this malfunction is the most common and can occur when the silent blocks on the Priora wear out.
Failure of the suspension can lead to unpredictable consequences while the car is moving, so the appearance of such a sign of a malfunction as a knock in the front suspension requires almost immediate intervention in the structure and repairs. During the suspension repair process, wear of the silent blocks on the Priora may be revealed. If such a malfunction is detected, the silent blocks must be replaced to avoid creating an emergency.
Basic faults
A beam can fail for two reasons:
- displacement from place;
- mechanical damage (most often a crack).
When a crack occurs in the lever, the torsional rigidity of the body decreases. This parameter determines the degree of safety, as well as the position of the parts. The fact is that with normal body rigidity, which is laid down during design and obtained after the final stage of car assembly, absolutely all components and assemblies (down to the bolts) are in place, they have a maximum permissible vibration amplitude. For example, the suspension “swallows” potholes - the parts actively move, and people in the cabin may not even notice the rolling.
If you increase the torsional rigidity of the body by adding lateral and longitudinal stability beams to the car, nothing bad will happen - the amplitude of vibrations will decrease, a pleasant plus will be the fact that the vehicle will become quieter, there will be less rattling. When the torsional rigidity of the body decreases, there may not even be any talk about comfort.
In addition to the fact that you will most likely have to get used to unpleasant sounds, there will be increased wear and tear on small parts. When a lever cracks, everything that is attached to it begins to move with greater amplitude. The problem is temporarily solved by welding, but this only postpones the solution to the problem for some time. Craftsmen recommend changing the beam.
Mechanical damage manifests itself in the connection of metal with rubber in the Priora levers - when wear reaches its climax, the rubber cracks and peels off. Because of this, a knock occurs in the front and rear suspension, and the car wobbles along the road.
Changing the front beam
For work, prepare two keys 17, 19, 24, WD-40 lubricant, and a ball joint remover. Removing and installing the front suspension arm in the following order:
- Place the car over the inspection hole. You can install the front of the car on stable supports.
- Secure the car with the handbrake.
- Remove the wheels. To do this, moving in a circle, gradually loosen the bolts, and then smoothly pull the wheel towards you, accepting it.
- Coat the threaded connections of the lever with WD-40.
- While holding the bolt securing the stabilizer bar to the lever, do not allow it to turn. Smoothly unscrew the fastening nut and remove the bolt.
- Holding the extension from turning with a wrench, unscrew the nut securing it to the beam.
- Remove the washer gasket.
- Unscrew the ball joint bolt and press the ball joint pin out of the beam.
- While holding the spring washer bolt from turning with a wrench, remove the nut that secures the washer to the lever.
- Smoothly remove the end of the lever from the body bracket.
- Remove the beam from the brace.
- Remove several washers from the guy and mark them so that when installing, put them in the same order.
- Inspect the part for damage: as it wears, the rubber will bulge, crack, and possibly peel off from the metal.
- If it is necessary to replace the silent blocks of the front beam of the Priora, unscrew the bolt securing the front silent block with a 18mm socket. The rear mounting bolts are unscrewed with a 15mm socket.
- Remove the silent block, noting its seating depth. Place the new part in place of the old one in strict accordance with the marked depth.
- Install a new lever. Place the washers in the marked order, with the same side in relation to the center of the part with which they were installed previously. Please note that the final tightening of the connections is carried out after the car is lowered to the ground.
The device of the standard suspension of the Lada Priora
The support is secured using 3 nuts to the stand. Due to the presence of a high degree of elasticity, the support is capable of ensuring the rack swings during the operating stroke of the car suspension and vibration damping. The bearing built into the support allows the rack to rotate simultaneously with the wheels.
With the help of the latter, the angle of inclination of the rotation axis is adjusted. The rotary cam is equipped with a closed type bearing. A hub is mounted on the inner rings of the bearing to secure the wheel. The bearing is tightened with a nut on the shank located on the Lada Priora wheel drive housing and is not subject to adjustment. All hub nuts are interchangeable and have right-hand threads.
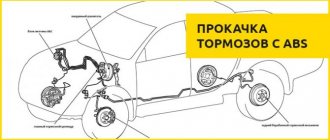
Changing the rear beam, how to remove it
- Replacing the rear beam on a Priora begins by raising the car using a lift, or you can raise the rear part by placing a jack under the lever. For work, prepare a pressing tool, wrenches 15, 19, 10 - the latter will be useful for unscrewing the brake pipe nuts.
- Remove the wheel.
- Remove the rear suspension shock absorbers.
- Disconnect the parking brake cables from the equalizer and remove them.
- Remove the cable sheaths from the bracket attached to the body. Take out the cables themselves and you will see the bolt securing the beam.
- Disconnect the fasteners for the elastic lever of the pressure regulator drive from the bracket on the lever.
- Remove the brake hoses one at a time, immediately closing the holes.
- Remove the nuts securing the lever to the brackets. Before removing the lever, knock out the bolts.
- When taking the lever with your partner, place it in a dry place. Despite the factory’s recommendations, it is recommended to leave the brackets on the body. After prolonged use, the bracket studs have become acidic and may break, so it is better to keep them in place.
- Place a new part in place of the old one and assemble the suspension in the reverse order.
- If you need to replace the silent blocks of the Priora rear beam, use a press out tool to remove the old parts, noting the depth of their installation, and put new ones in their place.
- For a car, a torsion bar is installed directly from the factory. But for better stability of the rear suspension, you can additionally install a stabilizer - this increases the torsional rigidity of the body, creates a more “dense” pressure exerted in relation to the car parts, preventing them from becoming unnecessarily loose when moving.
Product added to bookmarks!
- Description
- Reviews
Universal lower spacer AUTOPRODUCT.
APPLICABILITY: VAZ 2108, 2109, 21099, VAZ 2113, 2114, 2115, VAZ 2110, 2111, 2112, VAZ 2170, 2171, 2172 (Lada Priora).
Name: lower strut.
Accessory: element of the power structure of the body.
Purpose: reduces the movement of the front suspension arm bracket by more than 3 times, reduces the stresses occurring in the arm arm and the spar connector to the floor by up to 30% and the stresses occurring on the front end panel in the area of the right steering gear bracket by up to 8%.
Effect: improved handling, stability, increased body life.
Procedure for installing the lower spacer:
1. Remove the mudguard. 2. Unscrew the nuts and remove the bolts securing the arms to the body. 3. Attach the spacer to the arm mounting brackets, and, aligning the holes on the body with the holes in the spacer, insert the M12 bolts from the kit. 4. Fit and tighten the nuts. 5. Reinstall the mudguard by tightening the nuts on the front. At the rear, screw the mudguard to the spacer with two M8 bolts through the existing 10mm holes in the mudguard.
Easy replacement of the front suspension arm silent block
When repairing the chassis of front-wheel drive cars of the VAZ family (Samara, Priora, Kalina, Grants), quite often there is a need to replace the silent blocks of the front suspension arms. And if there are usually no problems with replacing the rear hinge of the extension (chamomile), an ordinary hammer and chisel is enough. There are many difficulties with pressing out and pressing in the silent blocks of the lever.
The easiest way is to take the car to a service station, pay the money and not worry about it. But, if you are reading this material, then most likely you will be doing the replacement personally and you want to do everything cheaply, with high quality and without extra effort.
What kind of tricks are not used:
- buy new levers with already pressed silent blocks and daisies (a rather low-budget option);
- they take their removed levers to a service station, where they change the silent blocks with a press;
- grind/buy various pullers;
- They are trying to make a replacement using improvised means.
All options are working and you can use whichever one you consider the most problem-free in your situation. I’ll tell you about a way to replace the silent blocks of a lever without much expense or effort, but you’ll have to prepare a little.
So, in addition to the usual tools, we will need:
- Old front wheel bearing from Samara, Priora, Kalina or Granta. If you have been repairing your car yourself for several years, then most likely you already have it lying around somewhere. If not, then you can ask your neighbors in the garage, friends, and finally, at any car service center. Its cost is close to zero, so it will be given to you without any problems at one service or another.
- Long bolt with nut. Preferably hardened, it will last longer. 15 centimeters long, 12 mm in diameter. There should be as many threads as possible. For our purposes, you can take a cylinder head bolt, classic suspension bolts, or in general any suitable bolts.
- A pair of thick washers with a central hole for our bolt, one with an outer diameter of at least 40 mm, the second with a diameter of up to 30 mm.
- Silicone grease or soap solution (or dishwashing liquid).
Selecting New Items
Do-it-yourself pressing and pressing of silent blocks
Polyurethane
To replace and ensure reliable operation of the car, you need to purchase good silent blocks. Choosing them is not difficult if you know some nuances:
- For the VAZ 2110 model, elements with catalog number 2110 2914054 are suitable. They have the required outer diameter corresponding to this specific VAZ model;
- Do not try to purchase a silent block from a nine and install it on your ten. Nothing will come of such events, no matter what anyone says;
- Make sure of the quality of the products. Low-grade silent blocks have flooded the market, but their service life leaves much to be desired. Good parts are made from high quality materials that can withstand extreme loads and temperatures.
Pressing out the silent block
To press out the old silent block, you need to cut off the rubber side on one side. You can cut the rubber with a simple knife, or you can cut it down with a hacksaw. Then, through any suitable iron spacer, we simply knock the silent block out of the lever. You need to hit it hard, preferably with a sledgehammer, don’t be afraid, you won’t break anything. In the picture below there is already a knocked out silent block with a cut off side.
Instead of a sledgehammer, you can use a heavy-duty vice if you have one. You can burn the rubber with a blowtorch or gas torch. You can drill several holes in the rubber and then knock out the weakened silent block. All options are working, choose the one that is more convenient for you. But, as a rule, just knocking it out is faster and easier (necessarily with a cut side).
Next, we clean the hole for the silent block from rust using a round file or sandpaper and lubricate it with soapy water or silicone grease. I strongly do not recommend using anything else as a lubricant, such as lithol, solid oil, fiol, CV joint, etc. Since such lubricants negatively affect the condition of rubber products. Therefore, only silicone or soap solution.
At this point, the operations of pressing out and preparing the lever for installing a new silent block can be considered completed.
Pressing in the silent block
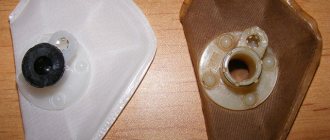
To press in the new silent block, we need the old wheel bearing, namely its inner race. It consists of two separate parts that have a large chamfer, with the help of which we will tuck the side of the silent block into the lever. This is what one inner half of the wheel bearing looks like.
Using a bolt with a nut, washers and the internal parts of the wheel bearing, we assemble such a sandwich.
We generously lubricate everything with silicone grease, coat the threads of the bolt and washer with lithol or something similar and begin tightening the nut (pressing in the silent block). We tighten it until the silent block is completely installed in its place, disassemble everything, and rejoice. If everything is done correctly, then replacement does not take much time and effort.
Do-it-yourself replacement of Priora silent blocks
When inspecting the car, I noticed cracks on the rubber bushings of the front suspension; the condition was unsatisfactory. The car has a relatively high mileage, so I decided to replace all the rubber joints and bushings in the suspension. And then came the agony of choice, as you always want to do better. The suspension on the Priora, in general, without significant changes, migrated from the VAZ 2108, which weighed noticeably less and had an engine 1.5 times weaker. I wanted to install stiffer bushings. In addition to the original ones, there are a huge number of silent blocks made of polyurethane from different manufacturers. Reviews about them are not always positive, and the price is much higher than rubber ones. In addition, I have the opportunity to compare the operation of identical mechanisms using rubber and polyurethane. Recently, roller bearings with polyurethane tires instead of rubber tires have been used in skip and cage hoisting of mines. As practice has shown, there is no significant increase in tire life; sometimes polyurethane simply breaks out in pieces. As a result, I didn’t want to experiment with my own money and bought all the products produced by Balakovorezinotekhnik.
I don't know about originality. Some of the rubber bands were in boxes with a hologram and the casting looks neater, the rest were simply sold in bulk.
As many car owners know, silent blocks have a direct impact on wheel alignment angles. Therefore, a beginner needs to understand how important it is to monitor the condition of these elements. Replacing the silent blocks of the front levers of a VAZ 2110 is quite simple, but today we will reveal some of the repair features to you.
Garage or service station
All car enthusiasts can be divided into two categories:
- Those who do most of the repairs independently in their garage, and only in critical cases turn to a car service;
- Those who prefer not to touch anything with their own hands, but completely entrust repairs and services to service station technicians.
Each of them is right in their own way. Therefore, we have no right to reproach those who do not want to carry out repairs themselves. After all, garage and professional repair of silent blocks, like other components, has its advantages.
STO has the following advantages:
- A high-quality, responsible car service provides a guarantee for repairs performed;
- In the event of a repeated breakdown covered by the warranty, repairs will be carried out free of charge;
- Professionals are professionals; they have extensive experience and knowledge, which allows them to competently perform their work.
Read:
But first you need to find such a car service, which, alas, is not an easy matter. Many provide a guarantee, but when you re-apply, they do everything possible to prove that the breakdown does not comply with the terms of the guarantee. A banal trick.
Repairing your garage will provide the following advantages:
- Significant financial savings, since you only have to spend money on consumables;
- The quality of the work performed by a master is always in doubt if you do not know this person personally. So self-repair may be much better than at a service station;
- You purchase the silent block, and the master only installs it. Why pay money for work that you can do yourself?!;
- Guarantee that a new one will be installed instead of the old silent block. Questionable service stations can easily install an old, more or less usable silent block instead of the one you gave them. You know what the result is.
When replacement is required
It will not be difficult for a more or less experienced driver to understand that the silent blocks are out of order and they need to be replaced. First of all, you will feel a certain discomfort while driving, you will hear the impact of iron in the suspension. But that's not all.
Determining the need to replace silent blocks is not difficult if you pay attention to the characteristic signs of their wear:
- While driving, strong or minor rubber squeaks are observed. It all depends on the degree of wear. Loud noise is a very bad sign;
- A noise similar to a knock is heard in the wheel area. This indicates that the silent blocks are poorly fixed and they are gradually destroyed;
- Cracks form on the surface of the elements, after which the process of disintegration of the silent block begins. In such a situation, it will be impossible not to hear a knock.
Wheel bearing
This element serves for uniform rotation of the car wheels. There are 4 such bearings on the Grant. On average, their resource is 100 thousand kilometers. What are the signs of a problem? The main symptom is a characteristic hum when moving. It may get worse as the car turns. The hum can occur on either side of the car, depending on which bearing has fallen apart
The entire assembly is replaced with a new one, and it doesn’t matter whether the Lada Granta’s rear suspension or the front one. Pressed out using a puller with special paws
Pressing takes place in a vice. It is important to maintain alignment when pressing. If a bearing is installed crookedly, it will be subjected to high loads and may fall apart after just a thousand kilometers.
You can recognize problems in the front suspension system, and more specifically the silent blocks on the Lada Kalina, by the characteristic sounds it makes while driving. Thus, driving on an uneven road may be accompanied by various cracks, squeaks and other unpleasant noises. This situation not only causes great discomfort, but can also cause a more serious malfunction or cause an accident.
In the video, replacing the front arm silent block on a VAZ car:
Replacement of silent blocks of front levers of VAZ 2110
Some car owners are afraid to replace the silent blocks of the front beam on a VAZ 2110 on their own. But in vain. Contacting a service station entails serious financial costs. Plus, it’s far from a fact that the service station will do your job better than you would have done yourself.
Zapisovka
The only thing is that you may need the help of a car service friend. All service stations have a special puller in their tool arsenal. There is no point in purchasing it, since it is expensive and is rarely needed by a car owner. Some craftsmen even make their own puller using a homemade method. There are many drawings and diagrams according to which it is made. So you can try it if you have free time.
There are two silent blocks in the front beam - in the front upper and front lower arm . The procedure for replacing them is somewhat different from each other, so we will consider the processes separately.
Front upper control arm silent block
Broken
Let us immediately note that it is easier to work with it than with the second element. The entire procedure involves performing several sequential operations.
- Raise the car on a jack and secure it in a stationary position. Turn on the handbrake, put stoppers under the wheels.
- Remove the front wheel.
- Unscrew and remove the support. To do this, you will need to turn the wheel out and hit the bipod with a hammer. It is better to do this through some kind of insert.
- By knocking out the support, you can remove the upper front control arm without serious problems.
- There is a bolt on the side, it is quite long. Unscrew it. Inspect the end play. Most likely, it is quite serious and is easily felt when checking. Therefore, you absolutely correctly decided to change the silent blocks.
- You can remove the silent block with a hammer and chisel. Just don't hit it too hard, or you'll damage other suspension components.
- In some cases, the silent block sits very firmly, so you can’t do without a drill and drilling it. After making the holes, you can safely remove the element.
- Now use the smaller bushing to press the new silent block into place. The part must fit firmly and securely into the socket.
How to change daisies on a VAZ 2114 or what nuances should be taken into account during the repair process
When you start repairing a VAZ 2114, then first study the technical documents of the vehicle, figure out what components are needed to solve the problem, how to change the daisies on a VAZ 2114, a video can help with this, especially one that demonstrates personal experience in replacing silent blocks. We will also outline standard tips for this repair procedure.
- When choosing new kits, you should not make a blanket decision, because it turns out that new spare parts from the VAZ 2108, 2109, 2110, 2112 models are not suitable for the VAZ 2114.
- It is recommended to purchase a special puller to quickly perform complex manipulations, and the video will demonstrate how to change daisies on a VAZ 2114 on how best to do this.
- Experienced car enthusiasts claim that the device for pressing in a new silent block is easy to do yourself. And you can’t do without it; it is used to facilitate the repair process. To make it yourself in the garage, you will need an M12 bolt, a regular bushing, a washer and a nut. All this is completed according to a special sample and the question of how to change daisies on a VAZ 2114 is solved.