Modern cars are much more comfortable than the models of the past; computer technologies serve to make drivers more comfortable. The clutch sensor on the Lada Vesta is needed to synchronize the rotation of the crankshaft and the gearbox input shaft. In this case, there are two types of devices, one is intended for a manual gearbox, and the second for a robotic gearbox.
Why an additional system is required: special gears are responsible for synchronizing the speed of the power plant with the rotation of the gearbox input shaft. If the synchronizer of any gear wears out, you will not be able to change gear. The presence of a sensor helps eliminate synchronizers from the circuit, since the electronic signal is transmitted directly to the control unit, and the power unit raises or lowers the speed to the required level. The system also helps to cope with the jerking of the car when changing gears.
The sensor installed on the Lada Vesta has two position options:
- "Enabled"
- "Turned off".
The control unit adjusts the engine speed to the position automatically. With automatic transmission, the system works in exactly the same way, and the data is transmitted to the electronic unit. The robotic box allows you to take into account the speed of movement and some other factors.
Sensor location and dismantling process
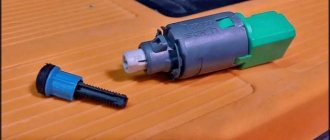
On the Lada Vesta, the sensor is located near the steering shaft, next to the pedal. If jerking or jerking occurs when changing gear, the car owner should check and adjust it.
To dismantle an element, you need:
- press the latch and carefully disconnect the block with wires;
- Rotate the component counterclockwise ninety degrees and remove it.
When installing the part in place, you need to make sure that the brake pedal is in the upper position; the actions are performed in the reverse order.
After installation, the pedal is carefully lowered, after which the block with wires is connected.
Installation
Installation of the clutch pedal travel sensor on Lada Vesta and X-Ray is carried out in the reverse order. To do this, you need to press the clutch pedal with your hand and place the sensor on the pedal assembly. When this is done, you need to block the sensor by turning it a quarter turn to the right (clockwise). While returning the clutch pedal to the reverse position, it should be held. In the end, all that remains is to snap the plug into place.
IMPORTANT! The sensor is adjusted automatically, depending on the position of the pedal itself. During the auto-adjustment process, clicks are clearly audible when moving through fixed positions.
It is worth remembering that if the sensor fails, the engine may operate with floating speeds and jerks when releasing the accelerator pedal, in addition, error P0830 may appear.
Before independently replacing or adjusting the clutch pedal travel sensor of Lada Vesta and X-Ray, it is strongly recommended to inspect it with a multimeter.
Checking the Clutch Sensor
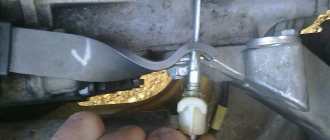
To check what position the sensor is in, you will need an ohmmeter. Next you need to follow this algorithm:
- the rod lock is moved to the extreme right position using a flat screwdriver;
- ohmmeter probes are connected to terminals 3 and 4;
- if the rod is in the free position, the resistance value should tend to infinity, that is, the circuit is in an open state;
- the circuit closes; if you press on the rod, the ohmmeter will show a resistance of about zero.
If the readings are incorrect, the sensor has failed and requires replacement.
Why is there a sensor installed on the Lada Vesta clutch pedal?
I hadn’t noticed it before, but yesterday I noticed the behavior of my Lada Vesta car. When I press the clutch pedal, the engine speed increases. Not much, but still getting bigger.
I began to get interested and ask friends who owned Vesta. Some of them explained to me that this was done on purpose to make it easier to move away without pressing the gas pedal.
I don’t know, maybe sometimes this will come in handy, but I always press the gas when starting off.
But if AvtoVAZ designed the car this way, then it’s necessary. I just decided to look into this issue in more detail, and learned a lot of interesting things.
If the engine control unit sees what position the clutch pedal is in, it means there is a sensor installed on it, or even several.
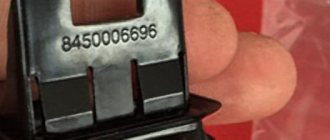
It turned out that such sensitive elements are installed on many other car models, for example, on Kalinas and Grants. It costs about 450 rubles in the store.
I started looking for a wiring diagram to find out how the clutch sensor is connected and to which device. It is difficult to find an electrical diagram for the Lada Vesta with a good image. While I was rummaging around on the Internet, I saw an article about the Vesta engine management system. I'll read it later.
This article shows the location of the sensor.
It says there that the sensor has its own name: “Clutch pedal position signal switch.” There is even an abbreviation - VSPPS. It is used to improve the driving performance of the car, which also includes starting from a stop. But this is not the main application.
It starts working while driving on the road. If the clutch sensor is faulty or incorrectly adjusted, you will feel jerking and jerking when shifting gears.
Here is a piece from the electrical circuit.
Number 30 shows the Vesta clutch sensor. It is connected to the can bus. In addition, I found evidence that a clutch sensor is needed to synchronize the angular velocity of the crankshaft and the transmission input shaft. AvtoVAZ designers created this sensor so that there would be no jerking when changing gears.
At what speed is it better to drive a Lada Vesta?
I couldn't find any other information. If you know about another purpose of the clutch sensor, please write in the comments about what it affects, besides synchronization, and whether it helps to avoid jerking when changing gears.
I compare it with my old “nine”. On the Lada Vesta, switching occurs much smoother. But to a greater extent it depends on the driver’s experience.
Why Lada Vesta jerks while driving - how to eliminate the cause
Replacing and adjusting the sensor
If you need to replace a faulty part on a car with a manual transmission, just install a new one. If the gearbox is robotic, then in addition to replacing the element itself, adjustments will need to be made.
The dismantled sensor must be measured - the rod should protrude at a distance of 17 to 18 millimeters. There is a special marking on the rod itself. It also helps with navigation. Usually it is required that the rod extends three or four notches.
The rod can be adjusted by gently pulling the end. If during the process the rod completely separates from the sensor or it is necessary to pull the end three or more times to achieve the desired values, then the element is faulty and a new part must be purchased.
What does adjustment help with?
If the element is in working order and the adjustment is carried out correctly, positive changes will be noted:
- the movement of the machine will become smooth;
- the car will not jerk when changing gears;
- There will be no shaking when releasing the gas.
The adjustment process does not take much time and is easily carried out on your own without the involvement of specialists from car services.
If after installation the rod is not held at the specified distance, you can try to fix it using a small piece of plastic tube or a spring of a suitable diameter.
If after adjustment the car behaves as before, it is recommended to contact a service center and carry out diagnostics.
How to install an application on MMS
Procedure:
- Copy the installation file (with the extension cab) to the SD card.
- Insert the SD card into the MMC.
- Exit to desktop.
- Go to “My Computer” -{amp}gt; SD card.
- Start installing the application by double clicking on the cab file.
It is more convenient to install and launch applications through AppLauncher:
- Launch Total Commander
- Open the SD card and start installing the application by double clicking on the cab file.
What useful and interesting applications for the standard Lada Vesta MMC can you recommend? By the way, here is the directory of programs for WinCE.
Let us remind you that we previously talked about other applications that expand the functionality of Vesta’s multimedia system:
- AppLauncher - allows you to launch applications without going to the desktop.
- A patch that allows you to watch videos while driving.
- Altmenu - allows you to comfortably use several navigation programs at once.
- Improved CityGuide - will make the program interface more convenient, and will add data about cameras, ambushes, etc. to the maps.
- Navitel
- Yandex maps
Key words: cassette player Lada Vesta
Replacing the clutch on Lada Vesta
This is not an easy job, no matter what type of transmission is installed. The further operation of the car will depend on the quality of the operations performed, and therefore it is better to entrust this to qualified specialists. The cost of such work is quite high and, depending on the complexity and type of transmission, can vary from 3,500 to 15,000 rubles. Of course, replacing the clutch of a Lada Vesta robot, and especially on a manual one, is quite possible. But this requires a wealth of experience and skills, and in the case of a robotic gearbox, also special software, without which it is impossible to adjust the transmission (adaptation).
Replacing the clutch on an AMT
To change it on a Vesta with a robotic transmission, you will need to completely dismantle the gearbox. The further algorithm of actions is as follows.
- If replacing the pressure plate is not included in the plans, then its position relative to the basket should be marked with paint so that there are no problems during assembly.
- Using a 8mm wrench, unscrew the bolts securing the basket to the flywheel of the power plant, remove the pressure and friction disc.
- Remove the release bearing along with the drive.
- All failed elements must be replaced, after which assembly is carried out in the reverse order of disassembly. Also, to install the basket, you will need a mandrel to center the friction disc.
In order not to carry out the labor-intensive process of dismantling the clutch several times, it is recommended to immediately change all the assembled parts.
Adjustment will require special equipment and knowledge. You definitely can’t do without specialists here.
Replacing the clutch on a manual transmission
Structurally, this mechanical unit is no different from an automated transmission, with the exception of some nuances. The replacement process is identical, however, in the case of a hydraulic drive, a procedure for bleeding the system from air will be required. This work is performed as follows.
- Remove the battery, its shelf, and the dust shield of the power unit.
- Unscrew the cap of the master cylinder reservoir and add brake fluid to the maximum level.
- Remove the protective plug from the fitting and put a suitable size hose on it (preferably transparent). The other end of the hose is released into a container with working fluid.
- Displace the fitting tube tip by lifting the clamp.
- Wait until air stops flowing along with the brake fluid through the tube, then release the lock and remove the hose from the fitting.
- Add fluid to the reservoir to the optimal level.
Even a beginner can identify clutch faults on a Vesta, be it a manual gearbox or a robotic one, if you follow all the instructions. Another thing is replacing the clutch. Not only a beginner, but also many experienced car enthusiasts cannot cope with this. The fact is that, in addition to the tool, you will need special equipment, as well as a lot of experience.
It’s easier to save a lot of time and nerves by trusting professionals. In addition, you can receive a quality guarantee for such work, which means you can be confident in further operation without any problems.
LADA Vesta is a car produced by the domestic company AvtoVAZ, which went on sale in not so distant 2015. In appearance, interior design, as well as in the range of options, Vesta has stepped far ahead of the classic Russian automobile industry. The car has become more similar to American, Japanese and European cars, in no way inferior to them in quality, and in some places even surpasses them.
Signs of clutch failure
The occurrence of malfunctions in the Vesta clutch mechanism is most often associated with improper operation (inexperience of the driver, aggressive driving style), an initial defect in the part, or breakdown of other components interacting with it. Of course, you will immediately notice problems with the clutch - the car will begin to behave differently:
- Gears are difficult to shift/do not work at all;
- Pedal too soft/hard;
- The car jerks;
- The device is activated in the upper position of the pedal.
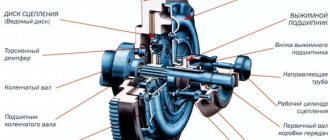
There can be many reasons for this behavior of Vesta, and not all of them are related to the intermediate part between the internal combustion engine and the gearbox. Often the problem comes from the fluid system. There may be a malfunction of the brake master cylinder, clutch slave cylinder, damaged hoses, a simply low DOT4 level or an air lock. Such problems (especially problems with the cylinder of the unit) have exactly the same effect as the failure of the entire unit. The clutch consists of a housing cast together with the drive/pressure disk (basket) and the driven disk.
What does the clutch sensor affect?
We have already answered the question of why a clutch sensor is needed. Now let's try to figure out how it affects driving and all the components associated with it.
As you know, when changing gears, the entire load of synchronizing the engine speed and the gearbox input shaft is taken on by the synchronizing gears. Quite often, car enthusiasts are faced with the impossibility of switching any speed - and in most cases the reason for this is a worn synchronizer of one of the gears. The clutch sensor practically eliminates the operation of synchronizers, since the signal transmitted to the control unit forces the electronics to automatically reset or raise engine speed to the most optimal value.
As for comfort, the clutch pedal sensor helps to cope with the jerking of the car when changing gears, which will undoubtedly appeal to all car enthusiasts without exception.