The main function of coolant in any car is, as paradoxical as it may sound, to cool the engine and maintain its optimal operating temperature within 90–110 °C . The main element of the entire cooling system is antifreeze or antifreeze, since, unlike water, they do not freeze to -40°C - 65°C , and the boiling point reaches even higher than +108°C .
This liquid, among other things, is not subject to corrosion and has high lubricating properties.
Replacing antifreeze in a VAZ 2114 - how to do it right
It is far from a fact that when buying a used car you will be able to find out literally everything about the car you are purchasing. For example, do you know what kind of coolant is used? Some people use antifreeze, others prefer antifreeze. Although there are some unique car owners who use ordinary water.
When buying a car secondhand, be sure to check the presence and quality of coolant in the engine system.
Coolant in a car
A little about the timing of coolant replacement
There are several possible reasons for replacing the cooler:
- according to the operating technique of the VAZ 2114, coolant must be carried out every 50 thousand km;
- if this car is rarely used, then the cooler is changed every season, according to the technical preparation plan for the spring-summer or autumn-winter seasons;
- It is very important to change the oil and cooler if you have just purchased a used car;
- If you used water in the summer, you should definitely worry about replacing it with antifreeze.
INTERESTING! There are a number of additives on sale that not only delay the day of replacing the cooler, but also protect the engine.
Coolant for VAZ 2114
What is filled with antifreeze or antifreeze?
So, you purchased a car and don’t know what exactly is in the cooling system. If there is water or already used coolant there, this does not bode well for your engine.
Therefore, first of all, check whether there is any coolant in the engine at all, and what exactly it is. At the same time, make sure there are no leaks from the pipes or radiator.
It is not difficult to independently determine the type of fluid used by the old owner.
- Antifreeze almost always has a blue or blue color.
- Antifreeze is mainly available in red or green. Moreover, there are a huge variety of shades of red.
- It is not difficult to distinguish water from blue or green liquid.
- If the color of the coolant has a characteristic shade of rust, then this indicates the need for urgent replacement.
Green antifreeze
Mixing different coolants. Yes or no?
In some cases, the quality of the fluid is good enough that it is not necessary to replace it. Only the quantity is somewhat below the required level.
Let's say you have antifreeze filled, but you only have antifreeze on hand. What to do in such a situation? Many VAZ 2114 owners are interested in whether it is possible to mix different compounds.
Antifreeze or antifreeze
There is no consensus on this matter. Let us say for sure that a disaster will not occur from mixing, antifreeze and antifreeze will not react and will not explode the car. But we definitely cannot recommend combining two types of coolant in one tank. Follow the instructions in your car's manual, fill in what the factory recommends, and then you won't have any problems.
Antifreeze is simply a type of antifreeze developed in Soviet times for Zhiguli cars. This was done due to the low quality of the antifreeze offered at that time. Since then, antifreeze is the number one choice for VAZ.
When to change?
We have already determined that, from the point of view of the needs of the VAZ 2114, antifreeze is best suited for this car. Although the plant itself has clear recommendations and standards in this regard. If you have a really high-quality antifreeze, which costs more than antifreeze, its performance efficiency will not be inferior to VAZ’s development, and in some places it may even be better.
But first, let’s determine exactly when the coolant needs to be replaced. It all depends on each specific situation, so there are several recommendations in this regard.
- When buying a new car, it should be replaced after every 60 thousand kilometers traveled.
- The standard service life of filled coolant is 2 years. Under normal operating conditions, it is sufficient to change it every two years.
- The coolant must be replaced immediately if its color has acquired a cloudy structure or a rusty tint.
- If the coolant leaked and water was used as a top-up, you need to eliminate the source of the leak and replace all the antifreeze.
- If the engine has been repaired or dismantled, the coolant must be replaced, regardless of its current condition.
What to fill?
A question that interests many is the volume of liquid that should be poured into the engine cooling system of the VAZ 2114. We answer. The volume of antifreeze or antifreeze is exactly 7.8 liters.
Since we agreed that antifreeze would be the best choice, let’s talk about its varieties and determine which one is best to use.
| Type of antifreeze | Peculiarities |
| AK | This antifreeze is a concentrate, so it cannot be poured in its pure form. Diluted with water in proportions of 1 to 1. The freezing point after dilution will be -30 degrees Celsius |
| A65 | Already diluted antifreeze that does not require adding water. The freezing point of the liquid is -65 degrees Celsius |
| A40 | The most common version of antifreeze for the VAZ 2114. Its freezing point is -40 degrees Celsius |
Decide for yourself which of this you will pour into the engine cooling system. Each of the three presented types of coolant has its own characteristics and works equally effectively for the benefit of your car.
Do not forget about the existence of high-quality antifreezes. They cost more, but last about 1-2 years longer.
Flushing
Many experts agree that the system should be flushed before replacing the coolant. But how to do this and is such an event really mandatory?
If the coolant being drained shows signs of rust and contamination, then the system should still be flushed. This preventive measure will never be superfluous. Therefore, try to allocate some of your precious time to the procedure. The engine will remain grateful to you.
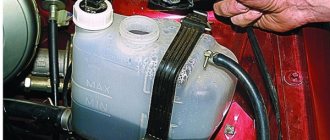
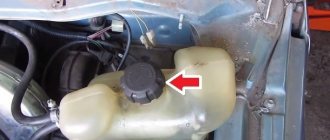
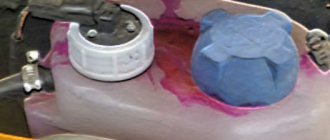
Expansion tank
The cooling system is washed quite easily:
- Drain the old fluid by unscrewing the drain plug;
- Fill the system with water through the filler neck;
- Distilled or boiled water can be used as a washing composition. Plus, there are special cleaning compounds. They are more expensive, but their efficiency is higher;
- Start the engine with flushing water inside and let it idle for about 30 minutes;
- Drain;
- If it is very dirty, repeat the procedure;
- Add new coolant to the system.
Stage of preparation and flushing of the system
In order for the next coolant you plan to install to function longer and better than the previous one, it is necessary to flush the system in advance. Scale, mucus, traces of oil and various contaminants can remain not only in cars with high mileage, but even in new cars. Therefore, flushing is a must before changing antifreeze or antifreeze.
As a rule, drivers do not use any special rinsing products, but ordinary water, the main thing is that it is clean (preferably distilled, but water from a filter can also work). This is because some chemicals in cleaning products can destroy not only dirt, but also corrode the pipe down to small holes. Only if you are sure that too much residue has formed there and water will not help, then it is better to use a cleaning product.
Step-by-step instruction
How to flush the cooling system correctly:
Prepare a container for draining in advance.
Drive the car onto an overpass or other hill, opening up the view.
Remove the radiator cap and wait until the dirty antifreeze drains out. Just be careful! When you open it when it's hot, hot antifreeze may spray out under pressure.
Pour new antifreeze into the tank to its maximum.
Run the engine, not forgetting to put the radiator cap back.
Let the car run for no more than half an hour at idle speed. Check the temperature of the device. If nothing has changed, clean it again.
Replacement
Now we can talk directly about how the coolant is drained and new antifreeze is added.
We noted that 7.8 liters of antifreeze are required to fill the entire volume of the coolant tank. But it is best to purchase a 10 liter canister. This is useful in case you spill some of the liquid past the neck, and also if you need to top up the coolant over time.
If you carry out the work in a clear sequence, watch preliminary training video instructions, then replacing antifreeze or antifreeze will become an easy task for you.
- Remove the main motor protection. To do this, there are four fasteners under the engine compartment. Although not all cars have protection.
- Remove the protective cover. It is located in front of the body under the engine.
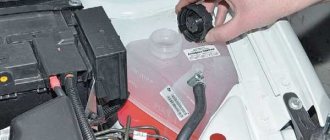
- Unscrew the cap from the expansion tank.
- We climb into the cabin and open the heater tap all the way. This will prevent some of the coolant from remaining inside the system when drained.
- Prepare a container where all coolant from the system will be drained. A basin or other wide dish is better suited so that nothing spills past.
- There is a drain plug on the radiator. You will find it on the lower left, in close proximity to the radiator.
- Don't rush to drain the coolant. First, be sure to protect the generator from antifreeze. To do this, you can wrap it in plastic and put on a bag.
- Now drain all contents from the radiator.
- Give yourself access to the drain plug on the cylinder block. To do this, you will have to remove the three bolts securing the ignition module.
- Place the module aside. Underneath it you will find a plug.
- Unscrew the plug and drain the old coolant solution.
- Let the car sit for about 15 minutes. This time should be enough for all the coolant to leave the system. Just remember, the engine must be cold.
- At this stage, you can flush the system if desired and necessary.
- After draining and flushing the system, tighten all plugs.
- Arm yourself with a canister and go to the expansion tank, which is located in the engine compartment. Remove the lid and begin to gradually pour in antifreeze or antifreeze.
- To avoid spilling the mixture, use a funnel. By inserting it into the fill hole, the coolant update procedure will be much easier.
- Be guided by the amount of coolant remaining in the canister. In some situations, an air lock may form in the system.
- To get rid of the plug, compress and release the upper hoses on the radiator.
- When filling is complete, you should have no more than 2 liters of liquid left in the canister.
Removing the airlock
Useful tips
Finally, we want to share a few very useful tips that will help you avoid mistakes that beginners often make:
- Coolant can only be changed when the engine is cold. If you do this on a hot engine, there is a huge risk of serious burns;
- When adding coolant, make sure that the required amount of mixture is in the system. If it is not enough, there is a high probability of engine overheating;
- Be sure to cover the generator with thick polyethylene or other material so that the solution does not get on it;
- If you mix antifreeze and antifreeze, nothing bad will happen. But try to avoid such situations, so as not to run into problems with the operation of the cooling system.
This is not to say that draining and replacing the coolant is a simple procedure. There are some nuances when updating the contents of the cooling system on a VAZ 2114. But with the right approach, even a car owner without repair experience can cope with this task.
Engine radiator drain
The next step in replacing antifreeze on a VAZ 2114 will be draining the cooler from the radiator. It is more convenient to do this on a viewing hole or a lift. In the lower corner of the radiator there is a special valve, which also brings owners a lot of trouble due to constant leaks. You can get rid of them using sealant. Before draining, it is necessary to prepare a clean container with a wide neck. You should open the tap carefully, as it is made of plastic and can easily crumble in your hands. Therefore, when performing this operation, you should play it safe and get a spare one.
If there is slight contamination, the liquid from the radiator can be reused, so the filled container must be put aside, first covered with something, avoiding debris.
Having completed this operation, you can begin replacing the radiator or expansion tank, but it is important to know that not all the coolant has been drained. For maximum efficiency, the cooling system operates in two cycles
Since a certain temperature is required for the best operation of an internal combustion engine, the cooling is configured in two circles:
- Small cooling circle.
- Large cooling circle.
The first is designed to warm up the engine as quickly as possible and achieve a comfortable operating temperature. When the temperature rises, a special damper opens, which allows the coolant to flow into a large circle passing through the radiator. The second circle is intended just for cooling the engine. To better achieve this goal, a special sensor is installed on the radiator - a thermostat, which turns on the fan when a certain temperature is reached.
The fan on the radiator creates air flow, thereby reducing the temperature of the running engine. One of the reasons for a car overheating can be a non-working fan or a faulty thermostat.
If the breakdown is more serious or complete cleaning of the cooling system from slag is required, it becomes necessary to drain the antifreeze from the VAZ 2114 unit. The inaccessibility of the drain hole on the engine block of cars of the Samara family complicates the work. To get to this point, you will need to remove the starter, since the plug is located underneath it. This strange design decision makes replacing antifreeze on VAZ cars the most labor-intensive.
Draining the antifreeze from the engine block must be done into another container, since it is not always possible to avoid dirt from getting into it from the car body. After waiting about ten minutes, you can start working.
Replacing antifreeze on a VAZ 2114
Replacing antifreeze in a VAZ 2114 is not considered a complicated procedure, but independent action will require the car owner to have certain knowledge and skills. The main attention is focused on the location of the cooling system components that will have to be encountered during the replacement.
How to properly replace antifreeze on a VAZ 2114?
The question of how to replace antifreeze on a VAZ 2114 is resolved in the standard manner. First of all, pay attention to the relevance of these actions. The reason for replacing the coolant may be one of the following factors:
- The service life of the filled antifreeze has expired;
- a leak is detected, the components of the system are repaired or replaced;
- the color of the coolant has changed, foreign impurities have appeared;
- The engine constantly overheats, the antifreeze cannot cope with cooling and gradually boils away.
If during a preventive inspection a low quality coolant is revealed, replacement is carried out with mandatory flushing of the system. It is also relevant if the brand and color of the consumable changes.
When it comes to the frequency of scheduled replacement of antifreeze on the VAZ 2114, they are guided by the service life of the coolant itself. In a car purchased from the manufacturer, it is changed after 60 thousand kilometers . The service life of a replacement consumable is determined by the canister; it is usually 5 years .
When replacing antifreeze on a VAZ 2114, pay attention to certain safety rules :
- all manipulations are carried out with a cooled engine - this avoids thermal burns and high pressure;
- when cooling, the pressure decreases, however, its presence should be taken into account when opening the covers and plugs of the system - splashes and coolant getting on your hands and face are possible;
- antifreeze has a high level of toxicity, it is not allowed to enter the soil; special containers are used to drain coolant and flush water;
- limit the presence of children and animals nearby that can interact with antifreeze.
Taking into account the above factors, the list of tools for replacing antifreeze in the VAZ 2114 includes the following equipment :
- rubber gloves, clean rag;
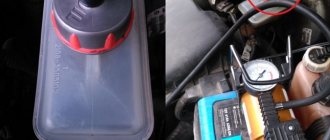
- a set of keys and screwdrivers, pliers, if possible, a compressor and a pumping bulb;
- drainage container with a volume of 7 liters or more. additional container for rinsing water;
- consumables - new antifreeze, distilled water, optional cleaning agent.
It is also recommended that you first inspect the entire cooling system for worn parts that may soon require replacement. In order not to change the coolant in the near future due to system components, it is recommended to carry out their preventive replacement at the same time as the antifreeze.
All consumables should be purchased only from authorized dealers and trusted suppliers in accordance with the manufacturer’s recommendations for vehicle maintenance. To do this, refer to the technical documentation and identify the original part numbers.
Stage one
Antifreeze is drained from the VAZ 2114 according to the following scheme:
- The car is parked on level ground and, if available, a repair pit or lift is used;
- if the engine has not been running for a long time, it is warmed up for better coolant circulation;
- as additional precautions, remove the minus from the battery, and also cover the generator to prevent antifreeze from getting on it;
- if there is additional engine protection and a protective casing, remove them;
- carefully, taking into account the possible pressure in the system, uncork the radiator and expansion tank caps;
- in the cabin, the heater tap is moved to the right to the maximum to ensure complete drainage of the coolant;
- there is a drain plug in the lower left part of the radiator - place a container under it for draining; before opening it, you should also make sure that the generator is protected from possible ingress of antifreeze;
- to drain the coolant from the cylinder block, you will need to dismantle the ignition module - it is secured with three bolts, the operation does not take much time;
- Place a container under the drain from the cylinder block and unscrew the plug.
Depending on the engine size, about 7 liters of used antifreeze leaks out. To speed up the procedure and ensure complete drainage, some car owners blow out the system with a compressor. Warming up the engine briefly for better circulation also helps. Remains from the expansion tank can be pumped out using a syringe or bulb.
Stage two
To flush the cooling system, use a special product or distilled water. When using the first option, repeated rinsing with water will be required, so many car owners and specialists do not use washing mixtures.
The general washing procedure involves the following stages:
- the lower drains are temporarily tightened, the system is restored to its original form;
- add washing agent or distilled water;
- warm up the engine to operating temperature, turn it off, and allow it to cool;
- drain the rinse in the same way as used antifreeze, repeat the procedure until the water at the outlet remains relatively clean.
Many car owners simplify the cleaning procedure by leaving the bottom drains open and feeding regular water from a hose into the system under medium pressure. This method allows you to avoid constant manipulation of connections and periodic warming up of the engine, but does not guarantee high-quality cleaning of the system.
Stage three
Filling antifreeze for the VAZ 2114 does not have key features that distinguish the process from a similar procedure with other cars. The only nuance is the removal of the coolant supply hose to prevent the formation of air locks.
To replace antifreeze after draining and flushing, the system is returned to its original state and the tightness of the fasteners is checked. After disconnecting the supply hose, new coolant begins to be poured into the radiator. As soon as it flows from the disconnected hose, it is returned to its place.
Next, antifreeze is poured into the expansion tank to the mark indicating the upper limit. Filling is carried out with a thin stream, periodically squeezing the pumping hoses to remove air bubbles.
After filling, screw on the radiator and expansion tank caps, and warm up the engine to operating temperature. The circulation of coolant from the first warm-up will reduce its level in the tank - after the engine has cooled, antifreeze is again added to the maximum.
After 100-200 km, the condition of the coolant should be checked again. Pay attention to the decrease in level - if necessary, add the required amount again and check the system for loose connections and possible leaks. If the color of the new antifreeze has changed, a reddish, brown or black tint has appeared - this is a low-quality product that should be urgently replaced with mandatory flushing of the system.
Cooling system elements
The process of draining coolant from the radiator
In order to understand how and why it is necessary to drain the coolant, you need to have a little understanding of the design of the car and the cooling elements. Also, you need to know how the coolant circulates in the engine and have an idea of the places where it can be drained.
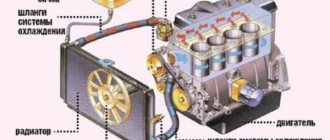
So, let's look at the complete diagram of the engine cooling system and how the coolant circulates:
Cooling system diagram
1 – element in the form of a plug for the expansion tank; 2 – expansion tank; 3 – hose for draining liquid from the pipe; 4 – hose passing between the radiator and the expansion tank; 5 – hose leading from the radiator; 6 – tank to the left of the radiator; 7 – aluminum tube; 8 – plug systems; 9 – tank to the right of the radiator; 10 – drain plug; 11 – middle of the radiator; 12 – casing for electric fan; 13 – plastic wings of the electric fan; 14 – electric motor; 15 – toothed pump pulley; 16 – pump impeller; 17 – camshaft drive belt; 18 – engine block; 19 – pump pipe; 20 – radiator hose with supply function; 21 – heater radiator hose with drain function; 22 – hose supplying coolant to the throttle pipe; 23 – exhaust pipe; 24 – hose for refilling; 25 – heater radiator hose with supply function; 26 – thermostat; 27 – coolant temperature sensor; 28 – coolant level indicator sensor.
Coolant drain options
There are two options for draining coolant from the system. They depend on what operations the motorist intends to perform with the car. So, let's look at both options separately.
Draining without removing the engine
This method is often used to replace coolant in the system, as well as to change cooling elements. The procedure is quite simple. Let's look at how to properly drain the liquid from the cooling system completely:
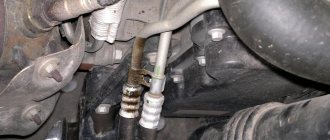
- We find the cooling system plug on the cylinder block.
Location of the coolant drain plug on the cylinder block
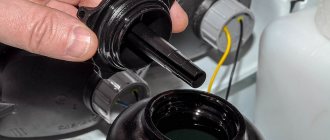
Remove the expansion tank cap
Unscrew the plug on the radiator to drain the coolant
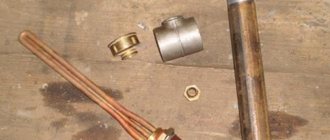
Installation of faucet
Drain faucet
For the convenience of subsequent draining and repair work, you can install a faucet. Moreover, you have already unscrewed the standard plug.
Draining with engine removal
The second method is easier than the first and is used when the engine is planned to be removed. Let's consider the sequence of actions aimed at draining coolant from the system:
- Unscrew the plug on the expansion tank.
- We unscrew the plugs from the cylinder block and radiator.
- Next, when the liquid has flowed out, you need to unscrew the pipes leading to the radiator.
- Of course, some liquid remains in the system and must be drained completely. This can be done in two ways: by blowing it out with a compressor or by disassembling the engine.
Why do you need to drain the coolant?
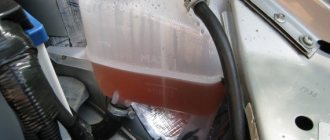
This “slurry” has already served its term
Let's look at the main reasons why you will need to completely drain the coolant from the system:
- Development of a full resource of use . It is recommended to carry out once every 90-100 thousand km. This is due to the fact that the coolant, due to a constant temperature difference, which is its operating temperature, loses its technical and physicochemical properties. After such a mileage, it can no longer effectively provide cooling of the engine and its elements, which can lead not only to failure of the thermostat and pump (most often these are the spare parts that suffer), but also to boiling of the engine, which can have unpleasant and material consequences .
- During engine overhaul . When the engine is dismantled for major repairs, the coolant will need to be completely drained.
- Replacing the radiator will also require draining the coolant completely from the system, but it is done according to a simplified option (the second one, which is indicated above).
- Replacement of other individual elements that will require draining the coolant from the system.
It will be useful: Automatic and manual transmission Chevrolet Cobalt: fuel consumption and oil change, common faults and diagnostic methods, do-it-yourself repairs and operating tips
How to choose the right antifreeze for VAZ 2114?
The following options are considered recommended for filling antifreeze for the VAZ 2114:
- AK is a concentrate, to obtain antifreeze it is diluted with distilled water in a 1:1 ratio;
- A65 - ready-made coolant, freezing threshold is -65 degrees;
- A40 is a more popular option, the freezing point of which is -40 degrees.
Manufacturer brands include MOTUL Ultra, Lukoil Ultra, and G-Energy. It is not recommended to mix different compositions and brands; the result may adversely affect the operation of the cooling system and its parts.
A pressing issue for many car owners is the issue of coolant color . For a simplified understanding, the following characteristics are distinguished:
- blue - antifreeze, it is not recommended to fill it into modern cars, the service life is 2 years;
- green - G11 class antifreeze. suitable for cars manufactured before 1992-96 depending on the brand;
- red is the most common option, classes G12, G12+ and G12++ are used in most modern cars;
- yellow - class G13, suitable for cars of recent years.
It is emphasized that the color of antifreeze is only a dye that mainly distinguishes the class of coolant. When leaks are detected, the color also helps determine what is leaking from the vehicle.
To replace antifreeze on a VAZ 2114, you will need up to 8 liters of ready-made solution. If you purchase concentrate, take 4 liters of it and distilled water. It is recommended to mix in a separate container and pour the ready-made solution into the system.
How to fill
To avoid an air lock, the clamp must be loosened. The hose that supplies coolant from the heating fitting of the throttle assembly must be disconnected. Removing the hose
Pour coolant into the reservoir until it begins to emerge from the hose. Depending on the model, the tank takes from 7 to 8 liters. We return the hose to its place. Add antifreeze to the full volume, that is, to the “MAX” level. Tighten the tank cap. We put the module back. Connect the negative wire back to the battery terminal. We start the VAZ 2114 engine and warm it up until the fan turns on. Turn off the engine and check the antifreeze level, top up if necessary. Attention! When the engine is turned on, observe the antifreeze temperature indicator on the sensor
If it is in the red zone and the fan does not turn on, then you need to turn on the heater and try with your hand the temperature of the air that flows through it. If it is warm, then there are likely problems with the fan; if cold air flows, then there may be an air lock in the cooling system. Turn off the engine To remove the plug, turn off the engine and wait until it cools down, and then, being careful (as antifreeze may splash out due to the fact that it boils during operation), unscrew the tank cap. After disconnecting the hose responsible for supplying antifreeze from the fitting, you need to add antifreeze to the required level in the tank.
Why is antifreeze or antifreeze leaking?
If antifreeze is leaking from the VAZ 2114 tank, you should tighten the cap more tightly. The antifreeze boils and expands in volume. If this does not help, you will have to replace the tank or carefully examine all connections.
Video “Why coolant leaks on a VAZ 2114”
This video describes one of the ways to eliminate coolant leakage.