The process of installing xenon in PTF
If we don’t take the tuning option, where xenon-type fog lights are an integral attribute, then consider installing PTF on a standard standard bumper, as most motorists do.
Options
There are several options for installing fog lights, among which the motorist must choose the one that best suits him.
- Buying a bumper with installed fog lights.
- Purchase of individual PTF elements and their installation.
Algorithm and necessary tool
So, to complete the process you will need the following tools: a xenon kit (the selection of this product is described below), a drill, drill bits, a jigsaw. Is everything collected? Then we proceed directly to the consideration of the sequential process of installing xenon fog lights on the VAZ-2114:
- First you need to remove the front bumper.
- Now, we clean it from dirt, dust and other objects. The best thing to do is wash it and clean it.
- We carry out markings for future fog lights.
- Using a drill and jigsaw, we cut out holes for installing fog lights.
- Using a file, emery and other grinding devices, we process the edges.
- We fasten the fog lights into the holes using the bolts.
- The headlights themselves are installed, now you need to secure the xenon ignition units.
- We do this in the engine compartment, away from water.
- Wires with light bulbs extend from the blocks, which need to be installed as fog lights.
- Now, we connect the PTF and xenon to the electrical circuit.
- At the last stage, performance testing is carried out.
As most motorists and experts recommend, xenon installation should be trusted to a professional. Thus, if a motorist is not sure that he is able to do everything himself and correctly, the best option is to contact a car service center or an auto electrician.
Selection of xenon lamps for VAZ-2114
With the installation process covered, it's worth considering what's included in the xenon fog light kit and where it can be purchased. To begin with, let’s look at what the entire xenon kit in the PTF consists of:
- Headlights;
- Light bulbs;
- Switching relay;
- Set of wires;
- Connection diagram;
- Button to turn on/off PTF.
Where to buy
Now that it’s clear what elements the kit consists of, it’s worth talking about purchasing options:
Chinese xenon, or?
You should not take the Chinese version of xenon, it is better to add a little and buy, albeit cheap, but high-quality branded goods.
As a rule, it has a guarantee, and the quality is certified by certificates. But, as practice shows, China is different from China and you can come across some pretty good and high-quality parts even made in China.
Methods for installing PTF on VAZ 2113, 2114, 2115
There are several options to equip your car with a fog light system. The choice depends on your personal preferences and capabilities.
| Way | Peculiarities |
| Buying a bumper with built-in PTF | Such bumpers are bought at a tuning studio, where everything will be connected and connected for you. The disadvantage of this option is the high cost |
| Buying a bumper from a VAZ 2115 and installing it yourself | To do this, you will have to buy a bumper from an older model, which has holes for fog lights. All that remains is to find a suitable set of PTFs and install them |
| Purchase of PTF and facing elements - glasses | Today this method is in greatest demand because it allows you to do the installation yourself for little money. |
The standard PTF kit includes several elements:
- Headlights;
- Light bulbs;
- Switching relay;
- Set of wires;
- Connection diagram;
- Button to turn on/off PTF.
https://www.youtube.com/watch?v=ytabout
When choosing a set, pay attention to the fact that the headlights match the shape of the glasses, that is, the facing elements.
Standard kit
Today, for VAZ 2114 owners who want to install fog lights, it is recommended to choose rectangular kits from the Kirzhach company. It is used for factory installation of PTF on expensive versions of the model.
Xenon in PTF
Many car owners are thinking about installing xenon lamps in their fog lights. Is it good? Not really.
The thing is that when installing xenon in the PTF, focusing is disrupted. The operating principle of xenon is somewhat different compared to conventional Kirzhach type lamps.
Standard PTFs are designed for certain types of lamps, so they cannot cope with xenon. As a result, excessive reflection is observed in the reflector, rays are refracted, and the light is blurred. Where does this lead? To blind oncoming drivers.
The xenon option is not a practical or successful solution. Therefore, we recommend that you avoid it.
Another option is a combination of xenon and yellow fog lights. You will need H1 xenon bulbs, which are mounted in a bottle cap and only then placed in the headlight. This way the light beam has smoother boundaries, does not blind oncoming traffic, and better illuminates the roads in bad weather. Only after installing this combination lighting, be sure to make sure that your headlights really do not blind oncoming cars.
If oncoming cars stubbornly continue to shine their high beams on you, try adjusting the light beam. If this does not help, it is better to abandon xenon.
Installation of fog lights can be done in several ways. Which one to choose, each car owner decides for himself, based on his capabilities and preferences. Let's look at the most common installation options:
- Buying a front bumper with PTF. In this case, the headlights are sold already mounted in the front bumper. As a rule, a part can be purchased without any problems at a car tuning studio and immediately installed and connected. The disadvantages of this option include high financial costs.
Buying a bumper with PTF installed is the most expensive option for installing fog lights on a car.
- Buying a bumper with holes for PTF. With this installation method, you should purchase a bumper with holes for the lights and the headlights themselves with all the necessary elements (wires, relays, power button, etc.).
When purchasing a bumper with holes for fog lights, you will need to purchase the lights themselves and all the necessary components for connection
- Self-installation of PTF is the most common installation method, since it requires minimal financial investment. The car owner only needs to purchase headlights with the necessary installation kit and facing elements.
The most common option for installing PTF is to purchase and then install a set of fog lights yourself.
Before connecting the fog lights, it is important to install the devices correctly on the front of the car. This is done in accordance with certain rules, which clearly stipulate the location of the light source. On modern cars, the installation locations for fog lights are marked from the factory.
Fog lights on the front of the vehicle must be installed in accordance with established regulations
Many car owners seek to install xenon in fog lights, arguing their actions by increasing lighting efficiency. Is this really true? Let's figure it out. First of all, when installing xenon in standard PTF housings, focusing is disrupted, which is due to a different operating principle in contrast to conventional lamps.
Since standard fog lights are designed to operate with certain lamps, they simply cannot cope with xenon. The result of such changes will be too much reflection in the reflector, the rays are refracted, and the light becomes blurry. A well-known situation arises - the blinding of drivers of oncoming vehicles, which increases the risk of an accident. Installing xenon in PTF is far from the most successful solution and the effectiveness of such light is questionable, so it should be abandoned.
When installing xenon light in standard fog lights, focusing is disrupted, which leads to dazzling oncoming drivers
Before you begin installing fog lights, you will need to select a certain list of tools and additional elements. You can purchase a ready-made connection kit or select the necessary spare parts separately. When everything is prepared, you can mark on the front bumper a place for installing future headlights.
https://www.youtube.com/watch?v=https:tv.youtube.com
To install foglights in the front bumper, you need to make holes using a jigsaw or drill with drill bits, having previously completed the markings
You will need:
- file;
- drill and drill bits;
- electric jigsaw;
- roulette;
- marker.
As a rule, the kit for installing PTF on VAZ 2113, 2114, 2115 includes the following elements:
- headlights with bulbs;
- set of wires;
- electromagnetic relay;
- PTF power button;
- ties and clips for fixing wires;
- PTF connection diagram VAZ 2113, 2114, 2115.
The kit for connecting fog lights should include wires with terminals and connectors, a relay, a button
The installation of the lighting sources in question must be carried out using a button and an electromagnetic relay. The fact is that fog lights consume quite a lot of current and connecting directly to the ignition switch will lead to burning and subsequently burnout of the contacts. All this can contribute to damage to the wire insulation and the occurrence of a short circuit, which may result in failure of the electrical wiring.
To install fog lights, the following procedure must be followed:
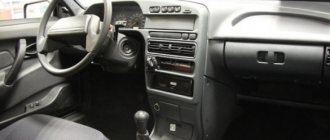
- Installation of the headlight switch button in the cabin. You can choose any location for the element, as long as the driver can easily operate the key. Quite often, the part is installed instead of plugs on the dashboard.
The PTF activation key is usually located instead of one of the plugs located on the dashboard
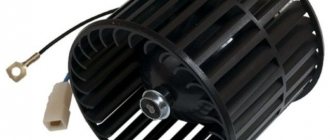
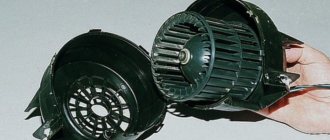
- The grille with the dynamic head is removed from the front panel. Behind it there are two blocks designed to turn on the headlights, indicate the operation of the PTF and illuminate the button.
- Having placed the button in a convenient place, connectors are connected to it. After this, the grate can be put back in place.
- The relay is installed under the hood on the partition of the engine compartment near the mounting block. To remove it, you need to unscrew 2 nuts, lift it and find 2 pads (numbers 7 and 8).
The relay is fixed near the mounting block, for which it is necessary to unscrew the two fastening nuts
- A block with a harness of four wires with contacts included in the kit is laid to the relay block.
A wiring harness with four contacts, which is included in the kit, is laid to the mounting block
- The connection of the wires that come from the PTF relay is carried out according to the diagram in the following order: the wire from the 30th contact of the relay is connected to block No. 8 of the mounting block at the 8th terminal, the 87th contact of the relay goes to the 1st terminal of the connector, 86 is “ground”, and 85 is connected with the 17th terminal of block No. 7.
Diagram for switching on fog lights: 1 - fog lights; 2 — relay for turning on fog lights; 3 — mounting block; 4 — fog lamp switch with a control lamp (on the left) and a backlight lamp (on the right); 5 — external lighting switch (fragment); A - to power supplies; B - to the instrument lighting regulator
- The positive wires are pulled to the PTF, the mass is mainly secured to the nut of the headlights. Voltage “ ” to the fog lights is supplied from the 2nd and 3rd contacts of block No. 8.
The ground is attached to the headlights, the positive wires are connected to pins 2 and 3 of block No. 8
- After all connections, the connectors are installed in the mounting block and secured.
As for the rear PTFs on VAZ 2113, 2114, 2115, on these modifications of the car such a light source is installed from the factory, i.e. another light bulb is used in the rear light. Control is also carried out from the passenger compartment using a button, but without fixing, since a slightly different relay design (electronic) is used. It’s worth knowing about this and not trying to install a latching key.
Installation methods
There are several ways to equip a VAZ-2114 with fog lights:
- Purchasing a tuning bumper with fog lights already installed. Such bumpers are usually made in a tuning studio, where they are installed and connected. It's not cheap.
- Installation of a bumper from the VAZ 2115 model on a car with seats made for fog lamps, followed by the purchase of a PTF kit and their independent installation on the car.
- Purchasing a set of fog lights and “glasses” - facing elements for these headlights, installing them yourself. Let's look at this method in more detail.
Typically, a PTF kit includes: headlights, bulbs for them, power relay, wiring, connection diagram, power button. When choosing this kit, you should take into account the shape of the headlights; they should fit well into the “glasses”.
For the VAZ 2114, small rectangular headlights produced by Kirzhach are considered optimal.
The optics of this manufacturer are used in the standard installation of PTF on model 2114.
When choosing another manufacturer, there is a risk of purchasing low-quality equipment, in particular light bulbs. As a result, the quality of headlight illumination will be poor.
How to install a PTF: necessary materials and tools
Installation of fog lights, regardless of the chosen installation method, requires the presence of certain parts and tools, without which it is impossible.
What are the button and relay for?
In order to install fog lights on a VAZ, you need to assemble certain parts in advance or purchase a ready-made kit. The cost of such a set rarely exceeds one thousand rubles.
The PTF kit includes:
- wires with blocks and terminals for a specific VAZ model. There are three of them as standard: one connects the headlights, the second goes to the relay from the switch, and the third goes from the relay to the fuse box;
- fog lamp relay;
- power button;
- clips and ties that secure the wires;
- fog lights.
Which PTFs should you prefer? The headlights themselves are chosen by the driver to his taste, but the main thing when choosing is not to make a mistake with the power, so as not to overload the generator and the car’s electrical wiring. It is better not to purchase headlights with xenon: the generator has a certain power reserve, but is not designed for too high loads. Regular light bulbs will be sufficient.
What are fog lamps for?
The main task of the PTF is to illuminate the space in front of the car. Correctly adjusted “fog lights” can illuminate a section of road 10–15 meters long. This distance is quite enough for safe movement by car in poor visibility conditions. The switching on and off of such lighting devices must be fully controlled by the driver.
Adjustment of fog lights is carried out during their installation. The procedure does not take much time, but requires care and precision. You can install the rear and front PTFs yourself.
How to adjust fog lights
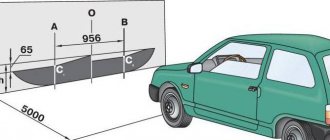
The main task of the fog lamp adjustment process is to give them a certain position in space, characterized by the formation of a light beam directed into an area free of condensation and evaporation, located at a distance of 0.3-0.7 meters from the surface of the road surface. Expanding these boundaries in one direction or another significantly affects the functionality of fog lights.
The technological operation for performing adjustment work comes down to setting certain values for the vertical and horizontal angles of the device.
Preparatory activities
Adjusting the fog lights is preceded by the following measures:
- selection of a flat horizontal platform;
- measuring the pressure in the car tires and bringing it to the value specified in the car’s operating instructions (the value of this parameter affects the height of the fog lights relative to the road surface);
- refilling the fuel tank (until full);
- loading the vehicle to a weight equal to the load weight of the main period of operation;
- at a distance of 10 meters (some experts reduce it to 5 meters) from the vehicle we place (perpendicular to the surface) a special screen (you can use a wall, garage door, etc. as the latter);
- preparation of tools: screwdrivers, measuring instruments (ruler, tape measure).
Preparing for installation
If your VAZ 2114 does not have fog lights provided by the factory, then you can install them yourself. First, you need to buy all the necessary parts and tools, namely:
- Fog lights, along with special wires;
- The framework in which the PTF will be installed;
- Mounting brackets;
- Light bulbs.
Before you start connecting this device, you need to prepare the holes in the bumper. On some models, plugs are installed that you simply need to remove and replace with headlights. But with some samples of the VAZ 2114, the situation is a little more complicated - you need to make the holes for the headlights yourself.
In order to do this work, you will need a stencil. To get it, trace the headlight mounting frames on paper and cut them out. Then, attach the stencil to the place where the fog light will be located. Trace the stencil, leaving a clear outline. Next, using a drill, drill many holes along the contour, close to each other, so that the middle of the plastic falls out and a hole is formed. It is advisable to sand the edges of this hole.
Tuning VAZ 2112 headlights - how to achieve the best effect?
Many experts consider poor road lighting to be one of the main flaws of every domestic car without exception. To get rid of this problem, and at the same time make the car even more attractive, we will look at tuning the front and rear headlights using the example of the VAZ 2112 model.
1 How to dismantle and disassemble headlights?
The first question we need to answer is how to remove and disassemble the headlight on a VAZ 2112? You don't need to buy modern equipment for this. We will need a set of screwdrivers and wrenches, which every car owner has. At the beginning of the dismantling work, we disconnect the pads and all wires from the car headlights. Next, remove the upper part of the radiator grille. After this, we disconnect the wires and blocks from the direction indicators on the car, and also dismantle the hydraulic corrector. To remove it, we need to press the fastening latch and turn the part 90˚ to the right.
- Optics for Priora tuning
- Throttle valve VAZ 2112
- Tuning the VAZ 2106 instrument panel - the best solutions for a legendary car
- Auto scanner for self-diagnosis of any car
Next, unscrew the bolts holding the headlight and move it back. The number of fasteners is the same for both the front and rear optics of the car. After this, we move the part closer to the center by about 4 cm. Subsequently, the lower part of the “eyelash” of the headlight should jump out of the latch that secures it to the wing of the car. At the next stage of dismantling the front and rear lights, we will need to loosen the bolts holding the upper part of the optical buffer of the VAZ 2112.
After this, press on the lower part of the pad so that the upper flange of the “eyelash” pops out of engagement with the buffer. At the final stage of tuning, unscrew the last mounting bolts and remove the car headlight. The entire dismantling operation will not take much time and effort. However, when doing the work you must be extremely careful, because both the buffer and the overlay are very delicate elements. Any wrong movement can cause them to break.
Do it! evokes uncontrollable desire in a woman in 15 minutes! Anyone will be yours - just make her coffee! The whole truth about the stimulant + reviews...
By dismantling the front and rear optics with our own hands, each of us can save a lot of money. In a similar way, you can remove the headlights on other domestic cars. For example, work is also carried out to disassemble the optics of the Priora model for the purpose of further tuning of this car.
2 Replacing lamps in the optics of a VAZ 2112
To complete the work we will need:
- lamps for automotive optics H7. Parts from Narva or Novator are best suited;
- set of wrenches;
- screwdriver;
- pliers;
- wiring;
- round file;
- soldering iron
We already know how to remove the front and rear optics from the VAZ 2112 model. After dismantling the headlights, we will need to greatly widen the hole for the reflector. Without doing this, we will not be able to install the H7 lamp. To drill a wider hole, you can use a drill with a special roller, but it is better to use a round file. When using it, much less dust is generated. While drilling, it is necessary to regularly apply a lamp to the hole.
After the lamp has gone out, you need to disconnect the “-” and “+” terminals. Instead, we solder other terminals to which we connect new wires and lamps. Next, install the car headlights in place. At the final stage of tuning, it is necessary to re-adjust the already modernized VAZ 2112 headlights.
3 How to swap PTF and VAZ turns?
Every motorist should have a universal device for diagnosing his car.
You can read, reset, analyze all sensors and configure the car’s on-board computer yourself using a special scanner...
At the beginning of the work, we dismantle the PTF by unscrewing 2 screws. After this, we remove the turns of the car. Next, remove the glass from the corners and PTF. Taking this opportunity, you can check the condition of the reflector in the PTF of the car. If rust has formed there, the part needs to be cleaned.
Then we take the fog light and use pliers to clamp the contact, which is located at the back of the element. Having loosened the wire a little, we break it, after which we glue the rear ring with a window seal. After this, insert the lamp and socket inside the fog lamp. Next, we assemble the entire headlight structure, lubricating its edges with sealant.
4 Installation of ProSport optics
Before installing a set of optics of this brand, we will need to change some parts of the headlights. In this way, it is possible to achieve more efficient road illumination at night and make the appearance of the devices much more beautiful.
It will be useful Intake air temperature sensor - what it looks like, where it is located, how to check, cleaning and replacing the air intake
You can tune ProSport optics before installing it on a VAZ 2112 by painting the headlight substrates. To do this, we disassemble the part and take out the lamps. Under them there is a silver-colored backing. Take paint of a different shade and get to work. Changing the color of the substrate requires several stages. After each of them, you will need to wait for the material to dry completely. Among the entire range of coloring compounds, aerosol enamel is best suited for this operation, which is also used when tinting car headlights.
Another method of tuning ProSport optics is additional lens illumination. The essence of the work is to install an LED strip behind the headlight lens.
Doing this with your own hands is not difficult for anyone. The main thing is to place the tape so that it evenly illuminates the entire headlight. To make ProSport parts stand out from others, you can change the color of the standard lighting. For this we need new LEDs. We unscrew the headlight, and then remove the standard backlight lamps. Next, install LEDs of any color and assemble the part structure in reverse order.
After we have tuned the new headlights, we can begin installing them. We already know how to dismantle the front and rear standard optics of a VAZ 2112. After removing the part, we clean the place where it was located and install ProSport headlights.
Do you still think that diagnosing a car is difficult?
If you are reading these lines, it means you are interested in doing something in the car yourself and really saving money, because you already know that:
- Service stations charge a lot of money for simple computer diagnostics
- To find out the error you need to go to specialists
- The services use simple impact wrenches, but you can’t find a good specialist
And of course you are tired of throwing money down the drain, and driving around the service station all the time is out of the question, then you need a simple CAR SCANNER ELM327, which connects to any car and through a regular smartphone you will always find the problem, turn off CHECK and save a lot of money.
We ourselves tested this scanner on different machines and it showed excellent results, now we recommend it to EVERYONE! To prevent you from falling for a Chinese counterfeit, we publish here a link to the official website of Autoscanner.
How to connect fog lights with your own hands
Before directly installing the headlights, their location is determined. In the case of the VAZ 2115 car, the bumper already has standard holes for installing additional lighting fixtures. Similar ones can be cut in the bumpers of VAZ 2113 and VAZ 2114.
There is no need to spoil the appearance of the bumper - fog lights are easily installed on special brackets. Many PTF kits contain special decorative plugs that add attractiveness and neatness to the installed headlights and facilitate the installation process.
Installation and connection algorithm
- Installation of a power button in the car interior. In the case of the VAZ-2114, the place for the button is on the left side of the driver on the front panel. However, its placement can be arbitrary - the main thing is that it is convenient for the driver to drive the car. Often, PTF power buttons are installed instead of plugs on the control panel.
- The grille with the speaker is removed from the standard front panel. Behind it there are two connectors - one is for turning on the headlights, the second is for indicating the operation of lighting fixtures and illuminating the key itself.
- The button is placed in a convenient place, and chips are connected to it. The speaker grill can be returned to its place.
- Under the hood there should be a mounting block that combines fuses and relays. The PTF relay will be mounted in the same place, so the block must be removed: to do this, unscrew the nuts that secure it and lift it.
- On the bottom panel of the mounting block there are two blocks - 7 and 8. Each of the blocks is signed during production at the factory, so it is impossible to make mistakes at this stage.
- The PTF set contains a wiring harness with four contacts. The mentioned wires are pulled to the fuse block from the fog light relay.
- The relay is mounted in the engine compartment of the car.
- The wires coming from the PTF relay are connected to connectors 7 and 8 of the mounting block: in connector 7, terminal 8 is connected to terminal 30 from the relay, terminal 87 is connected to connector 1, terminal 85 is connected to connector 17 on terminal 7, terminal 86 is connected to ground . From block 8, terminals 2 and 3 are directed to the left and right fog lights, respectively.
- The ground wires are connected to the fog lights: they are usually attached to the nuts of the headlights.
Wiring diagram for connectors and terminals of fog lights
The functionality of the entire connection can be checked by turning on the side lights - only then will the fog lights work.
Fog lights only function when the side lights are on
After completing the installation of the PTFs on the car, they only need to be adjusted correctly. The flow of light should not blind drivers in the oncoming lane.
Video: instructions for installing and connecting fog lights
Fog lights are essential lighting equipment on any car, making it easier to travel in conditions of minimal visibility. If there is no PTF on a certain car model, you can install them yourself. The installation procedure does not require special knowledge and can be carried out by the driver without the involvement of third parties.
Basic adjustment aspects
Adjusting VAZ headlights is done without material costs and a lot of time:
- To make adjustments, you must place the transport on a flat surface.
- Next, with the headlights on, one of which will be covered by something, you need to open the hood of the car and find the adjusting screws on the back of the headlight unit. One of them is designed to adjust the direction of light on a vertical surface, and the second – on a horizontal one. After adjusting the first headlight, you can proceed to the second.
It will be useful: Engine diagnostics using spark plugs
Connecting PTF and control keys
The connection diagram that comes with the kit is simple and easy to understand.
First, we cut the wiring of these lighting devices into the mounting block installed under the hood, near the windshield on the right. To do this, unscrew the bolts securing this block and lift it to gain access to the pads, marked Ш7 and Ш8.
These blocks provide for the connection of fog lights, although they are not installed regularly. They connect the wiring from the headlights themselves, as well as from the relay included in the kit. All this needs to be connected correctly, and the diagram is as follows:
- The wire coming out from pin “87” is ground and we connect it to the car body.
- Pin “85” leads to block Ш7 (connects to connector 17).
- Pins “30” and “86” are connected to block Ш8 (pin “30” - to connector 8, and “86” - to connector 1).
From the installed headlights, we lay the “positive” wire through the entire engine compartment, since they are connected to the Ш8 block, but only these wires are inserted into connectors 2 and 3.
Then we connect the pads to the mounting block, install the block itself in place, select a place for mounting the PTF relay not far from the mounting block.
The connection diagram for the foglight control is also simple - the kit includes a button that we install in a seat on the panel.
The factory provided the possibility of connecting these headlights, so there is a control block under the panel. For everything to work, you need to remove the panel, find the required block and connect it to the button. Afterwards the panel is put in place.
To check the functionality, turn on the side lights on the car, and then turn on the PTF. When the headlights are turned off, even if the fog light switch is pressed, they should go out.
Installing this lighting equipment on a VAZ 2114 with the right approach should not take much time. But the presence of working PTFs on a car will significantly improve the illumination of the road at night.
How to install and connect PTF?
Installation and connection are carried out in 3 stages:
- We install the PTF in the bumper.
- We connect the wiring to the mounting block via a relay.
- Install a button in the panel.
Connection diagram
Well, I think everything is clear here! However, the diagram is not indicated in full: the mass of the PTFs themselves on the body, which must be done without fail, is not indicated. It needs to be secured in a safe place, on metal of course! Before fastening, be sure to clean the metal from dirt and tighten the mass well so that there is no loss of tension. Otherwise, the PTF will burn dimly and unevenly.
Bumper installation
As stated above, there are two options - either install a new bumper with ready-made cutouts for the PTF, or cut it yourself with a jigsaw. To do this, remove the element, mark the mounting holes, and cut it.
Next, we install the “glasses” - they cover the cutout on the outside of the bumper, they consist of two parts:
- Decorative - external.
- Internal - attaches glasses to the bumper using side latches and holds the PTF. (How to remove the bumper?)
Connecting wiring to the unit via a relay
Relay with wire set
- First of all, open the hood, find the required block and unscrew its two fastenings to the body on the sides, remove the cover.
- From the bottom of the mounting block, unfasten the two outer wire blocks marked “7” and “8”.
- Take the installation kit: put the wires from the kit on the relay.
- We add their other ends to the block of wires “7” and “8” according to the diagram.
- We stick the pads back into the mounting block and fasten it back to its original place
- Next, we attach the relay to the car body in any place you like: for example, next to the same block.
- We run long wires from the mounting block blocks (which we have already installed) to the fog lights and connect them. We also attach the PTF mass to the car body.
Installing a button in a panel
To install the button that comes with the mounting kit, you will need to partially disassemble the front panel.
Fortunately, the factory prudently installed wiring for the PTF in all Samar configurations, so all we have to do is remove the center console and find a block in the wiring for connecting the button.
Removing the center console
To disassemble the panel, use the article: How to remove the instrument panel and remove only the console.
Next, find the wire block, install the button and assemble the panel.
Then you need to check the headlights for functionality.
Don't forget that they only work after the side lights are turned on!
After installation, the PTF will need to be configured and adjusted!
Severe weather conditions (rain, snow, fog) greatly impair visibility, thereby reducing traffic safety. A high-quality head lighting system, especially fog lights (FTL), plays an important role in reducing the danger when driving in poor visibility conditions. But the VAZ 2114 is not initially equipped with fog lights, so owners have to install them themselves or at a service station.
Content
Connection process
Connecting fog lights on a VAZ 2114 should be carried out strictly as shown in the diagram. This process starts from the inside of the car. On the panel of any VAZ 2114, regardless of its configuration, there is a special connector for the button for turning on the fog lights.
After the button is installed, the connection diagram goes into the engine compartment, to the fog lamp relay. This element is sold in a kit for connecting PTF. Its location should be in close proximity to the mounting block. This is explained by the fact that the block contains two terminal blocks that will need to be connected to the relay.
Next, when all the elements are connected, the relay should be connected to the fuse block, according to the order indicated in the diagram. Now, take the positive wire and lay it along the engine compartment, connecting the button contacts to the relay. Also, connect the PTF to this “plus”. The negative wire, in turn, needs to be connected at one end to the headlight, and at the other to the fastening nut, for ground.
Now that the connection is complete, connect the battery and try turning on the PTF. If everything works, then the work can be considered complete, and if not, then you should review the connection diagram again. You may have connected the wires incorrectly, or damaged the wiring when installing parts.
In general, experts recommend leaving as little excess wire length as possible. Since the loose presence of wiring in the engine compartment can cause it to weaken, and as a result, fall away from the relay.
Connecting the PTF on a VAZ 2114 should not be done independently, without the appropriate skills, as it can cause a short circuit and damage some elements of electrical equipment. If the installation of this device is simply necessary, then it is better to contact a specialist for help in connecting it.
Selection of body and main criteria when selecting PTF VAZ
When choosing a PTF VAZ 2114 or for any other car, it is important to consider what kind of lamp will be installed in the fog lights, why fog lights are installed, etc. As a rule, such headlights themselves can be in a plastic, aluminum or magnesium housing. It is quite obvious that aluminum and magnesium are more reliable and durable, but they also cost more.
Fog lights may also have a plastic or glass light diffuser. Plastic products are resistant to damage, but quickly turn yellow and cloudy, and light transmittance decreases. As a result, after just a couple of years the quality of road lighting deteriorates.
We also note that if the car is used actively or in difficult conditions (for example, driving on the highway at high speed or driving on bad roads), when choosing, it is better to choose PTF models, which can be closed with special foglight plugs made of plastic to protect against stones, etc. d.
- Now let's move on to the choice. To decide which fog lights to install on the VAZ 2114, first of all, you should choose a reliable housing. As you know, the condition of roads in the Russian Federation and the CIS is poor, so PTF made from a material resistant to damage and temperature changes will be the best solution. If there are protective plugs, this will be an additional plus. The kit should also include good quality fasteners, wires, and relays.
It will be useful Do-it-yourself muffler repair
The fogs themselves should produce the widest possible spot of light, distribute the light evenly, with a minimum of losses due to refraction and dispersion of the light flux. It should also be possible to adjust and adjust the light spot (both vertically and horizontally) so as not to blind drivers of oncoming cars. Even if the lamp burns out, access for replacement should be easy. This allows you to quickly change the llama yourself.
Finally, we note that when choosing PTF, it is also important that such headlights have acceptable aerodynamic performance and fit well into the overall exterior of the car.
As practice shows, car enthusiasts install domestic fog lights VAZ or Avtosvet as PTF on VAZ 2114. The list of imported solutions includes Bosch or Hella, as well as various Chinese PTFs. Also, regular PTFs from Samara, Niva, Priora, etc. are often installed on VAZ 2114 or 2115.
As for fog lights from China, they can be either cheap or expensive, and the quality can also vary greatly. At the same time, it often happens that more expensive analogues may turn out to be no better or even worse than average-priced options.