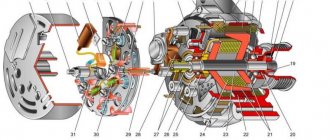
Front hub and its parts
In a VAZ 2109 car, replacing the front hub is necessary if it is worn out. The hubs, in turn, play a very important role. Without them, the wheels will not rotate at the required speed, which will first lead to damage to the brake system, and then to failure of the entire car. Therefore, if there are any problems with the front hubs, they need to be diagnosed in advance so that later it is not too late. Replacing the front hub of a VAZ 2109 is a difficult and responsible task, but you can handle it in your garage yourself.
Front hub wear
Replacing the front hub on a VAZ 2109
Typically hub wear manifests itself in the following ways:
- There is play in the hub bearings, that is, they wobble slightly.
Note: the play should not be allowed to be too strong, as this will require replacing not only the hub, but also the bearing.
- The bearings are “humming”. While driving, strange sounds are heard coming from the wheels. As a rule, with increasing speed they become even more pronounced. After this, when the speed decreases, the noise does not become less quiet.
Note: If the hum is heard on only one side, then only one hub needs to be replaced. If it occurs in both wheels, both hubs need to be replaced immediately.
- Bearings This can cause the caliper to overheat as well, causing it to fly off as well. In addition, the brake fluid also boils too quickly. This leads to rapid failure of the braking system.
Causes of hub wear
Replacing the front hub on a VAZ 2109
Usually there are the following reasons due to which the hub wears out:
- The wheel bearing has completely fallen apart. Perhaps it is only in the early stages of destruction. In any case, it will have to be changed, but after appropriate diagnostics.
Replacing the front wheel hub of a VAZ 2109
- The wheel bearing nut is not tightened properly. Such an oversight can cause backlash. In this case, you can get by by simply screwing in this nut all the way. That is, you should not change the hub or its bearing.
- The steering tip does not work well.
- There are shortcomings in the operation of the upper or lower ball joint.
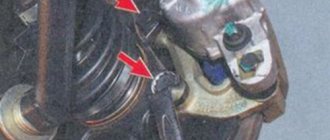
How to remove a bearing on a VAZ 2109 using method No. 2 with removing the strut, but without using a puller
The entire structure is removed, along with the steering knuckle. The part is replaced directly on the rack (possibly with a removable device). There is no need to do a wheel alignment.
Execution order:
- Unscrew and remove the steering tip as well.
- After this, you will need to free the strut from the top bolts under the hood.
- We also remove the strut assembly from the CV joint and disconnect it from the car.
- Now we change the part using the methods described above. Either using a puller, or using mandrels to remove and then press in a new front wheel bearing
Important to know: It is not recommended to use impact methods, especially when installing a new part. Use the pressing options described in method No. 1 or No. 3.
How to diagnose bearing play
VAZ 2109 front wheel hub
In fact, this process is very simple, and even a beginner can do it. For this:
- Raise the car using a jack to the optimal distance.
Note: It is much easier to diagnose using an inspection hole, but if you don’t have one, a jack will also work.
- Bleed the wheel. This should be done according to a certain pattern: hold the wheel on both sides, squeezing it as much as possible. You should swing your arms in the same direction (preferably away from you). By the way, this procedure is also carried out in car services, so it is advisable to attend it in order to be prepared for its implementation later.
VAZ 2109 front hub
- If there is slight play, the bearing nut should be tightened as much as possible.
Note: if this does not eliminate the play, then the hub or its bearing must be replaced.
- You should still hold the wheel on both sides. However, now you need to pump it not in one, but in different directions. What does it mean? You just need to press the wheel towards you with your left hand, and away from you with your right. If play is also observed, then the reason is not in the hub. In this case, the steering tip is faulty. It should be replaced.
Note: In some cases, tie rod ends are sold complete with tie rods. However, these thrusts do not always need to be changed either. They can be left, replaced if they break soon.
- Pull the wheel, placing maximum emphasis on the top of the wheel. If in this case there is also play in the bearing, then the upper ball joint should be replaced.
VAZ 21093 front hub
- Pull the wheel by the bottom. Accordingly, if there is still play, then the lower ball joint needs to be changed.
Note: if only one bearing has failed, then it is better to immediately change the second one, since it will most likely also break very soon.
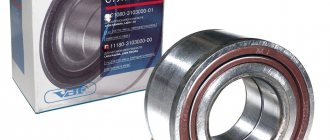
Bearing selection
To replace a wheel bearing, you will need to know about its parameters, dimensions, and characteristics specific to the VAZ 2109.
For the “nine”, a double-row angular contact roller bearing with tapered rollers is used. Axial clearances are pre-adjusted and filled with lubricant. Closed bearing type.
Based on the table, you can find the optimal bearing for the front hub of your car.
| Parameter | Required indicator |
| Inner diameter | 34 millimeters |
| Outside diameter | 64 millimeters |
| Bearing width | 37 millimeters |
| Bearing weight | 0.556 kilograms |
| Limit speed | 3700 rpm |
Replacing the front hub
Necessary:
- Unscrew the wheel nut with a 30 mm socket.
- Raise the car on a jack.
- Remove the wheel.
- Remove the brake caliper.
- By removing the brake disc, you will have access to the front hub.
- Unscrew the hub nut. It is secured with three bolts. The bolts are too close to each other, so the head becomes very tight here and is difficult to rotate.
Note: You can loosen these bolts slightly and then remove them. If the bolt is very tight, you can warm it up.
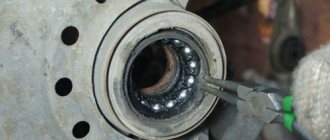
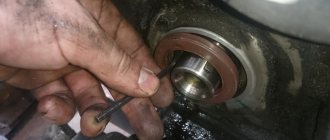
- Using a screwdriver, pull the hub out of its seat.
Mounting the front hub on a VAZ 2109
- Thoroughly clean the seat.
- An oil seal must be inserted into the hub housing. It needs to be pryed off, as it will get in the way (it can be inserted into a new hub). To make it fit better, its seat should be lubricated with oil.
- Traces of dirt will remain under the oil seal, so that in the future dirt does not get under the new oil seal, it is necessary to lubricate it with a special liquid.
- Put the hub in place. Lightly tighten the hub nut so that the hub does not fall out.
- Press it in.
- Tighten all the necessary screws on the reverse side.
Replacement with the rack not removed
This method will allow you to avoid subsequent collapse. Here you need to remove:
- wheel together with disk;
- caliper and the hub itself.
Replacement is carried out directly on the car, without removing the rack. Here you will have to work with a puller. The procedure is performed like this:
- unscrew the bolts from the brake drum and remove it;
- remove the ball joints;
- pull out the CV joint from the front hub, and then remove it itself using a chisel;
- the retaining ring is pulled out from the steering knuckle (it contains the outer part of the damaged bearing);
- the puller is installed directly on the fist;
- by tightening the bolt of the device, the part is pressed out;
When it completely leaves the axle, the protection is dismantled, then the hub is removed, from which the inner race is removed.
You can also remove the latter without a puller, but you will need a chisel for this. It’s also quite easy to score with a grinder and then split with a heavy hammer.
Important points
As can be seen from the article, replacing wheel bearings is a rather labor-intensive task, even taking into account the fact that the article provides the simplest method (an alternative replacement method allows you to do without removing the steering knuckles, but in this case the car owner will definitely need an inspection hole, which is far from available everyone has). In the method proposed above, a hole is not needed, and the main difficulty is not to disturb the camber of the car’s wheels. If the alignment still turns out to be damaged, there is only one way out: go to the nearest car service center and adjust the alignment again.
Replacement without a puller with dismantling the rack
In this case, the entire structure must be completely removed from the car, including the steering knuckle. Replacement of a part that has become unusable is carried out directly at the rack. The advantage of this method is that there is no need to subsequently deal with wheel alignment.
All work is carried out in the following order:
- the steering tip is removed;
- the upper bolts holding the rack are unscrewed (they are located in the engine compartment);
- then it is removed from the CV joint and pulled out of the car.
The bearing is replaced and the strut is mounted in place.
Installation
The inner surface of the fist is cleaned of dirt and lubricant (solid oil) is applied to it. The puller with the new bearing is installed in place and pressed into place. To make the process easier, it is recommended to first cool it thoroughly in the freezer.
A working unit is inserted into the fist as evenly as possible, trying to avoid distortion. After installing the bearing, put the hub back on and press it in if necessary. All other stages of work are carried out in reverse order.
The hub nut must be tightened using a torque wrench (the required force is 20 N*M).