What is the danger of current leakage from the battery?
Checking the battery for signs of energy consumption is a necessary measure for those who want to extend the life of on-board equipment. The first trouble that threatens the unlucky driver is the complete failure of the battery. And even recharging its capacity will only temporarily solve the problem.
As is known, acid batteries are structurally composed of plates placed in an electrolyte based on distilled water and sulfuric acid. When this equipment is discharged, acid salts accumulate on its plates. Because of this, the working surface capable of conducting current is reduced. Salts crystallize and become unable to dissolve even in an electrolyte. The battery capacity immediately decreases, and the product itself fails earlier.
You should know for what reasons such a phenomenon as excessive consumption of electric current can occur. First of all, you need to monitor the actual capacity and charge level of the car battery. A leak often occurs due to the negligence of the driver, who forgets to turn off one of the consumer devices in a closed car. Another common cause is electrical wiring faults.
So, in addition to light sources or a radio that have not been turned off for a long time, other causes of current leakage can be:
- short circuit in the wiring that occurred due to unprofessional installation of equipment;
- damage to the insulating layer (insulation) of electrical wiring in the on-board circuit;
- oxidation of contact groups, terminals, connection sockets due to the accumulation of a thick layer of dirt and dust;
- mechanical wiring damage;
- melting of wires or contacts due to their close location to the motor;
- using a very worn battery.
Timely diagnosis of current leakage will allow you to quickly eliminate the problem and drive without the risk of getting into an unexpected situation. This will also extend the life of a car battery of any brand.
Checking current leakage in a car with an ammeter
If the machine is operating normally, the on-board network will consume no more than 70 mA. But this indicator is not achieved instantly. At the very beginning (when the circuit consisting of an ammeter and the on-board network is connected), the electric current consumption will be 120–130 mA. However, if the multimeter reading is higher, then there is a malfunction. The first thing you need to do is inspect the fuse box. When checking for current leakage in a car with a multimeter, the fuses should be removed one by one.
Disconnect the wire from the negative terminal of the battery and connect the multimeter. Don't forget to turn off the car. The multimeter at this moment will determine the amount of electric current that the car consumes when it is off.
When checking the current leakage in a car with a multimeter, we remove the fuse and, using a test lamp, determine whether current flows to the fuse when the car is not started.
When the car is not equipped with an alarm system, players and the like, the amount of electricity consumed will be no more than 70–80 mA.
Checking the network for leaks
To carry out the test, you won’t need much - it’s enough to have an ammeter or multimeter on hand with the ability to measure current up to 10 A, a set of open-end wrenches, and cotton gloves.
As for the car, before checking the on-board network, the engine is turned off and all energy consumers are turned off.
That is, you definitely need to turn off the radio, air conditioning, and check if any lamps are turned on.
In general, you need to do everything as if the car was parked, but at the same time you need to provide access to the battery.
Before taking measurements, it is important to check again whether there are any remaining energy consumers turned on.
Current leakage is usually checked at the negative terminal from the battery. You should loosen the fastening of the negative terminal block from the battery and remove it from the terminal.
The positive wire remains connected. Next, the device is connected.
One probe of a multimeter or ammeter should touch the “negative” terminal of the battery, and the second one should touch the removed terminal block.
The polarity of the device does not matter when testing through the “negative” terminal. After connection, the display will show the current consumption value.
Normal current consumption from the battery is in the range of 15-70 mA; in some cars, a leakage current of 70 - 80 mA is allowed.
This range is determined by the number of electrical appliances - if it is minimal, for example, on a carburetor car with only basic electrical equipment and no alarm system, then the current consumption will be small.
But if the car uses an injector and has security multimedia systems, then the current consumption will be higher.
If, during the check, the current leakage measurements turned out to be normal, then you should then pay attention to the condition of the battery.
But if the device shows increased consumption, then you should continue checking.
Further measurements are quite simple, but you will need access to the fuse box.
The fuses should be removed from the safety block one by one, and after each one, the leakage should be measured.
If, after removing the next fuse, the leakage has decreased to a normal reading, it means that increased current consumption occurs precisely along the branch for which the removed fuse was responsible.
All that remains is to use the electrical diagram to determine which devices were powered by a given “branch”, and then carefully inspect the wiring, as well as check the functionality of the electrical devices.
How to check current leakage in a car with a multimeter
When the first signs of such a malfunction appear, it is necessary to check the current leakage in the car using a device.
Check sequence:
1. Before performing work, you need to find a diagram of the location of the car's fuses. This can be done by downloading the car's operating manual and asking the appropriate request in a search engine. In some cars, the fuse code is located on the fuse box cover. You need to find all the places where there are fuses in the car.
2. The positive terminal of the battery is removed. The ignition and all electrical equipment of the car must be turned off. Some experts recommend monitoring via the negative terminal. There are no fundamental differences, the circuit is still the same. When monitoring using the positive terminal, it is easier to search for a specific leak location.
3. The multimeter switches to the 10 Ampere DC measurement mode, the probes are installed in the appropriate connectors. It is better to put crocodile tips on the probes.
4. Next, the positive (red) probe is carefully secured to the positive terminal of the battery, the negative one - to the removed terminal going to the vehicle equipment. The location of this connection must be protected from accidental contact with the car body (you can simply temporarily insulate it with a rag) so that there is no short circuit.
5. The digital display of the multimeter will indicate the leakage current. If its value is less than 0.2 Ampere, no further control can be performed. If the current is more than 0.5 Ampere, that is, the critical value, it is necessary to proceed to further operations.
In the case when its value is in the range from 0.2 to 0.5 Ampere, the decision on the advisability of further actions is made independently. If the current exceeds the upper measurement limit (as shown in the following photo), you should stop measuring immediately and call a specialist.
6. If the leakage current in the car is greater than the critical value, begin to search for the specific cause and its source.
An assistant is needed for this. He will sequentially remove and insert fuses into their original places. At this time, the “operator” of the multimeter must monitor changes in the device readings.
If, with the fuse removed, the readings do not change significantly (by more than 5%), it means that practically no leakage current flows through this fuse.
It is more correct to start turning off - turning on with powerful fuses designed for high currents. This can speed up the search process. Usually along a chain of large rated fuses there are several smaller fuses.
If, for example, when dismantling the fuse responsible for the body control unit, the leakage current has decreased significantly, it is necessary to move on to monitoring small fuses responsible for lighting equipment, wipers, washer and other elements of body equipment.
Video - finding a current leak in a car:
It is best to go through all the fuses using this method. Car alarm fuses are usually not installed in standard places; they can “hang” next to the main alarm unit.
Some auto electricians use a sophisticated testing method. It does not require an assistant.
7. Complicated method. In this case, the positive terminal of the battery is connected back. The fuses are pulled out sequentially. The multimeter probes are installed in the connectors of the removed fuse, monitoring the current in a specific circuit. This method is more labor-intensive, but accurate.
8. Having deciphered all the circuits through which current flows from the fuse layout diagram, proceed to establish the specific cause of the leak in these circuits. To do this, you need experience working with car electrical circuits. The most common reasons:
- wiring short;
- relay sticking;
- failure of electronic components.
9. To temporarily eliminate the problem of current leakage, you can not replace the fuse through which the leakage occurs. For example, if the cause of the leak is a malfunction of the car radio, you can turn off the corresponding fuse while parked.
Calculator for calculating leakage current in a car
Excessive leakage current in the car will cause the battery to discharge while parked. The causes and verification of leakage should be dealt with separately. At the initial stage, the main thing is to understand what permissible leakage and how many milliamps are the norm for a particular car, since losses will depend on the number and name of energy consumption sources. An online calculator , using the formula - Battery capacity (A) * number k, will help you quickly calculate the permissible leakage current.
Current leakage should be checked as often as possible, especially in wet weather!
Other reasons for battery discharge
What to do if the driver measures the current consumption and it does not exceed the norm? As mentioned above, difficult starting after a long period of parking may not be caused by leakage currents. Some of the most common causes of this problem may include:
- High battery self-discharge.
- Generator malfunction.
Testing the battery for self-discharge
To determine the condition of the battery, you need to remove it from the car and wipe it clean with a rag soaked first in a solution of baking soda, then in water. If the battery is serviceable, you need to check the density and electrolyte level in each section (there are 6 in total). The battery is then fully charged by the mains charger to normal voltage (12.7 V without load).
All that remains is to leave the unconnected battery for several days and then measure the voltage at the terminals again. If the voltage loss is more than 0.2 V, then the problem is in the battery. You will have to buy a new battery or try to restore the damaged one, at least temporarily, by contacting the appropriate specialists. If the battery “holds”, then either the problem has been eliminated (for example, water was added to semi-dry jars), or the problem is different.
Checking the functionality of the generator
The problem may also be in the generator, which simply does not charge the battery when the engine is running. Of course, almost every car has a warning light that comes on if the battery is not charging. But it can also deceive if, for example, there is a charging current, but it is too small. In this case, the battery is not able to replenish the energy spent on starting the engine, and when a powerful load is turned on (headlights, heaters, etc.) it may even begin to discharge.
The multimeter switch must be set to constant voltage, the measurement limit should not be lower than 20 V.
First of all, it is necessary to measure the voltage at the battery terminals with the ignition off. For example, let it be equal to 12.7 V (battery is fully charged).
Voltage on the battery when the ignition is turned off (use a different type of multimeter).
Now you need to start the engine at idle speed, and turn off all consumers (headlights, radio, heaters, etc.). The voltage at the battery terminals should rise to 13.8 - 14.5 V (depending on the state of charge of the battery).
The voltage on the battery is sufficient to charge it when consumers are disconnected.
Now you need to connect energy-intensive consumers - headlights, heater/air conditioner, heated windows/seats, radio, etc. The voltage at the battery terminals should drop to 13.5-13.7 V.
The generator copes with the load and continues to charge the battery.
If it is lower, then the generator cannot cope with the load, and you will have to repair it. But that's a completely different story.
Never check the serviceability of the generator by disconnecting the battery while the engine is running. This method was suitable 30 years ago, when all the electrical equipment of the car consisted of a kilometer of wire and five relays. Modern car electronics will not forgive such an experiment. In addition, simply “throwing off” the terminal will not indicate a malfunction if the generator is running, but its voltage is not enough to charge the battery.
Any car, both domestic and foreign, is equipped with a certain set of standard and non-standard electrical equipment. At the same time, during operation, quite often you can encounter such a problem as a discharged battery.
As a rule, in this case, owners immediately begin to check the battery and the condition of the battery, diagnose the relay regulator, generator, etc. However, not everyone knows that the source of problems may not be the battery itself and charging systems, but a current leak in the car.
Current consumption rate in a car battery
Some car appliances are constantly running on electric current. Let's list them:
- watch;
- memory of the electronic control unit;
- standard anti-theft system;
- signaling.
These devices continuously consume electricity. The ECU memory, after it is rebooted, begins to function and remembers the current installation functions. The alarm starts working as soon as you leave the car in the parking lot. The listed car appliances depend on electric current, so they continuously consume a small amount of electricity.
Since electric current is used by many automobile appliances, a standard for current leakage has been established. This indicator is constant; it can be determined by adding up the amount of electricity used by each device. For example, when a clock, alarm system, and multimedia in a car continuously consume current, the total amount of current consumed will be 24 mA (1 mA 20 mA 3 mA). However, if we add up the volume of electrical current consumed by all devices that operate continuously, we get a value from 50 to 80 mA.
Also interesting: Installing a towbar on a Chevrolet Niva
For reference, a turned-on headlight consumes 500 mA, so a small electrical leak in the car equal to 50 mA will not cause the battery to run out.
Is it possible to check the current leakage in a car and find out the norm? To do this, it will have to be diagnosed by measuring current consumption. If it turns out that the amount of current consumed exceeds the standard indicators, you will have to find and eliminate the electrical malfunction.
How to find an energy consumer?
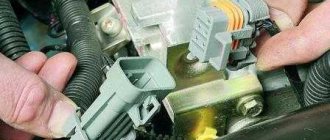
Further search for current leakage in the car is carried out using the fuse box (usually installed under the hood near the windshield). The procedure is as follows:
- Leave the ammeter connected to the battery terminals and remove the fuse box cover.
- Alternately pulling out the fuses from their sockets, monitor the readings on the multimeter display. If the manipulation does not produce results and the current value remains the same, insert the element back into the socket and move on to the next one.
- When you notice a drop in current to normal, find out which electrical appliances are “hanging” on the circuit of the pulled fuse. Look for the “culprit” using the method of elimination, checking each consumer separately.
Example: a high-consumption circuit powers 3 pieces of equipment - a cigarette lighter, a rear window defroster and a courtesy lamp. It is not difficult to deal with the cigarette lighter and the light bulb - you need to turn off these devices and measure the current at the relay contacts that close the heater circuit. If the readings are higher than normal, disconnect the heating element connector and try replacing the relay.
Several consumers are powered directly from the battery, bypassing the fuse box. This includes the electronic engine control unit, starter and generator. If manipulations with fuse links do not bring results and the display readings have not changed, proceed to checking the electric generator:
- Disconnect the positive battery terminal.
- Unscrew the power wire from the generator and wrap the exposed end with any dielectric (you can use a rag) to avoid a short circuit.
- Connect a multimeter to the battery open circuit and check the current value. If the diode bridge in the generator fails, consumption will drop to normal.
Typically, a broken alternator diode causes a large current draw, measured in amperes. The loaded winding acts as an electromagnet, which can be easily checked using a metal key attached to the unit pulley. If the key is pulled, the electric generator is probably faulty and is wasting battery power.
In a similar way, you can measure current leakage in other directly connected circuits. Look at the electrical diagram of the car and disconnect the wires one by one, bypassing the fuse box. If for various reasons the multimeter is missing, try to solve the problem in the following ways:
- carefully inspect the inside of the car for a burning light in the glove compartment or trunk;
- try with your hand the glass with built-in electric heaters;
- check if the seats are heating up;
- Turn off the burglar alarm and stereo amplifier completely.
When faced with current leakage and battery discharge, remember what non-standard equipment you happened to install on your car in recent days. The reason probably lies in the incorrect connection of the device.
Malfunctions of switching equipment
Loads connected to live wiring through switches or relays may cause increased leakage current.
In any case, the source of problems is the contacts, no matter the switch or relay - burnt and deformed from overload, they may not open completely, maintaining, albeit large, resistance through which current will flow
However, such cases are rare. But in modern cars with complex control systems for on-board consumers, the circuits are switched by semiconductors, and not by classic relays. And any semiconductor also has a reverse current - in switching transistors it is negligible, but in the event of a malfunction it increases to noticeable values, not to mention cases of breakdown of the transistor when the load is no longer disconnected from the power supply.
Connecting the device
Every car owner needs to know what leakage current should be in the car. Before determining current losses, the device must be connected to the network. Devices that consume battery power must be turned off. The multimeter is connected to the system:
- The cable from the positive output of the battery is removed.
- One contact of the multimeter is connected to the battery positive.
- The second contact is connected to the wire that is disconnected from the network.
We recommend: Battery for Hyundai Solaris
Do not connect the device to the plus and minus of the battery at the same time - this may cause a short circuit. The car will be fine, but the fuse will burn out quickly. If everything is connected correctly, the display shows an indication of the electrical current that is constantly flowing through the electrical device.
If the permissible loss of electricity in the machine is lower than the measurement result, you should continue to search for the cause of the leak.
How quickly can current leakage drain a battery?
Many car enthusiasts, even after a superficial study of this topic, cannot understand how such small currents can drain the battery to zero. Let's try to clearly explain how this happens in different situations. Moreover, such an outcome is quite possible when a completely new battery “does not survive” until the morning even with leakage currents not exceeding the norm.
Situation one. A brand new 60 Ah battery is available. Pre-charged fully from a stationary charger. The leakage current does not exceed the norm - say, 60 mA. How long will it take for the battery to run out completely in this situation? We count. With such a leakage current, the battery “loses” 60 mA in one hour. For one day, that is, for 24 hours, respectively - 1440 mAh or 1.4 ampere-hours. It follows that the previously stored 60 Ah will be enough for about 40 days. A lot of? Maybe yes, if you drive a car often. But if you left it in the parking lot and went on vacation, then it’s enough. Do not forget that these were ideal conditions described - a new battery and normal leakage current.
Situation two. The same new battery is available and the leakage current is normal. But before parking the car for a long time, we did not specifically charge anything. As a rule, even if the car's battery charging system is fully operational, the battery is very rarely fully charged at the end of the trip. That is, it no longer contains the 60 Ah of energy discussed above. Knowing the principle of calculation, it is easy to estimate how quickly a 60-70% charged battery will “die” in this situation.
Situation three. We have a used battery and normal leakage current. A battery of any technology inevitably loses its capacity over time. That is, even with proper operation (which is rare), after a couple of years, out of 60 Ah, only 25-35 Ah remains. Calculate for yourself how long it will take for such a battery to run out if it is not fully charged first.
Situation four. We have a not very new battery and a leakage current of about 300 mA (much higher than normal). As mentioned above, a non-new battery cannot have a capacity of 60-70 Ah due to natural wear and tear. Let's say there are 25 Ah left there. After another short trip, we did not specifically charge the battery, that is, it could be recharged from the generator, say, by 80%. In total, we park it with an energy reserve of 20 Ah. With a leakage current of 300 mA, our battery will completely “die” after 60 hours, that is, in just two to three days.
Situation five. To the not new battery and the leakage current beyond any norm, let’s add a haphazardly working charging system. That is, a worn-out generator, an incorrectly functioning relay-regulator and other problems that occur in cars all the time. Let's also add short trips with the headlights, heater and music on.
In the described situation, not only is the battery, in principle, unable to accumulate a lot of energy, but it has nowhere to get this energy from. You spent a lot on starting the engine, then drove for a short time, and then parked the car. Meanwhile, the battery has no more than 10 Ah of energy left in reserve. How long will it take for it to dry up if the leakage current is at least 300 mA? That's right - after 30 hours a deep discharge will occur. But it won’t be enough to start the engine even after 4-6 hours.
Let's add aggravating factors to all this. For example, negative air temperatures, at which the battery charges poorly and discharges faster, or even completely, can completely freeze. You should also remember that to successfully start the engine, the battery must be charged at least 20-30 percent. If it is more discharged, then even if there is some reserve of energy for the starter to operate, there will not be enough starting current. The latter will “squeak” sluggishly a couple of times, after which there will be silence.
Self-diagnosis with a multimeter
It's time to analyze in detail the step-by-step steps that will explain how to find a current leak in a car with a multimeter. In addition to the multimeter itself, you need to prepare gloves, a pen with a notepad, as well as an open-end wrench and clamps. The step-by-step steps from machine preparation to inspection are as follows:
- Disabling electronics and implicit current consumers.
- Eliminating the ignition and removing the key from the lock.
- Fixing the hood in the open position.
- Loosening the negative terminal on the battery using a wrench.
- Closing car doors. Open windows are a must.
- Activate the ammeter mode on the multimeter (switching the device to 10 A).
- Creating an open circuit by connecting one ammeter wire to the weakened terminal using a clamp. Next, the terminal is removed from the battery.
- Another wire is connected to the negative terminal of the battery.
- At the final stage, all that remains is to turn on the device and record the received readings on paper.
The permissible current leakage in a car with modern electrical appliances is 15 - 70 mA.
4. Next, the positive (red) probe is carefully secured to the positive terminal of the battery, the negative one - to the removed terminal going to the vehicle equipment. The location of this connection must be protected from accidental contact with the car body (you can simply temporarily insulate it with a rag) so that there is no short circuit.
5. The digital display of the multimeter will indicate the leakage current. If its value is less than 0.2 Ampere, no further control can be performed. If the current is more than 0.5 Ampere, that is, the critical value, it is necessary to proceed to further operations.
6. If the leakage current in the car is greater than the critical value, begin to search for the specific cause and its source.
An assistant is needed for this. He will sequentially remove and insert fuses into their original places. At this time, the “operator” of the multimeter must monitor changes in the device readings.
If, with the fuse removed, the readings do not change significantly (by more than 5%), it means that practically no leakage current flows through this fuse.
It is more correct to start turning off - turning on with powerful fuses designed for high currents. This can speed up the search process. Usually along a chain of large rated fuses there are several smaller fuses.
If, for example, when dismantling the fuse responsible for the body control unit, the leakage current has decreased significantly, it is necessary to move on to monitoring small fuses responsible for lighting equipment, wipers, washer and other elements of body equipment.
Some auto electricians use a sophisticated testing method. It does not require an assistant.
7. Complicated method. In this case, the positive terminal of the battery is connected back. The fuses are pulled out sequentially. The multimeter probes are installed in the connectors of the removed fuse, monitoring the current in a specific circuit. This method is more labor-intensive, but accurate.
8. Having deciphered all the circuits through which current flows from the fuse layout diagram, proceed to establish the specific cause of the leak in these circuits. To do this, you need experience working with car electrical circuits. The most common reasons:
- wiring short;
- relay sticking;
- failure of electronic components.
9. To temporarily eliminate the problem of current leakage, you can not replace the fuse through which the leakage occurs. For example, if the cause of the leak is a malfunction of the car radio, you can turn off the corresponding fuse while parked.
Why does the battery discharge for no apparent reason?
Let's start with the fact that there are many reasons why current leakage occurs. In fact, this problem manifests itself in the form of a banal battery discharge. In fact, after the car has been idle for a short time, the driver discovers that the battery is discharged.
In some cases, the starter will turn the engine, but weakly. In others, you may encounter that the starter clicks, but the engine does not turn over. It also happens that the battery is completely discharged, that is, the alarm goes off, and the car cannot even be opened using the central lock.
As many people mistakenly believe, it’s all about the battery and its charge. However, it often happens that the battery is fully charged and 100% operational, the generator charges the battery normally, but a rapid and deep discharge still occurs.
Naturally, the problem needs to be solved, since frequent battery discharges can cause a noticeable decrease in battery life or complete failure of the battery. One way or another, the vehicle’s on-board system will need to be checked.
Causes and consequences
First you need to understand what a car battery is. Like any other battery, it is a chemical current source that has an electrical capacity, the value of which is usually printed on the battery label. It is measured in ampere hours (Ah).
Battery capacity is measured in ampere-hours and shows how much current the car battery will be discharged with.
In fact, capacity determines the amount of electrical energy that a fully charged battery can deliver. Leakage current represents the current drawn from the battery. Let's say we have a serious short circuit in the car wiring, and the leakage current is 1 A. Then the 77 Ah battery given as an example will be discharged in 77 hours.
The main problem is that the battery is deeply discharged. When receiving energy from the battery, the sulfuric acid included in the electrolyte is gradually converted into lead salts. Up to a certain point, this process is reversible, since a similar thing happens when the battery is charged. But if the voltage in the cells drops below a certain level, the electrolyte forms insoluble compounds that settle on the plates in the form of crystals.
These crystals will never recover, but will reduce the working surface of the plates, leading to an increase in the internal resistance of the battery, and, therefore, a decrease in its capacity. In the end, you will have to buy a new battery. A dangerous discharge is considered to be a voltage below 10.5 V at the battery terminals. If you bring your car battery home to charge and notice lower voltage, it's time to sound the alarm and deal with the leak immediately!
In addition, leaks caused by short circuits or melted wiring insulation at sufficiently high currents can lead not only to battery damage, but also to fire. Indeed, a new car battery is capable of delivering hundreds of amperes over a short period of time, which, according to the laws of physics, can lead to melting and ignition in a few minutes.
The electrical system of a car is a complex of complex electronic systems interconnected
After considering all the unpleasant consequences of leakage current, it is worth understanding its causes. Previously, in the days of carburetor cars with a minimum of electronics, the normal leakage current was considered to be its complete absence. In those cars there was simply nothing to draw current from the battery when the ignition was turned off.
Today everything has changed: any car is simply crammed with various electronics. These can be either standard devices or installed later by the driver. And although all modern electronics, accompanied by a friendly march of environmentalists with slogans about energy saving, support special “sleep” or standby modes with very low energy consumption, a certain amount of current is consumed by duty circuits. Therefore, small leakage current values (up to 70 mA) are the norm.
Also interesting: Buy accessories for the car body Niva Chevrolet (LADA)
From the factory equipment in a car, the following devices normally constantly consume a certain amount of energy:
- Diodes in the generator rectifier (20-45 mA);
- Radio tape recorder (up to 5 mA);
- Alarm (10-50 mA);
- Various switching devices based on relays or semiconductors, on-board engine computer (up to 10 mA).
The maximum permissible current values for serviceable equipment are indicated in parentheses. Faulty components can dramatically increase their consumption. We will talk about identifying and eliminating such components in the last part, but for now here is a list of additional devices installed by drivers, which can often add another hundred milliamps to the leak:
- Non-standard radio;
- Additional amplifiers and active subwoofers;
- Anti-theft or second alarm;
- DVR or radar detector;
- GPS navigator;
- Any USB powered equipment connected to the cigarette lighter.
Checking current leakage in a car with a multimeter
Now that we have understood the nature of the leakage current, its varieties and the reasons for the increase above the norm, we move on to the main thing - checking the current leakage in the car with a multimeter. This is a simple matter and does not require much experience. It is much more difficult to then find the problem due to which the leakage current is higher than normal.
Checking current leakage in a car with a multimeter is performed according to the following algorithm:
- Turn off the engine.
- Move the ignition key to a position where it can be removed from the lock.
- Turn off all consumers that you can - music, lights, chargers inserted into the cigarette lighter, etc.
- After opening the hood, lock the switch, which “notifies” the security system that the hood is open. If the engine compartment is illuminated by a built-in light, unscrew it while taking measurements.
- Turn the multimeter into current measurement mode.
- Disconnect one of the terminals from the battery (any).
- Connect the multimeter to the resulting open circuit (between the battery and the terminal).
- Set the car alarm.
- Wait a few minutes.
- After the multimeter readings have stabilized, evaluate the leakage current and compare it with the norm for your car.
The simplest method for finding the reason why the leakage current exceeds the norm is discussed below. But first, it wouldn’t hurt to talk about common mistakes that car enthusiasts make when taking measurements.
Firstly, while measuring the leakage current with a multimeter, do not start the engine under any circumstances! If you do this, a current of at least a hundred amperes will flow through the multimeter. No ordinary multimeter can withstand such a load. To measure the current consumed by the starter, you need another device - a current clamp.
Secondly, checking for current leakage in a car should not be performed with a multimeter that is not set to the mode for measuring high currents (usually 10 A). A small range of 200 mA may not be enough, and the device will simply fail. Moreover, even if the leakage current in your car is normal (far from 200 mA), when the device is connected to the circuit, the current will always be about an ampere or more. The same jump will occur when setting the car alarm.
Thirdly, there is no point in measuring leakage current without the security system being turned on. Without it, the indicators may be within the normal range, and you will never know objectively how much the car “eats” while standing in a parking lot with the alarm on. Similarly, you should not disconnect the power of those devices that you leave during normal operation of the car - radio, DVR, and so on. The evidence, again, will not be objective.
Fourthly, you should not take as a basis the ammeter readings that it displays in the first minutes after being connected to the circuit. Especially if the car is stuffed with electronics, which need some time to turn on and go into standby mode.
Fifthly, it is highly advisable to check the leakage current when the battery is known to be charged. If it is “dead”, then the device will show underestimated readings, and again you will not see the real picture of what is happening.
How to avoid current leaks in a car's electrical network
Car electrical problems are very complex, so it is best to minimize the likelihood of their occurrence. To do this, it is recommended to follow a few simple rules:
Keep cleanliness both in the car itself and in the electrical connections. It is especially important that the terminals and contacts remain clean;
- To minimize the likelihood of oxides occurring on wires and connections, it is recommended to lubricate the chips and connections with grease 1-2 times a year, and it is also recommended to lubricate the battery terminals;
- Install new devices into the vehicle's electrical network only at trusted service centers. If the work is carried out independently, pay attention to the electrical wiring of the car, which can be found in the car operating book;
- If one of the fuses has blown, be sure to diagnose the circuit for which it was responsible. The most common cause of blown fuses is a short circuit in the circuit;
- Keep an eye on the wires. Do not allow them to “dangle” around the cabin or under the hood. Pay attention to sufficient insulation of wires, especially those that touch metal elements of the car body;
- When performing repair work, do not forget about the wires. Make sure that after work they are not pinched or placed on heating elements.
By following these simple rules, you can avoid problems with wiring, the search and solution of which can require a lot of effort and money.
How to measure leakage current with a multimeter?
Multimeter connection diagram for measuring leakage current
To measure current leakage from your car's battery, you will need three things - a multimeter, a 10mm wrench and rubber gloves. The procedure is as follows:
- turn off the car, turn off all electronics in the cabin (all light bulbs in the cabin, trunk, glove compartment, cigarette lighter, radio);
- remove the keys from the ignition, lower the windows (to allow access to the interior without a key);
- close all doors.
- wait 10-15 minutes until all static voltage in the electrical network is reset.
- open the hood and use the key to remove the negative terminal from the battery.
- set the multimeter to current measurement mode and connect one probe to the battery negative, and the second to the terminal, the device should show you a certain value - this will be the battery leakage current.
Important: do not connect the multimeter to the positive with both probes. This may cause a short circuit and blow the multimeter's fuse.
Life hack: how to check current leakage in a car with a multimeter
In the morning, when you tried to start the car, instead of the usual rumbling of the starter, you heard lonely clicks of the solenoid relay and a faint hum of the windings? Or maybe they didn’t hear anything at all? If the starter and battery are working properly, then the cause is current leakage.
Unfortunately, the leak is most often discovered quite late, by which time the residual charge of the battery is no longer enough to start the engine. We invite you to learn more about this problem, how to diagnose and fix it.
Relay test
Another item that needs checking if you have electrical problems is the relay of this component. Relays are used in high power appliances and are electrically activated switches. When you turn on your car, several components turn on, such as the fuel pump, computer, and electric fans.
The switch in your ignition can activate multiple relays, turning all the peripheral equipment without running full power through the ignition switch. Relays can also deteriorate over time and cause electrical problems.
The best way to test the relay is to have a working replacement or listen carefully to how the relay operates while turning on the device. You should feel light pressure and hear a soft click when the relay turns on.
Repairing the leak
When a leak is identified, it is necessary to begin eliminating the cause. Before performing any operations, the battery terminals must be removed. Solutions:
- Accumulation of dirt at the connection areas - dust and dirt should be removed using an alcohol solution.
- The insulation is damaged - close the internal conductors and provide protection from further exposure to negative factors (put on a hose to prevent overheating and chafing);
- Water or fogging in devices - dry. If water gets inside the alarm unit, you need to carefully open the module. After moistening with alcohol, wait for the water and dirt to drain. After removing fogging, come up with a protective cover that prevents moisture from penetrating inside.
- Malfunctioning electronic device - repair or replacement.
Having eliminated the cause of the leak, you should again check the current consumption rate with a multimeter.
In the video you can learn more about constant current consumers and checking current leaks. Two machines are compared that have different current consumption depending on the installed equipment.
Finding and fixing leaks
If the value obtained during the measurement process exceeds 80 mA, then the leak is serious and needs to be repaired. If the problem has not been identified, then it is also worth diagnosing the generator in a similar way. For this:
If the voltage does not rise above 12.8 volts, then most likely the fault lies here. In this case, the best thing to do would be to contact a service center, where they will conduct a full diagnosis and offer to either repair the generator (diode bridge or worn brushes) or replace it if repair is impractical.
In the case when the current at the generator is within the specified range and the battery shows the correct voltage, the reason almost certainly lies in the electrical network itself.