The main reason why you might need replacing the heater radiator VAZ 2109 – leakage of tanks or plates or severe blockage. For car owners who have a high panel, unscrewing and removing the heater radiator is a little easier. The difficulty for models with a low panel is that the radiator rests on the bottom shelf.
To change the heater radiator, you will need to drain the coolant and unscrew the panel fastenings on the passenger side. The instructions also suggest complete dismantling of the entire dashboard, but if you use a wooden block and remove the seat in order to crawl underneath, then it is possible to replace the radiator on a VAZ 2109 without removing the panel. For a detailed description of how to do this, see below.
Determining faults
We identify a radiator malfunction. The first signal that there is a malfunction is the frequent pouring of antifreeze into the tank. In this situation, it is impossible to say for sure that the problem lies precisely in the radiator. The culprits may be the pipes or tap of the heating system. To isolate the option with a tap, it is enough to check the interior of the car for an unpleasant odor and drops of antifreeze on the floor covering. If there are none, the problem is definitely not in the faucet. To determine the condition of the pipes, gain access to them to visually inspect them. This way you will understand whether they are leaking or not.
If there are no problems as such, the problem lies in the radiator. The problem must be solved quickly enough, since antifreeze can get into the interior and ruin the carpeting.
Symptoms of malfunction
Most often, the stove announces its problem with the onset of cold weather. Most drivers turn off the heater tap in the summer, stopping the flow of coolant into the radiator. As the temperature drops, car owners begin to actively use the heater, and are often faced with the appearance of wet spots of unknown origin on the carpet under the glove compartment on the front passenger side. This is the first sign that the heater radiator is leaking.
Sometimes it happens that a leak cannot be detected visually. Coolant can simply leak into the heater body, and from there, evaporating under the influence of warm air, enters the cabin through the deflectors of the ventilation and heating system.
In both cases, a specific smell inherent in antifreeze or antifreeze will linger in the cabin. In addition, a coolant leak into the vehicle interior may be accompanied by the formation of a white oily coating on the inside of the windshield.
If the listed symptoms appear, the radiator of the VAZ-2109 heater will need to be replaced, but before doing this, you should make sure that it is it that is leaking and not the heater tap.
Progress
- Remove the lower console, which goes from the interior heating control levers to the gearbox housing.
- Move both front seats as far back as possible. If, in addition to the heater radiator, you also want to replace the faucet, then you will need to remove the plastic trim from the thresholds and lift up the carpet.
- File the magazine shelf under the glove compartment on one side; you can screw it back using self-tapping screws.
- After which you will see that you can easily remove the part into the resulting gap without any problems.
- Turn off the heater tap and prepare plugs that you will use as plugs and a container for the remaining coolant to prevent the remaining antifreeze that has accumulated in the radiator itself from spilling.
- Unscrew three bolts on each side of the radiator.
- Loosen only those clamps that fit directly to the radiator, but do not tighten them.
- Now the hardest part is that you need to drain the remaining antifreeze from the radiator. To prevent coolant from spilling on the floor, place waterproof mats or an old cloth under the faucet, at the front passenger's feet, and under the radiator.
- Pull off the pipes from the radiator, the first one to remove is the bottom one, which is located below on the tap; it is closed. Place a container and drain the coolant from the radiator. Keep the cork ready. About a liter of liquid may leak out. You may need to drain the liquid several times, so you will most likely have to plug the pipe with a plug.
- Remove the outlet pipe from the radiator, but do not lower it down, as coolant may pour out of it, keep it at the level of the attachment to the radiator. There is no need to drain the liquid, just plug the pipe with a plug.
- Now you can pull out the radiator itself.
- Replace it with a new one.
- Plug in the top outlet pipe.
- Then the bottom one.
- Tighten the clamps.
- If necessary, remove the air lock.
We recommend: Why do car headlights sweat from the inside and what to do about it?
Typical faults
Where is the heating system on the domestic nine? How to disassemble and remove hoses for repair, for what reasons may the device stop working? If the VAZ 2109 stove does not heat up, first of all you need to understand the reasons why this is happening.
Radiator device for heating system
If the VAZ 2109 stove stops working, there may be several reasons for this:
- The stove fan does not work. According to the connection diagram, the problem may be an inoperative fan of the heating device. Sometimes the cause is a failure of the fan switch itself or broken and oxidized wiring.
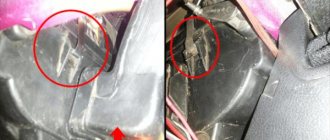
- Another reason why the VAZ stove does not work may be clogged air ducts. They can become clogged with leaves and other debris that falls on the car while parked. Sometimes the VAZ stove does not heat up due to closed air duct dampers.
- On a VAZ 2109, the heater may not heat up due to the radiator; this problem is one of the most common. The heater radiator of a VAZ 2109 or VAZ 21099 may be clogged with dirt, which is why antifreeze cannot circulate through the system. In some cases, the problem is a heater faucet that does not open, or this may also be due to the refrigerant level in the cooling system being too low. If there is an air lock in the system, this will also lead to insufficient heating of the vehicle interior. If the radiator of the VAZ 2109 stove is working normally, it is possible that the power unit simply cannot warm up to operating temperature. Much less often, the reason for the inability to heat the interior is a broken pump.
Heater valve for nine
Remedies
How to disassemble the heater on a VAZ 2109 and how to fix the problem?
- First of all, you need to check whether the ventilation device of the circuit is functioning; to do this, turn on the ignition and the interior heater, first at the lowest power. If the device is working normally, this will be audible. Before removing the stove for repairs and changing or blowing out the pipes, you need to make sure that the fan is out of order. Try cleaning the contacts connecting the power wires - sometimes their oxidation makes the element impossible to operate. If, through diagnostics, you have discovered that the ventilation device is working, but it still does not turn on, the problem should be looked for in the wiring.
- The next stage of diagnosing the VAZ heating system will be checking the air flow. Turn the heater on to maximum and check how well it blows from different air ducts - onto the windshield, side windows, and into the feet. If the fan is functioning and there is no good air flow from the air ducts, it is necessary to diagnose the blowers themselves - perhaps they are simply closed.
- The radiator may not work only because antifreeze does not pass through it. As a rule, this is due to the fact that the system is simply clogged due to the use of old consumables in it, in which sediment has formed, collecting in the stove pipes. So first you need to drain the consumables from the system and flush it, in particular the pipes, from sediment. Fluid for flushing pipes can be found at any auto store. The purchased product is poured into the cooling system, then the engine is started, which must run for a certain time in accordance with the instructions. If, after draining the flushing agent from the pipes, you notice dirt and sediment, this indicates the need to fill in new antifreeze. Replacement of pipes occurs in cases where the flushing agent cannot remove all the sediment from the system, which is firmly lodged in the lines. If the radiator device is clogged, there is no other way out other than replacing the radiator of the VAZ 2109 stove.
- The valve of the VAZ stove, as practice shows, is one of the weak points of the circuit. The heater valve is opened and closed by installing a regulator on the panel. This regulator is connected to the tap through a rod. If the thrust is very weak, you can try to adjust it. The VAZ stove valve is replaced if the element does not respond to adjustment.
- If the problem of unit inoperability is due to a low level of antifreeze in the system, it simply needs to be replenished. But at the same time, you should determine the reason why the leak occurred so that this problem will no longer bother you in the future.
- As stated above, the problem may be that the engine does not warm up to the desired temperature, usually due to a failure of the thermostat.
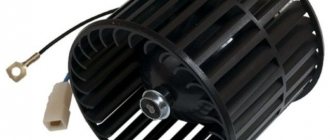
- The unit's electric motor has failed. A breakdown of the VAZ heater motor will make it impossible to heat the car's interior. If the mechanism fails, the issue can be resolved by replacing the heater motor (the author of the video is Pro Remont).
About the reasons for the malfunction of the VAZ 2109 heater
Air locks also became a fairly common occurrence during the first winter starts of the stove. Antifreeze simply does not circulate through the heating circuit, since it is blocked by an air lock. In this case, you need to take measures to remove the plug, and at the same time change the antifreeze and flush the cooling system for the company. It may happen that after 60-80 thousand, the amount of scale in the heater radiator simply does not allow coolant to circulate normally, in this case, if obvious symptoms of a malfunction are not visible, you need to make a decision depending on the mileage of the nine.
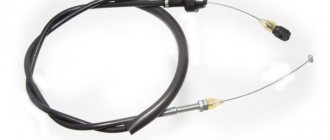
If the antifreeze still begins to leak, then first of all it is worth checking the heating system pipes. It's not as easy as it seems, but it's still better than removing the heater completely. In principle, even when replacing the stove radiator, it is recommended to change the hoses for preventive maintenance, so it’s worth buying them too. Since we are already in the store, then we will choose a suitable heater radiator.
Necessary tools and tools
Having carried out a preliminary inspection of the heating system and made an accurate “diagnosis”, you can begin to prepare for repairs. You should start by purchasing a new heater core. Today you can find two types of these spare parts on sale: copper and aluminum. The former are reliable and, with proper operation, can last an average of five years. Of course, they cost more (1500-2000 rubles). Aluminum radiators are a little cheaper (about 1000 rubles), but they last half as long. There is another type of heat exchanger made of the same material (non-original), which is better not to buy, especially if you are making a car for yourself. It’s unclear where they are produced, but they cost about 600 rubles.
In addition, independent replacement of the VAZ-2109 heater radiator involves the use of the following tools and means:
- set of wrenches;
- Phillips and slotted screwdriver;
- container with a volume of about 5 liters (for draining coolant);
- clean rag.
It is also desirable to have a male assistant present, who will help both physically and morally, because the upcoming procedure is not particularly exciting.
Choice
When choosing a new radiator for the stove of your VAZ 2109, you should understand what exactly you want to achieve and what budget you have.
Today, consumers are offered two types of units to choose from.
| Radiator type | Peculiarities |
| Aluminum | A relatively inexpensive radiator option, which is characterized by high thermal conductivity. However, such a device cannot be repaired, which is its main drawback. But in practice, repairs are not carried out so often, so few people pay attention to this disadvantage |
| Copper | If necessary and a leak is detected, the copper radiator can be repaired - soldered. Thermal conductivity indicators are slightly higher when compared with aluminum analogues. But at the same time, the price is quite high - both for repairs and for the radiator itself |
Aluminum unit
Due to unprofitability and high cost, most VAZ 2109 owners choose aluminum radiators. But it all depends on your personal decisions and preferences. When actively using a car in harsh winter conditions, a copper radiator is fully justified.
Copper unit
We recommend: Replacing the clutch cable of Lada 2109i (VAZ 2109i)
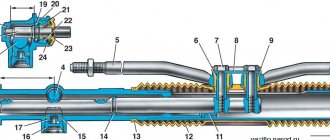
Principle of design and operation
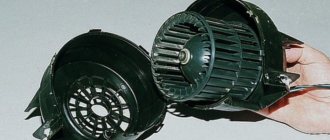
- The stove includes a pair of plastic casings (left, right). They will be connected to each other with brackets around the perimeter. For sealing, a harness is placed in the grooves of the casings.
- An electric heater fan forces air inside the cabin. It is held in place by a pair of screws on top of the stove. The heater is designed in such a way that the fan can be easily removed through the engine compartment.
- An electric motor is attached to the fan casings. On its shaft there is a fan impeller with three speeds. This is possible due to the two coils of the resistor. To obtain the required wheel speed, there is an additional resistor. It is attached to the hole in the heater casing on the left.
- The radiator is located in the heater casings. Mounted to the right one using 3 fasteners and sealed with a polyurethane gasket. The radiator consists of two rows of tubes, cooling plates and plastic tanks. Also two.
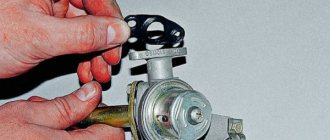
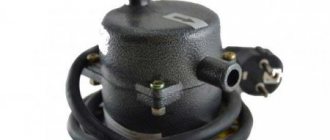
- The heater valve consists of a housing, two pairs of pipes and is connected to the cooling system using rubber hoses.
- The liquid circulates through the radiator due to the operation of the cooling system pump.
- On the supply line in the heater faucet body, there is a faucet valve on the axis (it is plate-type), which has a hole for the passage of cooling liquid.
- The valve lever of the faucet is connected to the handle lever by a rod. The handle is responsible for controlling air heating. When the lever is turned, the valve hole opens the line and liquid begins to flow into the radiator.
- The stove is controlled using three handles. Their levers are located on the axes of a plastic bracket secured to the instrument panel with 4 screws.
- The heating control handle acts on the faucet lever by means of traction and on the damper drive lever. By moving the handle completely to the right, the valve and damper will fully open, and air will begin to flow with the help of a fan through the radiator, where the heated coolant is circulated.
- In the middle position of the handle, the valve and tap move to an intermediate position. Some of the air goes through the radiator, and the other part goes past it. This effectively ensures the degree of air heating required by the user at a given moment.
- If the handle is in the extreme left position, the valve and tap are completely closed. As a result, the air flowing into the cabin is not heated.
- The upper left handle is responsible for adjusting the air supply to the legs of passengers and the driver. It is connected to the damper lever by means of traction.
- By moving the handle to the left, the footwell heating flap opens and air flows through the casings into the corresponding windows.
- On the left and right, air is supplied to the feet of the front passenger and driver. Interior ventilation ducts allow air to be delivered to the rear passengers' feet.
- The handle that regulates the air supply to the windshield is connected to the drive lever for the heated windshield flap using a rod. It can close or open the path for air to pass through the ducts to the glass.
- To provide air supply to passengers and blow off the side windows of the car, the design of the stove provides 4 nozzles - a pair of central ones, left and right. The body of each of them is equipped with a damper with a seal. By closing or opening the damper, you regulate the intensity of air supply. Plus another lever allows you to control the direction of the air coming from the nozzle.
- The VAZ 2109 is equipped with an exhaust or exhaust ventilation system. With its help, air is sucked out of the cabin. In the case of the nine, the hood is located behind the body openings for the side windows. The exhaust also occurs through the vacuum that occurs at the deflectors while the car is moving.
If problems arise with the operation of the stove, you can visit a car service center. Either there is another option - remove the stove yourself and try to repair it, or entrust the work to specialists. In any case, by dismantling the device yourself, you will save a lot of money and gain important experience.
To remove the stove, follow the following algorithm.
- Loosen the tension on the clamps and disconnect the pair of hoses from the faucet connections. To do this, you will first need to remove the dashboard from inside the cabin.
- Loosen the clamps and disconnect the hoses from the stove tap pipes. Here the work is already done through the engine compartment.
- Unscrew the heater tap mounting nuts.
- Remove the tap from the front panel.
- Remove the heater tap rod holder.
- Disconnect the rod and valve lever.
- Remove the boot that protects the gear lever.
- Remove the floor trim.
- Unscrew the floor covering fastener at the rear.
- Remove the tunnel lining on the floor by sliding it backwards.
- Remove the internal ventilation air duct and disconnect it from the heater body.
- Disconnect the wires coming from the heater motor.
- Disconnect the wiring from the resistor.
- Unscrew the fastening nuts to the right of the stove.
- Remove the remaining fasteners and remove the stove, taking the control panel with you.
Dismantling work
Further actions directly depend on the level of your training. For beginners, it is better to take the dismantled stove to specialists. If you have a good understanding of your VAZ 2109, you can try to carry out repair work yourself.
The stove is a complex but very important component in a car. Therefore, it is always necessary to monitor its functionality and detect malfunctions in time. It is unlikely that you will want to be left without heat in the cabin in winter.
Step-by-step process for replacing a stove radiator
So, how to replace a radiator using the example of a VAZ-2109? The work can be carried out using two methods – with removal of the dashboard and without dismantling the device.
The first option involves an easier process that will take about 6 hours. In the second, everything will be somewhat more complicated, but the time spent will not exceed two hours. It's quick or easy - it's up to you. We will tell you how to replace it without disassembling the car dashboard.
To get started, prepare the following tools:
- two screwdrivers - cross and flat;
- ratchet with a set of heads;
- any container with a volume of up to 8 liters so that the coolant can be drained;
- rubber gloves to avoid chemical burns;
- spanners.
It is recommended to carry out work in a garage with an inspection pit.
After everything is prepared, you can begin replacing the heater radiator on a VAZ-2109 car. Following our recommendations, the process will not seem so difficult.
Let's start:
- Put on gloves and climb into the inspection hole. Unscrew the radiator cap and drain the liquid into a container. To simplify the process, take a hose 1 m long and 1 cm in diameter.
- After all the liquid has been drained, it should be about two liters by eye, it is necessary to drain the coolant from the engine cooling system. To do this, just find the appropriate plug on the engine and do everything in the same way as with the radiator. The button is unscrewed using a key with a diameter of 17 mm.
- At the next step, the pipes of the clamps are lowered and the remaining antifreeze is drained from the heating system. To do this, you need to get to these nodes from the salon and carry out this procedure. It's easier to do this from the front passenger seat.
- After draining all the antifreeze, proceed to dismantling the radiator. First, remove the screws that hold the front panel in place.
- The next step is to remove the screw on the back wall of the glove compartment and the screw located next to the passenger side rear view mirror.
- Once all the screws are removed, the front panel should move up/down freely. To simplify the work, lift it up to the maximum and place a 7 cm block under it.
- Place your back on the passenger seat mat and unscrew the 3 screws that hold the heater in place and remove it.
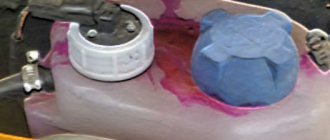
- At this stage, cover the new radiator with rubber band and put it in place. Be sure to clean this area before installation.
- Final step: Reassemble the entire system in reverse order. This should no longer cause additional difficulties.
We recommend: Where is the engine number of a car?
Dismantling process
- After draining the antifreeze, you can begin replacing the radiator itself.
- Remove the screws that hold the front panel in place.
- Unscrew the fasteners located on the rear wall of the glove compartment.
- You also need to remove the screw, which you will find near the side mirror on the passenger side.
- Once these fasteners are removed, the front panel will move freely up and down on the passenger side.
- To make your work easier, lift the panel as high as possible and insert something like a wooden block into the resulting gap. Usually you need a stopper about 7 centimeters thick.
- Lie on your back on the floor on the passenger side, unscrew the three fasteners that hold the heater in place. Get her out. The radiator has been removed.
- Apply a rubber seal to the new unit and insert the device in place of the old radiator. Don’t forget to clean the unit’s landing site first.
- Reassemble the unit.
- Fill the system with old or new coolant. This is an excellent reason to change the antifreeze if the old one has been in use for a long time.
Antifreeze should be added sequentially. First add fluid to the reservoir up to the MAX mark. After this, you need to start the engine so that it runs for about 15 minutes. The antifreeze level will drop, and you can add the missing amount.
The work is completed. The old radiator is recycled, the interior is tidied up and you can enjoy the result.
Didn't find the information you are looking for? on our forum.