How to find out what exactly the pump on 2109 has failed
The main problem that prevents the continued use of a water pump is its loss of tightness, which leads to the leakage of working fluid. Slightly less often, problems are caused by bearing wear.
In the first case, the pump remains suitable, therefore the easiest way to protect the power unit from overheating is to regularly restore the volume of liquid in the cooling system. This measure, however, gives only a temporary effect, since the leak will intensify day by day.
Bearing damage is much more serious. At first, this element signals its wear and tear with a fairly loud noise. If you do nothing, the destructive process will accelerate, and, most likely, the matter will end in the complete destruction of the part. The backlash formed in it is manifested by the following signs:
- loud grinding noise;
- pump jamming.
Ultimately, the likelihood of the drive belt breaking or even damaging the engine valves increases.
The pump installed on 2109 cannot be repaired, and therefore, if its improper operation is detected, the unit is dismantled and a new one is installed in its place.
The procedure, fortunately, is not particularly complicated, which means that replacement with a VAZ can be done without going to a car repair shop. The pump is located in an easily accessible place and no overall engine components (for example, a carburetor) will have to be touched.
Self-diagnosis
Based on indirect signs, one can guess whether the pump needs to be replaced, but this issue can only be more accurately understood by removing and inspecting this unit from all sides. You can preliminary judge the condition of the pump only by some indirect signs. For example, when the engine is operating in normal mode, a pump malfunction may be indicated by the temperature of the upper radiator hose and the presence of liquid in it. The hose must be warm. This can be determined by touch.
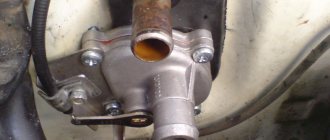
An external inspection can easily determine the condition of the oil seal. To do this, just remove the timing cover and inspect the oil seal hole. If there were leaks, deposits of a characteristic color will tell you about it.
What you need for work
To replace the pump on your VAZ-2109, you need to prepare some tools and materials. In particular, you will need:
- heads and wrenches (socket and socket) 17 mm and 10;
- knob;
- wide flat-tip screwdriver;
- sharp knife;
- wiping ends;
- capacity up to 10 liters for liquid;
- silicone neutral sealant;
- jack and additional support for the car;
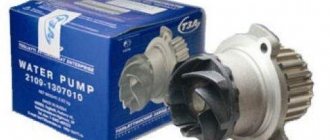
- new pump with gasket.
Replacing the VAZ-2109 carburetor pump should be carried out on a level surface. In summer it is not forbidden to work outdoors, but in winter it is better to use a warm garage.
How to replace the water pump on a VAZ 2108-VAZ 21099?
Note! When the timing belt is removed from the upper pulleys, do not under any circumstances turn the pulleys, otherwise you will disrupt the valve timing (In principle, you can install them, but it’s better not to touch them, but they are placed according to marks, you will learn more about these marks when you read one of the articles to which a link is given in this article), well, even if the valve timing can be set again, this does not mean that the pulley can still be turned, there are simply some engines (They were installed on nines) that bend the valves, so if If you sharply turn the pulley on the removed timing belt, the valves will be slightly deformed, and this will cost a lot of money!
Removal: The pump is not easy to change, but if you have the skill, then everything is simple, if you don’t have it, then most likely you will be replacing it more than once, in general, let’s start by first removing the minus terminal and then draining the coolant from the engine (How to drain fluid, read the article: “Replacing the coolant on a VAZ”, and about how to remove the minus terminal, read the article: “Replacing the battery on a car”), when this operation is done, remove the timing belt from the tension roller and then itself roller from the car (How to remove the roller, you will find in the article entitled: “Replacing the tension roller”), then remove the camshaft gear (How to do this, read “here”) and unscrew several bolts and nuts (There are about five of them, all of them on the photos below are shown) that secure the back cover and then separate it from the base so that there is access to the pump (there is no other way to remove it), and as soon as access appears, use a screwdriver to remove the pump by picking up its pulley as shown in the small photo .
Note! If the pump comes out, but the body gets in the way or something else (you can’t remove it completely, for example), then in this case ask an assistant to move the engine a little, to do this, just let him grab a convenient place (It must be made of metal ) and using force, tilt the engine in the desired direction, and at this time you pull the pump out of the hole in the car engine!
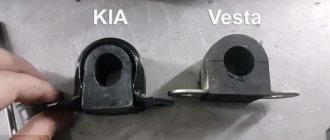
Installation: The new pump is installed in the reverse order of removal, before you buy it, be sure to compare the markings with the old one, we recommend that you take exactly the same one and don’t forget about the gasket that is between the pump and the engine (see small photo), be sure to look at that the place where the pump was adjacent to the engine, if there are pieces of this gasket left there, then you can scrape them off with a screwdriver and buy a new gasket, putting it on the pump instead of the old one.
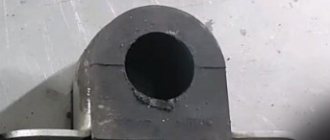
Note! When you buy a pump, we recommend taking one with an impeller made not of plastic but of metal, look at the top photo in this article, it clearly shows the impeller and you can clearly see that it is made of metal, and by the way, if you suddenly notice that the impeller has changed its color (For example, it has started to rust), then in this case, replace the pump with a new one. When installing, keep in mind that the marking should be directed upward (see photo 1), and the camshaft pulley must be installed with the protruding part towards the car engine (see photo 2) , well, after that, align everything according to the marks, tighten the timing belt (it is tensioned with a tension roller) and pour coolant into the car engine!
Additional video: You can see the process of replacing the water pump in more detail and clearly in the video below:
Preparatory activities
First of all:
- position the car in a place convenient for you and be sure to set the handbrake;
- make sure the gear lever is in neutral;
- If the machine has been used recently, wait until its power unit has cooled down.
Next, drain the coolant from the system. For this:
- move the heater adjustment lever to the right until it stops;
- remove the ignition mechanism with the bracket holding it;
- in the engine compartment, unscrew the coolant reservoir cap;
- find the drain hole (it is located at the bottom of the cylinder block);
- place the container;
- remove the plug;
- wait until the antifreeze has completely drained out;
- Wipe the engine dry if liquid gets on it.
An important point is that when the coolant is very dirty, it would be advisable to flush the entire system.
Purpose and design of the pump
The water pump is the most important element of the engine cooling system. Its main function is forced circulation of coolant through two circuits - small and large. On an unheated engine, antifreeze circulates in a small circle - from the water jacket of the engine to the radiator of the cabin heater and the carburetor cooling unit (or the throttle valve on the VAZ 21099 injector). When operating temperature is reached, the thermostat opens a large circuit and coolant begins to circulate through the main radiator.
The water pump impeller, driven by the timing belt, forces antifreeze to circulate through the cooling system.
If the pump fails, the movement of coolant through the channels will stop, and the engine will inevitably overheat. Aluminum pistons expanding in volume will damage the cylinder walls and compression will be lost. In this case, a major overhaul of the engine will be required, which is several times more expensive than the cost of a new pump.
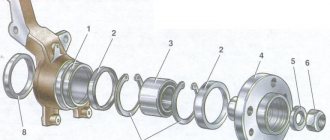
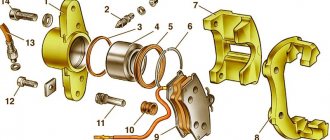
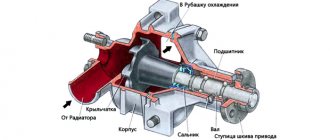
The water pump has a fairly simple device
The VAZ 2108 water pump consists of a housing with a flange attached to the cylinder block with three bolts. Inside the pump, a shaft with an impeller and a drive gear in the form of a toothed pulley is installed on bearings. To prevent antifreeze from flowing out through the pump shaft, the device is equipped with an oil seal.
Roller bearing life determines pump longevity
Replacing the VAZ-2109 pump
To carry out the replacement, it is necessary to remove the timing belt protective cover. It is held in place by 3 bolts - unscrew them with a 10 mm wrench. Next, the cover is dismantled and placed next to it, since there are marks on it that help set the TDC of the first cylinder.
Now, holding the crankshaft by the pulley, turn it until the notch on the camshaft gear coincides with the convex point located on its rear cover. Upon completion of the described manipulations, the casing is returned to its place, but not screwed, since you only need to make sure that the marks on it coincide with the position of the pulley.
It is also advisable to look into the inspection slot of the clutch housing - there the notches should similarly coincide. If this does not happen, you will have to turn the crankshaft some more.
At the next stage, arm yourself with a 17 mm wrench and use it to unscrew the nut holding the tension roller. The last element must be completely removed - be sure to check its functionality (unimpeded rotation and absence of play indicate serviceability).
Remove the transmission belt from the camshaft gear and throw it down. Now, using the same 17 mm wrench, remove the bolt holding the above-mentioned sprocket. To prevent it from spinning, wedge it with a screwdriver. Carefully remove the gear and be careful not to lose the locking key.
All that remains is to remove the nut and 3 more bolts that secure the rear camshaft cover - here you will need a ten key. After dismantling the named part, the pump can be removed quite easily - you just need to unscrew the elements that secure it.
Proceed to remove the pump - you will not be able to do this with your bare hands. First, it is pryed up with a screwdriver and torn from its place, and then a jack is placed under the engine (exactly where the failed unit is located). The 2109 engine is raised a little - this allows you to increase the gap between it and the fender liner, without which it is simply impossible to move the pump.
When the assembly is dismantled, the installation site should be cleaned, since often part of the old sealing gasket sticks and peels off. This can be done conveniently with a regular knife. Upon completion of the action, everything must be wiped thoroughly with a dry, clean cloth.
The new unit is mounted with the marking facing up (it is located at the end). Tighten the retaining bolts thoroughly, but be careful - they are screwed into the aluminum. Further work is performed in the reverse order to that described.
Procedure for replacing the pump
1. Open the hood, feel for the bolt, which is located just below the spark plug of the 4th cylinder, and open it.
2. At this moment, coolant will begin to flow out of the block, so it is recommended to place a container.
3. As soon as the pressure weakens, open the cap of the expansion tank.
4. Wait until all the liquid has drained out and screw the bolt into place.
5. Next, find the plastic cover of the GPM belt and remove it (it is held on by three bolts).
6. Loosen the bolt that secures the camshaft gear (this can be done through the hole in the gear).
7. Now we turn on the last gear and lift the right front part with a jack.
8. We look at the camshaft sprocket and look for the mark.
9. When the search is successful, use a wheel wrench to turn the wheel until the mark is level with the beak of the back cover.
10. Now we look into the crankcase hatch to see what the mark on the flywheel looks like. When you start assembling everything, the mark should match the mark of the camshaft gear.
11. After this, put the gearbox lever in the neutral position and lower the car.
12. Loosen the tension roller nut and turn it clockwise so that the belt tension is loosened and it can be removed from the camshaft gear.
13. Along with the belt, remove the tension roller.
14. Now you can unscrew the bolt that secures the gear to the camshaft and carefully remove it.
15. Open the back cover and see the pump that needs to be removed.
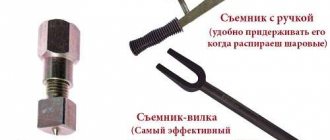
16. In order to remove it, you need to attach a piece of wood to the pulley and tap it with a hammer. The strength of your hand is not enough to remove it, because it is glued with sealant.
17. If after such manipulations the pump is not removed or is removed but does not pass through the available space, then
- open the crankcase protection and the right part of the mudguard;
- place a jack under the front engine support and lift the car;
- We repeat the same manipulations with a piece of wood and a hammer and pull out the pump.
18. There are sealant residues in the place where the pump was attached. They must be completely removed and the surface degreased.
19. Now we apply a thin layer of sealant to the new pump and its gasket and put it in place of the old pump and tighten the bolts so that the sealant sets.
Next, all that remains is to put all the removed elements in place, add coolant and pump it so that all the air comes out. And you can hit the road, just don’t forget to align the gear marks with the flywheel mark.
Assembly nuances
When returning drive belt 2109 to its place, make sure that all marks on the crankshaft are in the correct position. If they move, you will have to spend additional time adjusting both the ignition and the gas distribution system.
When the tension roller is put in place, do not forget to also make sure that the belt does not dangle on it.
Sometimes, after the reassembly is completed, the car does not want to start or starts poorly. This symptom indicates that the belt is installed incorrectly. To fix the situation:
- remove it from the gear;
- turn it literally a couple of millimeters;
- put the belt back in place.
Draining old oil from the engine.
We unscrew the oil drain bolt, this is what it looks like:
Before unscrewing it, place some kind of container for the old oil so that it does not spill onto the ground. While the old oil is draining, unscrew the old oil filter.
Pour new oil into the engine.
When all the old oil has flowed out, screw the bolt back into the pan and install a new oil filter. Before installing it, it is recommended to pour a little oil into it and lubricate the ring.
Now we fill in new engine oil. The volume of oil in the VAZ 2108, 2109 engine is 3.5 liters. That's the whole process of changing the oil. Also read other interesting articles about how to build a cramp yourself on our website.
Sources
- https://remont-vaz2109.ru/zamena-masla-v-dvigatele-i-maslyanogo-filtra/
- https://remontavtovaz.ru/vaz-2109/instrukciya-po-zamene-masla-v-dvigatele-vaz-2109.html
- https://vazkorch.ru/dvigatel-lada/zamena-masla-v-dvigatele-vaz-2109.html
Quick replacement of the pump on a VAZ 2109
If your pump (water pump) is broken and you have no idea how to change it, then we will teach you.
Replacing the pump on a VAZ 2109 is not difficult, but first you need to find out whether it really is out of order. It's done like this:
- start the engine and warm it up to operating temperature;
- compress the upper radiator hose.
If you feel that the water is circulating, it means the pump is intact. If not, then it’s broken.
It often happens that there is no need to change the entire pump; you can get by with changing the seal. And to find out if the oil seal is okay, you need to do the following:
- find the control and ventilation hole of the pump;
- look at it.
If liquid leaks from there, then the seal is worn out. You can verify this by removing the GPM cover and performing a more thorough inspection. If brown deposits have formed around the hole, then our assumption turned out to be correct.
Well, if while driving you hear howling sounds or the pump rattles and jams, and a visual inspection does not reveal any defects in the pump, then you will still have to remove it. It is possible that defects have appeared on the side of the rotor that is not visible.
Pump location
The water pump is installed on the right (in the direction of travel) side of the engine under a plastic cover. There is also a gas distribution mechanism that drives the pump toothed pulley through a belt. This arrangement creates a number of problems.
- To inspect the pump you have to remove the plastic casing.
- Due to a leaky seal and a small leak, antifreeze gets onto the belt, which quickly fails.
- If the bearing is severely worn, the shaft may jam, and the timing belt may jump off or break. In 90% of cases this leads to pistons hitting the valves, and subsequently to expensive repairs.
The coolant pump is installed on the right side of the engine
For these reasons, it is necessary to periodically (every 10–15 thousand kilometers) inspect the gas distribution mechanism for belt tension and pump performance.
Installing an additional pump
The disadvantage of the first front-wheel drive VAZ cars was the poor performance of the interior heater. Until the engine warms up to operating temperature, the cabin is cold. This is due to the design of the small circulation circuit, into which coolant enters in small quantities. The problem is solved by installing an additional electric pump from GAZelle.
An additional electric pump is installed in the stove pipeline
To install an electric pump, you must purchase:
- four-pin relay;
- multi-core wires and a two-pin connector;
- fuse socket;
- hoses and clamps for connection to the cooling system;
- electric pump from a GAZelle car.
The pump is placed on a homemade bracket, screwed to one of the bolts on the mounting flange of the gearbox. The antifreeze is first drained and the thermostat is removed, which will interfere with the installation of an additional pump. This is especially true for the injection model VAZ 21099.
To turn on the pump, a small circuit with a relay is assembled
The insertion is made into the return pipe coming from the cabin heater. In this case, the electric pump will create a vacuum in the heater radiator. To turn on the pump together with the ignition and from a separate button, a simple electrical circuit is assembled. A relay with a fuse is placed in the cabin under the dashboard, and any free button is selected as a switch.
Step-by-step replacement instructions
Sooner or later you will have to go into the inside of the car and change the pump. First, you need to ensure two prerequisites: the engine must be completely cooled, and the coolant must be drained from the system to the last drop. After this, the necessary tools are selected:
- Socket wrench 10 with extension.
- Open-end wrench 17.
- Screwdriver with a wide flat blade.
- To safely drain the coolant, you will need a special container. You can use a five-liter plastic container, the kind in which water is usually sold in supermarkets, after first cutting off the top part with the neck. Prepare a flexible hose by placing it on the lower radiator tap and unscrew the expansion tank cap.
This is how the coolant is drained
You need to remove the outer timing belt protection to get to the pump.
We fix the gear and unscrew the nut holding it
You will have to remove another casing, it covers the pump
Centrifugal pump removed
How to avoid problems with your pump?
Of course, this part itself is not too expensive (900-1500 rubles), but the peculiarities of the replacement do not allow us to call this process pleasant. Therefore, it is quite logical to try to avoid problems with this structural element. Let's look at the main causes of breakdowns:
- Natural wear and tear
. Like any other part, the water pump has its own resource. This figure is usually estimated at 70,000 kilometers; - Operating the engine at extreme conditions. The pump is driven by the crankshaft. Accordingly, the number of revolutions directly depends on the engine. Those who like to drive at high speeds wear out the pump bearing much faster. If you want to change the pump less often, then it makes sense to stick to a more relaxed driving style;
- Cooling system contamination
. During engine operation, salts and rust are deposited in its coolant passages. The same applies to the pump. There were cases when the pump was simply clogged with various dirt and it could not cope with the job. This caused the bearing to break. Also, if the system is clogged, the operation of the pump becomes more difficult, which can lead to problems. To avoid problems, periodically flush the cooling system.
Conclusion
. Cooling system malfunctions should be corrected as quickly as possible. Otherwise, your engine will fail quite quickly. Therefore, replacing the pump on VAZ 2109 and 21099 should not be shelved. The faster you do it, the better. This work in itself is not particularly difficult. It also makes sense to take care of extending the life of the pump; to do this, you should follow simple rules.