04/07/2021 20,749 VAZ Kalina
Author: Ivan Baranov
One of the disadvantages of the Lada Kalina is problems with the clutch. To avoid visiting a car service center and save time and money, you can diagnose the malfunction and adjust the clutch on the Lada Kalina yourself in the garage. The article describes step by step how to adjust the clutch, and also includes a video that demonstrates the entire procedure.
[Hide]
Clutch adjustment on Kalina description and Video
The clutch is the most important transmission mechanism of a car.
Useful properties of the clutch are the continuous transmission of crankshaft torque to the gearbox and mobility when connecting or disconnecting from the gearbox. Periodic clutch malfunctions are one of the weak points on the Lada Kalina car. Despite improvements in this area - the presence of automatic cable adjustment - independent clutch adjustment on Kalina is necessary from time to time.
The clutch is the most important transmission mechanism of a car. Useful properties of the clutch are the continuous transmission of crankshaft torque to the gearbox and mobility when connecting or disconnecting from the gearbox.
Periodic clutch malfunctions are one of the weak points on the Lada Kalina car. Despite improvements in this area - the presence of automatic cable adjustment - independent clutch adjustment on Kalina is necessary from time to time.
How does automatic cable tightening work?
Intensive use, naturally, contributes to abrasion of the friction linings of the clutch disc. As wear occurs, the built-in ratchet mechanism allows the cable to be slightly tightened to ensure proper disc performance. The release fork rotates, thereby compressing the bushing spring. A tense spring holds the tip clamps, as a result of which it is released and tensions the cable.
Malfunctions of the clutch transmission unit: how to determine
The machine itself can tell you that the clutch needs to be adjusted and the automatic cable locking no longer helps. These signs include:
1. The car does not pull forward well. The clutch does not provide proper connection between the flywheel and the disc, which is why a significant portion of the torque force and, accordingly, speed is lost.
2. When driving, the pedal is not raised all the way and dangles. In principle, this problem follows from the first one.
3. The clutch does not disengage well: the pedal is not pressed all the way, which makes it more difficult to change gear.
However, in order to be sure whether clutch adjustment is needed on Kalina, you need to carry out a number of small checks.
How to check the clutch
1. Depress the pedal and release it, as is done in reality when driving. Creaks and clicks when the pedal moves can already hint at a malfunction.
2. Check the pedal for sticking. An obstacle to movement more accurately means a problem in the adjustment area.
3. The travel of the clutch pedal should be “from end to end”. If it does not fully rise and certainly not fully fall to the floor, then clutch adjustment is definitely necessary.
But, before making a final decision whether it is necessary to adjust the clutch cable manually, it is worth trying to adjust the stroke. It is best to measure the stroke using a ruler. The pedal goes to the floor and then returns to its original state. If the distance is greater than 14.6 cm, only the pedal stroke needs to be adjusted. If everything is fine, then we proceed to further actions.
Clutch adjustment on Kalina is required when, when the clutch cable lead deviates from the release fork lever by 2.7 cm or more, the beating of the friction linings is pronounced, and the distance between them and the rivets is less than 0.2 mm.
Important: when checking the clutch, the engine must not be running and the car must be cold.
The procedure for adjusting the clutch on Lada Kalina
1. Open the hood and remove the air filter.
2. Pull the cable to maximum. This is done by stretching its tip.
3. Check the gaps between the lower cable guide and the release fork. As mentioned above, this distance should not exceed 2.7 cm with a normally adjusted clutch. If the gap is larger, you just need to turn the driver along the thread of the tip. It is better to take measurements not with a ruler, but with a caliper.
4. Squeeze and release the clutch pedal several times. Then repeat the measurements of the gaps between the fork lever and the driver again. When increasing, tighten the leash again and pump with the pedal.
The mechanism should also be adjusted when the car has cooled down and the engine is off!
As you can see, adjusting the clutch on Kalina is not difficult, and every car enthusiast can do it. However, if the cable keeps slipping and the clearance cannot be adjusted, then you may have to replace the clutch completely. You can also replace it yourself, but it’s better to contact a professional.
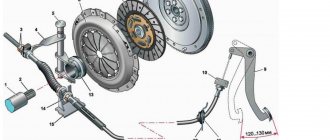
Clutch
Clutch: 1 — release bearing guide sleeve; 2 — gearbox input shaft; 3 — cable lead; 4 — clutch release fork; 5 — fork axle bushing; 6 — pressure disk assembly (basket); 7 — driven disk; 8 - flywheel; 9 clutch pedal; 10 mechanism for automatic adjustment of cable length; 13 — clutch release clutch (release bearing); 15 — bracket installed on the gearbox housing; 14 — lower tip of the casing; A - the distance of the tip displacement, checked when installing the cable (27 mm)
Basic data for monitoring, adjusting and servicing the clutch
Full travel of the clutch pedal, no more, mm
Permissible movement of the lower cable guide relative to the clutch release fork lever, mm
Permissible runout of driven disk linings, no more, mm
Minimum distance between the working surface of the driven disk linings and the rivets for their fastening, mm
Tightening torques for threaded connections
Name of units and parts
Thread
Torque. Nm (kgf-m)
Bolts securing the clutch basket to the flywheel
Nuts securing the clutch cable to the bracket
Bolts securing the clutch housing to the engine cylinder block
Nut securing the clutch housing to the engine cylinder block
Nuts securing the gearbox to the clutch housing
Bolts securing the release bearing bushing
Bolts securing the bottom cover to the clutch housing
The car is equipped with a dry-type single-plate clutch with a central pressure spring. The clutch release drive is a cable, backlash-free, with a mechanism for automatically adjusting the length of the cable.
The clutch consists of a basket (pressure plate assembly) and a driven disc. The basket is a steel casing in which a pressure spring and a pressure disk are installed. The pressure disk is fixed in the casing on three pairs of elastic plates. From the casing side, the disk is pressed by a diaphragm-type pressure spring. The clutch basket is attached to the flywheel with six bolts and is covered with an aluminum housing. A driven disk is installed between the pressure plate and the flywheel.
Friction linings are riveted to both sides of the driven disk. To dampen torsional vibrations when the clutch is engaged, a damper with six coil springs is built into the driven disk. The driven disk hub is splined into gear with the input shaft of the gearbox.
The clutch pedal is suspended on an axle and attached to the body through a bracket. The upper part of the clutch pedal is designed as a double-arm lever. At the end of the lever there is a pin to which the clutch release cable is attached. The connection is made through a special ratchet mechanism that regulates the length of the cable (see below). Therefore, during the operation of the vehicle, it is not necessary to regularly check and adjust the working stroke of the clutch pedal. This mechanism also ensures that there is no play in the clutch release drive.
Clutch release cable: 1 — spring fixing bracket; 2 — mechanism for automatic adjustment of cable length; 3 — bracket for the casing; 4 — rubber cover; 5 — cable sheath; 6 — corrugated cover of the lower end of the cable; 7 - threaded (lower) cable end
The cable is laid in a metal sheath with a polyethylene coating. The upper end of the shell has a bracket that is attached to the pedal assembly. The vertical surface of the bracket also serves as a travel limiter for the clutch pedal. A rubber plate is installed on it. The lower end of the cable sheath is fixed in a bracket mounted on the gearbox housing. The lower end of the cable is covered with a rubber corrugated cover. The cable is connected to the clutch release fork lever through a plastic leash screwed onto the threaded end of the cable.
The clutch release fork rotates in two bushings. The upper bushing is plastic, removable, and the lower bushing is bronze, pressed into the clutch housing. When the fork is turned, the force is transmitted to the pressure spring blades through an angular contact ball bearing (throwout bearing). The bearing is placed on the clutch release clutch, through which it contacts the clutch release fork. Constant engagement of the fork and clutch is ensured by a U-shaped spring. Due to the absence of clearance in the clutch release drive, the clutch is constantly pressed against the pressure spring petals, while the release bearing operates continuously. The bearing is lubricated for its entire service life. The clutch release clutch moves along a guide sleeve placed on the input shaft of the gearbox and attached to the clutch housing with three bolts.
During operation, the driven disk linings wear out. To compensate for this wear, an automatic cable length adjustment mechanism is built into the clutch release drive. As the linings wear, the clutch release fork lever turns and tightens the cable. At the same time, the spring located in the bushing of the adjustment mechanism is compressed and tightens the clamps of the toothed tip of the cable. The clamps release the tip, as a result of which it is freely pulled out of the cable leader, compensating for wear on the disc linings. When the clutch pedal is pressed, the upper guide moves upward. In this case, the clamps compress the toothed tip of the cable, preventing it from moving out of the adjustment mechanism housing.
Cable length adjustment mechanism:
1 - bushing; 2 - leash; 3 — toothed (upper) cable tip; 4 — cable end clamps; 5 bracket (with clutch pedal travel limiter)
Note. On early production cars, a spring was installed inside the leash.
Replacing and adjusting the clutch cable on a viburnum
Welcome!
Clutch cable - thanks to it, you can control the clutch fork, and at that moment it can disconnect the clutch from the flywheel, thanks to the release bearing, a cable is used on all front-wheel drive cars, because their gearbox is located deep in the front, on classics Together with the cable, the main and slave cylinders of the clutch are used (there is no clutch cable), these cylinders work differently, unlike the cable (the cable simply pulls), but the result is the same (the clutch is disconnected from the flywheel due to the release bearing) and the effect occurs due to one and the same unit, namely thanks to the clutch pedal.
Note!
To carry out the replacement work, you will need to use: Be sure to use wrenches, as well as in addition to them, any other wrenches that can be used to unscrew bolts and nuts can also be used, in addition to this, you will also need a caliper or instead a ruler and stock up on pliers!
Where is the clutch cable located?
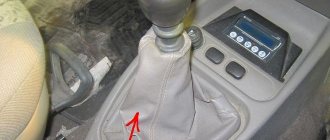
We won’t be able to show you in detail where it is, because it is located at the bottom and the angle that was taken in the photo below simply won’t allow you to look into that place, but we’ll still try to describe where it is, first, find the box, it’s for For clarity, the red arrow is indicated in the photo, this gearbox is connected to a cable that comes from the passenger compartment, so you can already make an approximate conclusion about where the cable goes, in addition to all this, pay attention to the blue arrow, which also shows approximately the location of the clutch cable in under the hood of the car.
When should you change the clutch cable?
Any cable, including the cable that goes to the handbrake, which goes to the gas (the throttle cable is correctly called) must be replaced if it breaks (If it breaks, you will not be able to use the system to which the cable goes, for example, the gas cable breaks, the car no longer will go, the clutch cable has broken, the clutch system will no longer work in the same way), with strong stretching, which by the way will greatly disrupt the operation of the clutch system (the clutch may not be completely disconnected from the flywheel, thereby changing gears will be harder and with a crunch), as well as it changes when souring, and souring of the cable is possible only if the car has not been used for a long time or is used in extreme winter conditions; when souring, the clutch pedal will be very difficult to press and will not be willing to return back, which can soon lead to an emergency situation on the road and therefore this the cable needs immediate replacement.
How to replace and adjust the clutch cable on a VAZ 1117-VAZ 1119?
Removal:
1) First, while inside the car, get to the clutch pedal and remove the stop of the cable sheath from the pedal bracket, this is done very simply, namely, take a wrench and use it to unscrew the nut securing the stop (see photo 1), as soon as the nut is is turned out, the stop is removed from the bracket stud (see photo 2), after which you have access to the clutch pin from which you will need to remove the stopper with pliers or a screwdriver (see photo 3), after the stopper is removed, remove it from the same finger housing of the mechanism for compensating wear of the driven disk linings (see photo 4).
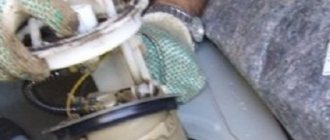
2) Now remove the plastic bushing from the clutch pedal finger by hand (see photo 1), check its condition, it should not be deformed or heavily worn, otherwise replace it with a new bushing (Before installing the new bushing, lubricate it with Litol lubricant -24 or LSC-15), then remove the rubber seal of the cable sheath from the hole that it covers (see photo 2), then get out of the car and move into the engine compartment of the car to the box, having reached it, pull the tip of the clutch cable forward and then disengage it from the fork (see photo 3) and then unscrew the leash and remove it from the cable tip as shown in the fourth photo.
3) And finally, remove the cable from the bracket on the box, let’s immediately note the fact that the bracket on Lada Kalinas is solid and not split as shown in the photo below (The photo below just shows another car and it’s not the bracket, but the clutch fork that is shown there), so from this hole the cable will need to be taken out (the cable is indicated by a blue arrow) towards the car interior (in the direction indicated by a green arrow) and therefore you will bring the entire cable out into the car interior from the engine compartment and thereby completely remove it from car (When removing the cable, remove the guide sleeve of the clutch cable sheath).
Installation:
The installation of a new cable begins from the interior; to be more precise, at the beginning you will need to insert the cable from the interior into the engine compartment and then, while in the cabin, the housing of the wear compensation mechanism for the clutch disc linings will have to be placed on the clutch pin and secured with a locking bracket, after fastening The cable sheath stop will need to be installed in its place and the rubber seal of the cable sheath will need to be tucked into the hole while inside the car, and after that you can move into the engine compartment, where you will need to insert the cable through the bracket (see photo 1) and install the cable sheath guide sleeve , when the bushing is installed, a leash is twisted onto the lower tip of the clutch cable, and it must be twisted in such a way that the tip of the cable protrudes relative to the end of the leash by 0-1 mm, having achieved this protrusion, overcoming the force of the cable spring, pull it forward all the way, and when the cable is fully extended, take a caliper and, holding the tip of the cable in an extended position, measure the distance indicated by the letter “L” in photo 2, this distance should be “27 mm”, if the distance does not match, then rotate the leash on the tip of the cable until it was exactly like this, as soon as everything works out for you, install the tip of the cable in the groove of the clutch fork and release it, also make sure that under the action of the spring, the tip guide is installed on the clutch fork without a gap and finally press the clutch pedal two or three times re-measure the distance “L” and, if necessary, re-adjust the clutch cable on the car.
Note!
This distance, which is indicated by the letter “L”, is the adjustment distance that should be exactly like this if the cable is adjusted correctly, but also take into account the fact that the cables are different and if you come across a defect that can be either longer than the standard original cable, or shorter , then there won’t even be a distance of “27 mm” on it, so buy good parts from proven places and if you see that with such an adjustment the release bearing is already starting to work (That is, you are not pressing the clutch pedal, but the noise is from the release bearing already exists), then in this case you can neglect it and adjust the cable not according to the information that the factory writes, but precisely by your own selection!
Additional video:
Using the example of a VAZ 2110 car, you can see how the clutch cable is replaced in the video below, but just keep in mind the fact that on Lada Kalinas the cable is replaced a little differently, but after studying this article and watching the video, most likely you There will be no difficulties when replacing the cable.
Hello Georgy!
This happens on many cars, on Priors there is practically no such thing, although the clutch cable on them is absolutely identical except for one part, on the Priors cable there is a spring at one end, if you transfer it to your cable on which you do not have one, then there is a very high probability that the pedal will stop clicking and we also recommend lubricating the plastic bushing on the clutch pedal with lithol, it rubs with the bracket, you should immediately notice it if you look at the place where the clutch pedal is attached!
Leave a comment Cancel reply
Clutch replacement instructions
Now it’s time to tell you how to replace the clutch disc on Lada Granta, Kalina and Priora cars. Which clutch is best to buy is a matter for every motorist. Here everything depends not only on preferences, but also on financial capabilities, as we said earlier. On our resource in this section you will find reviews of several brands, after analyzing which you can decide which device is best to install on the Lada Kalina or Priora. Replacing the disc is carried out according to the same principle on Lada Kalina, Grant, and Priora.
So, if you have decided which clutch is best to install, then let’s start replacing:
- First, you need to dismantle the gearbox from the Lada Granta, Viburnum or Priora. In the event that you plan to install the same pressure plate that you had, then before starting work, mark the location of the flywheel, as well as the housing. This is done in order to maintain balance and set the disc in the same position. Also install a special bushing (mandrel) into the hole in the pressure pulley. If you do not have such a bushing, then you can dismantle the device without it, but during removal you should hold the driven pulley, as it may fall out.
- Using a screwdriver, hold the flywheel to prevent it from turning. You need to unscrew the six screws that secure the device's pressure pulley housing to the flywheel. Do not unscrew one screw at a time; it is recommended to do this evenly, moving from one screw to another.
- Dismantle the device casing along with the pressure pulley. You can also dismantle the driven pulley with the bushing installed in it.
- If you notice that any of the elements have cracks or other mechanical damage, then these components need to be replaced. You should also check how worn the friction linings are. If the linings themselves are oily, the rivet retainers are loose, or the rivet heads are even slightly recessed, the driven pulley must be replaced. It would also be a good idea to check how securely the damper springs are secured. If they are broken, the disk will also need to be replaced.
- The next step will be to diagnose the driven pulley. If no defects were identified during a visual inspection, then you will need to diagnose its runout. If the runout indicator is more than one millimeter, then it will also be necessary to replace the pulley. Attention should be paid to diagnosing the working surfaces of the pressure shaft and flywheel, in particular, we are talking about the friction plane. Make sure that there are no defects, signs of wear, or scuffing, and there should be no signs of overheating. If components and mechanisms are found to be defective, they will need to be replaced.
- Next, pay attention to the condition of the so-called disc spring of the pressure shaft; as in other cases, signs of wear, defects or cracks are not allowed on it. The places where the spring petals come into contact with the bearing device for turning off the mechanism must be located in the same plane. Of course, there can be no talk of any defects; if wear is present, it should be no more than 0.8 mm. Otherwise, you will have to replace the entire pressure pulley assembly. If the rivets are loose, you will also have to replace the entire disc. Then it is also necessary to diagnose the condition of the spring support rings. As you understand, any cracks and mechanical damage are excluded, otherwise the pressure shaft is replaced as an assembly.
- If you understand which clutch is best to install, then before installing the device you need to check how well the driven shaft moves along the primary transmission pulley. If you notice that there are jams during movement, then any defects must be eliminated. If this cannot be done, then the parts will need to be changed.
- During installation, take into account the fact that when installing the driven shaft in the place where the pressure element is mounted, the part of the hub that protrudes must be directed towards the pressure spring. When installing the device, you must first install the driven pulley. Use a special bushing or do it as carefully as possible.
- After these steps, the pressure shaft housing is secured with three bolts, and screws are also installed with which the casing is attached to the flywheel. As during dismantling, the flywheel should be held with a screwdriver to prevent rotation. As you remember, you cannot tighten one screw at a time; this must be done gradually.
- The final stage will be dismantling the bushing installed in the disk and installing the gearbox. You need to mount the lower end of the clutch cable to the transmission, after which its initial adjustment is carried out. As for adjustment, we already wrote about it at the beginning of the article. But before restoring the original position of the cable, the wear compensation device should be reset to its original state. This is done because if the disk is completely worn out, the compensator device will be located in its lowest state.
The request returned an empty result.
You can understand that such a procedure for replacing a disk is quite labor-intensive, so not every car owner will be able to cope with it on their own. If you have doubts, it is better to seek help from specialists.
How to adjust the clutch on Kalina yourself
During the operation of the car, the driver encounters a number of problems that indicate that it is necessary to adjust the clutch on Kalina. Due to the peculiarities of the mechanism installed on these VAZs, even when the driven disk linings are worn, the clutch release cable automatically lengthens. This allows the car owner to adjust the pedal travel only occasionally, if a malfunction occurs. But even in these cases, it is possible to do it on your own, without resorting to the services of a car service.
Clutch faults Lada Kalina
Long-term use leaves its mark on the clutch mechanism; the driven disc linings wear out and become thinner. In order to compensate for this wear, the ratchet mechanism, as we have already said, automatically compensates for the degree of wear and tightens the cable. This is done by turning the release fork, causing the spring, which is located in the bushing of the adjustment mechanism, to compress. The spring, in turn, compresses the clamps of the toothed tip of the cable, after which the tip is released and tightens the cable.
Design and operation of the Kalina clutch
The unit is a dry-type mechanism, single-disc, with a central pressure spring. Switching off when pressing the pedal is carried out by a cable equipped with a ratchet. This part allows the cable to automatically change length depending on the wear of the disc linings and ensures a constant backlash-free fit of the clutch with the release bearing to the basket.
The pressure plate together with a diaphragm-type spring are enclosed in a casing. All together is usually called the clutch basket. Between this mechanism and the flywheel there is a driven disk. Its hub is connected to the gearbox input shaft.
When you press on the pedal, the cable tightens, turning the fork. Its lower bushing is pressed into the clutch housing, the upper bushing is removable. The force when turning the fork is transmitted through the clutch and clutch release bearing to the pressure spring and pressure plate, turning off the mechanism.
When the pedal is released, the clutch must fully transfer the engine torque to the transmission. Pressing the pedal normally completely disconnects it from the engine. Signs of the need to adjust the clutch on Kalina include:
- exceeding the full pedal travel (normally 146 mm from the lowered position to the stop on the floor) - adjustment of the clutch cable is necessary;
- when the pedal is pressed, the gear shift occurs with a grinding or crackling sound - the clutch does not disengage completely;
- when starting the engine, you can hear a howling sound in the crankcase - wear of the release bearing;
- jerking when starting to move indicates insufficient smoothness of clutch engagement;
- When driving in 3-4 gears, when you press the gas, engine speed quickly increases, and acceleration slows down - disc slipping, possibly due to wear on the linings or insufficient cable length.
As a rule, it is necessary to adjust the operation of the clutch after it has been repaired to bring the automatic adjustment mechanism into working condition.
This operation may also be required if Kalina has not been used for a long time or worked in winter.
In such cases, the wear compensator may lose some of its functions and cannot cope with adjusting the length of the cable.
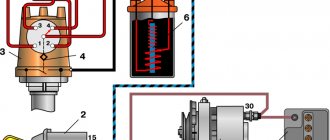
Troubleshooting Sensor Problems
This mechanism is installed only on the Lada Kalina clutch with an electronic gas pedal. Its function is to control engine modes when changing gears, starting to drive, etc. Sensor malfunctions are reflected on the engine controller as “error 0830”, and the Check Engine lamp lights up.
Physically, malfunctions are felt as jerking of the car when changing gears, when the engine is running at low speeds, or a sudden increase or decrease in engine speed when you press the pedal. It is impossible to adjust the clutch sensor on Kalina; it will have to be completely replaced.
This part is located above the pedal, under the steering column. When buying a new one, you should choose sensor 1118-3720015 (for Kalina, Priora, Grants). Replacing it is a little complicated by the inaccessibility of the 2 screws on which it is attached to the pedal bracket.
To remove the sensor, you need to pull the wire block holder out of the hole on the pedal bracket. Then disconnect it from the dashboard wiring harness. Use a screwdriver to remove the spring hook from the holder and unscrew the sensor mount on the pedal bracket (screws).
The clutch sensor is removed together with the holder, released and replaced. Reassemble in the reverse order, starting with attaching the sensor to the holder rods.
Adjusting the Lada Kalina clutch or replacing the sensor is not very difficult. When carrying out work, the engine must be turned off. If after adjustment measures extraneous noises and other malfunctions do not disappear, you should contact a car service for diagnostics and possible repairs with the replacement of clutch discs.
Correcting the mechanism
If various extraneous sounds appear when the clutch is disengaged during vehicle operation, you need to check the gap on the drive fork and, if necessary, adjust it. Clutch cable adjustment is performed in the following order:
- Remove the air filter and pull out the cable by the tip to its maximum length.
- Using a caliper, measure the distance between the tip and the fork. Normally, this distance should not deviate from 2.7 mm.
- If discrepancies are found, turn the driver on the thread until the desired value is established. Release the end of the cable: it should press tightly against the fork.
- Press the clutch pedal 3-4 times to activate automatic cable length correction, measure again.
When re-measuring, a deviation from the value of 2.7 mm may again be detected. In this case, you need to repeat the described steps to adjust the cable length.
The clutch on Kalina may make squeaks and noises even after adjustment. They can be caused by the tip driver rubbing against the fork. The noise in this case comes from the engine side and is eliminated by applying lubricant to the contact point between the cable tip nut and the fork. Other possible causes - pedal creaking, cable grinding when rubbing against the casing - can be eliminated by applying lubricant. In some cases, the source of the noise may be the clutch pedal sensor.
Why adjustment is necessary
The free play of the clutch cable increases as the clutch parts wear.
During the operation of Kalina, the clutch assembly may require adjustment.
This happens both due to design features and in the process of natural abrasion of the driven disk linings . Therefore, the clutch cable must be adjusted periodically.
Adjustment process
The adjustment process is simple and is performed in several stages:
- To get to the adjustment mechanism, you need to remove the air filter housing .