Checking parts and assembling the VAZ-21213, VAZ-21214 engine
We discussed engine disassembly in the article “Engine Disassembly”.
After disassembly, thoroughly wash the parts with kerosene, blow and dry them with compressed air (especially the oil channels of the parts).
Inspect the block, especially carefully the crankshaft supports.
Cracks in any place in the block are not allowed.
If there is a suspicion of cracks in the block (coolant has entered the crankcase or oil has entered the coolant), check the tightness of the block on a special stand.
Carry out the check in repair shops that have the appropriate equipment.
Inspect the cylinders on both sides.
Scratches, nicks and cracks are not allowed.
When inspecting cylinders, we recommend illuminating the cylinder mirrors with a portable lamp - in this case, defects are visible much better.
1. To determine the wear of the cylinders with a bore gauge, we measure the diameter of the cylinder in four zones and two planes (parallel and perpendicular to the axis of the crankshaft).
2. To determine the wear of the piston skirt, use a micrometer to measure the diameter in a plane perpendicular to the piston pin axis, at a distance of 55 mm from the piston bottom.
3. Using a micrometer, measure the diameters of the connecting rod journals
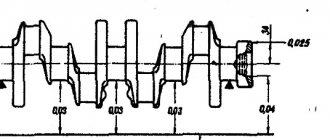
4. Using a micrometer, measure the diameters of the crankshaft journals.
We grind the crankshaft journals to the nearest repair size if their wear or out-of-roundness is more than 0.03 mm, and also if there are burrs and marks on the journals.
5. After grinding the crankshaft journals, it is necessary to remove the oil channel plugs, thoroughly rinse the channels to remove abrasive residues and blow them with compressed air.
We assemble the engine in reverse order.
We install new crankshaft bearing shells of nominal or repair size (after grinding the journals).
6. In the first, second, fourth and fifth supports of the cylinder block we install the upper main bearing shells with grooves, and in the third support - a liner without a groove on the inner surface (the same as in the main bearing caps).
7. Lubricate the main bearing shells with engine oil and place the crankshaft in the supports.
We insert thrust half-rings lubricated with engine oil into the grooves of the fifth support.
8. We install a steel-aluminum half-ring on the front side of the fifth support, and a metal-ceramic half-ring (yellow) on the back side.
The surfaces of the half rings with antifriction coating (they have grooves) must face the thrust surfaces of the crankshaft.
9. Install the main bearing caps in accordance with the marks marked on their outer surface (counting is done from the camshaft drive side).
In this case, the locks of the upper and lower shells of each main bearing must be located on the same side.
10. Tighten the bolts securing the main bearing caps to a torque of 68.31-84.38 Nm (6.97-8.61 kgf m).
11. Pistons for cylinders are selected according to classes.
The cylinder diameter class, indicated by letters, is stamped on the bottom plane of the cylinder block (the plane of the oil pan mounting).
12. Classes of piston skirt diameters and holes for the piston pin are marked on its bottom
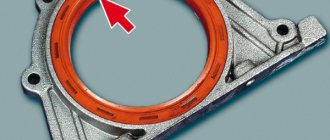
Thrust half rings
Just like on the liners, no adjustment operations can be performed on the half rings. If there are burrs, marks or peeling, replace the half rings with new ones.
Half rings are also replaced if the axial clearance of the crankshaft exceeds the maximum permissible - 0.35 mm. Select new half rings with a nominal thickness or increased by 0.127 mm to obtain an axial clearance in the range of 0.06-0.26 mm.
The axial clearance of the crankshaft is checked using an indicator, as described in the chapter “Engine Assembly” (Fig. 2-14).
The crankshaft axial clearance can also be checked with the engine installed in the vehicle. In this case, the axial movement of the crankshaft is created by pressing and releasing the clutch pedal, and the amount of clearance is determined by the movement of the front end of the crankshaft.
Removal, replacement, installation of the crankshaft and its bearings
Directory
Tags
Removing, replacing, installing anti-roll bar
Removing, replacing, installing timing belt
Removing, replacing, installing rear suspension shock absorber spring
Inspection, checking the steering
Removal, replacement, installation of the crankshaft and its bearings
Symptoms: low pressure in the lubrication system, dull metallic knocks in the engine.
Possible cause: The crankshaft or its bearings are damaged.
Tools: set of wrenches, set of screwdrivers, micrometer.
1. Place the car on an inspection hole or overpass, then remove the negative wire from the battery terminal.
2. Remove the engine oil pan from the vehicle.
4. Remove the camshaft drive cover along with the sealing gasket, and then remove the chain from the crankshaft sprocket pulley.
5. Mark the relative position of the connecting rods and their caps, as well as the relative position of the main bearing caps relative to the engine cylinder block.
6. Using a 14mm socket wrench, unscrew the two nuts securing the connecting rod cover.
Main bearing shells
Do not perform any adjustment operations on the liners. If there are burrs, marks or peeling, replace the liners.
Check the gap between the bearings and the crankshaft journals:
- place a piece of calibrated plastic wire on the neck being tested;
- install the covers with main bearings, and tighten the cover mounting bolts to a torque of 80.36 N·m (8.2 kgf·m);
- remove the covers and, based on the amount of flattening of the wire on the packaging scale (Fig. 2-37), determine the size of the gap.
The gap between the crankshaft journals and the liners can also be determined by calculation, measuring the diameters of the main journals, beds for the liners and the thickness of the liners.
The nominal design gap is 0.050 -0.095 mm. If it is less than the limit (0.15 mm), then you can use these liners again. If the gap is greater than the limit, replace the liners on these necks with new ones. If the crankshaft journals are worn and ground to repair size, then replace the bearings with repair ones (increased thickness, see Table 2-4). A sign of correct assembly and mating of the journals with the liners is the free rotation of the crankshaft.
Numbers 0.25, 0.50, etc. indicate the amount of reduction in the diameter of the crankshaft journals after grinding.
Weaknesses of the VAZ 21214 engine
In addition to the weak points of the base 21213, the motor has the following weak points:
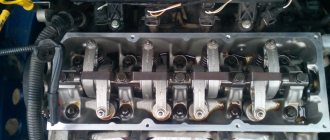
Cylinder block. This weak point appears on various models of Nivov engines, including the previously discussed 21213. Due to insufficient quality control, the assembly unit is manufactured with a high percentage of factory defects. In short, the drilling depth of the intake manifold stud holes is not maintained, causing the holes to meet the camshaft stud holes.
In this way, L-shaped through channels are obtained. After installing the studs at the factory, the connections remain sealed for some time and the problem is not identified when the quality control department employees accept engine tests. After the sale of new cars with low mileage, during sharp braking, oil begins to seep through the studs onto the hot intake manifold, so much so that smoke from the oil burning in the manifold pours out from under the hood, and accordingly, there is nothing to breathe in the cabin.
The most interesting thing is that AvtoVAZ knows about this problem and, in response to questions in correspondence with car owners, advises eliminating it according to the following technical specifications:
A sketch for the technical specifications for eliminating oil leaks from under the exhaust manifold studs.
- Remove the GC cover;
- Unscrew the two studs securing the bearing housing (see sketch) and remove oil from the threaded holes;
- Thoroughly degrease the holes and stud;
- Apply sealant UG-10 or its analogues to the lower threads of the studs;
- Place the studs in place;
- Tighten the bearing housing nuts;
- Install the cylinder head cover;
- Wait at least 30 minutes for the sealant to set.
Also interesting: Engine tuning: Niva 4x4 - increasing power using common methods
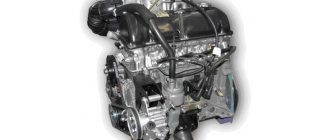
Technical characteristics of engine 21213
VAZ 21213 is a 1.7 liter petrol 4-cylinder 8-valve carburetor engine. The engine was created on the basis of 2121 and taking into account the developments of the VAZ 2107 unit. Engineers partially changed the original design to achieve better ergonomic characteristics of the Niva’s internal combustion engine:
- increasing power from 73 to 78.9 hp. and torque from 116 to 126 Nm;
- reducing fuel consumption to 12 liters per 100 km.
In addition to increasing the cylinder diameter to 82 mm, VAZ developed new pistons and a crankshaft for the 21213 engine. We replaced the outdated Ozone carburetor with the Solers, the most popular and successful model in the early 90s. Improved ignition and cooling systems.
To lubricate the 21213 engine, oil is selected depending on the climate:
- from -25℃ to +35℃ viscosity 10W-40 is recommended;
- from -2℃5 to +45℃ - 15W-30;
- from -30℃ to +20℃ - 5W-30, etc.
The manufacturer indicates the preferred brands of oils: Lukoil, ESSO, Rexol, Yar-Marka, Norsi, Shell, etc.
| Technical characteristics of the VAZ 21213 engine | Meaning |
| Number of cylinders/valves | 4/8 |
| Cylinder diameter/piston stroke, mm | 82/80 |
| Compression ratio | 9,3 |
| Cylinder volume, l | 1,69 |
| Crankshaft power, hp, at 5200 rpm | 78,9 |
| Torque , Nm, at 3000 rpm | 126 |
| Idle speed, rpm | 750 — 800 |
| Oil volume, l | 3,75 |
| Oil consumption , l/1000 km | 0,7 |
| Gasoline consumption, l/100 km, combined | 10,5 |
| Fuel type | AI-93 |
| Fuel tank volume, l | 42 |
| Dry weight , kg | 117 |
| Declared engine resource , thousand km | 80 |
Despite the factory-specified service life of engine 21213 being 80 thousand km, in practice the engine lasts 150 thousand km before overhaul, provided that high-quality fuels and lubricants are used and moderate operation.
Based on the 21213 engine, the 21214 unit with an injector was developed. The technical characteristics of the motors are identical. The designs differ in the power supply system, timing drive and the presence of hydraulic compensators. According to environmental requirements, the injection version meets the Euro-3 standard.
Similar article The principle of operation of a hybrid car engine
Weaknesses of the power unit of the VAZ 21213
- Water pump;
- Engine, manual transmission and transfer case oil seals;
- Generator;
- Starter;
- manual transmission;
- Valve cover gasket;
- Cooling system pipe connections;
- Radiator;
- Thermostat;
- Expansion tank;
- Vacuum brake booster.
The water pump (pump) is characterized by frequent failures on new cars after 2,000 km.
Due to poor quality, oil seals require more frequent replacement than required according to the operating manual.
The generator has a high probability of failure. As a rule, it burns out even on new cars that have not reached 4,000-10,000 km.
The starter has a low service life without repair.
On a gearbox, one of the common defects is the fifth gear slipping out. In addition, the gears are not fully engaged.
The valve cover gasket loses its properties over time and allows oil to leak out.
The connections of the cooling system pipes in the places where the clamps are installed are not reliable and lose their tightness very early, which is fraught with loss of antifreeze.
The radiator is leaking. The problem occurs due to the appearance of cracks in the radiator pipe package, accompanied by loss of coolant. This defect has become widespread.
The thermostat does not provide thermal conditions for the coolant in the engine cooling system. The manifestation of this problem is no exception. The cause of the defect is a failure of the valve mechanism inside the thermostat. To check that the thermostat is working properly, after starting the engine, simply place your palm on the lower (outlet) hose, through which hot antifreeze circulates into the radiator for cooling. If the thermostat is working properly, after some time the hose should become hot; if the hose remains cold, the thermostat must be replaced.
The expansion tank cracks and antifreeze leaks out. The appearance of cracks occurs due to the failure of the steam-air valve in the tank plug due to increased pressure.
Vacuum brake booster (VUT). Manifested by a stiff brake pedal. The speed may fluctuate when the brake pedal is pressed, as well as hissing. The problem is solved by replacing failed rubber products and replacing clamps in connections.
Read news about the new Niva
- What you need to know about the VAZ 21214 engine before buying a Niva | Weak engine
- Niva VAZ 21213 engine: characteristics, malfunctions and tuning
- What you need to know about the VAZ 21213 engine before buying a Niva | Weak engine
- Interchangeability of the Zhiguli and NIVA gearboxes (is it possible to install a Zhiguli gearbox on a Niva)
- Do-it-yourself Niva 4x4 tuning: updating the interior of the Lada VAZ-2121
- Chevrolet Niva Chevrolet power steering pump
- How to buy a used Ford Ranger - KOLESA.ru - automobile magazine
- Renault Logan winter tire size. Renault Logan tire size: which summer tires are better R14 or R15, tire size