Signs that replacement is needed
The main function of the air filter is to clean the air entering the engine from dirt and dust. The grains of sand entering with the air settle on the corrugations of the cleaning element, clean air enters the cylinders, and the engine operates at full power. The cleaning device also performs the function of muffling the noise from a running car engine.
If too much dirt accumulates on the corrugations, the air supply to the engine noticeably deteriorates due to increasing resistance, and the functions of the air filter are not fully performed. There are signs that it needs to be replaced. The signs do not differ on different VAZ models; they are the same on both VAZ 21214 and VAZ 21213, etc.
When a filter needs to be replaced, the car owner may notice the following signs:
- reduction in car engine power;
- exhaust pollution;
- increased fuel consumption;
- contamination or damage to the filter element.
Air filter housing VAZ 21214 injector
In cart: 0 items Amount: 0.00 rub.
| Catalog |
| Engine |
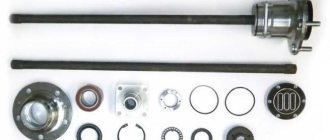
2102-2402020, drive and driven gears
2123-1703460 , 21230-1703460 -00
0002-13101641-00, GM 0885600
The cost of the set (4 pieces) is 19,000 rubles.
Bracket for air filter housing VAZ 21214M, upper
21214-1109179-00, air intake - injector
Catalog number: 21214-1109012
Standard price:
700.00 rub. Your price
Price For registered:
650.00 rub.
Before visiting the store, check product availability!
The filter element on the injection Niva is protected by the air filter housing. Consists of two elements of the lower and upper half-body. Installed on all Niva models with fuel injection VAZ 21213, VAZ 21214, VAZ 2131 and on various modifications of the car.
| Special offers |
| Manufacturer: | Motor-Super CJSC Tolyatti |
| Vendor code: | 21214-1109010-00 |
| Catalog number: | 21214110901000, 21214-1109010. |
| Name: | Air filter housing assembly VAZ-21214, 2123 21214-1109010-00 |
| Department: | VAZ |
| Product from category: | VAZ fuel and oxygen supply system |
Pickup from a warehouse in Yekaterinburg
Payment upon receipt:
- Cash
- Transfer to card
- By bank card
- By invoice (for organizations with VAT)
Important. Before receiving the product, check its availability by phone or place an order on our website.
Delivery by courier in Yekaterinburg and nearby cities
- Payment in cash upon receipt of goods
- The cost of delivery within the city and nearby cities is 100-250 rubles
- Free delivery throughout Yekaterinburg for orders over 10,000 rubles.
- Please check with the RusAvto manager for delivery times and costs.
For minimum order and delivery costs, see the Delivery section.
| Minimum order | Cost of delivery | Free delivery from | |
| Ekaterinburg | 1000 | 150 | 6000 |
| Upper Pyshma | 3000 | 200 | 10000 |
| Berezovsky | 3000 | 200 | 10000 |
| Aramil | 3000 | 200 | 10000 |
| Revda | 5000 | 400 | 17000 |
| Pervouralsk | 5000 | 400 | 17000 |
| Polevskoy | 7000 | 500 | 26000 |
| Sysert | 7000 | 500 | 26000 |
| Novouralsk | 10000 | 600 | 34000 |
| Nevyansk | 12000 | 700 | 37000 |
| * does not apply to large spare parts and special goods. price | |||
Filter selection
Every car owner should know how to choose the right filter for their car. An original part is best; you can also choose from a special catalog the available types of filters with parameters suitable for the VAZ 21214 Niva.
You should choose the right cleaning device, so before purchasing it is recommended to look under the hood of the car and check what it looks like and what its number is.
Replacing the air filter VAZ 21214 Niva
Replacing the VAZ 21214 Niva air filter with your own hands is quite quick and easy. The car owner must determine the location of the filter under the hood and prepare the necessary tools.
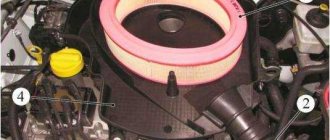
The air filter housing in the VAZ 21214 Niva is located under the hood and is not difficult to find. It is a large black box with an air exhaust tube located almost in the middle. The only tool you need to replace the filter element is a Phillips screwdriver.
Replacement steps
Step-by-step instructions for replacing the air filter on a VAZ 21214 Niva car are simple:
- Raise the hood, determine the location of the cleaning device housing;
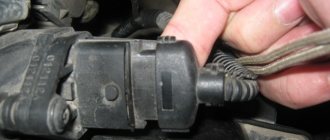
- To avoid damaging the wiring, disconnect the mass air flow sensor connector from the box;
- Using a Phillips screwdriver, unscrew the 4 screws securing the housing cover;
- Carefully lift the lid and remove the old element;
- Clean the empty housing from accumulated dust and dirt;
- Unpack the prepared new filter and put it in place;
- Make sure that the part is installed correctly - the arrows on the body and the corrugations on the device itself must be parallel;
- Close the housing cover, screw it tightly with screws;
- Finish work and close the hood.
If the car owner strictly follows the recommended sequence of actions, replacing the air filter on a VAZ 21214 injector will take no more than 10-15 minutes.
Air filter NIVA
About the operation of the air filter in Niva
AIR FILTER
- an element of the power system of any internal combustion engine. Its condition directly affects the loss of engine power, fuel consumption, engine oil consumption due to waste, and, of course, the correct formation of a high-quality combustible mixture. The lack of fresh air charge has a huge impact on increasing the consumption of not only fuel, but also engine oil due to waste.
Please note that on injection engines, the filter already has a different shape and costs an order of magnitude more.
The car is 2014. I have been using it since May 2014. According to all standards, it is recommended to change the air filter on the LADA 21310 after 30,000 km; when working in harsh conditions (dust and other fine particles), the replacement time must be halved - as evidenced by the operating manual, and most technical literature on vehicle maintenance and other cars with internal combustion engines.
Analyzing the situation that my mileage had just exceeded 15,000 km, cutting only the urban jungle with tires, I was inclined to replace the filter somewhere else after at least 5,000-10,000 thousand. But the current situation forced us to speed up the process - oil consumption for waste increased, which, based on the design of the exhaust gas system, can lead to serious and expensive breakdowns of it, and not only that.
Replacement is simple, and I think there is no need to describe it. The very essence is that for the normal operation of the internal combustion engine of your “niva”, for the preparation of a stoichiometric air-fuel mixture, try to take care of it more often, and to ensure that it breathes easily. After all, you probably clean your nose every day.
Removing and installing the Niva air filter housing
Disconnect the air hose and electrical connector from the VAZ 2121 mass air flow sensor (see Removing the mass air flow sensor).
Use a slotted screwdriver to pry off the three rubber supports of the housing
...the air intake support and remove the supports from the holes in the brackets. The air intake can also be released by unscrewing the upper right bolt of the VAZ 2131 radiator, which attracts the air intake support bracket (see Removing the radiator).
We remove the air filter housing with the mass air flow sensor and the Niva 2121 air intake. Install the Niva 2131 air filter housing in the reverse order. To make it easier to install the rubber supports in the holes of the brackets, lubricate the supports with penetrating lubricant such as WD-40.
Installing a radiator from a Chevrolet Niva and an air filter from a GAZ 3110 in a NIVU
I decided to make the cooling system with a Chevy Niva radiator, I hope it will be enough. Its location in the place of the spare tire is simply impossible. A pan was also made to connect the carburetor to the 3110 filter, for the subsequent installation of a snorkel
When making a new pan, first we mark everything and cut it out of a sheet of metal, I took a 1.5 mm sheet
Then I sanded all the edges
Assembling the resulting elements, we fix them in a vice using clamps
We grab the plates to each other using semi-automatic welding, in a checkerboard pattern, so that the metal does not move
Next, we scald and clean the resulting structure.
To make the fastening for the Sh-Niva expansion tank, I used a cardboard mock-up
After fitting, the dimensions from the layout were transferred to a sheet of metal
Carefully cut with a grinder
The resulting product is processed using sandpaper.
and clamp it in a vice to give the required shape.
drill holes to install the mounting pin
Well, already under the hood
To install the 3110 filter housing, I had to go over the fender with a hammer
Getting rid of dust and the possibility of water being sucked into the Niva air filter
I thought for a long time about what kind of smart guy came up with the idea of making an air intake into the engine from the car’s face, right behind the radiator. It's okay if it's a passenger car, but it's still an SUV! It turns out that all the dust from the car in front flies into the air filter. And what takes air from the front, near the headlights, is not good. If you drive through a river, there is a huge opportunity to get some water. Someone will think “what can we think about - we can install a snorkel,” but I don’t want to - I don’t want to cut the body for a snorkel. Therefore, it was decided to make a false snorkel under the hood with an air intake at the level of the battery, which already eliminates the suction of water since I do not intend to get into the water above the hood yet. And the dust won’t suck as much anymore. We will need:
1. A meter of plumbing pipe with a diameter of 50mm (this is important, since a smaller diameter does not provide sufficient air suction and 50mm is optimal)
2. Rubber adapter from 70mm to 50mm
3. Two corners - 50mm with an angle of 90 degrees, and one of 45 degrees.
Next, we go to the car and remove the lower part of the air filter housing with the exhaust pipe (the casing is secured with three rubber studs). Remove the standard exhaust pipe from the body. Next, look at the photo, I will describe everything there.
Yes, everyone can make the design and arrangement of the pipe as they want and their imagination allows. In the future, it is planned to make a nulevik filter at the end, and a homemade turbo air inflator. But more on that later and after the tests.
What do we need
Rubber adapter 70x50mm
Dismantled housing with standard air intake. already filmed.
We place the adapter on the sealant in the housing (so that there is no extra suction)
This is the front view, this is what should happen.
Inside view (be sure to lubricate the bell retaining holes). Next, once everything has dried, we insert a corner into the rubber pipe adapter at 90 degrees and adjust it as needed (I grabbed the inserted corner on both sides with self-tapping screws for reliability).
Next, we put everything in place and assemble the air duct.
I stretched it along the wing, there was just room for it.
and a 45 degree corner at the end. Air will be sucked in from here. Then I’ll make a nulevik filter there, and an insert with a homemade turbo boost
How to extend the life of the air filter: radiator grille in Niva
Problem: I broke the almost new facing grille.
Broke
A new one costs a penny, but is just as fragile. In general, I decided to work with the old one, fortunately it was available at that time. I dug out two old air filters from a GAZ-3309 (in principle, any others of this size would be suitable), gutted them, and got 2 meshes like this:
One of the filters. It is necessary to disassemble carefully so as not to bend the mesh again. It is better to completely cut off the soldered part so as not to bend the mesh, tearing off the seam.
Actually, the resulting mesh. Pay attention to where the cut goes on the left and right. This way I avoided sharp edges and cuts on my hands.
Tools required for extraction
After disassembly, I cut out part of the original plastic on the right side of the grille, cut off the excess from a piece of mesh and proceeded to perverting the fit and fixing it to the grille. In the process, I also decided to cover the part of the lattice that was left “alive” from the inside with a mesh:
Something like this.
Test fitting.
This is how everything is attached. Later I’ll attach it with glue or melt it into plastic.
This is how everything is attached. Later I’ll attach it with glue or melt it into plastic
Option for shaving fans
This is roughly what it looks like from the inside out.
Last fitting. The final version.
All that remains is to glue the loose part of the edges with something, screw the nameplate into place, and you can install it.
https://www.drive2.ru/l/7953317/, https://www.drive2.ru/l/1873785/, https://www.drive2.ru/l/2652178/, https://www .drive2.ru/l/1136776/, https://www.vazclub.com/niva/2121-2131/remont/dvigatel/inzhektornaya-sistema/zamena-korpusa-vozdushnogo-filtra.html
next article:
Throttle valve NIVA
Contents of the article: Removing the throttle assembly in Niva Cleaning the throttle valve in Niva Replacing the position sensor
Rating 0.00 [0 Vote(s)]
Replacement frequency
The owner of a VAZ 21214 Niva must determine how often the air filter in his car needs to be changed. To do this, you need to periodically inspect the replacement cleaning element and monitor for signs that the part needs to be replaced. If the indicated signs are absent, then the air filter on the VAZ 21214 Niva should be changed according to the maintenance regulations every 30,000 km.
Some car enthusiasts believe that there will be no harm to their vehicle if they drive for a while with a dirty cleaning mechanism. But this is a wrong point of view. The consequences of untimely replacement of a damaged element can be quite serious.
Grains of sand and dirt from a clogged filter gradually find their way inside the engine, between its working moving parts. The friction of sand grains causes accelerated wear of internal combustion engine parts, and as a result, the car owner may face the need for major engine repairs. Therefore, saving on a cheap cleaning device is completely unjustified; repairing the engine will cost much more.
It is enough to change the engine air element in a timely manner, using the step-by-step instructions given above, and the VAZ 21214 Niva car will last as long as possible.