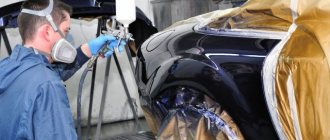
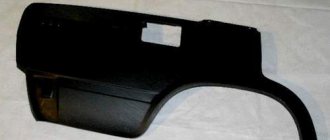
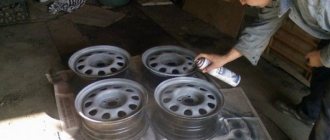
During the operation of the car, the wing most often suffers, especially the front one. This happens during a small collision or unsuccessful parking. If the damage is severe, the wing needs to be replaced. It is worth remembering that such parts are not sold factory painted. In addition to the replacement itself, it is also required to paint it in a color as close as possible to the color of the car. And this is an additional blow to the budget if you contact a car service. If you have ever done minor car repairs, then if you have the necessary conditions and tools, you can do the painting yourself.
Painting the wing yourself will cost much less than in a car service
Selection of high-quality and inexpensive material
To paint the wing yourself, in addition to the paint itself, you will need the following:
- putty and primer;
- sandpaper / abrasive material;
- paper tape;
- car varnish;
- clean rags (without small lint);
- polyethylene, pieces of old newspaper;
- dense pieces of rubber (about the size of a palm);
- solvent.
The entire necessary list can be purchased at your nearest hardware store.
The last point deserves special attention. You will need 2 types of solvent. If the amount of work is small (painting one wing), you can purchase them in bulk, which will significantly help you save money.
&feature
Paint selection
The next important step is the choice of paint and varnish substance. You can paint the car fender with auto enamels. They contain pigments and additives that protect the car surface from water, fire, corrosion, etc. Main types:
- Melamine-alkyd one-component enamel. Pros: dense structure due to nitrocellulose in the composition, wear resistance, not afraid of gasoline; applied in three layers, does not spread; provides shine. Cons: takes a long time to dry, doesn't polish well.
- Acrylic two-component enamel. Advantages: high-quality protection against corrosion, atmospheric influences, air temperature changes, precipitation; easy to use, dries quickly; polishes well; durable. Disadvantages: relatively high cost.
- Nitroenamel is not a universal product and is only suitable for eliminating minor defects. Cons: does not give the surface a glossy shine, applies unevenly, requires a large number of layers (up to 10 sprays), takes a long time to dry, is flammable, fades quickly.
- Enamels with a metallic effect are distinguished between single-layer, two-layer and three-layer compositions. The latter give the surface a “chameleon” effect. The compositions dry fairly quickly (no more than an hour). The metallic coating looks much more impressive, besides, it prevents overheating due to light reflection, and also has greater durability. Cons: high price.
Melamine-alkyd one-component enamel
Acrylic two-component auto enamel
Automotive nitroenamel
Acrylic enamel with a metallic effect Please note: Technology for painting scratches on cars: surface preparation, choice of composition and methods of its application
Necessary tool
The labor-intensive process of restoring the appearance of a car requires the use of improvised tools, auxiliary materials, etc. You will need:
- paper, newspapers, masking tape;
- abrasive agents (sandpaper, plane);
- degreaser (white spirit, kerosene, special solvents);
- spatula, putty, primer;
- spray gun, compressor, paint or aerosol can;
- rags, varnish, polishing paste and napkin;
- gloves, respirator, work clothes.
To complete the task, you need to prepare all the necessary means at hand in advance before starting repair work.
Sandpaper
Spray gun
Required Tools
The first step in painting a car fender is to have the necessary tools.
Necessary tools for work
You will need the following set:
- spray gun;
- compressor;
- putty knife;
- planers for cleaning.
Advantages of aerosol materials
To begin with, let’s evaluate the undeniable advantages of paints and varnishes in aerosol cans, namely:
- The materials in the cans are ready for use and do not require any preparation or dilution according to the instructions. It is enough to shake the can properly and the material is ready for application;
- Mobility. To work with aerosol materials, no additional equipment is required: a spray gun, a compressor, hoses with a pressure sensor and a regulator. Moreover, before starting work and after it, you do not need to wash the equipment with solvent. That is, a lot of issues with the acquisition, configuration, maintenance and storage of pneumatic equipment are immediately resolved;
- Aerosol materials are supplied in small volumes and are excellent for small, local repairs, which means there is no need to overpay for materials in large containers;
- Using spray paints is a great way to experiment with paint materials, learn about material compatibility, and get started in painting without purchasing equipment.
Aerosol materials for minor car repairs are very convenient!
At the same time, the most important thing is that the paints and varnishes in modern aerosol cans, thanks to a special valve, have a spray pattern very close to what is produced by a standard inexpensive spray gun, and therefore can replace it and show a result of comparable quality with minor repairs. The paint in the cans that they use when choosing a color is absolutely the same as what is used for professional painting with a spray gun and is prepared according to the same recipes, based on the same pigments. The paint in the aerosol can is ready for use, which means it is already “charged” with thinner. The total volume of the finished material in a standard can is 375 ml, and it is enough to cover an area of 1-1.5 m² in two layers. When planning a repair, also keep in mind that the required amount of paint also depends on the “hiding power” of the color and tone of the primer.
Please note: our catalog of aerosol paints in cans contains convenient filters by year, car model and paint shade, which will make it even easier for you to find the right paint or significantly narrow down the search for the desired color code on the car's identification plate. For example, a black 2021 Kia Soul can only have 2 color options (one of two code options that remains to be found on the car's identification plate) - link.
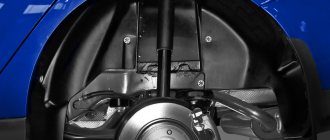
What should you consider when painting a wing yourself?
The biggest problem you can encounter when painting a wing is dust. It may not be noticeable to the naked eye, and the garage may seem clean, but when exposed to a spray gun, it rises out of nowhere, subsequently creating a sandpaper effect on the painted fender. Therefore, when painting a car fender with your own hands, you should pay special attention to cleaning the room - thoroughly vacuum and wash the floor.
We paint the new wing strictly in overalls, which should include rubberized gloves and a mask. This way you can minimize exposure to harmful substances when inhaling paint and working with solvents.
Acrylic two-component primer
This filler is designed to fill pores and mask defects in body panels after sanding. Depending on the proportion of mixing the base material with the hardener (from 3 to 5 to 1), it has different viscosity and layer thickness.
A mixture with acrylic resins is used as an intermediate material before applying paintwork. It is a sealant and has good adhesive characteristics. The main filler colors used to reduce paint consumption are grey, black and white.
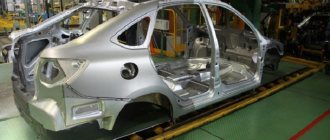
Stages of work execution
Painting work includes several stages, which must be performed strictly in the order in which they are indicated. Before you paint a car fender with your own hands, you need to properly prepare it. The surface must be perfectly clean and smooth, without any visible defects.
Before painting the wing, it is necessary to properly prepare it
It is worth not forgetting about workplace equipment. It is impossible to carry out work in poor conditions; the room must be clean and well ventilated. Dust is the main enemy of fresh paint.
Depending on the damage to the fender (scratches, dents or corrosion), the list of work may vary, but there is still one constant rule - the car must first be washed and dried. If the design of the car allows you to remove the wing, then it is easier to unscrew it and paint it separately.
A universal list of painting steps is given below.
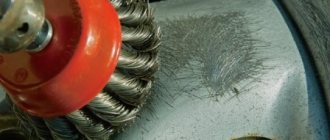
Preparing and polishing the wing
Before restoring and painting the wing, it is necessary to carefully sand the damaged areas or the entire part as a whole.
How to grind correctly? You need to start from the places where the filler was previously applied. The abrasive wheel P80 – P180 is designed for them. Next, they move on to medium-grain sandpaper (up to P320) and treatment of the entire surface to smooth out the marks of primary sanding. At the completion stage, proceed to sanding with fine sandpaper. If necessary, stripping is carried out down to metal.
When sanding by hand, you need to apply proper pressure to the surface. Movements should be linear, not circular. Otherwise, large scratches will remain on the surface of the wing.
Sanding the wing before painting
Prime and putty the surface
After sanding, the wing must be puttied, after which the resulting smooth surface with a minimum number of open pores will be obtained. During the puttying process, the wing must also be sanded. To achieve an ideal result, more difficult areas must be sanded by hand.
You can do this as follows:
- Degrease the surface of the wing and apply universal putty.
- After drying, go over the surface with a block or machine with sandpaper from P100 to P320 (depending on the situation).
- Repeat the process until completely leveled.
After puttying, it is necessary to apply the primer with a spray gun in 2-3 layers at a working pressure within 3-4 atmospheres. Adjust the torch so that it resembles the shape of an elongated oval. Before priming, be sure to do a test on a test surface.
Apply layers with a break of 5-10 minutes (until one layer dries). The first layer should be thin, and the second should be denser.
Leave for 24 hours, then sand the top with P500 – P600 sandpaper if the part will be painted metallic.
Puttying the wing before painting
Painting
The painting process itself is much easier than the preparatory stages. Before you start painting, you need to decide how much paint you will need. On average, it takes 150-200 g to paint one wing, if we take test paints into account.
How to paint a car fender:
- Degrease the surface to be painted and wipe dry. If it is not possible to remove the wing, then insulate the surface of the car with newspapers and paper tape.
- Apply the sprayer in 2-3 layers, you must work with it wearing a mask and keep it at a distance of at least 30 cm. You need to wait 10-15 minutes between each layer. Apply until the paint covers all glimpses of the primer.
- Let the paint dry.
Typically, drying times vary depending on the paint used. It is usually indicated on the packaging. For example, acrylic paint dries in about 10 minutes.
Varnishing
The last step in painting the wing is varnishing. The varnish is applied after all layers of paint have dried. It will turn the coating into gloss and protect the paint from rapid abrasion and fading.
The varnishing process depends entirely on the type of varnish used. In addition, weather conditions are taken into account. If varnishing is carried out in winter, the holding time increases significantly.
The process of painting a car wing will not take much time.
If the wing defect is small, then it must be painted and varnished in sections. To avoid the difference between the old coating and the fresh varnish, use a transition solvent, which is filled with a spray bottle and lightly sprayed onto the transition boundaries. This is done if the side edges of the wing are damaged. If the damage is in the center, it is recommended to do a local touch-up and completely varnish the wing, rather than fill all the edges with solvent.
After the varnish has dried, a visual inspection of the wing is carried out. If there are minor defects, the varnish is polished by machine using abrasive pastes. To avoid deviations, it is recommended to strictly follow the painting plan.
Surface painting
— When asked whether it is possible to paint the wing of a car with a spray can, experts give an affirmative answer. Motip acrylic enamel is ideal for painting the wing in this way. It has excellent performance characteristics - it is easy to apply, adheres well to the surface and forms a stable and durable coating.
— To get an excellent result, you need to choose the right paint color. This can be done using a matching catalog or a color fan. Experts can also help in this difficult task - you will need to give the serial number of the body color and, perhaps, bring its small painted part.
— Before working with aerosol paint, shake the can thoroughly for several minutes. The enamel is sprayed onto the wing from a distance of 30 cm. After applying the first developing layer, the surface is inspected and felt again. If any unevenness remains, we sand it again. It is better to apply several thin layers, allowing each to dry for 20-30 minutes.
— The final stage will be to consolidate the result using Motip acrylic varnish.
Apply 2 layers, allowing each to dry. Now we know how to paint a car fender - correctly and with excellent results. If you strictly follow painting technology and use high-quality materials, you will be satisfied with the result. A freshly painted wing will delight the eye with a radiant shine. Read our tips and get to work quickly!
Recommendations from experts
Do-it-yourself painting of a new wing is done using a sprayer at a distance of at least 30 cm strictly perpendicular to the surface, otherwise the result may be a non-uniform shade.
If painting is done in warm weather, allow each coat of paint to dry for at least 20 minutes before applying another. As a rule, the manufacturer writes detailed instructions for the paint, which you must read before starting work.
Each layer of paint should lie extremely evenly, without smudges. Gaps are allowed only when applying the first layer.
According to the recommendations of experts, to obtain an ideal result after finishing the fender painting work, it is recommended to polish the entire car. This way, the car will look like new, and the freshly painted wing will not be conspicuous by its shine.
Acidic and reactive soil
This is a wash-primer for application to the “bare” car body. The component includes polyvinyl resins, and the catalyst is orthophosphoric acid. Thanks to this composition, a durable film is formed that is resistant to corrosion and dissolution. Reactive primer is applied in a thin layer (9-10 microns). It penetrates the metal and promotes its passivation.
Soil for a car
The mixture can be one- or two-component. Hardens quickly. Putty cannot be applied to it, otherwise a chemical reaction will occur under the paintwork and the protective film will be destroyed. Therefore, the acid composition is covered with acrylic paint.
Cost of painting a wing at a car service center
The most popular choice is two types of paint - acrylic enamel and metallic. In the first case, purchasing consumables costs around 2000 rubles, and in the second – 2400-3000 rubles.
If you resort to the services of a car service, then painting a car wing costs 2000-2500 rubles. more expensive if you add this cost to the main consumables. This is the case if the damage is not serious. In other cases, painting the wing will cost a tidy sum (about 10,000 rubles). If you've ever had to deal with car repairs and have your hands in the right place, then painting your car fender yourself will significantly save your budget.
Primer purpose and use
The mixture is a protective link between the body and the applied paint. There are different types of primers for cars and their application can be as follows:
- Primary treatment of metal surface. To do this, use an epoxy-based composition that is dense in consistency.
- Smoothing surface defects. Use a thick putty with good water resistance.
- Protecting the structure of the mixture from corrosive elements of the paintwork. For this, a sealant is used.
To properly prime your car, you must follow the following rules:
- The surface to be treated must be completely free of dirt and degreased.
- To spray the composition, use a spray gun or a spray can.
- The layer must dry before matting.
- Paint with a mixture of one brand.
- Fill the body with liquid putty.
If the mixture contains a hardener and a base material, then their proportions should be observed. If the ratio of components is violated, the soil will not be able to fully provide its adhesive and anti-corrosion qualities.