What to do if there are no documents for the trailer?
If you do not have the above documents for the tow bar, please contact the manufacturer of this equipment to obtain copies.
Self-respecting organizations provide copies of documents without any problems. You can contact:
- in electronic form - through the organization’s website;
- in person - through an official representative in your city;
- by mail - by registered mail.
If it is not possible to restore the documents, then the only option left is to purchase a new coupling device, or to officially make changes to the design through the traffic police.
Note. Some organizations offer to buy a package of documents for a tow bar. I recommend ignoring such offers, because... Only the manufacturer himself has the manufacturer's documents. If such documents are issued by another organization, they will be fake.
Alternative tsu options
There are alternative solutions that I would like to discuss with you.
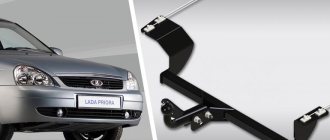
- Reinforced bumper with towbar. Nowadays, the Chevrolet Niva towbar with bumper protection is very popular. But no one is stopping you from installing it on the classic Niva. This is a ready-made bumper with a trailer hitch mounted into it. Products from Bosal (Bosal) or RIF will cost about 30 thousand rubles. This cost is justified because you get a bumper with a powerful gate and reinforcement, providing a high degree of rigidity and resistance to loads. Allows you to carry heavier loads. In this case, installation is carried out on conventional crossover body brackets and no modification is required;
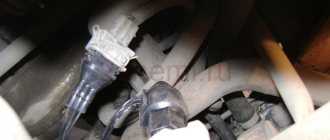
- Square towbar. Another option for the rear bumper. It costs about 2 times less than the previous trailer hitch. But you will need to buy a ball joint separately. It is in great demand due to price, ease of use and load-bearing capacity. And it looks quite original compared to standard towbars. Just look at the numbers indicated on the trailer hitch. They indicate permissible traction loads and additionally help to make sure that what you are looking at is not a fake.
Bumper towing options
Before purchasing a towbar for a Chevrolet Niva, you need to familiarize yourself with the manufacturing companies and the varieties of this part.
Among the companies that occupy leading positions in the production of towbars, it is worth highlighting such as “Bosol”, “Auto-Hack”, “Baltex”. Experienced motorists and specialists recommend choosing trailer hitches manufactured by these companies. The devices are characterized by high reliability and high-quality materials.
Towbars for Chevrolet Niva are divided according to the design of the product into:
Easy to install and dismantle. Mounted with 2 or 4 bolts, which are easy to remove. You can often find models with a removable ball on sale.
They are a one-piece design. Installed on a reinforced car bumper. They are welded to the side members or attached to massive bolts.
Often equipped with a folding mechanism. The ball is removed and stored separately from the trailer hitch. Used for transporting light loads in a trailer.
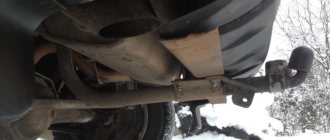
On the old-style Niva there are no standard mounting points for the tow bar. Experts do not recommend making special holes for mounting the trailer hitch yourself. In addition, it is impossible to find models of towbars for such cars on sale, and homemade towing devices do not have the proper quality.
After selecting a suitable towbar, we proceed to install the trailer hitch on the vehicle ourselves.
Instructions for installing and connecting a tow bar on a Chevrolet Niva with your own hands
By installing a towbar on a Chevrolet Niva, the motorist has the opportunity to transport trailers and other vehicles. The manufacturing plant of this model intends to make similar modifications to the design of the car, therefore it equips the car with standard places for attaching the trailer hitch. Installing a towing hitch has some nuances.
Bumper towing options
Before purchasing a towbar for a Chevrolet Niva, you need to familiarize yourself with the manufacturing companies and the varieties of this part.
Among the companies that occupy leading positions in the production of towbars, it is worth highlighting such as “Bosol”, “Auto-Hack”, “Baltex”. Experienced motorists and specialists recommend choosing trailer hitches manufactured by these companies. The devices are characterized by high reliability and high-quality materials.
Towbars for Chevrolet Niva are divided according to the design of the product into:
Easy to install and dismantle. Mounted with 2 or 4 bolts, which are easy to remove. You can often find models with a removable ball on sale.
They are a one-piece design. Installed on a reinforced car bumper. They are welded to the side members or attached to massive bolts.
Often equipped with a folding mechanism. The ball is removed and stored separately from the trailer hitch. Used for transporting light loads in a trailer.
On the old-style Niva there are no standard mounting points for the tow bar. Experts do not recommend making special holes for mounting the trailer hitch yourself. In addition, it is impossible to find models of towbars for such cars on sale, and homemade towing devices do not have the proper quality.
After selecting a suitable towbar, we proceed to install the trailer hitch on the vehicle ourselves.
Installation instructions
Before installing a tow bar on a Chevrolet Niva with your own hands, you need to prepare the car:
- Place the car on an overpass or inspection hole.
- De-energize the vehicle.
- Remove the luggage compartment trim.
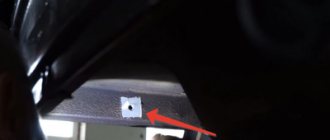
Next, for successful installation, you need to find the mounting points on the bracket. To do this, the trailer hitch is applied to the spar, then the mounting holes are found. They are sealed with special tape; after removing it, the car enthusiast can begin installation:
- The fasteners are lubricated with graphite grease supplied with the trailer hitch.
- The product is applied to the rail from behind, bolts are inserted into the holes and secured with nuts. The operation is performed in the following sequence: initially, a transverse nut is installed, intended for mounting the trailer hitch mount, then this rail is connected to the longitudinal one.
- A removable ball is installed, and a hook to which the trailer is attached.
After completing the installation of the traction hitch, proceed to connecting the electrical outlet.
Electrical connection
An electrical connection is necessary for the operation of additional lighting on the trailer. For this purpose, a 7-pin socket is used, which is supplied with the towbar.
The socket connection diagram is in the towbar instructions and looks like this:
- Left turn signal.
- Fog lamp.
- Weight.
- Right turn signal.
- Reverse.
- Brake signal.
- Parking lights.
Connecting the socket to the wiring is carried out according to the following algorithm:
- The rear headlight is removed and the insulation on its wiring is stripped.
- The wires are soldered in accordance with the pinout diagram.
- The places where the wires are inserted are wrapped with electrical tape.
- The headlight is installed in place.
After completing the work on connecting the socket, check the functionality of the trailer lights.
Operating rules
If you do not pay proper attention to the towbar, it will constantly break. To avoid this, you should follow some recommendations for operating a trailer hitch on a Chevrolet Niva:
- It is prohibited to transport a tow hitch weighing more than 1300 kg. If a homemade towbar is used, this figure is reduced by half.
- When towing a trailer, the vehicle speed should not exceed 90 kilometers per hour.
- The load on the ball and hook should be no more than 50 kilograms.
- Every 1000 kilometers of the road trip, the tow bar fasteners are checked and tightened.
A properly installed tow bar, if properly used, can last more than ten years.
Chevrolet Niva is a Russian cross-country passenger car. Often used in rural areas. Equipping such a car with a towbar allows you to use the car as a tow for trailers and other vehicles. In order for the trailer hitch to perform its functions, it is necessary to select a serial part from a reputable manufacturer, install it correctly and adhere to the rules for operating the towbar.
TSU selection
Is there an option for installing towbars on Nivas if the car originally came from the factory without one? Yes. These domestic crossovers have special holes, so the trailer hitch is mounted in standard places. But you will also need to drill a few additional holes. Now look specifically at your car.
Niva car owners are offered the installation of several trailer hitch options:
- non-removable or non-removable, in which the hook or coupling ball is welded to the base;
- conditionally removable, fastened with several bolts;
- quick-release, having a slightly protruding coupling for fixation, which allows you to store the hook with the ball separately;
- quick-release with a vertical type of fastening, where the hook is pulled down and the fasteners are not visible;
I will say right away that a removable ball is more preferable for me, since this design allows you to use the trailer hitch only when necessary. Moreover, it is better to take quick-release devices, because unscrewing several bolts will take quite a lot of time.
For VAZ Niva 4×4, they usually prefer to choose the simplest towbar options. They are inexpensive and can be purchased for several thousand rubles. Although this has its drawbacks.
And also interesting: Choosing an electric winch for the Niva - 6500 or 8000? Which company should I take?
Documents for a car tow bar
In 2021, the technical regulation of the customs union TR CU 018/2020 On the safety of wheeled vehicles is in force in Russia. It is this document that vehicles and the equipment installed on them must comply with.
Let's consider paragraph 77 of section 4 of chapter V of the technical regulations:
77. Vehicles are not subject to inspection in the following cases:
1) when installing components on a vehicle:
- intended for this vehicle and have undergone conformity assessment as part of this vehicle, which is confirmed by the documentation of the component manufacturer;
- provided by the vehicle manufacturer in the operational documentation;
2) when serial changes are made to the design on the basis of design documentation developed and approved in the prescribed manner, if on its basis an assessment of the conformity of the changes made was carried out.
So, there are 2 cases in which the towbar does not need to be registered with the traffic police:
- When making serial changes to designs. In this case, we are talking about installing a trailer hitch at the factory.
- When installing a towbar as additional equipment, if 2 conditions are simultaneously met: The manufacturer has provided for the installation of the towbar in the operational documentation. In this case, we are talking about the instruction manual, which is issued when purchasing any car. Open this document and look for the section on using a trailer. If there is such a section, then everything is in order.
- The towbar must have manufacturer documentation confirming that it is intended for use on your vehicle model and has passed a conformity assessment.
Thus, the list of necessary documents for using a tow bar:
- Vehicle Operation Manual.
- Documents for the towbar confirming that it is suitable for the vehicle of the required model.
- A certificate for the tow bar confirming that it complies with the requirements of the Technical Regulations.
Please note that you are not required to carry these documents with you and present them to traffic police officers. They can also be stored at home. Just if a traffic police officer has questions about the towbar, immediately tell him that you have all the necessary documents and the towbar was installed legally.
Connecting the device outlet
As for the connection diagram of the socket designed to provide current to the towbar, it is designed so that the second and fifth contacts remain free . The yellow trailer hitch wire is soldered to the first contact, it is responsible for the left turn, and the yellow-green wire is soldered to the third (acts as the trailer mass). The fourth contact will be used for soldering a white wire, which will ensure the operation of the right turn, the sixth is red, responsible for the brake light, and the side lights function thanks to the blue wire soldered to the seventh contact.
Preparing car trailer wires for soldering is carried out according to the following instructions:
- The wires (with the exception of blue) protrude from the cable by 2 centimeters.
- They are stripped of 7 millimeters of insulation (blue by 13-14 millimeters, in addition, it is cut off at the end by 0.5 centimeters).
- Power is supplied from connectors located on the rear lights.
We recommend: Front suspension design on the VAZ-2110: design, design
When connecting an outlet, care must be taken to ensure good insulation . If water gets on the contacts, oxidation will occur and it will become inoperative. There is a high risk of a short circuit . The insulating materials are the rubber gasket that comes with the socket and the sealant.
Several recommendations for using the device
When using the towbar, you must adhere to the following recommendations:
- when towing a trailer, do not exceed the recommended speed of 90 km/h;
- It is prohibited to tow cargo weighing more than 1300 kg;
- the load on the coupling ball cannot exceed 50 kg;
- the loads in the trailer must be evenly distributed, but the center of gravity must be above the axle if the trailer is single-axle, or between the axles if it is a two-axle trailer model;
- When carrying out a technical inspection, the connecting thread must be tightened.
Following these simple rules will extend the life of your trailer, so do not ignore them.
Recommendations for using the tow bar
If you have correctly installed the towbar on the Niva, you should adhere to the following recommendations for using the trailer hitch:
- It is prohibited to tow cargo weighing more than 1300 kg.
- It is necessary to adhere to a certain speed limit when towing a trailer (no more than 90 km/h).
- The load on the coupling ball should not exceed 50 kg.
- At each vehicle maintenance, it is necessary to tighten the connecting threads.
- If the load extends beyond the trailer by 1 meter at the front or rear, or 40 cm from the outer edge of the side light, it must be marked with special identification marks.
You should also adhere to the rules for placing cargo in a trailer. It should be evenly distributed, that is, the center of gravity should be above the axle (if we are talking about a single-axle trailer) or between the axles (if you are using a two-axle model).
These rules should not be neglected, since in a situation where the load is shifted forward, the load on the coupling device and the rear of the machine will increase, which will lead to poor traction with the road surface. It is also impossible to allow a shift back, otherwise the rear part of the car will rise, which will also worsen the vehicle’s handling.
Is it necessary to register a towbar with the traffic police in 2020?
In this case, everything depends on the tow bar itself and the documents available for it:
- If there are documents for the towbar, then the driver does not need to contact the traffic police to make changes to the registration certificate. You can simply install the towbar and safely operate the car with a trailer.
- If there are no documents or they cannot be restored, then installing a tow bar is a design change that should be registered with the traffic police.
Note. The necessary documents for the towbar will be discussed below.
For example, if the original towbar is installed on the car at the factory, then no additional actions need to be taken when contacting the traffic police to register the car. If the traffic police has any questions about the vehicle in the future, you can at any time request documents from the automaker and defend your own case.
On the other hand, if the towbar is made independently and simply welded to the car body, then this is a design change. To register it, you need to contact the traffic police. Moreover, it is far from certain that permission for the installation will ultimately be obtained.
Let me remind you that the algorithm for making changes to the design of a vehicle is discussed in a separate article:
Making changes to the design
It implies that the car owner must contact various organizations 7 times, i.e. quite labor intensive.
In this regard, in practice this option is also possible. If the towbar is already installed on the car, but there are no documents for it and it is impossible to restore them, then it may be easier, faster and cheaper to buy a new towbar with documents than to try to register a change in the design of the car with the traffic police.
Required
Article numbers of original accessories
:
- 99999212107216 Towbar Lada 4×4 (without electrical wiring), price about 5,000 rubles
- 99999000017182 Electrical wiring kits are required to connect the socket of the towbar, the price is about 750 rubles.
Installation nuances
Installation of the towbar is carried out in the following sequence:
- The car is driven onto an overpass or inspection hole. De-energize the vehicle wiring; to do this, disconnect the battery.
- Remove everything in the trunk. We are talking not only about personal belongings, but also a repair kit and a spare wheel. You should also remove the upholstery by disconnecting all the clips.
- Place the towbar at the installation site. Fix the device, correctly mark the places where the fasteners will be installed.
- Next, you need to drill holes wherever the fasteners will be installed. To avoid possible malfunctions in the future, the holes for fastening components must be treated with an anti-corrosion agent. This will help increase the service life.
- Using bolts and washers, install them into the holes and tighten them well using the appropriate wrench.
- Then, you need to make two more holes inside the trunk and at the bottom of the spar; use reinforcing pads while working. This will not only strengthen the fastening, but will also help relieve the load from the body.
- Next, the bolts are inserted and the linings are installed. The final stage will be the installation of the electrical part. To do everything right, we recommend that you listen to the tips you will learn about below. Choose one of two methods. You can learn more about installing a towbar in the video below.
Also interesting: Kenguryatnik on Niva, selection and installation of accessories
Before installing the towbar on the Niva, a number of preparatory measures should be carried out:
- Place the car on an overpass, inspection hole, or raise the rear of the car using a jack.
- Disconnect the car.
- Remove moldings, mudguards, and plastic covers from the car.
- Remove the wheels.
- Empty the trunk and remove the trim.
Wiring connection.
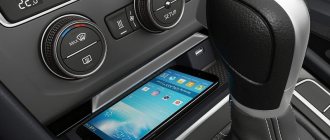
- The socket is installed in a special place next to the ball.
- After this, you should carefully read the connection diagram included in the kit.
- To protect the cable from short circuits due to moisture, it is better to wrap it with electrical tape or put it in a heat-shrinkable tube.
- The wiring runs into the car through the trunk. A special hole is provided for this on the left side.
- It is necessary to install at least 4 fuses and proceed to connecting the wires.
- Yellow – connects to the side lights line, red – brake indication, blue – left turn indicator, black – ground
- The right turn signal is connected separately; for this we lay another cable.
- The colors of the wires included in the kit may not completely match the colors of the wires in the headlight, so you need to pay close attention to this when connecting.
This is the basic principle of installing a dismountable device on a Chevrolet Niva. The whole process will take no more than an hour, if you have the necessary tools and skills.
It is important to remember that before you go on a long trip with a loaded trailer, you should test drive a short distance after installation to check that the connections are working properly.
Connecting an electrical outlet
- We install a socket in a special place in the ball
- We connect according to the diagram
- We wrap the cable with electrical tape or hide the heat shrink tube
- We run the wiring through the trunk on the left
- We install the necessary fuses, place the lugs on the wire lugs and crimp them
- We connect wires to the left headlight, depending on what each wire is responsible for. As a rule, yellow is responsible for the side lights, red for the brakes, blue for the left turn, and black for the ground.
- Checking the correct connection
Connecting the towbar socket
When connecting the towbar socket, you need to know the wiring diagram of your car. Usually it has 7 contacts, 6 of which are in a circle and 1 in the middle. But please note that in imported trailers there are 9 such contacts, of which 2 more are designed to provide additional lighting and operation of household appliances. Before connecting the equipment, check that there are no burnt contacts anywhere and disconnect the car battery. Further:
- strip the insulation on the wiring of the rear headlight;
- Carefully solder one of the wires to the contact in the socket using the pinout diagram, then solder the next 6 contacts;
- carefully wrap the wire insertion points with insulating tape;
- return the headlamp to its place and connect the battery.
Once completed, check all of the vehicle's lights.
Towbar installation
The process of installing a purchased trailer hitch is quite simple and consists of two stages:
- Direct installation of power elements;
- Connecting a plug socket to the electrical wiring diagram of a Niva Chevrolet car.
Installation of power elements
- Place the car on a pit (overpass or lift);
- Clean the mounting points from dirt and dust;
- Tear off the factory tape covering the threaded holes;
- Apply the tow bar;
- Coat the bolts supplied with graphite lubricant;
- Tighten them, securely installing and fixing the towbar to the car body.
Advice! Experts advise treating the joints of the trailer hitch parts with the car body using an anti-corrosion coating.
Electrical connection
A more difficult stage of the work will be the integration of the electrical components of the towbar with the standard wiring. Because the cost of an error can be too high - from a short circuit and failure of electrical parts to ignition of wiring insulation.
To work, you will need a wiring diagram for the Niva Chevrolet, for example, from the factory instructions, as well as a pinout diagram for the plug socket.
Note! If you are going to use European trailers (camping campers, caravans), then they have 9-pin sockets. Two additional contacts are responsible for power supply to the trailer's household appliances.
The procedure for connecting the outlet will be as follows:
- Disconnect the battery;
- Remove the rear headlight;
- Determine the wire color you need from the electrical diagram;
- Strip the insulation;
- Screw and carefully solder the connecting wire using a soldering iron;
- Connect the free end to the desired contact of the plug socket;
- Repeat the operation for the remaining 6 contacts;
- Insulate the insertion point with electrical tape;
- Reinstall the headlight;
Installation
Installing this device is a fairly simple procedure. Problems may arise with connecting and laying wires and installing the socket. Therefore, when performing work, you should adhere to a certain procedure:
- The car is installed on an inspection hole or overpass to gain access to the bottom.
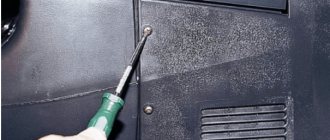
- There are holes for installation on the body. But at the factory they are sealed with tape and treated with an anti-corrosion substance. To simplify the search, you need to take the towbar and attach it to the bottom. After this, you can feel them with a thin screwdriver. In the place where the coating bends, we pierce and clean it.
- There is no need to remove the bumper; you can immediately proceed to installing the bolts.
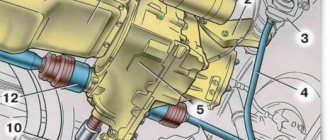
- They are inserted one by one into the standard holes and secured with nuts. It’s better to start by attaching the crossbar.
- We attach the longitudinal rail to the side members
- Using a bolt, we install the removable ball and proceed to install the socket.