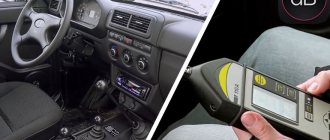
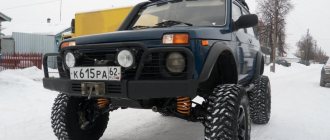
The transfer case is one of the main sources of vibration and noise in the VAZ 21214 and the modernized Urban.
The peculiarity is due not only to the specific design solutions of the unit, but also to the method of attaching the part to the car. So, instead of mounting it on the power components of the body, as is customary in the global automotive industry, engineers implemented a method of communication through silent blocks directly to the floor of the car.
The result is a rapidly collapsing bottom at the points of engagement and “splitting” at speeds above 80 km/h.
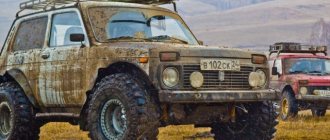
One way to relieve stress is to install a transfer case subframe on the Niva. At the same time, the owner will notice a decrease in vibration load, an increase in the natural service life, and also the protection of the transmission.
The disadvantages are the relative complexity of implementing the idea and the ground clearance reduced by 2-3 cm (corrected by a suspension lift).
Manufacturing according to the scheme
Although the market has no shortage of offers, it is possible to save money by making a subframe for Niva 2121 with your own hands according to the drawings.
Drawing 2.
Drawing 3.
Scheme 4.
Fig 5
Fig 6.
In the creation process, you will need a 4 mm sheet of cold-rolled steel 0.525x0.350 m, angles 35x35, 70x50, 70x70 with a length of 0.7 m, 0.4 and 0.4 m, respectively, as well as a 0.73 meter channel 16. Used as fasteners bolts M8, M10, M12x1.25 and M12x1.5.
DIY installation diagrams for a reinforced subframe
To work you will need a certain list of tools.
In an ideal situation, everything is done using milling equipment. But if this is not possible, you will need means to protect parts of the body (face, hands). Also a high-power drill, ruler, ink, roll, grinder, caliper, hammer. You will need reliable manufacturing diagrams that can be downloaded on the Internet. Measurements are taken from them. First, all possible distances from the main edge of the channel are measured, then it is processed. The thickness of the side wall in the area where it connects to the outer shelf is 8 millimeters. When cutting out the transverse length, the cut should end at a similar distance (eight millimeters) to the edge of the outer flange of the channel.
Between the gaps, the corners of fixation to the spar and cross member are made of any size. The height of fixation to the subframe must be observed; it is possible to use other schemes instead of fixation angles to the spar. It is possible to produce 2 types of transfer case – basic and reinforced. In the reinforced type modification, under the fastening elements of the transfer case holders, the ends are tucked to the sides of the channel, the elongated gaps for fixing the transfer case holders are duplicated.
The subframe protection is connected using bolts and is fixed using angles in the lower area. There are threaded gaps in the bottom flange of the corners, as well as in the side areas of the subframe. For greater strength, sheet protection is used to form the box. To drain water, oil, and resulting dirt, gaps are made between the sides of the channel, under the drain cover.
To provide enhanced protection, the structure must have greater strength and increased flatness, for which the profile of the side parts of the subframe is changed. At the cutout line for the transfer case, corners equipped with corners for securing the protection are welded into the channel, on the panels on the sides with the shelf down. Inside the channel, a frame is formed with four corners.
The production of such a subframe has received numerous reviews, save the diagrams, drawings and build the structure.
Although the market has no shortage of offers, it is possible to save money by making a subframe for Niva 2121 with your own hands according to the drawings.
Drawing 2.
Drawing 3.
Scheme 4.
Fig 6.
In the creation process, you will need a 4 mm sheet of cold-rolled steel 0.525x0.350 m, angles 35x35, 70x50, 70x70 with a length of 0.7 m, 0.4 and 0.4 m, respectively, as well as a 0.73 meter channel 16. Used as fasteners bolts M8, M10, M12x1.25 and M12x1.5. In the creation process you will need a 4 mm sheet of cold-rolled steel 0.525x0.350 m, angles 35x35, 70x50, 70x70 with a length of 0.7 m, 0.4 and 0.4 m, respectively, as well as a 0.73 meter channel 16. M8, M10, M12x1.25 and M12x1.5 bolts are used as fasteners.
Standard tool
- angle grinder;
- drill;
- caliper and ruler;
- core;
- hammer.
An alternative tuning option is permissible using not corners, but a square profile with a section of 60x30 or 40x25.
There are ideas of placing the RC and the checkpoint on the same “frame”.
Materials, tools and drawings
The protection is mainly used for models 21214, 2121, 21213, which have vibration problems. To assemble a subframe on the field with your own hands for a transfer case, you will need metal channels, angles, bolts and a sheet of thin metal as the main materials. In addition to the materials, you need to get diagrams or a drawing of the subframe. The simplest design consists of two transverse parts and two crossbars that connect them. The tools you should prepare are:
- grinder;
- drill;
- measuring instruments - calipers, ruler;
- bank;
- hammer.
To protect against metal filings, you should take protective clothing made of thick fabric.
There are several design options, so the number of channels and angles may vary depending on the drawing.
• angle grinder;
• Drill;
• Calipers and ruler;
• Core;
• Hammer.
An alternative tuning option is permissible using not corners, but a square profile with a section of 60x30 or 40x25.
There are ideas of placing the RC and the checkpoint on the same “frame”.
Design modification
To strengthen the subframe and reduce the profile height (up to 2 times), it is possible to additionally equip the side shelves of the channel with 4 corners at the level of the hole under the transfer case, followed by cutting off the sidewalls to the corner flange.
Finer tuning is provided by connecting the spar and subframe through couplings/bushings.
We make a subframe for the field with our own hands according to the drawings
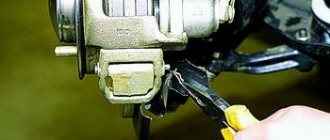
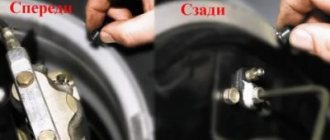
Disconnect the hydraulic pipes from the corrector valve. Immediately seal open ends of valve lines and ports to prevent dirt from entering the system.
Remove the three bolts securing the communication line support brackets in the left rear corner of the subframe. Installing parts and protecting the lower part of the Niva and most new models in this series have fasteners for installing protective subframes, so there will be no problems with installing the subframe. Factory versions, similar to the Niva Comfort frame, already have ready-made fastenings and they only need to be screwed into the right place. To install homemade products, you may have to additionally make space for the Niva Chevrolet subframe drawings.
You can, of course, screw everything directly to the cornfield frame, but this is not recommended. You can make other protective parts for the Niva yourself.
For example, engine crankcase protection in the form of a plate, which is located near the transfer case, is very easy to make even at home. Having picked up a bunch of information on the Internet and scoured a bunch of sites, it was decided to try installing a subframe. The choice was between Techno Sphere products: Niva Chevrolet subframe drawings. My choice fell on option number two.
It eliminates drilling and welding of side members and was originally declared as a product to eliminate vibrations, is attached to standard places and has virtually no effect on ground clearance.
The only serious thing can be considered the price, but this toad has already been overcome.
The Techno Sphere product, in my opinion, is more suitable for tired cars. I ordered the product “Stretcher” on the website of the same name, having first read everything about it and talked with representatives of the company.
Removing and installing the Chevrolet Niva front suspension subframe
After allowing the coating to dry thoroughly, you can begin installing the device. Let's try the structure in place, mark its attachment points on the side members and drill through holes in them, two on each side.
We dismantle the transfer case suspension bracket on one side, turn it over, install it on the subframe and secure it with a bolt, lightly tightening the nut. Let's do the same with the second fastener.
Installation
For ease of installation, the car is fixed on a lift or above a pit. Pre-preservation of surfaces (attachment points, subframe) is carried out using protective agents, for example, Movil.
The finished product is tried on site individually for each vehicle. 4 holes are drilled along the perimeter of the structure, symmetrical relative to the center line. Having previously loosened the transfer case fasteners.
Having placed the plates on the interior side, as in the photo, the subframe is attached to the side members with M12x1.25 bolts.
The RK brackets are sequentially removed, turned over and freely fixed to the subframe. The position of the shaft flanges is adjusted until minimal gaps are formed by moving the entire structure. Alignment is performed at 3000 rpm with the machine standing.
The bolts are thoroughly tightened.
Installing parts and protecting the bottom
Niva 21214 and most new models in this series have fastenings for installing protective body kits, so there should be no problems with installing the subframe. Factory versions, similar to the Niva Comfort frame, already have ready-made fastenings and they only need to be screwed into the right place. To install homemade products, you may have to make additional fastening points. You can, of course, screw everything directly to the cornfield frame, but this is not recommended.
You can make other protective parts for the Niva yourself. For example, engine crankcase protection in the form of a plate, which is located near the transfer case, is very easy to make even at home. It can be conveniently attached to the transfer case subframe, thus creating a whole protective kit.
If you often use your Niva for off-road driving, then you will need to assemble protective kit No. 2 of a complex design. It provides comprehensive protection for the lower part of the body and even perfectly covers the transfer case mount. Unfortunately, there is only No. 1 on sale - Niva Comfort, which is not capable of providing good protection for the underbody from external damage. A purchased subframe is easier to install yourself, but it bends easily. If you often travel through the mountains or country roads, it is better to use a reinforced design. The same applies to a purchased reinforced plate for the engine. If you want to equip your field with a protective system, it is better to make all the parts yourself according to the drawings.